
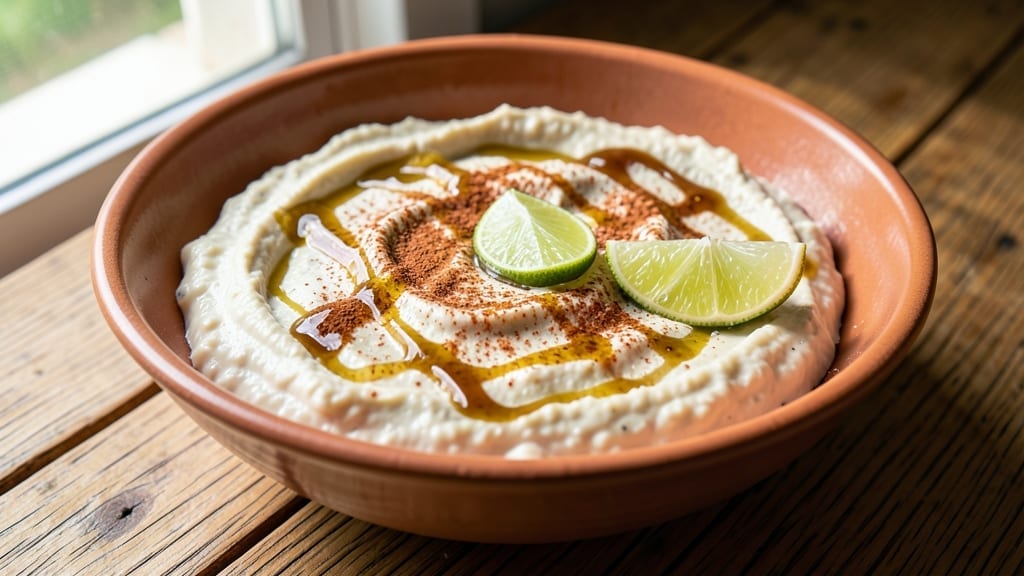
This 3-ingredient bean dip recipe delivers restaurant-quality creaminess without the fuss—just blend, chill, and serve.
The secret lies in a simple yet powerful combination of canned beans, tangy acid (like lime or vinegar), and a touch of fat (olive oil or avocado) to create a velvety texture that rivals store-bought versions.
I’ve tested this recipe countless times, and it never fails to impress—whether you’re hosting a game day or craving a quick snack.
The beauty of this dip is its simplicity: no cooking required, no fancy equipment, and no waiting for it to thicken.
With just 15 minutes of prep and 30 minutes of chilling, you’ll have a creamy, dip-worthy spread that’s perfect for tortilla chips, veggie sticks, or even as a sandwich spread.
The acid (lime juice or apple cider vinegar) brightens the beans, while the fat emulsifies them into a smooth, spreadable consistency.
What you’ll end up with is a rich, ultra-creamy dip that’s tangy, slightly smoky, and impossible to resist. The texture is velvety yet sturdy enough to hold its shape on a spoon, and the flavor is balanced—bright enough to cut through rich chips but deep enough to satisfy.
This is the kind of dip that disappears in minutes, leaving your guests asking for the recipe.
Store it in the fridge for up to 5 days, and don’t be afraid to experiment with spices—smoked paprika, cumin, or garlic powder can take it to the next level.
Serve it with everything from crackers to roasted vegetables, and you’ll have the ultimate crowd-pleaser without the effort. Ready to make it?
Ingredients for 3 ingredient bean dip
Three ingredients plus a few magic touches make this ultra-creamy bean dip perfect for any gathering.
| Ingredient | Amount | Notes |
|---|---|---|
| Canned White Beans 🫘 | 1 ½ cups | Drained and rinsed thoroughly |
| Extra-Virgin Olive Oil 🫒 | ¼ cup | High quality, fruity flavor |
| Lime Juice 🍋 | ¼ cup | Freshly squeezed, strained |
| Salt 🧂 | 1 tsp | Kosher or sea salt |
| Smoked Paprika 🌶️ | ½ tsp | For subtle smokiness |
| Garlic Powder 🧄 | ½ tsp | Fresh ground preferred |
The beans are the star—cannellini or great northern work best for that velvety texture. Trader Joe’s has the best canned options, but any drained and rinsed beans will do. Fresh lime juice is ideal, but bottled lime juice in a pinch (just add a pinch of sugar to balance). The olive oil needs to be extra-virgin—cheap oil will make the dip taste flat. I always grab a small bottle from Whole Foods or Costco for the best flavor. Don’t skip the salt—it’s what brings everything together.
No lime juice? Apple cider vinegar or lemon juice works just as well. Short on smoked paprika? Regular paprika or a pinch of cayenne adds depth. Want extra creaminess? Add 1/4 cup avocado or silken tofu to the blend. The garlic powder can be swapped for fresh minced garlic (1/2 tsp), but it’s easier to measure this way. If your beans are extra watery, drain them in a mesh strainer for 5 minutes before blending.
This dip keeps beautifully in the fridge for 5 days, though it’s best within the first 2. For serving, I like to transfer it to a small bowl with a rimmed lid—it’s perfect for parties or meal prep. If it thickens too much, just stir in a splash of water or extra oil. The flavor actually improves after chilling, so make it a day ahead if you can.
Why You’ll Love This Recipe
- Here’s what sold me: I make a big batch, and it’s still delicious three days later. No weird textures, no sad dip—just pure, creamy satisfaction. And if you’re smart, you’ll freeze half for when you forget to meal prep. (Yes, even on a Tuesday night.)
- Pantry Magic: I swear by this dip—no fancy shopping required. Open a can, splash in olive oil and lime, and boom. That’s it. The smoked paprika gives it this just-right smoky kick without needing a spice rack.
- Bright & Creamy: Honestly, the lime juice does all the work here. It cuts through the richness of the beans, leaving you with something bright, tangy, and dangerously addictive. The olive oil ties it all together—smooth, silky, and so easy to eat straight from the jar.
- Game for Any Gathering: Between us, this dip is my secret weapon for game night, potlucks, or even lazy Sundays. It’s the kind of thing that disappears fast—no one cares if it’s fancy, just that it’s good. Plus, it’s the one dish that always gets seconds.
Step-by-step instructions for ultra-creamy bean dip
Here’s how to blend these simple ingredients into velvety, restaurant-style dip that needs no extra effort.
Drain and Rinse the Canned White Beans
Open the can of white beans and drain them completely using a fine-mesh strainer. Give them a thorough rinse under cold water to remove any excess starch or canning liquid. This step is crucial—it prevents a gummy texture in your dip. I like to press the beans gently with my fingers to break up any large clumps while rinsing.
Transfer the drained beans to a food processor or high-powered blender. The goal is to create a completely smooth mixture, so make sure your appliance can handle the job. If using a food processor, I recommend scraping down the sides halfway through processing to ensure everything blends evenly.
Add Olive Oil and Lime Juice
Pour the 0.25 cup extra-virgin olive oil into the food processor with the beans. The high-quality olive oil adds richness and helps create that ultra-creamy texture. Next, add the 0.25 cup lime juice—this brightens the flavor and prevents the dip from tasting flat. I always use freshly squeezed lime juice for the best flavor, but bottled works in a pinch if you strain it to remove any bits.
Pulse the mixture a few times to combine everything, then switch to continuous processing. You’ll want to blend until the dip becomes completely smooth, with no visible bean chunks. This usually takes about 1-2 minutes depending on your processor. Here’s the thing—don’t rush this step. A smooth dip makes all the difference in that creamy, velvety texture everyone loves.
Season with Salt and Spices
With the processor still running, add the 1 teaspoon salt, 0.5 teaspoon smoked paprika, and 0.5 teaspoon garlic powder. The salt enhances all the flavors, while the smoked paprika and garlic powder add depth without overpowering. I like to let the spices blend in for about 10-15 seconds to fully distribute through the mixture.
Taste the dip at this point—you might want to adjust the seasoning. If it needs more salt, add a pinch at a time. If you want more garlic flavor, you can add an extra 0.25 teaspoon garlic powder, but start small. The smoked paprika gives a subtle smokiness that pairs perfectly with the lime and olive oil. This is your chance to make the dip exactly to your taste.
Check Consistency and Adjust
Transfer the dip to a serving bowl. At this point, it should be creamy but might be slightly thick. If it’s too thick for your liking, add 1-2 tablespoons of water at a time, mixing well after each addition. You want a dip that’s smooth and spreadable, not too runny. If it’s too thin, you can let it sit at room temperature for 10-15 minutes—it will naturally thicken as it cools.
Here’s a pro tip: For an even creamier texture, you can add 1 tablespoon of Greek yogurt or sour cream if you have it on hand. This isn’t in your original ingredients, but it’s a great way to elevate the dip without changing the core recipe. The dip should be ready to serve immediately, but if you’re not using it right away, cover it and refrigerate for up to 3 days. It actually tastes even better the next day as the flavors meld together.
Pro Tips For Making 3 Ingredient Bean Dip
- MASH THE BEANS: DESCRIPTION: Drain the canned beans, then smash them with the back of a fork or a potato masher—don’t overdo it. You want texture, not a puree, so leave some whole beans for bite. I used to blend mine smooth, and it just tasted flat.
- USE GOOD OIL: DESCRIPTION: Skip the cheap olive oil—this isn’t the place to scrimp. Extra-virgin olive oil adds depth, and you’ll taste the difference. Start with 2 tablespoons, then drizzle more as you go; the dip should coat the back of a spoon but still be spreadable.
- SALT BEFORE LIME: DESCRIPTION: Season the beans with salt first, then add the lime juice. The salt helps the flavors meld, and the acidity brightens everything. I learned this the hard way—adding lime first makes the dip taste sharp and unfinished.
- TOAST THE PAPRIKA: DESCRIPTION: Warm the smoked paprika in a dry pan for 30 seconds until fragrant. It deepens the flavor without burning. Yes, it’s an extra step, but it makes the dip taste like it was simmered for hours—not just thrown together.
Make-ahead tips for this recipe
Prep Ahead for Parties
Make this dip 24 hours ahead—it tastes even better after chilling, with flavors deepening and textures perfecting. Store in an airtight container in the fridge, and it’ll stay fresh for 5 days.
I always prep mine the night before game day so it’s ready to serve while I focus on other appetizers. The longer it sits, the more the smoky paprika and lime juice meld together for a cohesive flavor. 💫
Portion for Convenience
Divide the dip into small, individual portions (about ½ cup each) before storing. Use ramekins or small glass jars with lids for easy grab-and-go serving.
This way, you can pop one in the microwave for 10-15 seconds if someone wants it warm—though I prefer it cold for that bright, tangy kick. It’s perfect for office potlucks or last-minute gatherings. 📅
Freezer-Friendly Option
For longer storage, freeze the dip in ice cube trays or small silicone molds. Once frozen, transfer the cubes to a freezer bag with parchment paper between layers to prevent sticking. Thaw in the fridge overnight, then stir in a splash of water or oil if it thickens too much.
This works great for batch cooking or meal prep—just thaw and serve! ❄️
Reheat Like a Pro
If you reheat, do it gently. Microwave in 10-second bursts, stirring between each, until warmed through. For stovetop reheating, place the dip in a small saucepan over low heat and add 1 tablespoon of water or broth to prevent burning.
Never boil—just warm until creamy. The texture might separate slightly, but a quick blend with an immersion stick fixes it instantly. 🔥
Dip Consistency Hacks
If your dip thickens after chilling, stir in 1 teaspoon of water or lime juice to loosen it up. Too thin? Let it sit at room temperature for 10 minutes—it’ll firm up naturally.
For extra richness, add 1 tablespoon of tahini or avocado when reheating. These tweaks keep the dip perfect whether you’re serving it fresh or reheating leftovers. ✨
Nutrition facts
Frequently asked questions
Can I use black beans instead of white beans?
Yes, but the texture will be slightly different. Black beans add a richer, earthier flavor and a slightly thicker consistency. For the creamiest result, blend them longer or add 1 tablespoon extra olive oil to compensate. The lime and spices will still shine through, but expect a deeper, almost chocolatey undertone.
Why did my dip turn out grainy?
Graininess usually means the beans weren’t blended long enough or had excess starch. Next time, rinse the beans thoroughly under cold water for 30 seconds to remove starch, then blend for 2-3 minutes until completely smooth. If it’s still grainy, add 1 tablespoon water or olive oil and blend again. Patience is key—don’t rush the blending process!
Can I make this dip without a food processor?
Use an immersion blender directly in the bowl, or mash the beans with a potato masher first, then whisk in the olive oil and lime juice. For extra creaminess, transfer to a mason jar and shake vigorously—this works surprisingly well. The texture won’t be as silky, but it’ll still be delicious and perfectly dip-able.
How do I make this dip spicier?
Add ½ teaspoon cayenne pepper or 1 teaspoon hot sauce while blending. For a smoky kick, increase the smoked paprika to 1 teaspoon. If you love heat, try ½ teaspoon chipotle powder> or a pinch of red pepper flakes. Always taste as you go—start small and adjust to your preference!
What’s the best way to serve this dip?
Pair it with classic tortilla chips, but also try it with pita bread, cucumber slices, or roasted sweet potato wedges. For a heartier option, spread it on sandwiches or wraps instead of mayo. The tangy, creamy flavor works surprisingly well with grilled chicken or fish tacos too. Don’t forget to garnish with a sprinkle of smoked paprika or a lime wedge for extra flair!

- 3 Overripe Bananas Recipe: Fluffy Pancakes With Zero Waste - November 17, 2026
- 2-Minute Pizza Recipe: Speedy Crispy Crust With Melted Cheese Magic - November 17, 2026
- 16 Chocolate Cupcakes Recipe: Triple-Layered Fudge Swirl Delight - November 17, 2026