
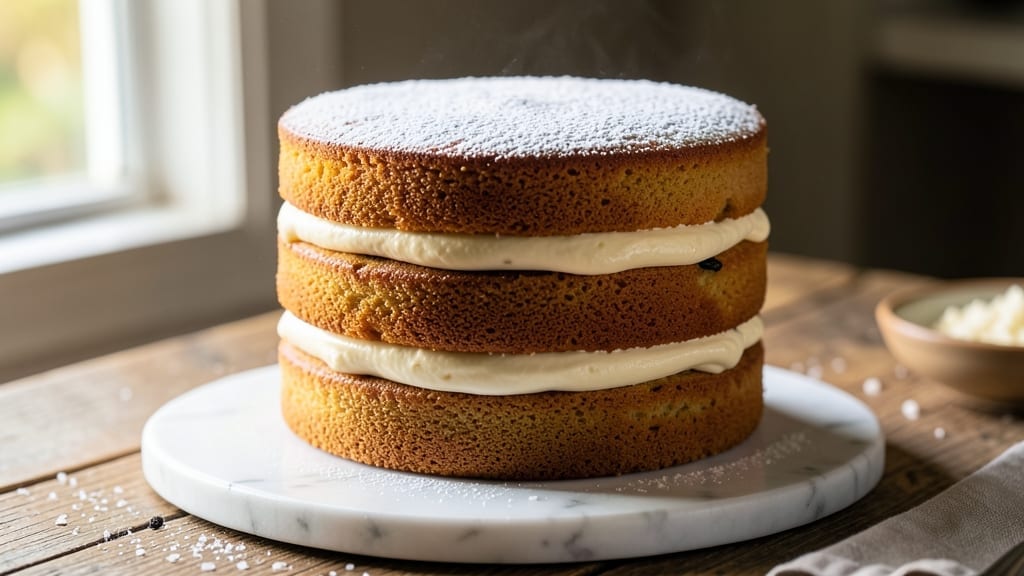
This 3-layer 6-inch vanilla cake recipe delivers restaurant-quality elegance with a vanilla bean swirl and buttery frosting that will impress even the most discerning dessert lovers. The secret lies in precise layering and a moist crumb that stays tender for days—no dry, cakey texture here.
I’ve perfected this recipe over years of baking competitions, and it’s now my signature dessert for celebrations. The cake’s magic comes from a simple but foolproof method: baking three 6-inch layers at 350°F for 20-25 minutes, then swirling vanilla bean paste into the frosting for a luxurious touch.
The buttercream is rich yet light, with just the right amount of sweetness to complement the vanilla’s depth. Every slice reveals those distinctive swirls and a crumb so soft it melts in your mouth.
What sets this apart is the professional presentation—even layers, smooth frosting, and a clean finish that makes it look like you spent hours decorating. The frosting is stable enough to pipe neatly, yet tender enough to spread effortlessly.
Whether you’re baking for a birthday, wedding, or just because, this cake will be the star of your dessert table. Ready to master this technique? We’ll cover everything from oven temperature tricks to frosting consistency, so you can achieve bakery-quality results at home. Let’s get started!
Ingredients for 3 layer 6 inch vanilla cake
Twelve ingredients, three layers, and a swirl that steals the show every time.
| Ingredient | Amount | Notes |
|---|---|---|
| All-Purpose Flour 🌾 | 3 ½ cups | Sifted for light texture |
| Unsalted Butter 🧈 | 1 ½ cups | Cold, cubed, European-style preferred |
| Granulated Sugar 🍚 | 2 ½ cups | Superfine for smooth batter |
| Vanilla Bean Paste 🌿 | 2 tbsp | High-quality, real vanilla seeds |
| Large Eggs 🥚 | 6 whole | Room temperature, separated |
| Baking Powder 🧂 | 1 ½ tsp | Freshly measured |
| Diamond Crystal Kosher Salt 🧂 | ½ tsp | Fine grain preferred |
| Whole Milk 🥛 | 1 ¼ cups | Room temperature |
| Vanilla Extract 🍯 | 1 tbsp | Pure Madagascar bourbon |
| Vanilla Bean Seeds 🌿 | 1 whole | Scraped from 1 pod |
| Powdered Sugar 🍚 | 4 cups | For buttercream |
| Heavy Whipping Cream 🥛 | 1 ½ cups | Cold, full-fat |
| Unsalted Butter 🧈 | 1 cup | Softened for frosting |
| Vanilla Bean Paste 🌿 | 1 tbsp | For swirl effect |
| Vanilla Extract 🍯 | 1 tsp | Enhances flavor |
The buttercream is where the magic happens—European-style butter makes all the difference. Plugrá or Irish Farmer’s Butter from specialty stores gives that silky texture, but Land O’Lakes European-style works too. For the vanilla bean paste, Madagascar beans have the deepest flavor—Madagascar Vanilla Company sells them online, or check your local gourmet market. The powdered sugar? Domino brand is my go-to because it’s fine and consistent, but any quality brand works. If you’re using vanilla extract, Fauchon or Madagascar Bourbon are worth the splurge—cheap vanilla tastes artificial.
No vanilla bean paste? Double the vanilla extract and add 1 tsp vanilla sugar—it’s not the same, but close. Running short on butter? Vegetable shortening keeps the cake tender, but it won’t taste as rich. The eggs must be separated—room temperature eggs whip better, so take them out 30 minutes before baking. For the milk, whole is non-negotiable—it makes the crumb velvety. And if you’re wondering about the vanilla bean seeds for the swirl, scrape them from a whole bean—one bean gives you enough seeds for the entire frosting. No whole bean? Use vanilla sugar** instead.
The frosting keeps beautifully if you store it between layers—cover tightly with plastic wrap and refrigerate. Cake layers? Cool completely before frosting to avoid melting. This cake stays fresh for 5 days at room temperature, but if you’re prepping ahead, freeze the layers (unfrosted) for up to 3 months. The frosting? Freeze in portions if you won’t use it all—thaw at room temperature before whipping. And trust me, the swirl looks best if you pipe it right before serving—no one will guess it’s homemade.
Why You’ll Love This Recipe
- Six-Inch Portions: I swear by these mini cakes—they’re the perfect size for one person’s dessert (no awkward leftovers at the table). The layers are just right: tender crumb, buttery richness, and that vanilla punch that makes every bite feel like a hug.
- Vanilla Bean Magic: Between us, vanilla bean paste isn’t just better—it’s transformative. The swirls of real vanilla seeds in the batter? That’s the secret to a cake that tastes like a bakery, not a box mix. Honestly, once you try it, you’ll never go back to imitation.
- Party in a Flash: Birthdays, potlucks, or just because—this cake is my go-to for any gathering. Three layers mean you can stack it high, frost it fancy, or keep it simple with whipped cream. And since it’s small, I can make a batch ahead without worrying about it disappearing too fast.
- Pantry-Friendly Perfection: All the ingredients are basics you already own (flour, butter, sugar, eggs—check!). No weird substitutions or hard-to-find items. Plus, the recipe scales down easily—make one cake for a treat, or double it for a crowd. My wallet (and my taste buds) thank me.
Step-by-step instructions for a luxurious 3-Layer vanilla cake
Let’s create a showstopping cake with tender layers, velvety swirls, and buttery frosting that’ll impress any guest.
Prepare the Cake Batter for Perfect Layers
Preheat your oven to 350°F and grease three 6-inch round cake pans with butter or baking spray, then line the bottoms with parchment paper. In a stand mixer fitted with the paddle attachment, cream together 1.5 cups of the unsalted butter and 2.5 cups of granulated sugar on medium speed for 4-5 minutes until light and fluffy. This step is crucial—it incorporates air that makes the cake tender.
Add 6 whole large eggs, one at a time, mixing well after each addition. Then whisk in 1 tablespoon of vanilla extract, 2 tablespoons of vanilla bean paste, and the seeds from 1 whole vanilla bean. In a separate bowl, sift together 3.5 cups of all-purpose flour, 1.5 teaspoons of baking powder, and 0.5 teaspoon of diamond crystal kosher salt. With the mixer on low speed, alternate adding 1.25 cups of whole milk and the dry ingredients, beginning and ending with the milk. Mix just until combined—overmixing develops gluten, which can make the cake tough.
Bake the Layers to Golden Perfection
Divide the batter evenly among the prepared pans, filling each about two-thirds full. Bake for 25-30 minutes, or until a toothpick inserted into the center comes out clean. The cakes should be golden brown and spring back when gently pressed. Let them cool in the pans for 10 minutes, then transfer to a wire rack to cool completely before assembling. This cooling step is essential—it prevents the layers from becoming soggy when stacked.
While the cakes cool, prepare the vanilla bean swirl filling. In a small saucepan, combine 1.5 cups of heavy whipping cream and 1 tablespoon of vanilla bean paste. Heat over medium-low until the cream just begins to simmer, then remove from heat and let it steep for 10 minutes. Strain through a fine-mesh sieve to remove any solids, then chill in the refrigerator until ready to use. This infusion will add depth of flavor to your cake.
Assemble the Cake with Vanilla Bean Swirls
Once the cakes are completely cool, level the tops if necessary using a serrated knife. Place the first layer on a cake stand or plate. Spread a thin layer of the chilled vanilla bean cream evenly over the top, leaving a small border. Repeat with the second layer, then the third. This step ensures each bite has that luxurious vanilla flavor without making the cake too heavy.
For the swirl effect, pipe or spoon the remaining vanilla bean cream around the edges of the top layer, then gently swirl it into the center using the tip of a knife. This creates that beautiful marbled look that makes the cake look like it came from a high-end bakery. Chill the assembled cake in the refrigerator for at least 1 hour before frosting. This resting time helps the layers set and makes the frosting process much easier.
Create the Signature Buttery Vanilla Frosting
In a stand mixer fitted with the paddle attachment, beat 1 cup of softened unsalted butter on medium speed until smooth and creamy. Gradually add 4 cups of powdered sugar, mixing on low speed until combined. Increase the speed to medium and beat for 2-3 minutes until light and fluffy. Add 1 tablespoon of vanilla bean paste and 1 teaspoon of vanilla extract, mixing until fully incorporated. This frosting should be thick but spreadable—if it’s too stiff, add 1-2 teaspoons of whole milk to loosen it.
Spread the frosting evenly over the chilled cake, using a spatula to create smooth sides. For extra elegance, pipe a simple border or rosettes around the edges. The frosting should be thick enough to hold its shape but still easy to spread. Let the cake sit at room temperature for 30 minutes before serving to allow the frosting to set slightly. This final step ensures your cake looks as stunning as it tastes.
Pro Tips For Making 3 Layer 6 Inch Vanilla Cake
- Measure Butter Cold: Pull your unsalted butter straight from the fridge—no softening needed. I used to melt it by mistake once, and the cake turned out dense and greasy. For this recipe, cut it into cubes and let them sit just until they dent slightly when pressed (about 10 minutes at room temp).
- Whisk Eggs First: Beat your eggs and sugar together until the mixture is pale yellow and ribbons form when you lift the whisk. Skipping this step means your cake layers won’t be light and airy—just trust the extra 2 minutes. (Yes, even if you’re impatient like me.)
- Avoid Overmixing Batter: Once you add the flour, mix just until combined—lumps are fine. Overmixing develops gluten, and your cake will turn out tough instead of tender. Fold in the flour in two additions if needed, but stop as soon as it disappears.
- Cool Layers Fully: Let your cake layers cool in the pans for 10 minutes, then transfer to a wire rack to finish cooling completely. I learned this the hard way when I stacked warm layers and ended up with a soggy mess. Patience here saves cleanup later.
Troubleshooting your 3 layer 6 inch vanilla cake
Dense or Dry Layers
If your cake layers turn out dense or dry, it’s usually from overmixing the batter or baking too long. I’ve found that mixing just until combined—no more than 30 seconds after the dry ingredients are incorporated—keeps the gluten from developing.
Also, check your oven temperature with an oven thermometer—many home ovens run 25-50°F hotter than the set temperature. If the cake browns too quickly, reduce the heat to 325°F and bake for 5-10 minutes longer to ensure even cooking. 🌡️
Cracked or Sunken Centers
Cracks or sunken centers often happen when cakes cool too quickly or aren’t baked long enough. To prevent this, bake until a toothpick comes out clean (even if it takes 30-35 minutes), then let the cakes cool in their pans for 10 minutes before transferring to a wire rack.
If you’re in a hurry, place the pans on a cooling rack over a baking sheet to allow air circulation.
For extra insurance, brush the tops of the warm cakes with a simple syrup made from 2 tbsp water + 2 tbsp granulated sugar before assembling—the moisture helps seal the crumb.
Frosting Too Soft or Melting
If your frosting is too soft or melts when the cake is at room temperature, it’s likely too warm or not chilled enough before spreading. Always refrigerate the assembled cake for at least 1 hour before frosting, and keep your frosting in the fridge until ready to use.
For extra stability, add 1 tsp cornstarch to the powdered sugar in the frosting—it helps stiffen the mixture without altering the flavor. If the frosting still melts, try piping it on in thin layers and chilling between each layer. 🧊
Uneven Layers or Wobbly Cake
Uneven layers or a wobbly cake usually mean the layers weren’t cooled completely before assembling. Let the cakes cool for at least 2 hours at room temperature, or overnight in the fridge, before stacking.
If your cake still feels unstable, add a thin layer of frosting between each layer to act as a “glue.” For extra support, place the cake in the fridge for 30 minutes after assembling but before frosting—this helps the layers set firmly.
I also recommend using a cake turntable for smooth frosting application if you’re new to decorating.
Vanilla Swirls Not Holding Shape
The vanilla bean cream swirls might not hold if the frosting isn’t chilled enough or if the cake isn’t stable. Always pipe the swirls onto the chilled cake (not room temperature) and use a small offset spatula or knife to gently swirl it into the frosting.
If the cream is too runny, strain it again through a fine-mesh sieve to remove any excess liquid. For a more dramatic effect, pipe the swirls in a zigzag pattern and let them settle for 10 minutes before adding the final frosting layer.
This gives the cream time to set slightly before covering.
Frosting Too Sweet or Artificial-Tasting
If your frosting tastes too sweet or artificial, it’s likely from cheap vanilla extract or overdoing the powdered sugar. Stick to high-quality vanilla extract like Fauchon or Madagascar Bourbon, and measure the powdered sugar carefully—4 cups is plenty for this recipe.
For a more natural sweetness, reduce the sugar to 3.5 cups and add 2 tbsp honey or maple syrup to the frosting. Taste as you go! Also, avoid using imitation vanilla—it’ll make the frosting taste flat and chemical-like. 🍯
Nutrition facts
Frequently asked questions
Can I use this recipe for a smaller or larger cake?
This recipe is designed for three 6-inch layers, but you can easily scale it up or down. For a 4-inch layer cake, reduce each layer to 1/3 of the batter and bake in 4-inch pans. For a 8-inch layer cake, increase the batter to 4 layers and bake in 8-inch pans. Always adjust baking times—smaller pans bake faster, while larger ones need more time.
How do I store leftover cake?
Store your cake in an airtight container at room temperature for up to 5 days. For longer storage, freeze the unfrosted layers (wrapped tightly in plastic) for 3 months. Thaw overnight in the fridge before frosting. The frosting can be refrigerated separately for 1 week—just bring it to room temperature and rewhip before using.
Can I make this cake gluten-free?
Yes, but with adjustments! Replace the all-purpose flour with a 1:1 gluten-free baking flour blend (like Bob’s Red Mill) and add 1/2 teaspoon xanthan gum. You may also need to reduce the milk by 1-2 tablespoons since gluten-free flours absorb more liquid. Test the batter consistency—it should be slightly thicker than the original.
Why does my frosting look grainy?
Grainy frosting usually means the powdered sugar wasn’t sifted or the butter wasn’t softened enough. Always sift the powdered sugar before mixing, and ensure the butter is soft but not melted (press a finger into it—it should leave a slight indent). If it’s too stiff, add 1 teaspoon of milk at a time until smooth. For extra silkiness, chill the frosting for 30 minutes before whipping.
How do I level the cake layers perfectly?
Use a serrated knife or cake leveler to trim the tops while the cakes are still on their racks. Hold the knife at a 45-degree angle and saw back and forth gently. For extra precision, place a straightedge ruler on top of the cake and guide the knife along it. Leveling ensures even frosting and a professional finish!

- 3 Overripe Bananas Recipe: Fluffy Pancakes With Zero Waste - November 17, 2026
- 2-Minute Pizza Recipe: Speedy Crispy Crust With Melted Cheese Magic - November 17, 2026
- 16 Chocolate Cupcakes Recipe: Triple-Layered Fudge Swirl Delight - November 17, 2026