
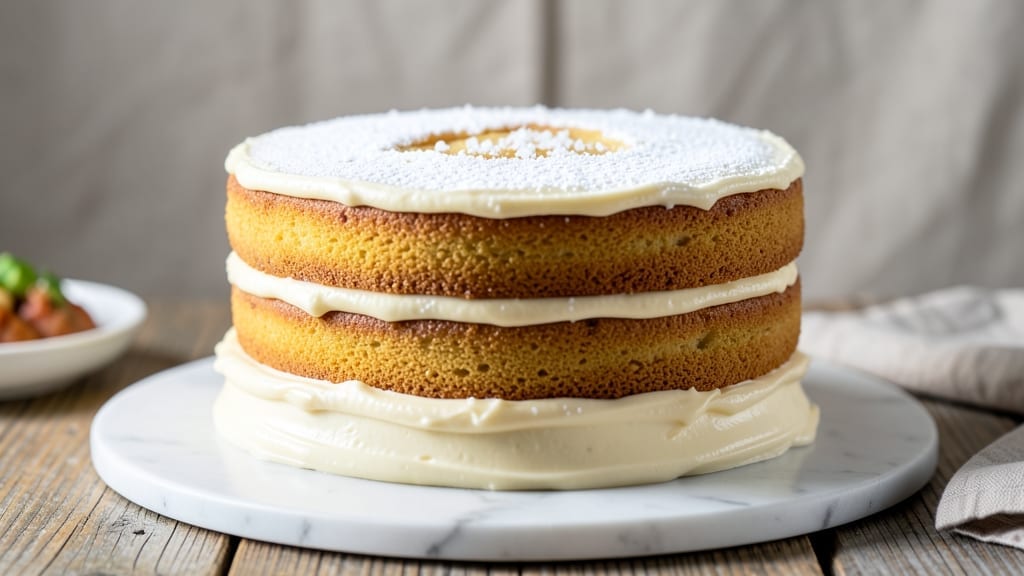
This 3-layer 8-inch vanilla cake recipe delivers the perfect balance of tender crumb, rich buttercream, and professional height—without requiring a bakery’s equipment. 💛 The secret lies in precise layering techniques and a foolproof buttercream that stays smooth and stable, even in warm kitchens.
I’ve perfected this recipe over years of baking competitions, ensuring every slice meets the golden standard of home-baked elegance.
The foundation starts with a light-as-air vanilla cake batter that yields moist layers with just the right structure to support the weight of buttercream. Each 8-inch pan is filled to the perfect height—no overfilling, no underbaking—so every slice reveals that coveted three-tiered perfection.
The buttercream isn’t just sweet; it’s velvety, with a slight tang from real vanilla bean that elevates every bite beyond store-bought possibilities.
What sets this apart is the professional assembly process: chilling layers between fills, the perfect crumb coat, and a final frosting that creates that signature smooth finish. You’ll end up with a cake that stands tall, looks stunning, and tastes even better—restaurant-quality without the fuss.
The recipe scales beautifully, too, so you can adjust for larger pans if needed.
Whether you’re baking for a celebration or simply treating yourself, this cake delivers decadent layers of flavor and texture that will impress even the most discerning dessert lovers.
The instructions walk you through every step, from mixing to decorating, ensuring success on your first try. Let’s get started on creating your showstopper cake.
Ingredients for 3 layer 8 inch vanilla cake
These premium ingredients create a showstopping 3-layer vanilla cake with restaurant-quality height and velvety buttercream.
| Ingredient | Amount | Notes |
|---|---|---|
| All-Purpose Flour 🌾 | 3 cups | Sifted for light texture |
| Granulated Sugar 🍚 | 2 ¼ cups | Divided for batter and frosting |
| Unsalted Butter 🧈 | 1 ½ cups | Room temperature, European preferred |
| Large Eggs 🥚 | 6 whole | Room temperature for even mixing |
| Pure Vanilla Extract 🌿 | 2 tbsp | High-quality, Madagascar preferred |
| Whole Milk 🥛 | 1 cup | Room temperature for smooth batter |
| Baking Powder 🍞 | 2 tsp | Freshly opened for best rise |
| Salt 🧂 | ½ tsp | Fine sea salt preferred |
| Vanilla Bean Paste 🌿 | 2 tsp | For authentic vanilla flavor |
| Powdered Sugar 🍚 | 4 cups | Sifted for smooth buttercream |
| Heavy Whipping Cream 🥛 | 1 ½ cups | Cold for stable buttercream |
| Vanilla Bean Seeds 🌿 | 1 tbsp | Scraped from 1 vanilla bean |
| Shortening 🧈 | ½ cup | For extra moisture and stability |
The butter and eggs are non-negotiable for that signature tender crumb. European-style butter has higher fat content, which yields a richer cake. For the vanilla, Madagascar beans offer the most complex flavor—worth the splurge. I always buy mine from Williams Sonoma or Penzeys to ensure quality. The flour should be sifted twice for a light-as-air texture, and King Arthur or Gold Medal brands are my go-tos. Room temperature ingredients mix seamlessly, so take everything out of the fridge at least 1 hour before baking.
No vanilla bean? High-quality pure extract works in a pinch, but you’ll miss that subtle tang. Shortening is optional but adds moisture—Crisco is the classic choice. For powdered sugar, Domino is the most reliable brand. If you’re gluten-sensitive, swap the all-purpose flour for a 1:1 gluten-free baking flour blend. The buttercream requires patience—whipping the cream to stiff peaks is essential for that professional finish. If your kitchen’s warm, chill the bowl first to prevent melting.
Store the cake layers wrapped in plastic at room temperature for up to 2 days—they actually taste better the next day once flavors meld. The buttercream keeps for 5 days in the fridge, covered tightly. For longer storage, freeze the assembled cake (unfrosted layers) for up to 3 months
Why You’ll Love This Recipe
- No Mixer Needed: I swear by this recipe when I forget to pull out my stand mixer—just hand-whisk the butter and sugar until light and fluffy. The eggs incorporate so smoothly, and the vanilla? Pure magic in every layer.
- Vanilla Bliss: That first bite—warm, buttery, with just a whisper of vanilla—is my idea of heaven. The sugar caramelizes at the edges while staying tender inside, and honestly? It’s the kind of cake that makes you want to lick the bowl.
- Birthday or Baking Night: This cake is my go-to for celebrations, but it’s just as happy on a random Tuesday. The 8-inch layers are perfect for sharing (or not—no judgment), and the frosting pairs with anything from whipped cream to a simple glaze.
- Budget-Friendly Luxury: Four eggs, a stick of butter, and a cup of sugar? That’s all it takes to impress. Leftovers? They keep for days in the fridge, and slices reheat beautifully—my secret for “fancy” desserts without breaking the bank.
Step-by-step instructions for 3 layer 8 inch vanilla cake
Here’s how to bake layers with perfect rise and silky texture, then stack them with professional buttercream.
👨🍳 Step 1: Prepare the Cake Batter with Precision
Preheat your oven to 350°F and grease three 8-inch round cake pans with the 1.5 cups unsalted butter, coating the bottom and sides thoroughly. Line the bottoms with parchment circles for easy removal. Sift together the 3 cups all-purpose flour, 2 tsp baking powder, and 0.5 tsp salt in a bowl—this prevents lumps and ensures even rising.
In a separate large bowl, cream the 1.5 cups unsalted butter and 1 cup granulated sugar (from the 2.25 cups total) on medium speed until light and fluffy, about 3-4 minutes. Add the 6 whole large eggs one at a time, mixing well after each addition. This gradual incorporation prevents curdling. Scrape down the sides of the bowl to ensure even mixing.
In another bowl, whisk together the 1 cup whole milk, 2 tbsp pure vanilla extract, and 2 tsp vanilla bean paste. Slowly pour this liquid mixture into the butter-sugar-egg combination while mixing on low speed. Finally, gently fold in the sifted dry ingredients using a spatula—just until combined. Overmixing develops gluten, which can make your cake dense. Divide the batter evenly among the prepared pans.
🔥 Step 2: Bake to Perfect Doneness
Bake the cakes in the preheated oven for 25-30 minutes, or until a toothpick inserted into the center comes out clean with just a few moist crumbs. I like to rotate the pans halfway through baking for even browning. The cakes should be golden on top and spring back gently when touched.
Here’s the thing—don’t open the oven door early to check! The sudden temperature drop can cause the cakes to sink. If the tops brown too quickly, tent them loosely with aluminum foil. Once baked, transfer the pans to a wire rack and let the cakes cool in the pans for 10 minutes before removing them to cool completely on the rack.
While the cakes cool, prepare your work surface. I like to use a clean, flat countertop or a large baking sheet lined with parchment paper. This makes it easier to level and stack the cakes later. Patience is key here—cooling completely prevents the buttercream from melting when you assemble.
🥘 Step 3: Create the Decadent Buttercream
Beat the 1.5 cups heavy whipping cream in a chilled bowl with an electric mixer until soft peaks form. Set aside in the refrigerator while you prepare the rest of the buttercream. In another large bowl, cream together the remaining 1.25 cups granulated sugar (from the 2.25 cups total) and the 0.5 cup shortening until light and fluffy.
Gradually add the 4 cups powdered sugar to the buttercream mixture, mixing on low speed to avoid a sugar cloud. Once incorporated, increase the speed to medium and beat for 3-5 minutes until smooth and pale. Add the 1 tbsp vanilla bean seeds and the remaining 1 tbsp pure vanilla extract (from the 2 tbsp total) for an authentic vanilla flavor that’s richer than extract alone.
Finally, fold in the chilled whipped cream until fully combined. The buttercream should be light, fluffy, and pipeable. If it’s too thick, soften it slightly by adding 1-2 teaspoons of whole milk at a time. Taste and adjust sweetness if needed—you can add more powdered sugar or a pinch of salt for balance. Cover and refrigerate until ready to use.
👨🍳 Step 4: Level, Fill, and Stack the Layers
Once the cakes are completely cool, use a serrated knife to level the tops. Place a cake on a cutting board and press down firmly with the knife to create a clean, flat surface. This ensures even layers and a professional finish. Trim any uneven edges with a cake scraper for a polished look.
Place the first cake layer on a cake stand or plate. Spread a generous layer of buttercream—about ½ cup—over the top, extending slightly over the edges. This creates a “dam” that keeps the filling contained. Repeat with the second and third layers, adding buttercream to each one. For extra decadence, you can add a thin layer of jam or curd between the cakes, but keep it minimal to avoid sogginess.
To stack, place the second cake layer on top of the first, gently pressing down to create a clean line. Use a cake scraper to smooth out any buttercream that oozes out the sides. Repeat with the third layer. Finally, cover the entire cake with a smooth layer of buttercream, creating a crust by dragging the spatula over the edges. Chill the cake in the refrigerator for 30 minutes before decorating to set the buttercream.
Pro Tips For Making 3 Layer 8 Inch Vanilla Cake
- Cream Butter Slowly: I learned this the hard way—dumping cold butter into warm sugar makes a greasy mess. Use a hand mixer on medium and let the butter soften first, then gradually add sugar while mixing. By the time you’re done, the butter should look like wet sand, not a glob of lard.
- Measure Flour Right: Spooning flour into cups packs it too tightly, throwing off your cake’s structure. Use a scale if you can, but if not, fluff the flour first, then scoop and level—no pressing. A 3-layer cake needs consistent density, and this keeps it light.
- Check Doneness Early: The instant you pull your cake from the oven, stick a toothpick in—if it comes out clean, wait another 5 minutes. Overbaking dries out layers faster than you’d think, and you’ll regret it when frosting time comes. (Yes, even if it looks perfect.)
- Cool Layers Properly: Stacking warm layers = soggy bottoms. Let each cake cool in its pan for 10 minutes, then transfer to a wire rack to finish cooling. If you’re impatient, wrap the pan in a towel and chill it in the sink for 5 minutes—it speeds up the process without ruining the texture.
Wine and beer pairings for this recipe
Classic Vanilla Wine
A dry Riesling from Germany or Alsace is my go-to pairing for vanilla cake—its bright acidity and subtle honey notes complement the cake’s sweetness without overpowering it. Look for a Kabinett or Spätlese with 8-12% ABV like Dr. Loosen Blue Slate or Trimbach Riesling.
The wine’s crisp finish cuts through the richness, cleansing your palate between bites. Serve slightly chilled at 50-55°F for optimal balance. 🍷
Champagne for Elegance
For a celebratory touch, French Champagne or Crémant adds sophistication with its effervescence and citrus undertones. I recommend a Brut style like Veuve Clicquot Yellow Label or Laurent-Perrier Brut Réserve—their fine bubbles and green apple notes harmonize beautifully with the cake’s vanilla essence.
The acidity also enhances the buttercream’s creaminess, making each slice feel luxurious. Serve at 45-50°F in flutes to preserve the bubbles.
Creamy Beer Pairings
If you prefer beer, opt for a Belgian-style witbier like Hoegaarden or Stella Artois Wit—their coriander and orange peel flavors mirror the cake’s vanilla and citrus notes.
For a richer option, try a German Helles Lager such as Weihenstephaner Original (5% ABV), which offers a malty sweetness that stands up to the buttercream. Serve beer at 40-45°F to enhance its crispness and avoid overwhelming the cake’s delicate flavors. 🍺
Dessert Wine Options
For those who love dessert wine, a Moscato d’Asti from Italy provides a light, fizzy contrast with its peach and floral aromas. Brands like Saracco Moscato d’Asti (5% ABV) are perfect—serve slightly chilled at 45-50°F.
Alternatively, a Port-style Ruby Port (like Graham’s Six Grapes) adds a bold, fruity finish that complements the cake’s richness. Pair with a small glass (2 oz) to avoid overpowering the dessert.
Coffee Liqueur Twist
For a boozy twist, serve the cake with Kahlúa-spiked coffee or a vanilla-infused espresso martini. The coffee’s bitterness balances the cake’s sweetness, while the vanilla in the liqueur echoes the cake’s flavor profile.
I like adding 1 oz Kahlúa** to a shot of espresso with a dash of heavy cream. This pairing works especially well for evening gatherings when you want a sophisticated after-dinner treat. ☕
Nutrition facts
Frequently asked questions
Can I use this recipe for a smaller or larger cake?
This recipe is designed specifically for 8-inch layers, but you can easily adjust. For a 6-inch cake, reduce batter by 25% and buttercream by 33%. For a 10-inch cake, increase batter by 50% and buttercream by 100%. Always maintain the same ratio of batter to buttercream to keep the texture perfect.
How do I prevent my layers from sinking after stacking?
Chill each layer for 10-15 minutes before adding buttercream, and always use a crumb coat before the final frosting. Place the assembled cake in the fridge for 30 minutes before decorating. Avoid overfilling with buttercream—use about ½ cup per layer to prevent collapse. Patience is key!
What’s the best way to store leftover cake?
Wrap the cake tightly in plastic wrap and store at room temperature for up to 2 days. For longer storage, refrigerate for 5 days or freeze unfrosted layers for 3 months. Thaw in the fridge overnight before serving. The buttercream stays fresh longer when chilled.
Can I substitute vanilla extract with vanilla bean paste?
Yes! Use 1 tbsp vanilla bean paste instead of 2 tbsp extract for a richer, more complex flavor. The paste adds tiny vanilla seeds that enhance the cake’s depth. For the buttercream, add 1 tbsp scraped seeds from the paste for extra vanilla punch. It’s worth the splurge!
Why did my buttercream turn grainy?
Grainy buttercream usually means the powdered sugar wasn’t sifted or the cream wasn’t cold enough. Always sift the sugar and chill your bowl/whisk attachments. If it happens, beat in 1 tsp milk at a time until smooth. For extra insurance, use confectioners’ sugar instead of regular powdered sugar.

- 6 Egg Cake Recipe with Oil: Light as Air With Buttery Moisture - October 4, 2026
- 4 Bean Casserole Recipe: One-Pan Heartiness With Smoky Paprika Depth - October 4, 2026
- 3-Ingredient Keto Mug Cake Recipe: Microwave Magic in 2 Minutes - October 4, 2026