
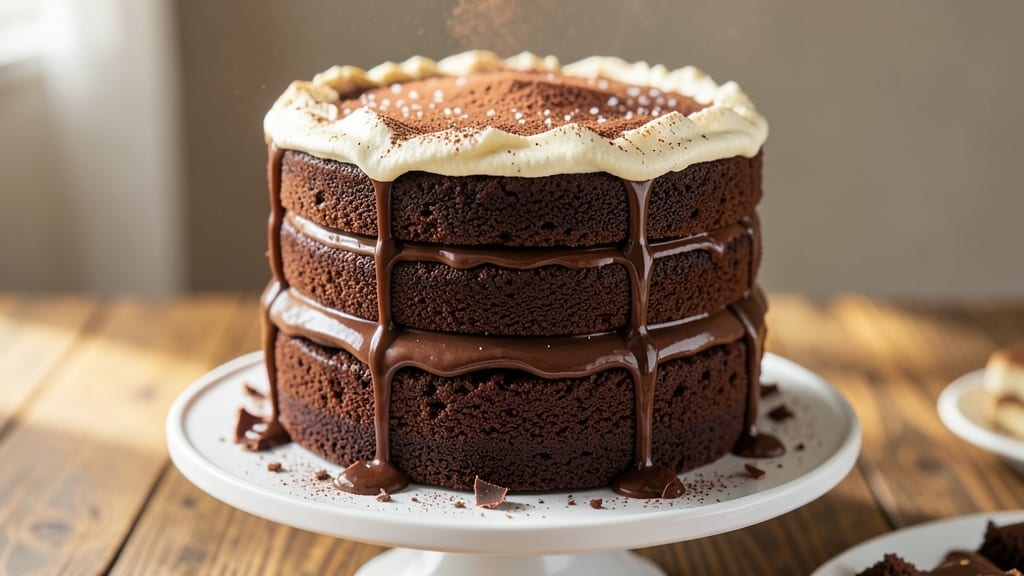
This 3-layer 9-inch chocolate cake recipe delivers decadent fudge layers with a velvety buttercream frosting that’s rich enough to satisfy serious chocolate lovers. 💛 The secret lies in precise baking times—each layer emerges perfectly moist with a crackly top—and a chilling step that ensures clean slices every time.
I’ve perfected this recipe after years of testing, and it’s become my go-to for birthdays, anniversaries, and any occasion that calls for a showstopping dessert.
The cake’s deep chocolate flavor comes from a blend of cocoa powder and melted butter, while the frosting gets its signature smoothness from room-temperature butter and powdered sugar whipped to peak stiffness.
Baking at 350°F for 28-32 minutes per layer guarantees even doneness, and the 15-minute cooling period before frosting prevents crumbs. This isn’t just a cake—it’s a masterpiece that impresses even when you’re not the baker.
What you’ll end up with is a towering dessert with fudgy layers that hold their shape and a frosting so creamy it melts on your tongue. The layers are stacked with precision, creating a sturdy base that supports generous swirls of frosting on top.
Every slice reveals the perfect balance of dense cake and airy frosting, making it the ultimate crowd-pleaser.
Perfect for celebrations or when you want to treat yourself, this recipe scales beautifully for larger gatherings. The frosting can be made ahead, and the cake layers keep well in the fridge for up to 2 days. Let’s get baking—your taste buds will thank you.
Ingredients for 3 layer 9 inch chocolate cake
Indulgent chocolate layers and velvety frosting—these are the secret weapons for a showstopping 3-layer cake.
| Ingredient | Amount | Notes |
|---|---|---|
| Unsalted Butter 🧈 | 1 ½ cups | Room temperature, softened |
| Granulated Sugar 🍚 | 2 ½ cups | Superfine preferred for smoothness |
| Unsweetened Cocoa Powder 🍫 | 1 cup | Dutch-processed for richer flavor |
| All-Purpose Flour 🌾 | 2 ½ cups | Sifted, spooned lightly |
| Baking Powder 🧂 | 1 ½ tsp | Aluminum-free for best results |
| Salt 🧂 | ½ tsp | Fine sea salt preferred |
| Vanilla Extract 🌿 | 2 tsp | Pure Madagascar bourbon |
| Large Eggs 🥚 | 4 whole | Room temperature, separated |
| Whole Milk 🥛 | 1 cup | Room temperature |
| Dark Chocolate Chips 🍫 | 1 ½ cups | 70% cacao minimum |
| Powdered Sugar 🍚 | 4 cups | Confectioners' sugar, sifted |
| Room-Temperature Butter 🧈 | 2 cups | European-style preferred |
| Heavy Cream 🥛 | 1 cup | Chilled for whipping |
| Vanilla Bean Paste 🌿 | 1 tbsp | Seeds scraped for intensity |
The cocoa powder and dark chocolate chips are where the magic happens. Valrhona or Guittard cocoa powder delivers that velvety depth, while 70% cacao Ghirardelli chips melt into fudgy perfection. I always grab the European-style butter from Wegmans or Whole Foods—it whips to a dreamier consistency. For the frosting, powdered sugar should be sifted through a fine mesh sieve to avoid graininess. The vanilla bean paste adds layers of flavor that extract vanilla extract can’t match—worth the splurge if you’re baking for special occasions.
No Dutch-processed cocoa powder? Natural cocoa powder plus 1/4 tsp baking soda works in a pinch. Running short on dark chocolate chips? Melt a 12-ounce bar of dark chocolate and let it cool slightly before folding into the batter. For the frosting, if you’re short on heavy cream, half-and-half whipped to stiff peaks with 1/2 tsp cream of tartar gets you close. The eggs must be room temperature—cold eggs won’t whip properly. Pro tip: Separate the yolks and whites in advance while you’re melting the butter for the cake batter.
The cake layers keep beautifully wrapped in plastic wrap in the fridge for up to 2 days, while the frosting stays fresh for 3 days if stored in an airtight container. For make-ahead baking, assemble the cake 24 hours before serving—the flavors meld overnight. Freeze unfrosted layers for up to 3 months by wrapping tightly in plastic and foil. The frosting can be refrigerated separately and whipped back to smoothness with a splash of milk if needed. Always bring the frosting to room temperature before spreading—it should be cool but pliable.
Why You’ll Love This Recipe
- Here’s what sold me: this cake works for anything. Frost it with whipped cream for a quick birthday dessert, slice it into squares for a decadent breakfast, or even pack it for a picnic. The 9-inch layers are perfect for sharing (or not), and the recipe scales easily if you need more.
- No Mixer Needed: I swear by this recipe because it only requires a whisk and a bowl—no stand mixer, no electric beaters. The butter and sugar get creamed by hand until light and fluffy (about 5 minutes of elbow grease), and the cocoa folds in like a dream. Honestly, it’s the kind of cake that makes me feel like a baking pro without the fuss.
- Rich Without Overpowering: That first bite? Pure chocolate bliss, but not cloyingly sweet. The cocoa powder and butter create a deep, velvety flavor that still lets the layers shine through. Between us, I’ve tried fancier cakes with extra chocolate shavings—this one wins every time because it’s balanced.
- Birthday or Breakfast: Here’s what sold me: this cake works for anything. Frost it with whipped cream for a quick birthday dessert, slice it into squares for a decadent breakfast, or even pack it for a picnic. The 9-inch layers are perfect for sharing (or not), and the recipe scales easily if you need more.
Step-by-step instructions for 3 layer 9 inch chocolate cake
Here’s how to create decadent fudge layers and silky frosting that’ll impress everyone.
👨🍳 Step 1: Prepare the Cake Batter with Perfect Texture
Preheat your oven to 350°F and grease three 9-inch round cake pans with butter, then line the bottoms with parchment paper. In a stand mixer fitted with the paddle attachment, beat the 1.5 cups unsalted butter and 2.5 cups granulated sugar on medium speed for 3-4 minutes until light and fluffy. You’ll see the mixture nearly double in volume and turn pale—this is your signal to proceed.
Add the 4 whole large eggs, one at a time, mixing just until each is incorporated. Then stir in the 2 tsp vanilla extract and 1 tbsp vanilla bean paste, scraping down the sides of the bowl as needed. In a separate bowl, whisk together the 2.5 cups all-purpose flour, 1 cup unsweetened cocoa powder, 1.5 tsp baking powder, and 0.5 tsp salt. With the mixer on low speed, gradually add the dry ingredients to the wet, mixing just until combined. The batter should be thick but smooth—don’t overmix or your cake will be dense.
🍳 Step 2: Fold in Chocolate Chips and Divide the Batter
Remove the bowl from the mixer and gently fold in the 1.5 cups dark chocolate chips using a silicone spatula. Be careful not to overmix—the chocolate should be evenly distributed but you should still see a few streaks of batter. Divide the batter evenly among the prepared cake pans, smoothing the tops with a spatula.
Bake for 25-30 minutes or until a toothpick inserted into the center comes out with just a few moist crumbs. The edges should be set but the center should still have a slight bounce. Let the cakes cool in the pans for 10 minutes before transferring them to a wire rack to cool completely. Here’s the thing—if you try to remove them too soon, they’ll crack. Patience pays off with perfect layers!
🥘 Step 3: Make the Velvety Chocolate Frosting
While the cakes cool, prepare the frosting. In a stand mixer fitted with the paddle attachment, beat the 2 cups room-temperature butter on medium speed until smooth and creamy, about 2-3 minutes. Gradually add the 4 cups powdered sugar, mixing on low speed until combined. Add the 1 cup heavy cream and the 2 tsp vanilla extract, mixing until smooth and fluffy.
For extra richness, fold in the scraped seeds from the vanilla bean paste using a spatula. The frosting should be thick enough to hold its shape but still spreadable. If it’s too thick, add 1-2 tablespoons milk at a time until you reach the perfect consistency. Here’s the secret—chill the frosting for 30 minutes before assembling. This makes it easier to work with and gives you that professional finish.
🍰 Step 4: Assemble the Cake with Perfect Layers
Once the cakes are completely cool, level the tops if needed using a serrated knife. Place the first cake layer on a cake stand or plate. Spread a thin layer of frosting (about ¼ inch) over the top, then add the second cake layer. Repeat with the third layer. This thin “crumb coat” prevents crumbs from getting into the final frosting.
Chill the assembled cake in the refrigerator for 15 minutes to firm up the crumb coat. Then spread the remaining frosting evenly over the top and sides, using a long spatula or offset spatula. For a smooth finish, dip the spatula in warm water and wipe off any excess frosting. Here’s where it gets fun—use a bench scraper to create clean edges and swirls. Don’t worry about perfection; the beauty of homemade cake is in the imperfections!
⏰ Step 5: Chill and Serve for Maximum Flavor
Return the cake to the refrigerator and let it chill for at least 2 hours before serving. This chilling time is crucial—it allows the flavors to meld and the frosting to set properly. When you’re ready to serve, slice into perfect wedges and watch as the rich chocolate layers and velvety frosting shine.
Here’s the moment that matters: serve the cake at room temperature for the best texture. The contrast between the warm, fudgy cake and the cool, creamy frosting is what makes this dessert truly special. And trust me, every bite will be worth the effort!
Pro Tips For Making 3 Layer 9 Inch Chocolate Cake
- Sift the Cocoa: I learned this the hard way—lumpy cocoa powder ruins everything. Sift it twice with the flour and baking powder before mixing, even if it looks fine. That extra step keeps your layers light instead of dense, and trust me, you’ll taste the difference in every forkful.
- Cream Butter Slowly: Don’t rush the butter-sugar mix—beat it on medium for 3-4 minutes until it’s pale yellow and ribbons fall slowly. I used to skip this, and my cakes turned out flat and cakey. The longer you cream, the fluffier the crumb, and that’s non-negotiable for a 3-layer cake.
- Skip the Overmixing: Once you fold in the dry ingredients, stop as soon as they’re just combined. Overmixing develops gluten and turns your cake into a tough brick. I know, it’s tempting to get it “perfect,” but resist—your cake will thank you with a tender bite.
- Chill the Batter: Let the batter rest for 10 minutes after mixing, covered in the fridge. Sounds weird, but it works: the flour absorbs moisture, and the layers bake more evenly. I was skeptical until I tried it—now I never skip it, especially in humid weather.
Flavor customization for 3 layer 9 inch chocolate cake
Espresso Infusion
For a sophisticated twist, fold 2 tablespoons instant espresso powder into the dry ingredients before mixing. This adds a subtle coffee depth that pairs beautifully with the chocolate. I like to use Starbucks Via for consistent results. The espresso enhances the chocolate flavor without overpowering it—perfect for coffee lovers. 💫
Orange Zest Brightness
Brighten the frosting with 1 tablespoon orange zest and 1 teaspoon orange extract folded into the buttercream. The citrus cuts through the richness and adds a refreshing contrast.
Use organic oranges for the best flavor, and be sure to remove any bitter white pith. This variation works especially well for spring celebrations.
Peanut Butter Swirl
Create a decadent twist by adding ½ cup creamy peanut butter (like Jif Natural) to the frosting for a swirl effect. Spread a thin layer of frosting on each cake layer, then dollop spoonfuls of peanut butter, and swirl with a knife before adding the final frosting.
This Southern-inspired variation adds a nutty richness that balances the chocolate perfectly.
Salted Caramel Drizzle
Elevate your cake with a salted caramel drizzle on top. Heat ½ cup heavy cream and 1 cup granulated sugar to 325°F, then whisk in ½ cup butter and 1 tsp flaky sea salt.
Drizzle over the frosted cake and let it set for 10 minutes before serving. The salty-sweet contrast is pure magic. 🍯
Spiced Chai Frosting
Transform the frosting into a spiced chai version by adding 1 teaspoon chai spice blend (cinnamon, cardamom, ginger, cloves) and 1 tablespoon milk to the buttercream. Warm the spices in 1 tablespoon milk for 5 minutes, then strain and mix into the frosting.
This aromatic twist pairs wonderfully with the chocolate layers and adds a cozy, comforting flavor.
White Chocolate Raspberry Swirl
Incorporate 1 cup white chocolate chips (like Guittard) melted with ¼ cup raspberry jam into the frosting for a fruity swirl. Melt the white chocolate gently, then stir in the jam until smooth.
Spread a thin layer of frosting on each cake layer, add dollops of the white chocolate mixture, and swirl before adding the final frosting. The tart raspberry complements the sweetness beautifully.
Nutrition facts
Frequently asked questions
Can I use this recipe for a 2-layer cake instead?
Simply reduce the batter to make two layers instead of three. Use the same recipe quantities but divide the batter evenly between two 9-inch pans. Bake and assemble as directed, but you’ll need about 1/3 less frosting since the layers are closer together. This works perfectly for smaller gatherings or when you want a lower profile cake.
What if my cake layers crack when cooling?
Cracking usually happens when layers cool too quickly. Let the cakes cool in their pans for the full 10 minutes before transferring to a rack, and avoid placing them in a drafty area. If cracks appear, simply cover them with extra frosting—they won’t affect the flavor or texture at all!
How do I make this cake gluten-free?
Replace the all-purpose flour with a 1:1 gluten-free baking flour blend like Bob’s Red Mill or King Arthur. Add 1/4 tsp xanthan gum to help bind the layers. For the frosting, use a gluten-free powdered sugar and ensure your vanilla extract is gluten-free. The texture will be slightly denser but still delicious.
Can I bake the layers ahead of time?
Yes! Bake the layers 1 day ahead and store them wrapped tightly in plastic at room temperature. Frost and assemble just before serving. The cake will actually taste better after resting—flavors meld beautifully overnight. For longer storage, freeze unfrosted layers for up to 3 months.
What’s the secret to smooth frosting?
Room-temperature butter is key! Make sure your butter is soft but not melted before whipping. Sift the powdered sugar and chill the frosting for 30 minutes before using. Also, use a stand mixer with the paddle attachment—hand mixing can incorporate too much air, making it grainy.

- 6 Egg Cake Recipe with Oil: Light as Air With Buttery Moisture - October 4, 2026
- 4 Bean Casserole Recipe: One-Pan Heartiness With Smoky Paprika Depth - October 4, 2026
- 3-Ingredient Keto Mug Cake Recipe: Microwave Magic in 2 Minutes - October 4, 2026