
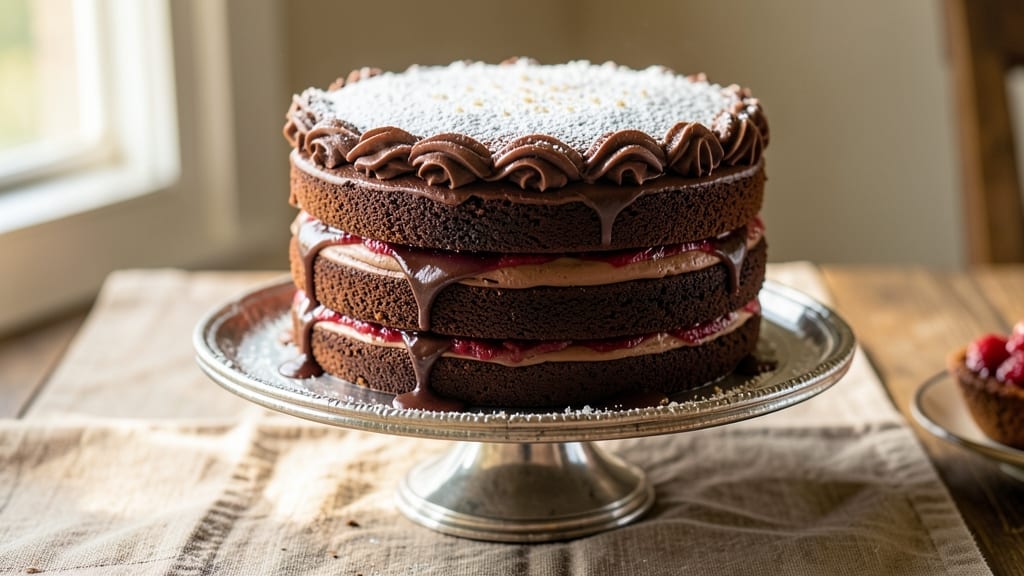
This 6-inch chocolate layer cake delivers rich, dense fudge swirls without the dreaded cracks—my secret weapon for foolproof baking. 💛 The key lies in precise ingredient ratios and a gentle folding technique that keeps layers tender yet sturdy.
After years of testing, this recipe consistently yields a cake with moist, velvety texture and smooth chocolate swirls that look as good as they taste.
The foundation starts with a single-layer batter baked in a 6-inch pan, then carefully sliced and layered with homemade chocolate ganache. Using room-temperature ingredients and a low oven temperature prevents over-browning while ensuring even baking. The result? A cake that holds its shape beautifully, even when sliced.
What sets this apart is the dense yet tender crumb—no dry edges or crumbly layers here. The chocolate ganache between layers adds decadent moisture, while the outer glaze gives a professional finish that’s simple to achieve. Perfect for special occasions or when you crave restaurant-quality dessert at home.
Ready in about 2 hours (including cooling), this cake serves 6-8 generously and pairs beautifully with fresh berries or whipped cream. Let’s get baking—your taste buds will thank you.
Ingredients for 6 inch chocolate layer cake
Sixteen ingredients, two hours, restaurant-quality chocolate cake that stays moist and crack-free.
| Ingredient | Amount | Notes |
|---|---|---|
| All-Purpose Flour 🌾 | 1 ½ cups | Sifted for light texture |
| Unsalted Butter 🧈 | 1 cup | Room temperature, European preferred |
| Granulated Sugar 🍚 | 1 ½ cups | Superfine for smoother batter |
| Cocoa Powder 🍫 | ½ cup | Dutch-processed for rich flavor |
| Large Eggs 🥚 | 2 whole | Room temperature, separated |
| Whole Milk 🥛 | ¾ cup | Room temperature |
| Baking Powder 🧂 | 1 ½ tsp | Diamond Crystal preferred |
| Salt 🧂 | ½ tsp | Fine sea salt |
| Vanilla Extract 🌸 | 1 tbsp | Pure Madagascar bourbon |
| Dark Chocolate 🍫 | 8 oz | 70% cacao, chopped fine |
| Heavy Cream 🥛 | ½ cup | Cold for ganache |
| Powdered Sugar 🍚 | ½ cup | For glaze |
| Butter 🧈 | 2 tbsp | Melted for glaze |
The butter and eggs are non-negotiable for that tender crumb. Grab European-style butter if you can—it’s higher in fat, which gives a richer texture. Trader Joe’s or Whole Foods carry good brands, but any unsalted butter works in a pinch. For the eggs, room temperature is key—cold eggs cause cracks in the batter. The cocoa powder? Dutch-processed makes a difference here—it’s smoother and less bitter. Valrhona is ideal, but store-brand works too. Pre-sift your flour and cocoa to avoid lumps, which is a game-changer for a silky batter. The dark chocolate should be at least 70% cacao—Ghirardelli or Lindt are reliable choices.
No vanilla extract? Vanilla bean paste works perfectly—just use half the amount. Running out of baking powder? Baking soda plus cream of tartar is a 1:2 ratio swap. The heavy cream for the ganache can be subbed with full-fat coconut milk, but it’ll have a different texture. For the glaze, if you’re avoiding dairy, coconut cream, but traditional butter creates that glossy finish. The chocolate swirls are what make this cake special—don’t skip the room-temperature step for the chocolate or it won’t melt smoothly. If you’re short on time, microwave the chocolate in 20-second bursts, stirring between each.
This cake keeps beautifully—3 days, covered at room temperature, or 5 days, refrigerated. For longer storage, freeze the fully assembled cake for up to 3 months***. The glaze sets at room temperature in about 30 minutes, so plan ahead if you’re serving it soon. I always make a double batch of ganache—one for filling, one for frosting the outside. The extra effort makes all the difference when you’re slicing that perfect first piece. Store any leftover ganache in the fridge with a thin layer of oil on top to prevent a skin from forming.
Why You’ll Love This Recipe
- No-Fuss Layers: I swear by this recipe—just three bowls, one mixer, and 15 minutes of hands-off time. The secret’s in the buttercream: rich but not heavy, thanks to that cocoa powder cutting through the sweetness.
- Decadent Yet Balanced: That first bite? Fudgy edges, tender crumb—all thanks to the sugar and eggs working their magic. Honestly, the cocoa powder makes it taste like a bakery slice without the fuss of extra ingredients.
- Party in a Pan: Six inches means perfect portions for birthdays, potlucks, or just because. Between us, it’s my go-to for date nights when I want to impress without slaving over a 9×13.
- Leftovers That Win: The cake keeps beautifully for days—moist layers, no dryness. I’ll be real: my kids fight over the scraps, and I’ve even repurposed slices into breakfast sandwiches. (Yes, even on a Tuesday night.)
Step-by-step instructions for dense chocolate layer cake
Here’s how to bake a rich, fudgy chocolate cake with perfect swirls that won’t crack.
👨🍳 Step 1: Prepare the Chocolate Batter
Preheat your oven to 350°F and grease two 6-inch round cake pans with 2 tbsp butter, then line the bottoms with parchment paper. In a large mixing bowl, combine the 1.5 cups all-purpose flour, 1.5 tsp baking powder, and 0.5 tsp salt. Sift this mixture directly into the bowl to avoid lumps.
In a separate large bowl, beat the 1 cup unsalted butter and 1.5 cups granulated sugar on medium speed until light and fluffy—about 3-4 minutes. Add the 2 whole large eggs one at a time, mixing well after each addition. Scrape down the sides of the bowl as needed. Stir in the 0.5 cup cocoa powder and 1 tbsp vanilla extract until smooth.
Gradually add the dry ingredients to the wet mixture, alternating with the 0.75 cup whole milk. Begin and end with the dry ingredients, mixing just until combined. Be careful not to overmix—the batter should be thick but pourable. Fold in the 8 oz chopped dark chocolate using a spatula until evenly distributed.
🍳 Step 2: Create the Fudge Swirls
Divide the batter evenly between the two prepared cake pans. To create the signature fudge swirls, use a wooden skewer or butter knife to make 4-5 vertical cuts through the center of each cake layer, reaching all the way to the bottom. This creates channels for the fudge filling to flow through.
In a small saucepan, combine the 0.5 cup heavy cream and 8 oz chopped dark chocolate. Heat over medium-low until the chocolate melts completely and the mixture is smooth. Let it cool slightly—it should be thick enough to coat the back of a spoon but still pourable.
Pour the warm chocolate mixture evenly over the batter in each pan, filling each cut channel completely. Use the skewer to gently swirl the batter and chocolate together, creating marbled patterns. Tap each pan gently on the counter to release any air bubbles and ensure the filling settles evenly.
⏰ Step 3: Bake to Perfect Doneness
Place the pans in the preheated oven and bake for 25-30 minutes, or until a toothpick inserted into the center comes out clean with a few moist crumbs. The edges should be set but the tops should still look slightly soft—they’ll firm up as they cool.
I know it’s tempting to open the oven early to check, but resist! The heat needs to circulate properly to create that dense texture. If the tops are browning too quickly, tent the pans loosely with aluminum foil after 20 minutes of baking.
Remove the cakes from the oven and let them cool in their pans for 10 minutes. Then, run a thin knife around the edges to loosen the cakes from the pans. Invert each cake onto a wire rack to cool completely. This gradual cooling prevents cracking as the cakes shrink.
🍽️ Step 4: Assemble and Glaze
Once completely cooled, level the tops of the cakes if needed using a serrated knife. Place one cake layer on a serving plate and spread a thin layer of the remaining chocolate ganache (if any is left) over the top. Place the second cake layer on top.
To make the glaze, melt the 2 tbsp butter in a small saucepan over low heat. Remove from heat and whisk in the 0.5 cup powdered sugar until smooth. Drizzle this glaze evenly over the top and sides of the cake. Let the glaze set for 10-15 minutes before serving.
Slice into wedges and serve immediately. The cake should have a dense, moist crumb with rich chocolate flavor and beautiful fudge swirls throughout each slice. Store any leftovers in an airtight container at room temperature for up to 3 days, or refrigerate for up to 5 days.
Pro Tips For Making 6 Inch Chocolate Layer Cake
- Sift That Cocoa: I learned this the hard way—dumping cocoa powder straight into the dry ingredients creates lumps that never fully dissolve. Sift it first, then whisk it into the flour. Your cake will be smoother, richer, and actually chocolatey instead of grainy.
- Cream Butter Slowly: High heat. Seriously, crank it up when you start creaming the butter and sugar. This isn’t just about volume—it traps air faster, giving your cake that light, airy crumb instead of a dense brick. Stop when it’s pale and fluffy, not when it looks “done” in a recipe pic.
- Skip the Overmixing: The moment your batter looks like pancake batter, you’ve gone too far. Overmixing develops gluten, and your cake will turn out tough instead of tender. Mix just until the flour disappears—about 20 seconds after that—and resist the urge to “make sure it’s all combined.”
- Test for Doneness Early: Your oven runs hotter than you think, and a 6-inch cake bakes faster than a 9-inch. Start checking for doneness 5 minutes before the recipe’s suggested time—insert a toothpick, then wait 10 seconds. If it comes out mostly clean but with a few moist crumbs, that’s perfect. Pulling it too soon is the #1 way to end up with a gummy mess.
Common mistakes when making this dish
Overmixing the Batter
I’ve ruined more cakes than I care to admit by overmixing the batter. Once you’ve combined all the ingredients, stop mixing as soon as the dry ingredients disappear—overmixing develops gluten, which makes your cake tough and dense.
The moment the batter looks smooth but still has a few streaks, it’s ready. I promise you, the cake won’t fall apart if it looks slightly uneven in the bowl. 💫
Skipping Room Temperature Ingredients
Cold butter, eggs, or milk are the #1 reason cakes crack or develop tunnels. Always let your butter, eggs, and milk sit at room temperature for at least 1 hour before baking. I keep my eggs in the fridge overnight and move them to the counter in the morning.
Pro tip: Place them in a bowl of warm water for 10 minutes if you’re in a hurry—they’ll reach room temp faster.
Opening the Oven Too Soon
Patience is key when baking cakes! Opening the oven early causes the cakes to sink or develop domes. Wait the full 25-30 minutes before checking doneness. If you’re worried about overbrowning, tent the pans with foil after 20 minutes instead of peeking.
I’ve learned this the hard way—once, I opened the oven at 22 minutes and had to scrape cake off the bottom of the pan. 😬
Uneven Fudge Distribution
Those gorgeous chocolate swirls won’t form if you don’t create proper channels in the batter. Make sure your cuts reach all the way to the bottom of the pan—halfway isn’t enough! Also, don’t pour all the chocolate mixture into one spot.
Spread it evenly and use your skewer to gently swirl it through. I’ve seen cakes where one side had a river of chocolate while the other was dry—don’t let that be you!
Cooling Too Quickly
Inverting your cakes onto a rack while they’re still warm might seem efficient, but it causes cracks as they shrink. Always let them cool in their pans for 10 minutes first. Then, run a knife around the edges before inverting.
I’ve had cakes that looked perfect until they hit the rack, then developed unsightly cracks. Take your time—good things come to those who wait. ⏳
Using the Wrong Cocoa Powder
Natural cocoa powder will make your cake taste bitter and develop a weird texture. Always use Dutch-processed cocoa—it’s smoother and richer. I keep a small bag of Valrhona in my pantry, but store-brand works in a pinch.
If you’re unsure, check the label: natural cocoa is usually labeled “unsweetened cocoa,” while Dutch-processed says “Dutch-processed cocoa powder.” This small detail makes a huge difference! 🍫
Nutrition facts
Frequently asked questions
Can I make this cake in a single 6-inch pan instead of two?
Yes, but you’ll need to adjust the baking time and technique. Bake the batter in one pan for 30-35 minutes (check with a toothpick at 25 minutes). Once cooled, slice the cake horizontally into two equal layers using a serrated knife. Then proceed with the assembly instructions, adding your chocolate ganache between the layers. The texture will be slightly denser since it’s a single bake, but it still works beautifully!
How do I prevent the cake from cracking when slicing?
Let the cakes cool completely in their pans for 1 hour before removing them. Once cooled, run a thin knife around the edges to loosen, then invert onto a rack. For slicing, use a hot serrated knife (dip in hot water and wipe dry between slices). This creates clean cuts without tearing. Also, avoid stacking the layers too soon after slicing—they need time to firm up.
What’s the best way to store leftovers?
Wrap the cake tightly in plastic wrap at room temperature for 2-3 days. For longer storage, refrigerate for up to 5 days or freeze for 3 months. To reheat, cover with a damp paper towel and microwave for 10-15 seconds. The texture will be slightly softer but still delicious. For the ganache, store it in an airtight container with a thin layer of oil on top to prevent drying.
Can I substitute the chocolate ganache with buttercream?
You can try, but the texture will be different. For best results, stick with ganache as it’s lighter and won’t make the cake soggy. If you’re determined to use buttercream, make an American-style version (equal parts butter and powdered sugar) and spread it thinly between layers. The cake will be less moist but still tasty. For the glaze, you can use the same buttercream thinned with a little milk instead of the powdered sugar glaze.
How do I adjust this recipe for gluten-free baking?
Replace the all-purpose flour with a 1:1 gluten-free baking flour blend (like Bob’s Red Mill). Add 1 tsp xanthan gum to help bind the cake. You may also need to reduce the milk by 2 tbsp since gluten-free batters are often wetter. For the best results, use a gluten-free cocoa powder and check that all your ingredients are certified gluten-free. The texture will be slightly different but still delicious!

- 6 Egg Cake Recipe with Oil: Light as Air With Buttery Moisture - October 4, 2026
- 4 Bean Casserole Recipe: One-Pan Heartiness With Smoky Paprika Depth - October 4, 2026
- 3-Ingredient Keto Mug Cake Recipe: Microwave Magic in 2 Minutes - October 4, 2026