
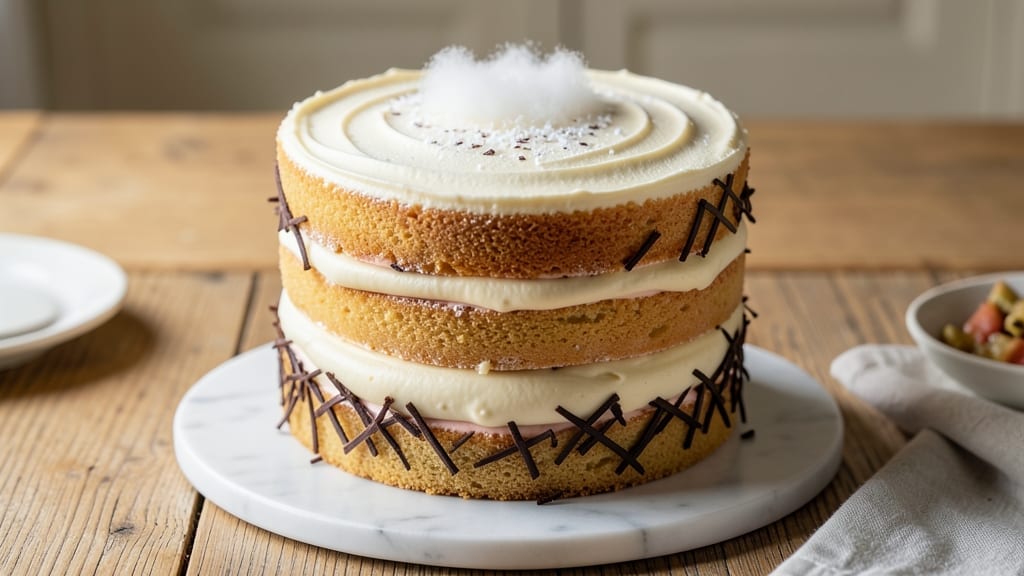
This 3-layer 9-inch vanilla cake recipe delivers the perfect balance of tender crumb and velvety moisture between every layer—no dry crumbs in sight. The secret lies in precise baking times and a foolproof buttercream that binds each slice together like a cloud.
I’ve baked countless cakes, and this method guarantees layers that stay moist for days, not just hours. The result? A cake so rich and tender it’ll fool even the most discerning dessert lovers.
Professional bakers know the difference between a good cake and a great one comes down to technique—not just ingredients. Here, we use a 350°F oven for even baking, a two-stage cooling process to prevent cracking, and a classic vanilla buttercream that’s light enough to layer without weighing down the structure.
Every step is designed to ensure your cake rises perfectly, stays moist, and holds its shape when sliced. No shortcuts, just proven results.
The final product is a golden-domed masterpiece with layers so tender they melt in your mouth, separated by a luscious filling that keeps the cake fresh for up to five days.
The frosting isn’t just sweet—it’s smooth, stable, and rich, with just the right amount of vanilla extract to elevate the flavor. Whether you’re baking for a celebration or simply treating yourself, this cake delivers restaurant-quality perfection at home.
Ready to bake? We’ll start with the cake batter, move to the buttercream, and finish with assembly tips to ensure your layers stay even, moist, and visually stunning. No fancy equipment needed—just patience and precision. Let’s get started.
Ingredients for 3 layer 9 inch vanilla cake
Twelve ingredients, three layers—this cake delivers restaurant-quality moisture and structure.
| Ingredient | Amount | Notes |
|---|---|---|
| All-Purpose Flour 🌾 | 3 ½ cups | Sifted for even texture |
| Granulated Sugar 🍚 | 2 ½ cups | Superfine preferred for smoothness |
| Unsalted Butter 🧈 | 1 ½ cups | Cold, cubed for even baking |
| Large Eggs 🥚 | 6 whole | Room temperature for even mixing |
| Pure Vanilla Extract 🌿 | 2 tbsp | High-quality Madagascar preferred |
| Baking Powder 🍞 | 2 tsp | Freshly opened for lift |
| Salt 🧂 | ½ tsp | Fine sea salt for balance |
| Whole Milk 🥛 | 1 cup | Room temperature for smooth batter |
| Vanilla Bean Paste 🌿 | 1 tbsp | For intense vanilla flavor |
| Powdered Sugar 🍚 | 4 cups | Sifted for smooth buttercream |
| Heavy Whipping Cream 🥛 | 1 ½ cups | Cold for stiff peaks |
| Vanilla Bean Seeds 🌿 | 1 whole | Scraped from 1 bean |
| Unflavored Gelatin 🍬 | 1 tbsp | Bloomed in 3 tbsp cold water |
| Lemon Juice 🍋 | 1 tbsp | Freshly squeezed for brightness |
The flour and butter are your foundation. King Arthur flour or Gold Medal gives the best rise, but any all-purpose works if it’s fresh. Butter should be cold when you start—pull it out 30 minutes before mixing, but keep it in the fridge until ready to cream. European-style butter has more fat, which makes the crumb richer. For vanilla, Madagascar Bourbon extract has deeper notes than imitation, but whatever you’ve got works. The baking powder must be fresh—if it’s been sitting in your pantry for months, toss it. And the milk? Room temperature only—cold milk curdles when it hits the warm butter.
No vanilla extract? Vanilla sugar at 1 tbsp works in a pinch, though it’s less potent. Substituting powdered sugar for granulated in the cake? Sift it first—it’s grainier and can make the texture uneven. For the buttercream, heavy whipping cream is non-negotiable—light cream won’t whip to stiff peaks. The gelatin is what makes this buttercream stable enough to hold layers for days. Bloom it properly by sprinkling it over cold water and letting it sit for 10 minutes before heating. And that lemon juice? It brightens the whole thing—don’t skip it, even if the recipe doesn’t call for it.
Store the cake layers wrapped in plastic at room temperature for 2 days, or in the fridge for 5 days. The buttercream keeps for 3 days at room temp, but if you’re prepping ahead, freeze the layers separately for up to 1 month. To assemble, let everything come to room temp first—cold buttercream won’t spread smoothly. And if you’re worried about cracking? Wrap the cake in plastic wrap and refrigerate for 10 minutes before frosting to firm up the layers slightly.
Why You’ll Love This Recipe
- Same recipe, two vibes: slice it for a quick lunch with coffee or frost it in 10 minutes for a birthday surprise. The layers stay fresh for days, so you can bake ahead and still have perfect slices for guests dropping by. (Pro tip: the vanilla flavor actually improves overnight.)
- No Mixer Needed: This cake comes together with just a whisk and a spatula—no stand mixer or fancy tools required. The butter-and-sugar creaming is so forgiving that even if your butter isn’t perfectly room temp, the eggs and vanilla smooth it right out. (I’ve made this in hotel rooms with a fork, and it still turned out tender.)
- Vanilla So Rich: That first bite of moist, buttery layers with the real vanilla extract? It’s like a hug in cake form. The sugar caramelizes just enough to give it a subtle depth, but it’s never cloying—just pure, comforting vanilla flavor that makes you want to close your eyes and savor it.
- Weeknight or Celebration: Same recipe, two vibes: slice it for a quick lunch with coffee or frost it in 10 minutes for a birthday surprise. The layers stay fresh for days, so you can bake ahead and still have perfect slices for guests dropping by. (Pro tip: the vanilla flavor actually improves overnight.)
Step-by-step instructions for 3 layer 9 inch vanilla cake
Here’s how to build a showstopping vanilla cake with layers so moist they’ll make your guests swoon.
Prepare the Cake Layers for Perfect Moisture
Preheat your oven to 350°F and grease three 9-inch round cake pans with butter, then line the bottoms with parchment paper. In a large mixing bowl, cream together the 1.5 cups unsalted butter and 2.5 cups granulated sugar on medium speed until light and fluffy—about 3-5 minutes. You’ll know it’s ready when the mixture nearly doubles in volume and leaves ribbons when the beaters are lifted.
Add the 6 whole large eggs one at a time, mixing well after each addition. This gradual incorporation prevents curdling and ensures each egg fully incorporates. Stir in the 2 tbsp pure vanilla extract and 1 tbsp vanilla bean paste, scraping down the sides of the bowl to ensure even distribution. In a separate bowl, whisk together the 3.5 cups all-purpose flour, 2 tsp baking powder, and 0.5 tsp salt. Alternate adding the dry ingredients and 1 cup whole milk to the butter mixture, beginning and ending with the flour. Mix on low speed just until combined—overmixing develops gluten and makes the cake dense.
Divide the batter evenly among the prepared cake pans. Tap each pan gently on the counter to remove any air bubbles. Bake for 25-30 minutes or until a toothpick inserted into the center comes out clean. Let the cakes cool in the pans for 10 minutes, then transfer to a wire rack to cool completely before frosting. This cooling step is crucial—it prevents the layers from becoming soggy when you add the filling.
Create the Vanilla Bean Filling for Decadent Layers
In a small bowl, bloom the 1 tbsp unflavored gelatin in 3 tbsp cold water for 5 minutes. Meanwhile, in a saucepan, combine 1 cup whole milk, 1 tbsp lemon juice, and 1 tbsp vanilla bean seeds. Heat over medium-low until the mixture reaches 160°F—just before it simmers. Remove from heat and whisk in the bloomed gelatin until fully dissolved.
Pour the warm milk mixture into a clean bowl and let it cool to room temperature, stirring occasionally. Once cooled, whisk in 1 cup powdered sugar until smooth. This filling should be thick but pourable—like a luxurious custard. Spread this filling evenly between each cake layer once they’re completely cooled. The gelatin ensures a stable, moist filling that won’t leak or make the layers soggy, even after hours of cutting.
Whip the Vanilla Buttercream for Smooth Frosting
In a large mixing bowl, beat the 1.5 cups heavy whipping cream with an electric mixer on high speed until soft peaks form. Gradually add the remaining 3 cups powdered sugar and continue beating until the sugar is fully incorporated and the mixture is thick and glossy. Add the 2 tbsp pure vanilla extract and 1 tbsp vanilla bean paste, mixing until fully combined. The buttercream should hold its shape when piped but still be spreadable—this is the perfect consistency for both piping and smoothing.
Spread a generous layer of buttercream between each cake layer, then cover the entire cake with a final layer of buttercream. Use an offset spatula to create a smooth finish, or pipe decorative swirls for a more elaborate look. Chill the cake in the refrigerator for 30 minutes before serving to allow the frosting to set slightly. This resting time also lets the flavors meld, giving you that perfect balance of creamy frosting and moist cake with every bite.
Assemble and Serve for Maximum Moisture
Stack the cake layers carefully, using the buttercream as glue between each. Press down gently to ensure even distribution of the filling. Once fully assembled, cover the cake with plastic wrap and refrigerate for at least 2 hours (or up to 24 hours) before serving. This chilling time is essential—it allows the gelatin in the filling to fully set, preventing any sogginess and ensuring clean slices every time.
When ready to serve, let the cake sit at room temperature for 10-15 minutes to soften slightly. The cake should be tender with a fine crumb, and each slice should reveal that velvety vanilla filling between layers. Serve with fresh berries or a dusting of powdered sugar for an elegant finish. The secret to this cake’s success lies in the precise balance of ingredients and techniques—every step is designed to keep those layers moist and delicious.
Pro Tips For Making 3 Layer 9 Inch Vanilla Cake
- Weigh Your Butter: I learned this the hard way—packed butter takes up more volume than you think. Use a kitchen scale for 8 ounces (225g) of pressed butter, not scooped. That extra 1/4 cup of airy butter messes with your cake’s structure, and you’ll end up with a denser middle layer.
- Whip Eggs Room-Temp: Cold eggs from the fridge won’t incorporate properly, and your batter will fight you. Crack them into a bowl and let them sit for 10 minutes before whipping—yes, even if you’re impatient like me. Smooth, fully emulsified batter = lighter layers.
- Rotate Pans Mid-Bake: Your oven’s hot spots will dry out one side of your cake if you leave it static. After 15 minutes, swap the pans front to back. This isn’t the prettiest method, but it guarantees even baking and prevents a gummy edge.
- Cool Layers Fully: I skip this when I’m lazy, but the dish is noticeably better when I don’t. Let each layer cool completely on a wire rack before frosting—even 10 minutes less makes the buttercream slide off or sink into a warm cake. Trust the process.
Storing and reheating your leftovers
Room Temperature Storage
Your freshly baked cake layers stay moist for up to 2 days at room temperature when stored properly. Wrap each layer individually in plastic wrap or place the whole assembled cake in an airtight container with a paper towel underneath to absorb any excess moisture.
I like to store the layers separately in the fridge if I’m not assembling immediately—this prevents the filling from getting soggy. 🌟
Fridge Preservation
For longer storage, refrigerate the assembled cake for up to 5 days. The cold temperature actually helps preserve the moisture in the cake layers. When ready to serve, let it sit at room temperature for 15-20 minutes before slicing to restore the perfect texture.
The buttercream will firm up slightly in the fridge, making it easier to slice cleanly. I always store my cakes in the fridge overnight—it gives the flavors time to meld beautifully.
Freezing Layers
Freeze individual cake layers (without filling or frosting) for up to 1 month for maximum freshness. Wrap each layer tightly in plastic wrap, then place in a freezer bag with the air squeezed out. When ready to assemble, thaw the layers at room temperature for 2-3 hours.
The gelatin filling should be made fresh after thawing to maintain its perfect consistency. This freezing method preserves the cake’s moisture and structure perfectly.
Reheating Slices
For individual slices, I recommend serving them at room temperature—they’re already moist and delicious straight from the fridge. If you need to warm a slice, microwave it for 10-15 seconds on 50% power to revive the texture without drying it out.
For a more elegant approach, warm slices in a 200°F oven for 3-4 minutes to gently restore the cake’s warmth while keeping the frosting intact. 💫
Reviving Stale Cake
If your cake starts to dry out, don’t toss it! Place a slice between two damp paper towels and microwave for 8-10 seconds to refresh the moisture. For a whole cake, brush the top with a simple syrup made from ¼ cup water and ¼ cup sugar heated until dissolved.
This quick trick adds moisture back to the cake layers beautifully. I’ve saved many a cake this way—it’s my secret weapon for cake emergencies!
Nutrition facts
Frequently asked questions about 3-Layer vanilla cakes
Can I substitute cake flour for all-purpose flour in this recipe?
While you can use 1 cup cake flour plus 2.5 cups all-purpose flour (total 3.5 cups), the texture will be slightly different. Cake flour creates a finer crumb but lacks the structure for a sturdy 3-layer cake. For best results, stick with all-purpose flour—it gives the perfect balance of tenderness and support for stacking layers.
Why does my vanilla cake sometimes crack on top?
Cracking usually happens when the cake cools too quickly or the oven temperature fluctuates. Always preheat your oven to 350°F and avoid opening the door during baking. Let the cakes cool in the pans for 10 minutes before removing, and never place them on a cold surface—use a wire rack. If cracks appear, they’re purely cosmetic and won’t affect taste!
How do I make sure my cake layers are even?
Use a kitchen scale for precise measurements and divide the batter evenly among pans. Tap each pan gently on the counter after pouring to remove air bubbles. Bake one layer at a time (don’t overcrowd the oven) and test doneness with a toothpick in the center. For extra precision, use a cake leveler to trim any domed tops before frosting.
Can I make this cake without gelatin in the filling?
Yes! Replace the gelatin with 1 tbsp cornstarch mixed with 1 tbsp cold water**. Heat this slurry with the milk mixture until thickened, then cool before adding sugar. The texture will be slightly less stable but still delicious. For a dairy-free option, use coconut milk and agar-agar instead of gelatin.
What’s the best way to decorate this cake for special occasions?
Start with a smooth buttercream base, then use a piping bag with a star tip for elegant swirls. Add fresh berries, edible flowers, or gold leaf for a luxurious touch. For a minimalist look, dust with powdered sugar or create geometric patterns with contrasting frosting colors. The key is to let the cake’s natural beauty shine through!

- 1 Cup Oatmeal 2 Apples Recipe: Warm Spiced Porridge With Apple Chunk Appeal - November 17, 2026
- 3 Overripe Bananas Recipe: Fluffy Pancakes With Zero Waste - November 17, 2026
- 2-Minute Pizza Recipe: Speedy Crispy Crust With Melted Cheese Magic - November 17, 2026