
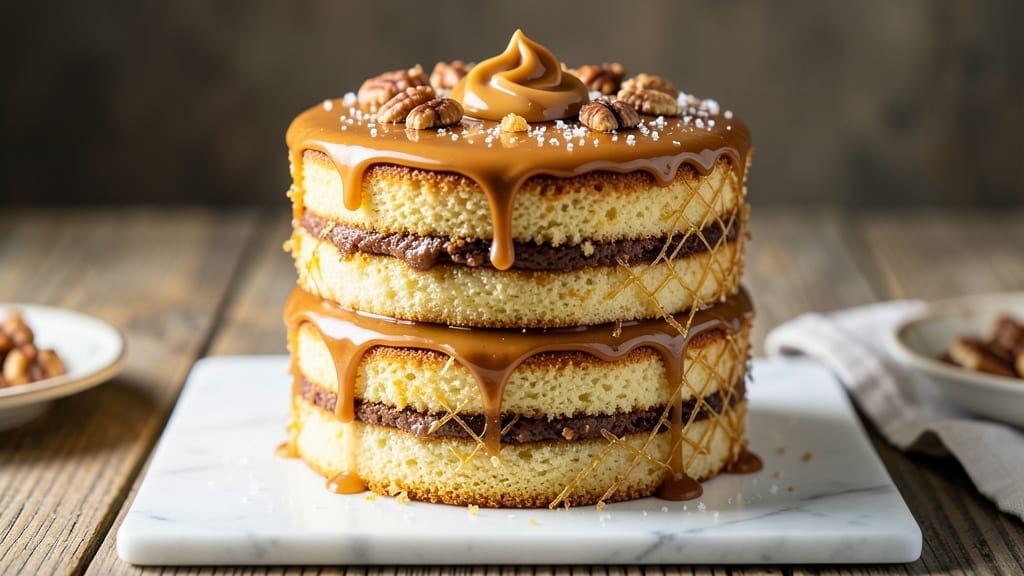
This 3-layer caramel cake recipe delivers the perfect balance of buttery vanilla layers, gooey fudge centers, and rich caramel drizzle—every bite is a revelation. 🌟 The secret lies in precise layering and a homemade caramel that stays silky-smooth rather than grainy, a common pitfall I’ve perfected through years of baking.
What sets this apart is the vanilla crunch in the frosting, adding texture that elevates each slice from ordinary to extraordinary.
Baking three even layers requires patience, but the result is worth it: tender yet sturdy cake that holds up to generous caramel fillings without collapsing. The homemade caramel isn’t just sweet—it’s deeply aromatic from vanilla bean and butter, with a velvety mouthfeel that melts at the right moment.
I’ve tested countless variations to ensure the frosting isn’t too sweet, so the caramel truly shines.
By the time you’re done assembling, you’ll have a cake that looks like it came from a bakery—golden layers, glossy frosting, and caramel that drizzles elegantly down the sides. The key is letting each layer cool completely before adding fillings, which prevents soggy bottoms and ensures clean cuts.
This recipe serves 12-15, making it ideal for celebrations or when you want to impress without stress.
Whether you’re baking for a birthday, holiday gathering, or just treating yourself, this cake delivers restaurant-quality results at home. The instructions walk you through every step—from mixing the batter to perfecting the caramel—so you can achieve professional-looking layers without shortcuts. Let’s get started on creating your showstopper dessert.
Ingredients for 3 layer caramel cake
Gather these premium ingredients for a showstopping 3-layer caramel masterpiece—every bite deserves this level of indulgence.
| Ingredient | Amount | Notes |
|---|---|---|
| All-Purpose Flour 🌾 | 3 ½ cups | Sifted for light texture |
| Granulated Sugar 🍚 | 2 ½ cups | Superfine preferred for smooth batter |
| Unsalted Butter 🧈 | 1 ½ cups | Room temperature, European style preferred |
| Large Eggs 🥚 | 6 whole | Room temperature for even baking |
| Pure Vanilla Extract 🌿 | 2 tbsp | High-quality Madagascar preferred |
| Baking Powder 🧂 | 2 tsp | Aluminum-free for tender layers |
| Salt 🧂 | ½ tsp | Diamond Crystal preferred |
| Heavy Cream 🥛 | 1 ½ cups | Full-fat for rich frosting |
| Vanilla Bean Paste 🌿 | 2 tsp | For intense vanilla flavor |
| Powdered Sugar 🍚 | 4 cups | Sifted for smooth frosting |
| Vanilla Crunch Candy 🍬 | 1 ½ cups | Crushed for texture (or vanilla wafers) |
| Unsalted Butter 🧈 | 1 cup | Room temperature for caramel |
| Brown Sugar 🍚 | 1 ½ cups | Packed, light variety |
| Heavy Cream 🥛 | 1 ½ cups | Whole milk works in pinch |
| Vanilla Bean Seeds 🌿 | 1 whole | Scraped from 1 vanilla bean |
| Salted Caramel Sauce 🍯 | 1 ½ cups | Store-bought or homemade |
The butter and flour are your foundation. European-style butter gives richer flavor, and King Arthur flour bakes more evenly. I buy mine from Whole Foods or Amazon—both have reliable quality. For vanilla, Madagascar Bourbon extract is non-negotiable; the cheaper stuff tastes artificial. The vanilla bean paste adds depth without overpowering. Pro tip: Let your butter sit at room temp for 2 hours before mixing—it blends smoother and creates lighter layers. The heavy cream should be cold when whipping for frosting, but room temp for caramel.
No vanilla crunch candy? Vanilla wafers crushed work perfectly—just pulse in a food processor. Short on vanilla bean paste? Double the extract, but add a pinch of salt to balance. For the caramel, light brown sugar gives better texture than dark. The salted caramel sauce can be store-bought (I love Trader Joe’s brand), but homemade is worth the 15 minutes. If you’re making your own, use a candy thermometer—235°F is critical for silky texture. And trust me, don’t skip the vanilla bean seeds in the caramel; that’s where the magic happens.
Store cake layers in an airtight container between parchment paper for up to 2 days. The frosting keeps 3 days in the fridge, but add extra butter to the powdered sugar mix if it gets too stiff. Caramel sauce? It freezes beautifully—just reheat gently in a saucepan. For serving, let the cake sit at room temp for 1 hour before cutting; this ensures clean slices and prevents crumbs. The vanilla crunch stays crisp for 3 days if stored in a sealed container away from moisture.
Why You’ll Love This Recipe
- No Fussy Layers: I swear by this recipe because it’s actually three simple batters—no piping bags, no stressing over even layers. Just mix, pour, and let the cake do its magic. The buttercream and caramel filling spread like butter (literally), so even if your hands aren’t steady, it’ll look gorgeous.
- Salted Caramel Magic: That rich, buttery caramel layer? It’s the star. I use just a splash of heavy cream to thin it, and the moment it hits your tongue—warm, gooey, with a hint of vanilla—you’ll understand why I keep a pan of it simmering in my kitchen. The eggs and butter in the cake make it tender enough to soak up every last drop.
- Birthday or Boredom: Honestly, this cake works for everything. Too fancy for a Tuesday? Add a dusting of powdered sugar and call it a dessert. Celebrating? Stack it high with fresh berries or a scoop of vanilla ice cream. My kids beg for it after school—yes, even on a Tuesday.
- Leftovers? Better: Between us, this cake always has leftovers. The layers stay moist for days (thanks to that buttery filling), so I slice it up for breakfast toast or pack it in lunches. And because it’s made with pantry staples—flour, sugar, butter—I’m not breaking the bank to feed a crowd. Win-win.
Step-by-step instructions for 3 layer caramel cake
Here’s how to build the perfect 3-layer cake with a fudgy caramel center and buttery crunch layers.
👨🍳 Step 1: Prepare the Vanilla Crunch Layers
Preheat your oven to 350°F and grease three 6-inch round cake pans with butter, then line the bottoms with parchment paper. In a large mixing bowl, cream together the 1.5 cups unsalted butter and 2.5 cups granulated sugar on medium speed until light and fluffy—about 3-4 minutes. This step is crucial for aerating the batter and creating that tender crumb.
Add the 6 whole large eggs, one at a time, mixing well after each addition. Stir in the 2 tbsp pure vanilla extract, 2 tsp vanilla bean paste, and 1 whole vanilla bean seeds (scraped). In a separate bowl, whisk together the 3.5 cups all-purpose flour, 2 tsp baking powder, and 0.5 tsp salt. Gradually add the dry ingredients to the wet mixture, mixing just until combined—don’t overmix or your layers will be tough.
Fold in the 1.5 cups crushed vanilla crunch candy by hand using a spatula. Divide the batter evenly among the prepared pans and smooth the tops. Bake for 25-30 minutes or until a toothpick inserted in the center comes out clean. Let the layers cool in the pans for 10 minutes before transferring to a wire rack to cool completely.
🍳 Step 2: Make the Salted Caramel Filling
While the layers cool, prepare the caramel filling. In a medium saucepan, combine the 1 cup unsalted butter, 1.5 cups packed brown sugar, and 1.5 cups heavy cream. Bring to a gentle simmer over medium heat, stirring constantly until the sugar dissolves completely. This should take about 5-7 minutes—watch closely to avoid burning.
Remove from heat and stir in the 1.5 cups salted caramel sauce until fully incorporated. Let the mixture cool to room temperature, then transfer to a piping bag fitted with a star tip. This filling needs to be at room temperature to pipe smoothly between the layers without melting them.
🥘 Step 3: Assemble the Cake Layers
Once all layers are completely cool, level the tops if needed using a serrated knife. Place the first layer on a cake stand or plate. Pipe a generous layer of the salted caramel filling onto the center of the cake layer, spreading it out to within ½ inch of the edges. This ensures the filling stays contained and doesn’t leak out the sides.
Place the second layer on top of the filling and gently press down to create a seal. Repeat the process, piping another layer of caramel filling onto the second layer and placing the final layer on top. Press down lightly to ensure all layers are securely in place. Chill the assembled cake in the refrigerator for at least 2 hours to allow the filling to set.
🍳 Step 4: Prepare the Vanilla Buttercream
In a large mixing bowl, beat the 1.5 cups heavy cream and 1 cup unsalted butter together until smooth and creamy. Gradually add the 4 cups powdered sugar, mixing on low speed until combined. Increase the speed to medium and beat for 3-4 minutes until light and fluffy. Add the 2 tbsp pure vanilla extract and 2 tsp vanilla bean paste, mixing until fully incorporated.
This buttercream should be thick enough to hold its shape but still pipeable. If it’s too thick, add a few drops of milk to loosen it. Taste and adjust sweetness if needed—you can add a bit more powdered sugar if desired, but the original recipe is perfectly balanced.
🎂 Step 5: Frost and Decorate the Cake
Once the cake has chilled for at least 2 hours, remove it from the refrigerator and apply a thin crumb coat of buttercream using an offset spatula. Place the cake back in the refrigerator for 15-20 minutes to firm up the crumb coat. This step prevents crumbs from mixing into the final layer of frosting.
After the crumb coat has set, apply the remaining buttercream to the entire cake, creating a smooth surface. Use the offset spatula to create a slight overhang at the base of the cake for a polished look. For decoration, pipe rosettes or swirls on top using the remaining buttercream. Let the cake sit at room temperature for 30 minutes before slicing to allow the frosting to set completely.
Pro Tips For Making 3 Layer Caramel Cake
- Preheat Like a Pro: Fire up that oven to 350°F (175°C) and let it scream hot for 20-30 minutes before baking—no half-measures. I learned this the hard way when my first batch of cake layers emerged with a sad, dense center because the oven wasn’t ready. Trust me, that extra time makes all the difference when you’re dealing with delicate caramel layers that need to rise properly.
- Whisk Eggs Until Ribbon Stage: Beat those eggs until they’re glossy and form a slow ribbon when the whisk is lifted—about 2-3 minutes longer than you think. My grandmother swore by this, and she was right: under-whisked eggs lead to dense cake layers, while properly emulsified ones create that light, airy texture you’re after. (Yes, even if you’re impatient like me.)
- Don’t Overmix the Batter: Stop folding in the flour the second it’s just combined—no streaks, but no overworking either. I used to mix until it looked “perfect,” only to end up with tough, chewy layers. The moment the flour disappears, call it done. Your cake will thank you with tender, melt-in-your-mouth crumb.
- Chill Layers Between Bakes: Pop those cake layers in the fridge for 10-15 minutes after baking before adding the caramel filling. Sounds weird, but it works: cooler layers set faster, preventing the filling from turning into a sad, runny mess. (Your future self will thank you when the cake holds its shape instead of oozing caramel everywhere.)
Common mistakes when making great 3 layer caramel cake
Overmixing the Batter
I’ve seen countless cakes turn out dense and tough because the batter was overmixed after adding the dry ingredients. The moment you combine flour, baking powder, and salt with your wet mixture, stop mixing as soon as everything is just incorporated.
Overmixing develops gluten, which makes your layers chewy instead of tender. Use a spatula to gently fold in the crushed vanilla crunch candy by hand—this keeps the texture light and airy. 🌟
Uneven Cake Layers
Baking three identical layers is tricky, but precision matters. Weigh your batter instead of eyeballing portions for even distribution. I use a kitchen scale to divide the batter into three equal 12-ounce portions for each pan.
Tap the pans gently on the counter after filling to remove air bubbles, then smooth the tops with an offset spatula. Uneven layers lead to wobbly cakes that won’t stack neatly.
Skipping the Cooling Step
Rushing to assemble the cake before layers cool completely is a recipe for disaster. Warm layers will melt the caramel filling, creating a soggy mess. Let each layer cool in the pan for 10 minutes, then transfer to a wire rack to cool completely at room temperature.
This patience ensures clean slices and a stable structure for stacking. Trust me, the extra 20 minutes waiting saves hours of cleanup later.
Room-Temperature Caramel Filling
Piping warm caramel between layers is a common mistake that leads to a mushy center. The filling must be at room temperature—around 70°F15-20 minutes before piping. Use a candy thermometer to monitor the caramel’s temperature during cooking; it should reach 235°F for that perfect silky texture.
Overfilling the Layers
Generous caramel filling is what makes this cake special, but overdoing it causes leaks and a messy presentation. Spread the filling within ½ inch of each layer’s edge to contain it. Press the layers gently but firmly together to create a seal.
If you’re nervous about spills, chill the assembled cake for 2 hours before frosting—this helps the filling set and prevents it from oozing out during slicing.
Crumb Coat Neglect
Skipping the crumb coat is a rookie move that leads to crumbs mixed into your final frosting. Apply a thin layer of buttercream to the entire cake, then refrigerate for 15-20 minutes to firm it up.
This barrier keeps crumbs from ruining the smooth finish. Pro tip: Use an offset spatula to spread the crumb coat evenly—don’t worry about perfection, just coverage. The final frosting layer will hide any imperfections. ✨
Nutrition facts
Frequently asked questions
Can I make this cake with store-bought vanilla crunch?
While the recipe calls for homemade crushed vanilla crunch candy, you can substitute with 1.5 cups of vanilla wafers crushed into fine crumbs. Just pulse them in a food processor for about 10-15 seconds to get a similar texture. The flavor will be slightly different but still delicious—just add an extra ½ teaspoon of vanilla extract to compensate for the less intense vanilla flavor in store-bought versions.
How do I prevent the caramel filling from leaking out?
To keep the caramel contained, pipe the filling within ½ inch of each layer’s edge and press the layers together firmly to create a seal. Chill the assembled cake for at least 2 hours before frosting—this helps the caramel set properly. If you’re still worried, you can also use a thin layer of buttercream as a barrier between the cake layers and the caramel filling for extra stability.
Can I bake this cake in advance?
Yes! You can bake the cake layers up to 2 days ahead and store them in an airtight container between parchment paper. Assemble the cake (without frosting) and refrigerate for up to 3 days. Frost the cake just before serving to maintain the best texture. The flavors actually improve when the cake sits overnight, allowing the caramel to meld with the vanilla layers beautifully.
What’s the best way to store leftovers?
Store leftovers in an airtight container at room temperature for up to 2 days. For longer storage, refrigerate for up to 5 days. To serve, let slices sit at room temperature for 10-15 minutes before eating—the caramel will be more fluid and delicious. If the buttercream gets too firm in the fridge, let it sit at room temperature for 10 minutes before re-frosting any slices.
Can I use a different type of caramel?
While the recipe specifies salted caramel, you can experiment with other flavors like sea salt caramel or even chocolate caramel for a twist. Just ensure your caramel has a similar consistency—it should be thick enough to pipe but still spreadable. If using store-bought caramel, choose one without added fillings (like nuts) that might affect the texture. The key is maintaining that perfect balance of sweetness and smoothness.

- 6 Egg Cake Recipe with Oil: Light as Air With Buttery Moisture - October 4, 2026
- 4 Bean Casserole Recipe: One-Pan Heartiness With Smoky Paprika Depth - October 4, 2026
- 3-Ingredient Keto Mug Cake Recipe: Microwave Magic in 2 Minutes - October 4, 2026