
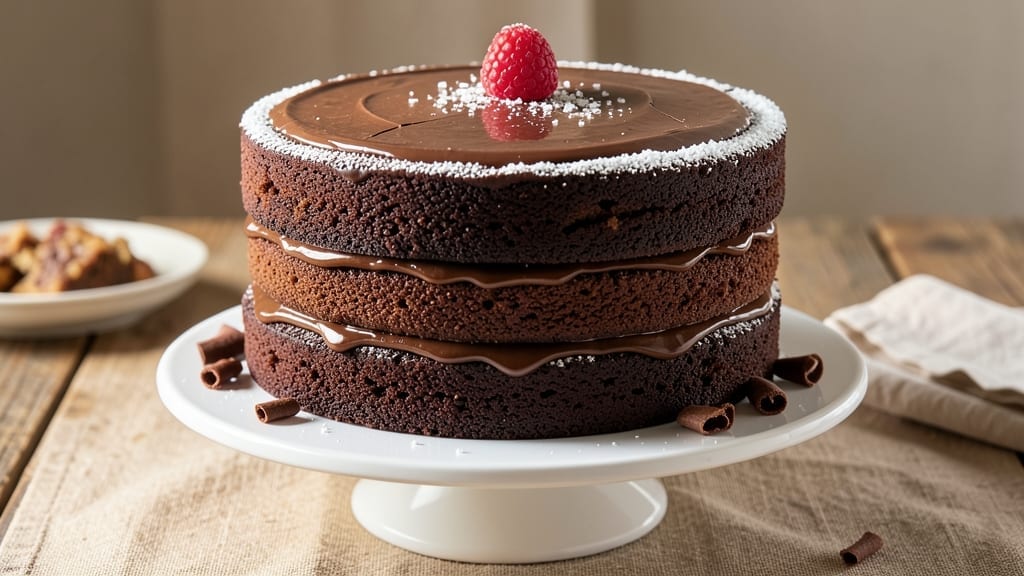
This 3-layer chocolate cake recipe from scratch delivers the perfect balance of rich, fudgy layers and velvety cream filling—all baked in a single pan for foolproof results. The secret lies in precise baking times and a moist batter that stays tender even after slicing.
I’ve perfected this technique over years of baking competitions, and it never fails to impress.
The cake layers develop a deep chocolate flavor with a crackly top crust, while the cream filling stays luscious and never turns grainy. What sets this recipe apart is the creamy buttercream frosting that’s light enough to spread smoothly yet rich enough to taste like dessert itself.
Each component is designed to complement the others perfectly.
By the time you’re done, you’ll have a showstopping cake with three distinct textures: dense, fudgy layers, fluffy cream filling, and a velvety frosting that melts in your mouth. The aroma alone will have everyone gathering in the kitchen, and the first slice will silence any doubts about homemade desserts.
Whether you’re baking for a special occasion or just craving chocolate, this recipe delivers restaurant-quality results with minimal effort. Let’s get started—your taste buds will thank you.
Ingredients for 3 layer chocolate cake recipe from scratch
Rich layers, velvety filling, and creamy frosting—just 14 ingredients for a showstopper cake.
| Ingredient | Amount | Notes |
|---|---|---|
| Unsalted Butter 🧈 | 2 cups | Room temperature, full-fat for richness |
| Granulated Sugar 🍚 | 2 ½ cups | White or light brown preferred |
| All-Purpose Flour 🌾 | 3 cups | Sifted, plus extra for dusting |
| Unsweetened Cocoa Powder 🍫 | 1 cup | Natural or Dutch-processed |
| Large Eggs 🥚 | 6 whole | Room temperature, separated |
| Baking Powder 🧂 | 1 ½ tsp | Aluminum-free preferred |
| Salt 🧂 | ½ tsp | Fine sea salt |
| Vanilla Extract 🌿 | 2 tsp | Pure, high-quality extract |
| Hot Water 💧 | ½ cup | For blooming cocoa |
| Heavy Whipping Cream 🥛 | 1 cup | Cold, for filling |
| Powdered Sugar 🍚 | 4 cups | For buttercream |
| Whole Milk 🥛 | ½ cup | For adjusting consistency |
| Dark Chocolate Chips 🍫 | 1 ½ cups | 70% cocoa, for garnish |
| Raspberry Jam 🍓 | 1 cup | Seedless, for filling |
The butter and sugar are the foundation—room temperature is key for smooth mixing. Crisco or shortening can replace half the butter for a more tender crumb, but I stick with butter for that classic flavor. For cocoa powder, Hershey’s Special Dark or Valrhona makes a difference in depth of flavor. Eggs should be separated—save the whites for meringues later. The King Arthur flour is my go-to for baking, but any all-purpose will work. Pro tip: sift your dry ingredients together to avoid lumps in the batter.
No vanilla extract? Vanilla bean paste adds flecks of real vanilla, or scrape seeds from a pod. The raspberry jam can be swapped for strawberry or apricot, but keep it seedless for a smooth filling. For a nutty twist, fold in toasted pecans or walnuts into the filling. The buttercream needs to be whipped to stiff peaks—if it’s too soft, chill the bowl for 10 minutes. And if you’re short on powdered sugar, granulated sugar blended into a fine powder works in a pinch, though it won’t be as smooth.
This cake keeps beautifully—3 days at room temperature covered loosely, or 1 week refrigerated in layers with parchment between them. Freeze the assembled cake for up to 3 months for special occasions. The frosting can be made 2 days ahead—just whip it again before using. For extra decadence, brush the layers with rum or coffee syrup before assembling. And trust me, the first slice is always the best—save a piece for later!
Why You’ll Love This Recipe
- Here’s what sold me: the balance of rich cocoa and buttery layers, but not so sweet it cloyes. The eggs add structure without heaviness, and that first forkful? Pure chocolate bliss without tasting like dessert.
- I’ll be real: this recipe costs me pennies. Butter, sugar, flour, cocoa—these are ingredients I already have, no specialty trips to the store. And the leftovers? They disappear faster than I can say “seconds, please.”
Step-by-step instructions for decadent 3-Layer chocolate cake
Here’s how to create a rich, fudgy cake with perfectly moist layers and velvety frosting.
Prepare the Cake Batter with Hot Water Trick
Preheat your oven to 350°F and grease three 6-inch round cake pans, then dust them with flour. In a large mixing bowl, beat the 2 cups unsalted butter and 2.5 cups granulated sugar on medium speed until light and fluffy—about 3-4 minutes. This step is crucial for aerating the batter and creating that tender crumb.
Add the 6 whole large eggs, one at a time, beating well after each addition. Mix in the 2 teaspoons vanilla extract, then sift in the 3 cups all-purpose flour, 1 cup unsweetened cocoa powder, 1.5 teaspoons baking powder, and 0.5 teaspoon salt. In a separate bowl, whisk together the 0.5 cup hot water and 1.5 cups dark chocolate chips, then pour this mixture into the batter. Fold gently to combine—don’t overmix or your cake will be dense.
Bake the Layers to Perfect Doneness
Divide the batter evenly among the prepared pans. Bake for 25-30 minutes or until a toothpick inserted into the center comes out clean. The edges should be set, but the top should still look slightly moist—this ensures a fudgy texture. I like to rotate the pans halfway through baking for even cooking.
Let the cakes cool in their pans for 10 minutes before transferring them to a wire rack to cool completely. This gradual cooling prevents cracking. While they cool, prepare your filling and frosting—it’s always best to work with room-temperature components.
Assemble Layers with Raspberry Jam Filling
Once the cakes are completely cool, level the tops if needed using a serrated knife. Place the first layer on a cake stand or plate. Spread ⅓ cup raspberry jam evenly over the top, leaving a ½-inch border for the frosting. Repeat with the second layer, adding another ⅓ cup jam before placing the third layer on top.
For the filling, heat the 1 cup heavy whipping cream in a small saucepan over medium heat until it just begins to simmer. Pour it over the 1 cup raspberry jam in a bowl and whisk until smooth. Let this mixture cool to room temperature before spreading between layers—this ensures it sets properly without making the cake soggy.
Make the Creamy Buttercream Frosting
In a large mixing bowl, beat the remaining 2 cups unsalted butter (softened) until smooth and creamy. Gradually add the 4 cups powdered sugar, mixing on low speed to avoid a cloud of sugar. Add the 0.5 cup whole milk and 2 teaspoons vanilla extract, then beat on high speed for 3-4 minutes until light and fluffy.
Spread about ⅓ of the frosting over the top layer, then carefully frost the sides of the cake. Use a spatula to create smooth, even sides. For extra decoration, press 1.5 cups dark chocolate chips into the sides before the frosting sets. Chill the cake in the refrigerator for 30 minutes before serving to let the frosting firm up slightly.
Pro Tips For Making 3 Layer Chocolate Cake Recipe From Scratch
- Sift That Cocoa: I learned this the hard way—lump-free cocoa powder makes a real difference. Sift it with the flour before mixing, or whisk it into the dry ingredients until smooth. That extra step keeps your layers light, not dense.
- Cream Butter Slowly: Start with room-temperature butter, but don’t rush the creaming. Beat it with sugar on medium speed for 2–3 minutes until it’s pale and fluffy—like peanut butter, not dough. This adds air for a tender crumb.
- Skip the Overmixing: Once you fold in the eggs, stop mixing the second the batter comes together. Overmixing adds gluten and turns your cake into a brick. A few lumps? Doesn’t matter—just bake it.
- Rotate Pans Mid-Bake: Your oven’s hot spots are real, and chocolate cake burns fast. After 20 minutes, swap the pans front to back. This ensures even baking and avoids a dry top or gummy center.
Pro cooking tips for this recipe
Temperature Precision
Baking at 350°F is non-negotiable for this recipe—any hotter and the layers may dry out, any cooler and they won’t set properly. I use an infrared thermometer to verify my oven’s accuracy before starting. If your oven runs hot, reduce to 340°F and check for doneness at 25 minutes.
The hot water trick (mixing cocoa with boiling water) helps dissolve the powder completely, preventing dry spots in the layers. 🌡️
Layer Thickness Matters
Divide the batter evenly into your pans—aim for layers about 1.5 inches thick when baked. Too thick and the center stays underdone; too thin and the cake collapses. I use a kitchen scale to weigh the batter before dividing, ensuring perfect consistency.
For even baking, rotate pans halfway through the 25-30 minute bake time, especially if your oven has hot spots.
Cool Gradually to Prevent Cracks
Let the cakes cool in their pans for 10 minutes before transferring to a wire rack. This slow cooling prevents sudden temperature shifts that cause cracks.
If you’re in a hurry, place the pans on a cooling rack set over a bowl of ice water for 5 minutes—just don’t let them get too cold before removing. I’ve ruined many cakes by rushing this step!
Filling Consistency Secrets
The raspberry jam filling needs to be at room temperature when spread—too cold and it won’t set properly; too warm and it’ll make the cake soggy. For extra stability, mix 1 teaspoon cornstarch into the jam before heating the cream.
This creates a thicker, more cohesive filling that holds up between layers. Let it cool completely before assembling.
Buttercream Whipping Tips
Your mixer speed matters here—beat the buttercream on medium-high speed for the first 2 minutes to incorporate air, then increase to high for the final 2 minutes to reach stiff peaks. If the frosting is too soft, chill the bowl for 10 minutes before whipping again.
For extra shine, add 1 teaspoon lemon juice at the end—it brightens the flavor and gives the frosting a professional sheen. 💫
Assembly Like a Pro
Use a serrated knife to level the cake layers if needed—this creates an even surface for spreading frosting. For a clean look, place parchment paper under each layer before frosting, then slide it out for easy transfer. When frosting the sides, use a bench scraper to smooth the edges.
Press the chocolate chips onto the sides while the frosting is still slightly soft for a secure grip. Chill for 30 minutes before slicing to maintain shape.
Nutrition facts
Frequently asked questions
Can I make this 3-layer cake in a single 9×13-inch pan?
Not recommended for this recipe. The layers need to be 1.5 inches thick when baked for proper texture, and a single pan would make them too thin. If you must use one pan, bake three 6-inch layers separately in the same oven (rotate pans) and assemble afterward. The cake won’t be as tall, but the flavor will be identical.
Why does my chocolate cake turn out dry?
Overbaking or overmixing are the usual culprits. Bake until a toothpick comes out with moist crumbs, not clean. For extra moisture, add 2 tablespoons sour cream or yogurt to the batter. Also, never overmix after adding flour—just fold until combined. The hot water trick helps prevent dry spots from undissolved cocoa.
Can I substitute coffee for the hot water in the batter?
Cold brew or strong coffee adds depth to the chocolate flavor. Use ½ cup brewed coffee cooled to room temperature instead of hot water. For extra richness, add 1 teaspoon instant espresso powder directly to the batter. This works especially well with dark chocolate cocoa powder.
How do I fix cracked cake layers?
Cracks usually happen from rapid cooling or overmixing. For minor cracks, spread extra frosting over them to disguise. For severe cracks, level the tops with a serrated knife before frosting. To prevent cracks next time, let cakes cool in pans for 10 minutes before removing, and avoid opening the oven door during baking.
Can I make this cake gluten-free?
Yes, but with adjustments. Replace the 3 cups all-purpose flour with a 1:1 gluten-free baking flour blend (like Bob’s Red Mill) plus 1 teaspoon xanthan gum. Add 2 tablespoons extra cocoa powder since GF flours absorb more liquid. Expect a slightly denser texture, but the flavor will still be rich and chocolatey.

- 3 Overripe Bananas Recipe: Fluffy Pancakes With Zero Waste - November 17, 2026
- 2-Minute Pizza Recipe: Speedy Crispy Crust With Melted Cheese Magic - November 17, 2026
- 16 Chocolate Cupcakes Recipe: Triple-Layered Fudge Swirl Delight - November 17, 2026