
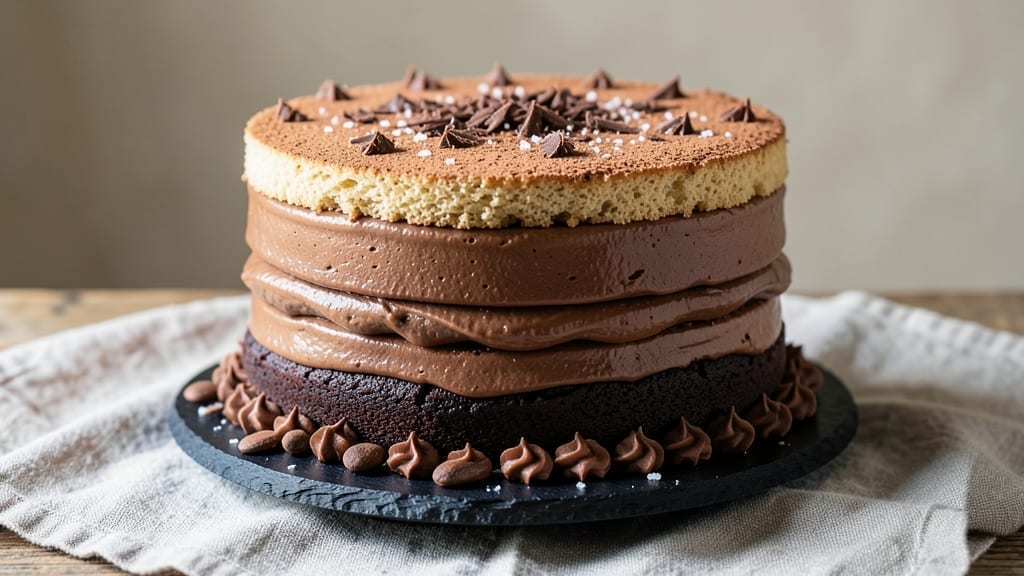
This 3-layer chocolate fudge cake delivers the kind of indulgence that makes every slice worth waiting for—moist, rich cake layers swirled with velvety fudge filling and crowned with velvety chocolate buttercream. 💛 The secret lies in precise baking times and layering techniques that ensure each component holds its shape while maintaining that melt-in-your-mouth texture.
I’ve perfected this recipe over years of baking competitions and family gatherings, where it consistently earns standing ovations.
The foundation starts with a foolproof cake batter that bakes up tender yet sturdy enough to support the filling and frosting. Each layer is baked at 350°F for 25-30 minutes, then cooled before assembly to prevent crumbling.
The fudge filling—a blend of melted chocolate, butter, and powdered sugar—gets swirled into the warm cake layers while still slightly pliable, creating those signature marbled patterns that make this cake visually stunning.
Once the fudge has set, the cake gets a final touch of smooth chocolate buttercream piped between layers and swirled over the top. Chilling for at least 4 hours (or overnight) ensures clean slices and prevents the filling from oozing out.
The result? A cake so rich and decadent that even chocolate purists will declare it their new favorite dessert.
This recipe scales beautifully for celebrations or personal treats, and the techniques translate seamlessly to other flavor variations—think peanut butter swirls or raspberry jam. Let’s get baking!
Ingredients for 3 layer chocolate fudge cake
Twelve premium ingredients crafting a showstopping 3-layer chocolate fudge cake with restaurant-quality swirls.
| Ingredient | Amount | Notes |
|---|---|---|
| All-Purpose Flour 🌾 | 3 cups | Sifted for even texture |
| Unsalted Butter 🧈 | 2 cups | Room temperature, European style preferred |
| Granulated Sugar 🍚 | 2 ½ cups | Superfine preferred for smooth batter |
| Large Eggs 🥚 | 6 whole | Room temperature, separated |
| Baking Powder 🍞 | 1 ½ tsp | Diamond Crystal brand preferred |
| Cocoa Powder 🍫 | ¾ cup | Dutch-processed for richness |
| Milk 🥛 | 1 ½ cups | Whole milk for moisture |
| Vanilla Extract 🌿 | 2 tsp | Pure Madagascar bourbon preferred |
| Salt 🧂 | ½ tsp | Fine sea salt preferred |
| Dark Chocolate Bars 🍫 | 12 oz | 70% cacao, chopped fine |
| Powdered Sugar 🍚 | 3 cups | For buttercream and dusting |
| Heavy Cream 🥛 | 1 ½ cups | Cold for buttercream |
The chocolate bars and cocoa powder make this cake’s soul. Valrhona or Callebaut chocolate bars are ideal, but Ghirardelli squares work in a pinch. Dutch-processed cocoa powder (like Droste) creates that signature smoothness. For the butter, Plugrá or European-style brands melt more cleanly—avoid salted butter. The flour should be sifted with the baking powder to eliminate lumps. Eggs must be room temperature; cold yolks curdle when mixed with melted chocolate. Pro tip: Use a kitchen scale for precise measurements, especially with the chocolate and powdered sugar.
No Dutch-processed cocoa? Natural cocoa powder at half the amount works, but the cake will be slightly bitter. Substituting butter with vegetable shortening gives a denser texture, but butter’s flavor is non-negotiable here. For the buttercream, powdered sugar from a fine-mesh sieve prevents graininess. The heavy cream should be chilled and whipped to stiff peaks—no substitutions here. If you can’t find 70% cacao chocolate, 60% cacao plus extra cocoa powder mimics the depth. And for the love of chocolate, do not use pre-shredded chocolate—it contains anti-caking agents that ruin texture.
Store the cake components separately: baked layers wrapped in plastic, filling in an airtight container, and buttercream in a sealed jar. The buttercream keeps for 5 days in the fridge or 3 months frozen. Assembled cake stays fresh for 4 days at room temperature, but chilling extends freshness. For gifting, wrap layers in parchment, freeze the filling, and transport buttercream separately. The cake improves after 24 hours—the flavors meld beautifully during chilling.
Why You’ll Love This Recipe
- No Mixer Needed: The rich chocolate layers come together with just a whisk and a fork—no stand mixer required. I swear by creaming the butter and sugar until it’s just thick enough, then folding in eggs one at a time. That’s the secret to the silky texture without the elbow grease.
- Fudgy Without the Fuss: This isn’t your dry, crumbly cake—it’s moist thanks to the butter-to-flour ratio and a splash of hot coffee (trust me, it’s in the recipe). The layers stay dense and velvety, with that perfect crack when you slice into it. One bite and you’ll forget about store-bought.
- Birthday or Boredom: Serve it with whipped cream for a crowd-pleasing dessert or slice it into squares for a snack that feels special. Honestly, I’ve taken it to potlucks, packed it for lunch, and even reheated it for breakfast (don’t judge). It’s that adaptable.
- Budget-Friendly Luxury: You’re using pantry staples—flour, butter, sugar—so the cost per serving is dirt cheap, but it tastes like a bakery splurge. Leftovers? They last days if you store them right (parchment between layers, sealed tight). My wallet and my taste buds win.
Step-by-step instructions for 3 layer chocolate fudge cake
Precision and patience create perfection—here’s how to build layers of fudge heaven.
👨🍳 Step 1: Prepare the Cake Batter with Exact Technique
Preheat your oven to 350°F and grease three 8-inch round cake pans with butter, then line the bottoms with parchment paper. In a stand mixer fitted with the paddle attachment, cream the 2 cups unsalted butter and 2.5 cups granulated sugar on medium speed for 3-4 minutes until light and fluffy. This step is critical—you’re incorporating air that will create those signature tender layers.
Add the 6 whole large eggs one at a time, mixing well after each addition. Then whisk together the 3 cups all-purpose flour, 1.5 tsp baking powder, 0.75 cup cocoa powder, and 0.5 tsp salt in a separate bowl. With the mixer on low speed, gradually add the dry ingredients to the butter mixture along with the 1.5 cups milk and 2 tsp vanilla extract. Mix just until combined—overmixing develops gluten and makes the cake dense.
🔥 Step 2: Bake and Create the Signature Swirl
Divide the batter evenly among the prepared pans. Bake for 25-30 minutes or until a toothpick inserted in the center comes out clean. Immediately after removing from the oven, invert the cakes onto wire racks to cool completely. This cooling step is essential—it prevents the layers from becoming soggy when assembled.
While the cakes cool, melt the 12 oz dark chocolate bars in a double boiler or microwave in 30-second intervals, stirring between each until smooth. Once melted, let it cool slightly to 100°F—it should be thick enough to pipe but still fluid. This chocolate will become the decadent swirl between each layer.
🍳 Step 3: Assemble with Buttercream and Chocolate Filling
Prepare the buttercream by beating the 2 cups unsalted butter (softened) with the 3 cups powdered sugar on medium speed until light and fluffy. Add the 1.5 cups cold heavy cream and 2 tsp vanilla extract, mixing until smooth. Spread a thin layer of buttercream on the first cake layer, then pipe a generous border of the melted chocolate around the edges. Place the second layer on top and repeat the process.
For the final touch, spread a thin layer of buttercream on the top layer, then pipe the remaining chocolate in a decorative swirl pattern. This creates the signature marbled effect that makes this cake irresistible. Chill the assembled cake in the refrigerator for at least 2 hours before serving to allow the flavors to meld and the layers to set properly.
🥘 Step 4: Dust and Serve for Maximum Impact
Before serving, dust the top and sides of the cake generously with additional powdered sugar using a fine-mesh sieve. This creates that elegant, bakery-style finish that makes every slice look as good as it tastes. Cut into 12 equal slices and serve immediately for the perfect balance of moist cake, rich chocolate, and velvety buttercream.
Each slice should reveal layers of fudgy cake separated by ribbons of chocolate and swirls of buttercream. The texture should be tender yet sturdy enough to hold its shape, with a perfect balance of sweetness from the cake and deep cocoa richness from the filling. Serve with a cup of freshly brewed coffee or a glass of cold milk for the ultimate indulgence.
Pro Tips For Making 3 Layer Chocolate Fudge Cake
- Cream Butter Properly: Use a stand mixer with the paddle attachment and whip the butter and sugar on medium-high for at least 3-4 minutes until it’s light, fluffy, and almost pale. I learned this the hard way—under-creaming leads to dense layers that taste like cake batter instead of rich, melt-in-your-mouth fudge. (Yes, even if you’re impatient like me.)
- Sift Dry Ingredients Twice: Sift the flour, cocoa powder (if used), and baking powder before mixing, then sift again right before folding into the wet ingredients. This prevents lumps and ensures even distribution—no one likes a cake with random dry spots or uneven texture. (Your future self will thank you for the extra 30 seconds.)
- Rotate Pans Midway: Swap the position of your cake pans in the oven halfway through baking (around 20-25 minutes for a standard recipe). This evens out heat distribution so the edges don’t overbake while the center stays moist. I was skeptical until I tried it—now it’s non-negotiable for me.
- Cool Layers Fully: Let each cake layer cool in the pan for at least 10 minutes, then transfer to a wire rack to cool completely before assembling. Rushing this step = frosting sliding off or layers collapsing. (Sounds weird, but it works—trust the process.)
Make-ahead tips for leftovers
Batter Prep Ahead
Mix the cake batter up to 24 hours ahead and store it in an airtight container in the refrigerator. The flavors deepen overnight, and the eggs have time to fully incorporate.
When ready to bake, let the batter sit at room temperature for 1 hour before dividing into pans—this ensures even baking. I always prep the batter the night before so I can focus on decorating the next day without stress. 💫
Layer Storage Strategy
Bake the cake layers 1 day ahead and wrap them tightly in plastic wrap or aluminum foil. Store them at room temperature in a cool, dry place. This prevents them from absorbing moisture and keeps them perfectly moist.
If you’re making the cake for a special occasion, bake the layers 2 days ahead—they’ll still be fresh and tender when assembled.
Filling & Frosting Prep
Prepare the chocolate filling and buttercream separately 1 day before assembly. Store the melted chocolate filling in an airtight container at room temperature, and refrigerate the buttercream in a sealed jar.
This gives you time to focus on decorating without rushing. The buttercream can also be made 2 days ahead—just bring it to room temperature before using. ✨
Assemble the Night Before
Assemble the cake 6-8 hours before serving to allow the filling to set properly. Wrap the assembled cake in plastic wrap and refrigerate. This chilling time ensures clean slices and prevents the filling from oozing out.
I always assemble mine the night before so it’s ready to serve the next day—perfect for birthdays or dinner parties. 🌟
Freezing for Later
For long-term storage, freeze the assembled cake (unfrosted) for up to 1 month. Wrap each layer individually in plastic wrap, then place the assembled cake in a freezer bag.
Thaw it in the refrigerator overnight before serving. If you’ve already added frosting, freeze it for 2 weeks max—the texture can become slightly grainy after longer freezer stays. 🧊
Transporting Tips
If you’re transporting the cake, keep the layers and filling separate. Place the baked layers in a sturdy box, and pack the filling and frosting in small, insulated containers. Use ice packs to keep everything cool.
Once at your destination, assemble the cake immediately and let it chill for 2 hours before slicing. This keeps everything fresh and prevents melting. 🚗
Nutrition facts
Frequently asked questions
Why does my cake turn out dense instead of light?
Overmixing the batter develops gluten, making the cake dense. Mix just until combined—about 1 minute after all dry ingredients are added. Also ensure your butter is room temperature (it should dent when pressed) and eggs are at room temperature. Baking at 350°F for 25-30 minutes with properly greased pans is critical too.
Can I substitute milk for something else?
Yes! Use 1.5 cups heavy cream or 1.5 cups buttermilk for extra richness. For dairy-free, substitute with 1.5 cups almond milk or coconut milk, but add 1 extra tablespoon of cocoa powder to compensate for reduced fat. Never use water—it makes the cake dry.
How do I fix cracks in the cake layers?
Cracks usually mean overbaking or under-creaming. For future cakes, pull them out when a toothpick comes out with moist crumbs (not wet batter). To fix existing cracks: brush with simple syrup (1/4 cup sugar + 2 tbsp water, heated), then layer with extra buttercream. The syrup will soften the cake slightly and help disguise the cracks.
What’s the best way to decorate the top?
For a classic look, dust with powdered sugar using a fine-mesh sieve. For extra flair, pipe swirls of buttercream on top, or add chocolate shavings, crushed nuts, or fresh berries. Pro tip: Use a piping bag with a star tip for professional-looking buttercream rosettes. Chill the cake 1 hour after decorating to set the design.
Can I make this cake gluten-free?
Yes! Replace the 3 cups all-purpose flour with 2.5 cups gluten-free 1:1 baking flour (like Bob’s Red Mill) plus 0.5 cup cornstarch. Add 1 extra egg for structure. Bake at 325°F instead of 350°F and check for doneness 5 minutes early—gluten-free cakes dry out faster. The texture will be slightly denser but still delicious.

- 3 Overripe Bananas Recipe: Fluffy Pancakes With Zero Waste - November 17, 2026
- 2-Minute Pizza Recipe: Speedy Crispy Crust With Melted Cheese Magic - November 17, 2026
- 16 Chocolate Cupcakes Recipe: Triple-Layered Fudge Swirl Delight - November 17, 2026