
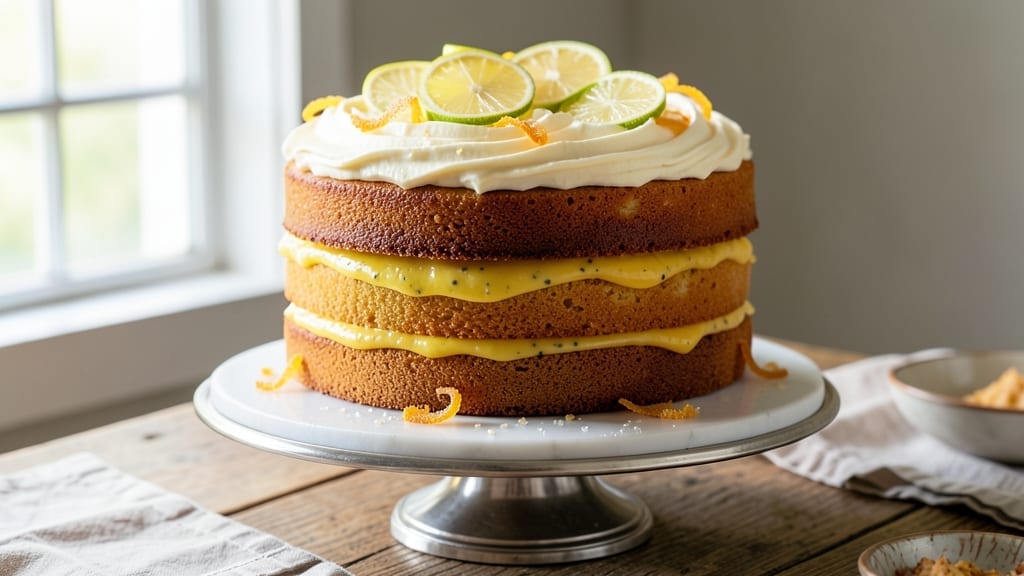
This 3-layer lemon cake recipe delivers a perfect balance of tender sponge, bright lemon curd, and velvety buttercream—every bite is a harmonious blend of zesty and sweet. 💛 The secret lies in baking the layers just golden, filling them with homemade lemon curd for that signature tang, and finishing with a smooth, creamy frosting that ties everything together beautifully.
What sets this recipe apart is the foolproof layering technique—each sponge cake is baked to exact doneness, cooled properly, and stacked with precision to prevent collapsing. The lemon curd isn’t just a filling; it’s the star, adding a vibrant citrus punch that cuts through the richness of the frosting.
This method ensures your cake stays moist for days, making it ideal for celebrations or special occasions.
By the time you’re done, you’ll have a showstopping dessert with crisp edges, tender layers, and a glossy finish that looks as impressive as it tastes. The frosting isn’t just decorative—it’s a flavorful bridge between the lemony layers and the sweetness, creating a texture that’s both light and indulgent.
Serve it with fresh berries or a sprinkle of powdered sugar for extra elegance.
This recipe scales perfectly for gatherings, and the techniques are adaptable—whether you’re baking for a crowd or treating yourself to a classic. Let’s get started on creating a cake that’s as beautiful as it is delicious.
Ingredients for 3 layer lemon cake
Twelve ingredients crafting a showstopping lemon cake with perfect balance of zesty and sweet.
| Ingredient | Amount | Notes |
|---|---|---|
| All-Purpose Flour 🌾 | 3 cups | Sifted for light texture |
| Granulated Sugar 🍚 | 2 ¼ cups | Divided for sponge and curd |
| Unsalted Butter 🧈 | 1 ½ cups | Room temperature, softened |
| Large Eggs 🥚 | 6 whole | Room temperature, separated |
| Fresh Lemon Juice 🍋 | ¾ cup | From 4-5 lemons, freshly squeezed |
| Zest of 2 Lemons 🍋 | 1 tbsp | Fine, bright yellow zest |
| Baking Powder 🧂 | 1 ½ tsp | Aluminum-free preferred |
| Salt 🧂 | ½ tsp | Fine sea salt |
| Whole Milk 🥛 | 1 cup | Room temperature |
| Powdered Sugar 🍚 | 4 cups | For buttercream, sifted |
| Heavy Cream 🥛 | 1 cup | Cold, for buttercream |
| Vanilla Extract 🌿 | 1 tbsp | Pure vanilla bean extract |
| Unsalted Butter 🧈 | 1 cup | Cold, cubed for buttercream |
| Lemon Zest 🍋 | 1 tbsp | Extra for buttercream |
The flour and sugar are your foundation—King Arthur flour or Gold Medal work best for that tender crumb. Butter should be room temperature but not melted—press a thumbprint that holds shape. Eggs? Room temperature separates beautifully, so take them out 30 minutes before baking. For lemon juice, fresh is non-negotiable—bottled won’t give that bright punch. Store-bought zest works, but freshly grated from organic lemons adds vibrant color and deeper flavor. If you’re using a stand mixer, make sure your bowl is ice-cold when whipping egg whites for the sponge.
No fresh lemons? Lemon extract at half the amount is a decent pinch-hitter, but it lacks that fresh citrus aroma. Substituting powdered sugar for granulated in the buttercream? Add 1 tbsp corn syrup to prevent graininess. Buttercream too sweet? Add 1 tbsp lemon juice—it balances beautifully. For the sponge, if you’re at high altitude, reduce baking powder to 1 tsp and add 1 tbsp cornstarch. The baking powder should be aluminum-free—Diamond Crystal is the standard in professional kitchens. Store your vanilla extract in the freezer to preserve its potency—it lasts years this way.
Freshly baked layers cool on wire racks for 1 hour before filling—this prevents soggy bottoms. Lemon curd keeps 5 days in the fridge, but it’s best used within 3 days for peak brightness. Buttercream can be made 2 days ahead and stored in an airtight container; bring to room temperature before using. For transport, wrap the cake in plastic wrap and place in a cake carrier. If you’re making this for a crowd, assemble the cake the morning of—it holds up beautifully for serving later that day.
Why You’ll Love This Recipe
- No Fuss Layers: I swear by this recipe because it’s three layers but feels like one. Just mix the batter, fold in lemon juice, and bake—no piping, no stress. The buttercream? Whipped in minutes with powdered sugar and more lemon zest. Honestly, it’s the kind of cake that makes me feel like a baking pro.
- Zesty Magic: That fresh lemon juice—not bottled—is the star here. It cuts through the richness of the butter, and the layers? Light as air with a crisp crumb. Between us, I’ve never met a lemon cake that balances sweet and tart this perfectly. The eggs add that subtle richness, too.
- Party Ready: Slice it for a brunch spread, stack it for a birthday, or pack it for a potluck. The layers hold up beautifully, and the lemon flavor travels well (yes, even on a Tuesday night). I’ve even dressed it up with berries or whipped cream when I’m feeling fancy—no extra effort, just vibes.
- Budget-Friendly Luxe: All the ingredients are pantry staples—flour, sugar, butter, eggs—and the lemon juice is cheap if you buy in bulk. A single cake feeds six, and leftovers? They last days in the fridge. I’ll be real: it’s the kind of treat that makes me feel fancy without breaking the bank.
Step-by-step instructions for 3 layer lemon cake
Here’s the precise method for building light, citrusy layers and velvety frosting that stays put.
👨🍳 Step 1: Prepare the Lemon Curd and Sponge Batter
First, make the lemon curd by combining ½ cup of the granulated sugar, ½ cup of the unsalted butter, 0.75 cup of the fresh lemon juice, and 1 tbsp of the zest of 2 lemons in a saucepan. Cook over medium heat, whisking constantly, until the mixture thickens enough to coat the back of a spoon (5-7 minutes). Strain through a fine-mesh sieve into a bowl and set aside to cool completely.
In a separate large bowl, whisk together the remaining 1.75 cups granulated sugar, 1 cup unsalted butter, and 6 whole large eggs until pale and fluffy (3-4 minutes). Sift in the 3 cups all-purpose flour, 1.5 tsp baking powder, and 0.5 tsp salt, then gently fold in the 1 cup whole milk and the cooled lemon curd. The batter should be smooth but not overly thick.
🍳 Step 2: Bake the Three Layers
Preheat your oven to 350°F. Divide the batter evenly among three 8-inch round cake pans lined with parchment paper. Bake one layer at a time for 20-25 minutes, until a toothpick inserted in the center comes out clean. Rotate pans halfway through baking for even browning. Let layers cool in pans for 10 minutes before transferring to a wire rack to cool completely.
Here’s the thing—don’t overbake. You want layers that spring back when pressed gently, not dry or crumbly. If the tops brown too quickly, tent with foil after 15 minutes to prevent over-browning while the centers finish baking.
🥘 Step 3: Assemble the Cake with Lemon Buttercream
Beat the 1 cup cold cubed unsalted butter with an electric mixer until creamy (2-3 minutes). Gradually add the 4 cups powdered sugar, 1 tbsp vanilla extract, and 1 cup heavy cream, mixing on medium-high speed until light and fluffy. Fold in the remaining 1 tbsp lemon zest for extra brightness.
Place the first layer on a cake stand or plate. Spread a thin layer of buttercream (¼ cup) over the top, then place the second layer on top. Repeat with the third layer. Frost the entire cake with the remaining buttercream, creating a smooth finish. Chill in the refrigerator for 30 minutes before slicing to set the frosting.
⏰ Step 4: Final Touches and Serving
Once chilled, use a serrated knife to cut the cake into 12 equal slices. For clean cuts, dip the knife in hot water and wipe dry between each slice. Serve at room temperature for the best texture—this lets the flavors meld and the frosting soften slightly.
This cake keeps well in the fridge for 3 days wrapped tightly in plastic. Bring to room temperature before serving for optimal texture. The lemon curd layers will stay moist, and the buttercream will maintain its velvety consistency.
Pro Tips For Making 3 Layer Lemon Cake
- Use Room-Temp Butter: Cold butter creates pockets of steam in the cake, making it dense and gummy. Let that butter sit out for 30-60 minutes until it’s soft but not melted—it should dent when pressed with a finger. (Yes, even if you’re impatient like me, this makes a real difference.)
- Whisk Eggs Until Ribbon Stage: Stop beating those eggs when they hold a slow ribbon when the whisk is lifted—about 2-3 minutes past when they look fully incorporated. Overbeating adds air that collapses during baking, leaving you with flat layers instead of the light, fluffy texture you want.
- Don’t Overmix the Batter: Fold in the dry ingredients just until combined—lumps are better than a tough, rubbery cake. After 30 seconds of mixing, the batter should look like thick pancake batter, not smooth cake batter. (Your future self will thank you.)
- Chill Layers Between Bakes: Let each layer cool for 10 minutes on a wire rack, then refrigerate for 20 minutes before adding the filling. This prevents the buttercream from melting into a soupy mess and keeps the layers from sliding apart when you cut it. (I learned this the hard way—skipping it makes a noticeable difference.)
Pro cooking tips for perfect results
Layering Like a Pro
Start by leveling your cake layers with a serrated knife for even stacking—this prevents wobbling and ensures clean slices. I use a cake leveler from OXO for precision.
Place the first layer on a cake stand or sturdy plate, then spread a thin layer of buttercream (¼ cup) evenly with an offset spatula. This thin layer acts as a glue to hold everything together beautifully. 💛
Temperature Control Secrets
Room temperature ingredients are non-negotiable for this recipe. Butter should be soft enough to leave a thumbprint, but not melted. Eggs should be room temperature when separated to achieve maximum volume in your sponge layers.
I pull eggs from the fridge 30 minutes before baking for best results. The oven should be preheated to 350°F—any hotter and your layers risk drying out.
Lemon Curd Perfection
Your lemon curd should coat the back of a spoon but still move smoothly when stirred—this happens at about 5-7 minutes of constant whisking. Strain it immediately through a fine-mesh sieve to remove any cooked bits that could make your filling grainy.
For extra brightness, I add 1 tbsp fresh lemon juice to the cooled curd before using it in the cake. This keeps the flavor vibrant throughout the layers.
Frosting Consistency
Buttercream should be light and fluffy, not stiff or runny. If it’s too thick, add 1 tsp heavy cream at a time until it reaches the perfect piping consistency. For extra stability, chill the frosting for 15 minutes before assembling the cake.
This helps prevent melting during warm weather. I use a KitchenAid stand mixer with the paddle attachment for the smoothest texture.
Chilling for Stability
Never skip the 30-minute chill in the fridge before slicing. This crucial step lets the frosting set properly and prevents the cake from collapsing. For extra insurance, I place the assembled cake in the fridge for 1 hour if serving in warm weather.
The layers will stay perfectly moist, and the frosting will hold its shape beautifully. 💡
Clean Slices Every Time
For professional-looking slices, dip your serrated knife in hot water and wipe it dry between each cut. This prevents crumbs and gives you clean edges. I find that cutting the cake at room temperature yields the best texture—it’s firm enough to slice cleanly but still tender.
Serve immediately after cutting for the perfect balance of moist layers and creamy frosting.
Nutrition facts
Frequently asked questions
Can I substitute lemon curd with another filling?
You can! For a different twist, try raspberry jam or white chocolate ganache between the layers. Just reduce the amount by 20% compared to the lemon curd recipe—these fillings are denser. If using jam, warm it slightly to make it more spreadable, but never use it hot to avoid melting the buttercream.
Why did my cake layers sink in the middle?
This usually happens when layers aren’t fully cooled before stacking or if the buttercream isn’t thick enough to support them. Always let layers cool completely on a wire rack, and chill the assembled cake for 30 minutes before slicing. For extra stability, add a thin layer of lemon curd between buttercream layers to act as a “glue.”
How do I make this gluten-free?
Replace the 3 cups all-purpose flour with a 1:1 gluten-free baking flour blend like Bob’s Red Mill or King Arthur. Add ½ tsp xanthan gum to help bind the layers. For the buttercream, use a gluten-free powdered sugar substitute. Note that gluten-free cakes often have a slightly denser texture—bake for 2-3 minutes longer to ensure doneness.
Can I bake the layers ahead of time?
Bake layers 1 day ahead and wrap them tightly in plastic wrap. Store at room temperature until ready to assemble. For best results, fill and frost the cake 4 hours before serving—this lets flavors meld. If storing longer than 2 days, refrigerate the assembled cake and bring to room temperature before serving.
What’s the best way to decorate this cake?
Keep it classic with fresh blueberries or raspberries arranged in a circular pattern on top. For elegance, dust with powdered sugar or add a lemon twist garnish by slicing a lemon into thin rounds. For a modern touch, pipe swirls of lemon buttercream around the edges before adding berries. Avoid heavy decorations that could weigh down the frosting.

- 3lb Prime Rib Roast Recipe: Juicy Pink Center Guaranteed in 3 Hours - October 31, 2026
- 5 Spice Cake Recipe: Warmly Spiced Layers With Crunchy Top - October 31, 2026
- 1950’s Macaroni and Cheese Recipe: Nostalgic Creamy Cheese Sauce with Buttery Noodles - October 31, 2026