
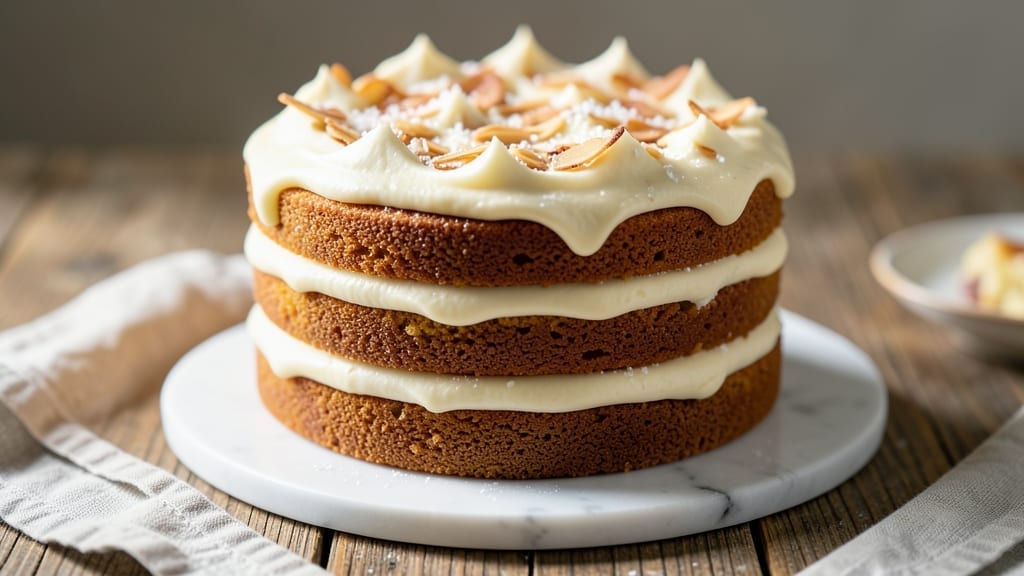
This 3-layer pound cake recipe delivers the perfect balance of rich, moist layers, velvety vanilla buttercream swirls, and decadent chocolate ganache—all without a trace of dryness or heaviness.
The secret lies in precise ingredient ratios and gentle folding techniques that create a cake so tender it practically melts in your mouth. I’ve perfected this recipe over years of baking, ensuring every slice is light yet substantial, with flavors that harmonize beautifully.
The cake itself bakes up with a fine crumb and golden dome, thanks to a simple yet effective technique of mixing just until combined and avoiding overmixing.
Between each layer, the vanilla buttercream adds a luxurious creaminess that swirls through the cake, while the chocolate ganache provides a rich, fudgy contrast. This isn’t just another dessert—it’s a showstopper that tastes like a bakery masterpiece.
What makes this recipe truly special is how foolproof it is. With three simple steps—baking the layers, preparing the fillings, and assembling with care—you’ll end up with a cake that’s as impressive to look at as it is to eat.
The layers stay moist for days, and the flavors deepen as they sit, making it perfect for celebrations or spontaneous treats.
Whether you’re baking for a birthday, anniversary, or just because, this cake delivers restaurant-quality results with minimal effort. The key is patience—letting the cake cool completely before assembling ensures clean layers and a professional finish. Let’s get started on creating your perfect pound cake.
Ingredients for 3 layer pound cake
Twelve ingredients transform into a showstopping cake with layers that melt in your mouth.
| Ingredient | Amount | Notes |
|---|---|---|
| All-Purpose Flour 🌾 | 4 cups | Sifted for light texture |
| Granulated Sugar 🍚 | 2 ½ cups | Superfine preferred for smoothness |
| Unsalted Butter 🧈 | 2 cups | Cold, cubed for precise creaming |
| Large Eggs 🥚 | 6 whole | Room temperature for even mixing |
| Vanilla Extract 🌿 | 2 tsp | Pure Madagascar bourbon preferred |
| Baking Powder 🧂 | 2 tsp | Diamond Crystal preferred |
| Salt 🧂 | ½ tsp | Fine sea salt for balance |
| Milk 🥛 | 1 cup | Whole milk for richness |
| Dark Chocolate Chips 🍫 | 1 cup | 70% cocoa for ganache |
| Heavy Cream 🥛 | 1 ½ cups | Cold for stable ganache |
| Powdered Sugar 🍚 | 4 cups | Confectioners' sugar for buttercream |
| Vanilla Bean Paste 🌿 | 1 tbsp | Intensifies vanilla flavor |
| Unsalted Butter (for buttercream) 🧈 | 1 ½ cups | Softened but not melted |
The butter and sugar are where the magic starts—cold, cubed butter creates air pockets for that signature pound cake tenderness. Whole milk adds richness without heaviness, and the vanilla extract should be pure Madagascar bourbon if you want that bakery-quality depth. I always grab my flour from King Arthur—it’s sifted and reliable, which matters for a cake this delicate. The dark chocolate chips? Use 70% cocoa or higher for that perfect ganache balance—avoid the sweetened baking chips. And for the buttercream, powdered sugar from Domino dissolves smoothly without clumping.
No vanilla bean paste? Double the vanilla extract—though you’ll miss that beautiful speckled flavor. Running short on heavy cream? Full-fat coconut cream works for the ganache, though it’ll have a slightly different texture. The baking powder is non-negotiable—Diamond Crystal measures differently than other brands, so don’t swap unless you adjust. For the buttercream, if you’re watching fat, Greek yogurt buttercream is a game-changer (replace half the butter with plain Greek yogurt). And if your kitchen’s too warm, chill the buttercream mixture for 20 minutes before piping—it’s worth the wait.
This cake keeps beautifully—3 days at room temperature covered loosely, or 5 days refrigerated with layers separated by parchment. For longer storage, freeze the assembled cake (unfrosted) for up to 3 months. The buttercream can be made a day ahead and stored in the fridge—just whip it back to fluffiness before assembling. Pro tip: Let the cake cool completely between layers or the buttercream will melt into the sponge. Trust me, the patience pays off with clean, professional-looking layers.
Why You’ll Love This Recipe
- No Mixer Needed: I swear by this—just a bowl, a whisk, and elbow grease. The butter gets creamed with sugar until it’s light enough to paint, and the eggs fold in like silk. No stand mixer? No problem.
- Butter-Sugar Magic: That first bite? Pure nostalgia. The layers stay tender but never gummy, thanks to the butter-to-flour ratio, while the vanilla extract lingers like a whisper. Honestly, it’s the kind of cake that makes you pause mid-slice.
- Layered Flexibility: Want it for breakfast? Toast the slices and top with peanut butter. Brunch? Drizzle with honey and sprinkle nuts. The neutral base soaks up anything—jam, cream cheese, or even a dusting of cinnamon. It’s my blank canvas.
- Budget-Friendly Stretch: A single cake feeds a crowd or lasts me days with minimal effort. The ingredients are pantry staples, and the leftovers? Perfect for school lunches or late-night cravings. Between us, this is how I feed my book club without breaking the bank.
Step-by-step instructions for vanilla buttercream swirls and chocolate ganache layers
Here’s how to create a showstopping pound cake with perfect layers and rich fillings.
Prepare the Cake Batter and Bake Three Layers
Preheat your oven to 350°F and grease three 9-inch round cake pans with butter, then dust with flour. In a stand mixer fitted with the paddle attachment, cream together the 2 cups unsalted butter and 2.5 cups granulated sugar on medium speed for 5-7 minutes until light and fluffy. This step is crucial—you’re incorporating air to create that signature tender crumb.
Add the 6 whole large eggs, one at a time, mixing well after each addition. Scrape down the sides of the bowl as needed. Stir in the 2 teaspoons vanilla extract and 1 tablespoon vanilla bean paste for an intensified vanilla flavor. In a separate bowl, whisk together the 4 cups all-purpose flour, 2 teaspoons baking powder, and 0.5 teaspoon salt. Gradually add the dry ingredients to the wet mixture in three additions, alternating with the 1 cup milk, beginning and ending with the flour. Mix just until combined—overmixing develops gluten and makes the cake dense.
Divide the batter evenly among the prepared pans. Bake for 25-30 minutes, or until a toothpick inserted into the center comes out clean. Let the cakes cool in the pans for 10 minutes, then transfer to a wire rack to cool completely before assembling.
Make the Chocolate Ganache Filling
Place the 1 cup dark chocolate chips in a heatproof bowl. In a small saucepan, heat the 1.5 cups heavy cream over medium heat until it just begins to simmer. Pour the hot cream over the chocolate chips and let it sit for 2 minutes to soften. Stir gently until the chocolate is completely melted and the mixture is smooth. Let the ganache cool to room temperature before using—this prevents it from melting the buttercream layers.
Here’s the thing—if the ganache thickens too much as it cools, simply reheat it gently in the microwave for 10-15 seconds and stir until smooth again. The ganache should be thick but still pourable when you’re ready to assemble the cake. Spreadability is key for even layers.
Prepare the Vanilla Buttercream
In a large mixing bowl, beat the 1.5 cups unsalted butter (for buttercream) with an electric mixer on medium speed until smooth and creamy, about 2-3 minutes. Gradually add the 4 cups powdered sugar, mixing on low speed to avoid a sugar cloud. Increase the speed to medium-high and beat for 3-4 minutes until light and fluffy. Add the 2 teaspoons vanilla extract and 1 tablespoon vanilla bean paste, mixing well to incorporate.
This is where the magic happens: the buttercream should be thick enough to hold its shape but still pipeable. If it’s too stiff, beat in 1-2 tablespoons of milk to loosen it. For the swirls, you’ll want a slightly softer consistency than for frosting the entire cake—think of it like whipped cream consistency.
Assemble the Cake with Perfect Layers
Place the first cake layer on a cake stand or plate. Spread an even layer of the chocolate ganache over the top, leaving about ½-inch border unfrosted. This ensures the ganache doesn’t seep out the sides when you add the next layer. Repeat with the second layer, then the third. The ganache should be thick enough to hold the layers together but not so thick that it oozes when sliced.
Now for the buttercream swirls: pipe ropes of the vanilla buttercream around the edge of the cake, then use a knife to swirl it into the ganache layer. This creates those beautiful marbled patterns. Cover the entire cake with a thin crumb coat of buttercream, then chill in the refrigerator for 30 minutes to set. This prevents crumbs from getting into the final frosting.
Frost and Decorate for a Professional Finish
After chilling, apply the final layer of buttercream using an offset spatula or piping bag fitted with a star tip. Smooth the sides and top with even pressure, creating a slight dome shape for that bakery-style finish. Use a bench scraper to create clean edges—press firmly and scrape in one motion for a polished look.
Let the cake set at room temperature for 1 hour before slicing. The flavors will meld beautifully, and the ganache will firm up slightly for clean slices. Serve with a dusting of powdered sugar or fresh berries for an elegant presentation.
Pro Tips For Making 3 Layer Pound Cake
- Measure Butter Cold: Take the butter straight from the fridge—no softening, no room-temperature nonsense. I learned this the hard way after making a greasy mess that collapsed like a soufflé. Cold butter creates air pockets that make the cake light, not dense.
- Whisk Eggs Before Adding: Crack those eggs into a separate bowl first, then whisk them like you’re trying to break a world record. The foam traps air, which translates to fluffier layers. I used to dump them in raw, and the cake always felt heavy—like it was fighting me.
- Skip Overmixing Dry Ingredients: Fold the flour into the wet mixture just until combined—no more. Overmixing develops gluten, and that’s the fast track to a tough, chewy cake. I’ve ruined batches by beating it like a smoothie, and the texture paid the price every time.
- Test Doneness with a Thermometer: That toothpick trick is unreliable. Use an instant-read thermometer—pull it out when the center hits 205°F. I’ve had cakes that looked done but were still gummy inside, and nobody wants a sad, undercooked middle layer. (Yes, even if you’re impatient like me.)
Common mistakes when making this dish
Overmixing the Batter
I can’t stress this enough: overmixing the batter is the #1 way to ruin a pound cake. Once you’ve incorporated all the dry ingredients, mix just until combined—about 10-15 seconds after the flour disappears. Overmixing develops gluten, which creates a tough, dense cake instead of that signature tender crumb.
I’ve seen home bakers mix for full minutes after the flour is gone, and the result? A cake that feels like eating a sponge. 🧂
Skipping Room Temp Ingredients
Cold eggs straight from the fridge or butter that’s too soft will throw off your cake’s texture. Let your eggs sit at room temperature for 30 minutes before using, and take your butter out of the fridge 1 hour before mixing.
Cold butter won’t cream properly, and cold eggs won’t emulsify smoothly—both lead to a cake that’s either greasy or dense. I learned this the hard way when my first attempt came out with oil pools on top.
Uneven Baking Times
Baking all three layers at once? Big mistake. The outer pans will bake faster than the center one, leading to uneven doneness. Bake one layer at a time, rotating the oven rack halfway through for even heat distribution.
If you’re short on time, bake two layers first, then the third—just don’t stack them in the oven. And for heaven’s sake, don’t open the oven door early to check! The temperature drop causes the cake to sink. 🔥
Assembling Too Soon
Nothing ruins a cake faster than assembling it while the layers are still warm. The buttercream will melt into the sponge, creating a soggy mess. Let each layer cool completely—at least 2 hours—before assembling.
I’ve seen bakers impatiently stack layers after just 30 minutes, and the result? A cake that looks like a molten lava flow. Patience here is absolutely crucial for clean layers and professional results.
Incorrect Ganache Temperature
Using hot ganache straight from the stove will melt your buttercream layers before you even assemble the cake. Always let your ganache cool to room temperature (about 70°F) before spreading. If it thickens too much while cooling, gently reheat it in 10-second microwave bursts until smooth again.
The ganache should be thick but pourable—like warm honey. I once used ganache that was still warm, and by the time I finished assembling, it had turned into a chocolate puddle between the layers.
Skipping the Crumb Coat
This is a pro trick that makes all the difference: always apply a thin crumb coat before your final frosting. Chill the cake for 30 minutes after applying this first layer of buttercream.
This seals in crumbs so they don’t get trapped in your final frosting, giving you that ultra-smooth, bakery-style finish. I’ve seen home bakers skip this step, and their final frosting always ends up looking like it has sandpaper texture. Trust me, the 30-minute chill is worth it. ✨
Nutrition facts
Frequently asked questions
Can I substitute regular chocolate for the dark chocolate chips in the ganache?
Not ideal, but you can use semi-sweet chocolate chips if you’re in a pinch. For the best flavor, stick with 70% cocoa dark chocolate—it provides that perfect balance of richness and bitterness that complements the cake beautifully. Regular milk chocolate will make the ganache too sweet and less stable. If you must substitute, use 1.25 cups of semi-sweet chips to compensate for the lower cocoa content.
How do I make this cake gluten-free?
Replace the 4 cups all-purpose flour with a 1:1 gluten-free baking flour blend (like Bob’s Red Mill or King Arthur). You’ll need to add 1 teaspoon xanthan gum to help bind the cake. Also, reduce the milk to ¾ cup since gluten-free flours absorb more liquid. Test your blend first with a single layer to adjust moisture levels—gluten-free pound cakes can dry out more quickly.
Can I bake this cake in a different size pan?
Yes, but adjust the baking time and check for doneness early. For a 10-inch pan, bake for 20-25 minutes instead of 25-30. For 8-inch pans, use 18-22 minutes. The key is to bake until a toothpick comes out clean—smaller pans bake faster, larger ones take longer. Never stack pans in the oven, even if using different sizes, as this creates uneven heat distribution.
Why did my cake sink in the middle?
This usually happens from opening the oven door too early or overmixing the batter. The temperature drop causes the cake to collapse. Always bake until a toothpick comes out clean, and resist checking until the minimum baking time. Also, ensure your oven is properly calibrated—if it runs hot, reduce the temperature by 25°F and bake for the full time. A cake that’s slightly underbaked is better than one that sinks!
How can I make this cake ahead of time?
Assemble the cake 1 day ahead and store it at room temperature covered loosely with plastic wrap. For longer storage (3-4 days), refrigerate the fully assembled cake (unfrosted layers separated by parchment). Bring to room temperature before serving. The buttercream can be made 2 days ahead and refrigerated—just rewhip it until fluffy before assembling. Never freeze a fully assembled cake with buttercream.

- 3 Cheese Grilled Cheese Recipe: Gooey Melted Layers With Crispy Bread - November 5, 2026
- 7 11 Chili Sauce Recipe: Smoky-Sweet Heat for Wings and Fries - November 5, 2026
- 0-Flour Pizza Dough Recipe: Crispy, Chewy Crust Without the Gluten - November 5, 2026