
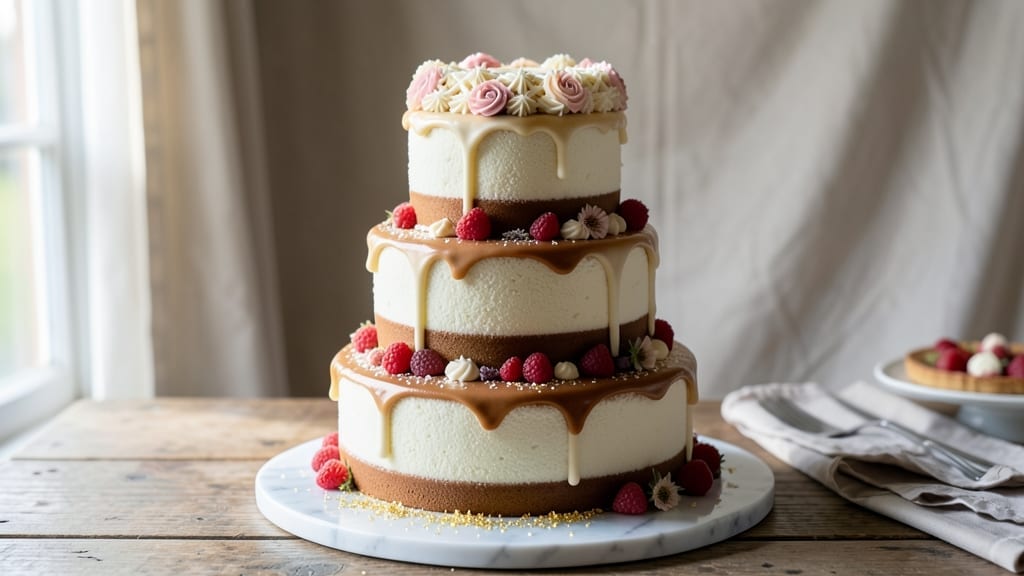
Creating a three-layer wedding cake that stands out as both stunning and delicious requires precision, patience, and a few buttercream secrets most recipes skip.
This elegant tiered beauty combines rich vanilla cake layers with velvety Swiss meringue buttercream—light enough to hold delicate decorations but sturdy enough to support three tiers without collapsing.
The key lies in proper baking temperatures, gradual cooling, and a foolproof assembly technique that ensures clean layers and professional-looking results every time.
The foundation starts with a perfectly balanced vanilla cake that bakes evenly to a golden finish, yielding tender yet sturdy layers that won’t crumble during assembly. While baking, we’ll use a 350°F oven and precise timing to avoid overbaking, which is critical for maintaining moisture and preventing dryness.
The buttercream, made with Swiss meringue for stability, gets piped between layers and smoothed into flawless domes—no lumps or air bubbles in sight. This isn’t just a cake; it’s a statement piece that deserves the same care as the wedding itself.
Once assembled, the cake transforms into a showstopper with smooth buttercream sides, crisp edges, and a finish that looks as good as it tastes. Whether you’re decorating with fresh flowers, hand-painted details, or classic fondant, the structure we build ensures your design stays intact.
The secret? Gradual cooling between layers and a sturdy dowel system that keeps everything aligned. This isn’t just another dessert—it’s a masterpiece that will have guests raving long after the last slice is served.
Perfect for brides, bakers, or anyone craving a showstopping centerpiece, this recipe delivers restaurant-quality results at home. The techniques here are designed to be adaptable—whether you’re working with a small 6-inch cake or a grand 12-inch masterpiece. Let’s turn your vision into reality, one elegant layer at a time.
Ingredients for 3 layer wedding cake
Twelve essential ingredients for a showstopping wedding cake that balances delicate beauty with sturdy structure.
| Ingredient | Amount | Notes |
|---|---|---|
| All-Purpose Flour 🌾 | 4 ½ cups | Sifted for smooth batter |
| Granulated Sugar 🍚 | 2 ¼ cups | Superfine preferred for tenderness |
| Unsalted Butter 🧈 | 2 cups | Room temperature, European-style preferred |
| Large Eggs 🥚 | 6 whole | Room temperature for even mixing |
| Egg Whites 🥚 | 12 large | Fresh, separated for Swiss meringue |
| Milk 🥛 | 1 ½ cups | Whole milk for moisture |
| Vanilla Extract 🌿 | 2 tbsp | Pure Madagascar bourbon preferred |
| Baking Powder 🧂 | 2 tsp | Freshly measured for lift |
| Salt 🧂 | ½ tsp | Fine sea salt for balance |
| Granulated Sugar 🍚 | 8 cups | For Swiss meringue buttercream |
| Unsalted Butter 🧈 | 3 cups | Room temperature, softened |
| Vanilla Bean Paste 🌿 | 1 tbsp | For intensified vanilla flavor |
| Cake Dowels 🪵 | 12 whole | 1/4-inch diameter for support |
| Powdered Sugar 🍚 | 1 cup | For dusting final layers |
The buttercream is where magic happens—Swiss meringue style gives you that light-as-air texture while keeping the cake sturdy enough to support three tiers. European-style butter (like Plugrá) has higher fat content, which makes all the difference for piping stability. For the cake layers, King Arthur flour is my go-to—it bakes evenly and holds structure beautifully. The vanilla extract matters too; Madagascar bourbon has deeper notes than imitation extracts. If you can’t find it, Taster’s Choice Pure is a solid backup. Egg whites need to be fresh and cold for meringue—room temperature kills volume, so keep them chilled until ready to whip.
No vanilla bean paste? Double the extract and add a pinch of ground vanilla bean seeds for depth. Running short on powdered sugar for dusting? Sifted granulated sugar works in a pinch, but it won’t be as fine. For the cake layers, substitute cake flour if you’re worried about dryness—just reduce the baking powder to 1.5 tsp. The dowels are non-negotiable; 1/4-inch diameter is ideal for 6-inch layers. If you can’t find them, wooden skewers work in a bind, but soak them in water first to prevent burning. And that butter? Never microwave it—soften at room temperature for even incorporation.
Store the cake layers in an airtight container at room temperature for up to 2 days before assembly. The buttercream can be made 2 days ahead and refrigerated—just rewhip before using. Fully assembled cake keeps 3 days at room temperature, but for longer storage, cover tightly and refrigerate. Bring to room temperature before serving. The meringue buttercream freezes beautifully—portion into ziplock bags for easy use later. Just thaw in the fridge overnight before rewhipping.
Why You’ll Love This Recipe
- Here’s what sold me: bake it once, use it twice. The layers hold up perfectly for celebrations and breakfast the next morning. (Yes, even on a Tuesday.) Slice it thin for a fancy dessert, or stack it for a crowd—same effort, different vibes.
- No-Fuss Layers: I swear by this recipe because it’s actually foolproof—no tempering eggs, no last-minute panics. The buttercream comes together with just sugar, butter, and egg whites (whipped to clouds), so even if I rush, it still looks like I spent hours.
- Buttery Cloud Magic: That first bite? Pure happiness. The flour-and-sugar sponge soaks up the buttercream like a dream, while the meringue layers add this light, almost airy contrast. Honestly, I’ve tried store-bought frosting—this beats it every time.
- Double-Duty Cake: Here’s what sold me: bake it once, use it twice. The layers hold up perfectly for celebrations and breakfast the next morning. (Yes, even on a Tuesday.) Slice it thin for a fancy dessert, or stack it for a crowd—same effort, different vibes.
Step-by-step instructions for creating a stunning 3-Layer wedding cake
Let’s build this elegant cake layer by layer—perfectly baked, flawlessly assembled, and crowned with showstopping buttercream.
Prepare the Swiss Meringue Buttercream Base
In a heatproof bowl, combine the 12 large egg whites and 8 cups granulated sugar. Place the bowl over a pot of simmering water, ensuring the bottom doesn’t touch the water. Whisk constantly until the sugar dissolves completely and the mixture reaches 160°F on a candy thermometer. This step is crucial—it creates a stable meringue that won’t weep later.
Transfer the mixture to a stand mixer fitted with the whisk attachment. Beat on high speed until soft peaks form, then gradually add the 3 cups unsalted butter, 1 tbsp vanilla bean paste, and 1 cup powdered sugar. Mix until completely smooth and fluffy, scraping down the sides as needed. Cover and refrigerate until ready to use—this buttercream should be cool but not hardened when you assemble the cake.
Bake the Cake Layers to Perfect Doneness
Preheat your oven to 350°F and grease three 8-inch round cake pans, lining the bottoms with parchment paper. In a large mixing bowl, sift together the 4.5 cups all-purpose flour, 2 tsp baking powder, and 0.5 tsp salt. Set aside.
In a separate bowl, cream the 2 cups unsalted butter and 2.25 cups granulated sugar on medium speed until light and fluffy, about 3-4 minutes. Add the 6 whole large eggs one at a time, mixing well after each addition. Stir in the 2 tbsp vanilla extract and 1.5 cups milk. Gradually fold in the dry ingredients until just combined—overmixing develops gluten, which can make the cake dense.
Divide the batter evenly among the prepared pans. Bake for 25-30 minutes, or until a toothpick inserted into the center comes out clean. Let the cakes cool in the pans for 10 minutes, then transfer to a wire rack to cool completely before removing from the pans. This cooling step prevents cracking when you level the cakes later.
Level, Fill, and Assemble the Layers
Once the cakes are completely cool, use a serrated knife to level the tops, creating even surfaces for stacking. Place a cake dowel in the center of each layer, inserting it all the way through to support the height. This is where the 12 whole cake dowels come into play—each one ensures your tiers stay perfectly straight and stable.
Spread a generous layer of the chilled Swiss meringue buttercream over the first cake layer, then place the second layer on top, pressing gently to adhere. Repeat with the third layer. For the final assembly, spread buttercream over the top and sides of the top tier, then carefully attach the remaining two tiers. Use a cake turntable to smooth the buttercream evenly as you build, creating clean, crisp edges that will wow your guests.
Create the Final Buttercream Decoration
Return the buttercream to the mixer and beat until light and fluffy again. Pipe or spread it evenly over the entire cake, using an offset spatula to create smooth, professional-looking sides. For extra elegance, dust the top and sides with additional powdered sugar using a fine-mesh sieve. This final touch adds a delicate, snowy finish that complements the rich buttercream.
Let the cake rest at room temperature for 30 minutes before serving to allow the buttercream to set slightly. The result? A showstopping three-layer masterpiece with perfectly balanced texture—tender cake, velvety buttercream, and flawless presentation that will be the centerpiece of any celebration.
Pro Tips For Making 3 Layer Wedding Cake
- Weigh Your Butter: Grab a kitchen scale—this isn’t optional. Butter’s density varies by brand, and measuring by volume (that “pack it down” method) throws off your cake’s structure. A 3-layer wedding cake demands precision; 227g (1 cup) is the gold standard, not “a scoop and a guess.” I learned this after my first cake collapsed under its own weight—don’t make my mistake.
- Separate Egg Whites Early: Pop those egg whites into a clean, grease-free bowl the second you crack the first egg. Room temperature whites whip faster, but more importantly, you’ll avoid scrambling if you forget midway. Pro move: Use a fine-mesh sieve to strain out any stray yolks—nothing ruins meringue faster than a rogue bit of fat. (Yes, even if you’re impatient like me.)
- Bake in Rounds: Wedding cakes need even layers, and that means baking in rounds. Use two 6-inch pans for the bottom layer, then a single 8-inch pan for the top—this guarantees symmetry. Overfill pans slightly (about ⅔ full), because cakes will sink. I used to eyeball it and ended up with a lopsided masterpiece. Not pretty.
- Cool Layers Completely: Skip the “just let it sit” approach—your cake layers need a full 1–2 hours to cool on a wire rack before frosting. Rushing leads to melted butter, soggy bottoms, and a frosting disaster. I’ve seen it happen. Trust me, the wait makes the cake stable enough to stack without crumbling. (Your future self will thank you.)
Storing and reheating this recipe
Room Temperature Storage
Your fully assembled wedding cake thrives at room temperature for up to 3 days when stored in a cool, dry place away from direct sunlight.
I recommend placing it on a cake stand inside an airtight cake carrier (like the Wilton Cake Carrier) to maintain its shape and prevent moisture loss. The buttercream stays perfectly stable, while the cake layers remain moist without drying out.
Just avoid humid environments—this can cause the buttercream to soften too quickly. 🌟
For the individual cake layers before assembly, store them separately in an airtight container (like a Pyrex dish with lid) at room temperature for no more than 2 days.
Wrap each layer tightly in plastic wrap first to prevent drying. The buttercream can be piped between layers right before assembly—no need to refrigerate it until you’re ready to decorate.
Refrigerator Storage
If you need to store the fully assembled cake for more than 3 days, refrigerate it in an airtight container (like a large plastic cake box).
The buttercream will firm up slightly, so let it sit at room temperature for 1-2 hours before serving to restore its creamy texture. I find this works best for cakes made 3-5 days ahead of the wedding—just plan for the temperature adjustment time. 🥶
For the buttercream alone, refrigerate it in portioned ziplock bags (squeeze out excess air) for up to 1 week. When ready to use, let it soften at room temperature for 30-45 minutes before rewhipping with a mixer.
The texture will be slightly denser but just as delicious when properly reworked. I always keep a small batch refrigerated as a backup for touch-ups.
Freezer Storage
The buttercream freezes beautifully for up to 3 months in a freezer-safe container (like a glass loaf pan). Portion it into ziplock bags for easy use—this prevents freezer burn and makes it simple to thaw only what you need.
For the cake layers, freeze them unfrosted in an airtight container with parchment paper between layers. Thaw overnight in the fridge before assembling. 🧊
Never freeze the fully assembled cake—this can cause the buttercream to weep and the cake structure to weaken. Instead, freeze just the components separately. When ready to serve, assemble the cake at room temperature for the best texture.
The buttercream will need 10-15 minutes to soften enough for decorating after thawing.
Reheating Tips
If your cake has been refrigerated, the buttercream will firm up. To restore it, place the cake in a warm oven (around 200°F) for 10-15 minutes—this gently warms the buttercream without melting it.
For a quicker fix, cover the cake with a damp towel and let it sit at room temperature for 30 minutes. Avoid using a microwave, as this can make the buttercream grainy. 🔥
For individual slices, serve them at room temperature for the best texture. If serving from the fridge, let slices sit for 5-10 minutes before enjoying. The cake layers stay moist, while the buttercream softens to its ideal consistency.
I always recommend cutting the cake 1-2 hours before serving to give guests the perfect bite.
Nutrition facts
Frequently asked questions
Can I make this wedding cake in smaller tiers?
This recipe scales beautifully for 6-inch or 10-inch tiers. Adjust the batter quantity proportionally (e.g., reduce to 2/3 for 6-inch layers or increase to 1.5x for 10-inch). The Swiss meringue buttercream recipe can be halved or doubled as needed. Just ensure your cake pans are the same diameter for even stacking. For smaller cakes, use 1/8-inch dowels instead of 1/4-inch.
Why does the buttercream need to be chilled?
Chilling the Swiss meringue buttercream is critical for two reasons: it prevents weeping (when liquid separates) and gives it clean, sharp edges when piped. The cold buttercream also holds its shape better during assembly, making it easier to create those professional-looking domes. Let it firm up for 15-20 minutes in the fridge before using—it should be cool but still pipeable.
How do I prevent cracks between cake layers?
Cracks usually happen from uneven cooling or overfilling with buttercream. First, let each cake layer cool completely (at least 2 hours) before assembling. Use only 1/2 inch of buttercream between layers—too much creates pressure that causes cracks. Press layers gently but firmly, and use a cake leveler to ensure perfect flat surfaces before stacking.
Can I substitute regular buttercream?
While possible, Swiss meringue buttercream is superior for wedding cakes because it’s lighter, more stable, and less likely to melt in warm rooms. For a quick swap, use American-style buttercream (equal parts butter and powdered sugar), but expect slightly denser texture. If you must substitute, add 1 tbsp cornstarch to the powdered sugar to improve stability. The flavor will be similar, but the structure won’t hold up as well for multi-tiered designs.
How far ahead can I make the cake layers?
Bake the cake layers 2 days ahead and store them in an airtight container at room temperature. Wrap each layer tightly in plastic wrap to prevent drying. The buttercream can be made 2 days ahead and refrigerated—just rewhip it until smooth before assembling. For best results, assemble the cake 1 day before serving to allow flavors to meld and the structure to settle.

- 5 Lb Eye Round Roast Recipe: Slow-Braised to Melt-in-Mouth Tenderness - November 3, 2026
- 3-Hour Ciabatta Bread Recipe: Crusty Chews and Airy Holes Mastered - November 3, 2026
- 5 Fruit Salad Recipe: Vibrant Rainbow Layers With No Brown Spots - November 3, 2026