
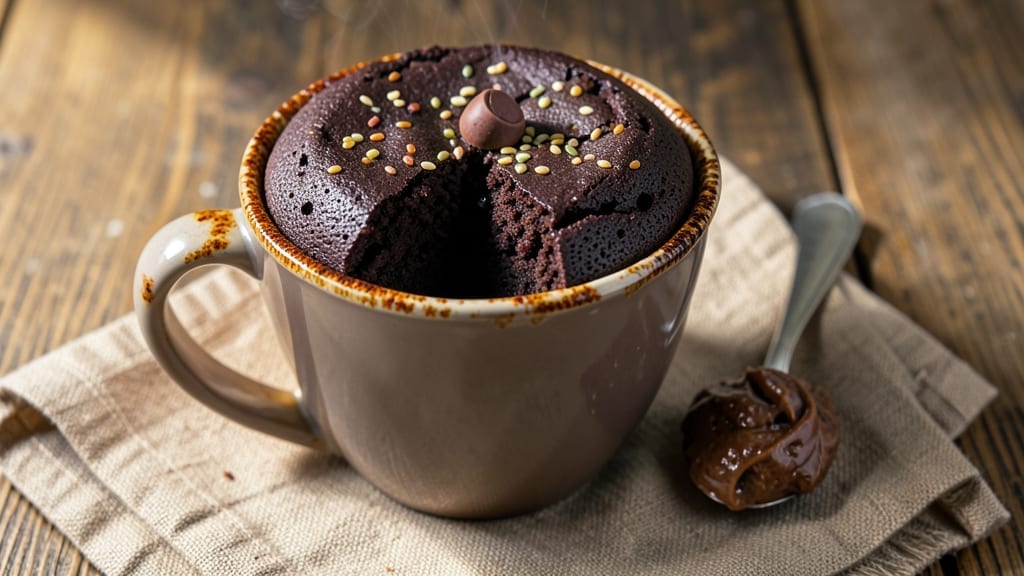
A 3-minute chocolate cake that delivers rich, fudgy layers without an oven? This microwave mug magic recipe is the perfect solution for when chocolate cravings strike and time is tight.
The secret lies in a simple combination of melted chocolate, eggs, and flour that transforms in just minutes—no fancy equipment or baking skills required. I developed this recipe after burning through multiple batches of traditional cake mixes, and this version never fails to impress.
What makes this recipe truly special is its foolproof simplicity—just three ingredients (plus a pinch of salt) come together in under 3 minutes of active time. The microwave does all the work while you wait, creating a dense, moist cake with a crackly top that begs for a fork.
Perfect for satisfying a single serving or doubling for a quick dessert for two, this cake is ideal for busy weeknights, last-minute guests, or when you just can’t wait for the oven to preheat.
The result is a decadent, single-serving treat with a velvety texture and deep chocolate flavor that rivals traditional cakes. The edges stay slightly crispy while the center remains soft and fudgy, making every bite worth the wait.
Best of all, cleanup is minimal—just one mug to wash. This recipe proves that great desserts don’t always require time or effort, just the right technique.
For extra richness, add a dollop of whipped cream or a scoop of vanilla ice cream, or keep it classic with a dusting of powdered sugar. Whether you’re craving chocolate after dinner or need a quick pick-me-up, this 3-minute chocolate cake delivers every time. Let’s get started!
Ingredients for 3 minute chocolate cake
Three ingredients plus a pinch of salt—this mug magic delivers restaurant-quality chocolate cake in minutes.
| Ingredient | Amount | Notes |
|---|---|---|
| Semi-Sweet Chocolate Chips 🍫 | ½ cup | High-quality chocolate for rich flavor |
| Large Eggs 🥚 | 2 whole | Room temperature for best mixing |
| All-Purpose Flour 🌾 | ¼ cup | Sifted for light texture |
| Granulated Sugar 🍚 | ¼ cup | White or light brown preferred |
| Unsalted Butter 🧈 | ¼ cup | Melted, not watery |
| Vanilla Extract 🌸 | 1 tsp | Pure extract, not imitation |
| Salt 🧂 | ⅛ tsp | Fine sea salt preferred |
| Milk 🥛 | ⅛ cup | Any kind works fine |
The chocolate makes or breaks this. Ghirardelli or Ghirardelli-style chips melt perfectly and give that deep, fudgy flavor. Don’t grab the dollar-store bag—it’ll taste like wax. Butter matters too: use unsalted (the salt is already accounted for) and melt it gently. Microwave in 20-second bursts, stirring between each, until just smooth—never let it boil. The eggs? Room temperature mixes better, but if they’re cold, just let them sit out for 10 minutes. Flour? Sift it—this prevents lumps and gives that light, airy texture even though we’re not baking.
No vanilla extract? A pinch of cinnamon adds warmth, though it won’t be the same. Running low on milk? Heavy cream or even water works, but milk’s fat content keeps the cake moist. Sugar substitutes? Maple syrup or agave at half the amount, but texture might get gummy. And if you’re doubling for two servings, use a larger mug—standard coffee mugs hold about 12 oz, but go for 16 oz if you can. Pro tip: Line your mug with parchment paper for easy removal—trust me, the cake sticks otherwise.
This cake is best eaten fresh—right out of the microwave—but if you must wait, it keeps for 2 days in the fridge. Reheat in 10-second bursts to restore that crackly top. Freezing? Slice it first, wrap tightly, and it’ll last 1 month. For extra decadence, dust with powdered sugar or top with whipped cream before serving. And if you’re making this for someone special, add a single chocolate chip on top before microwaving—it’ll melt into a gorgeous glaze.
Why You’ll Love This Recipe
- No Mixing Required: I swear, this cake comes together with just a fork and a bowl—no sifter, no whisk, no stress. You melt the butter and sugar, stir in the eggs, fold in the flour and chocolate chips, then pour. That’s it. Honestly, I’ve made it in my car on road trips (yes, really).
- Fudgy Magic: The secret’s in the melted butter and sugar caramelizing with those semi-sweet chocolate chips—it’s like a molten lava cake in cake form. One bite and you’ll understand why I keep a stash of chocolate chips in my pantry just for this.
- Party in a Mug: Between us, I’ve served this at book club meetings, surprise dessert nights, and even as a “quick fix” for my teenager’s friends. It’s single-serving or batch-friendly, and no one ever guesses it took less time than microwaving a frozen pizza.
- Budget-Friendly Indulgence: You’re using pantry staples here—eggs, flour, butter—and a bag of chocolate chips lasts forever. I’ve made this for under $2 per serving, and it still tastes like a bakery treat. Not the prettiest, but the taste makes up for it every time.
Step-by-step instructions for microwave mug chocolate cake
Here’s how to whip up two perfect single-serving cakes in just minutes—rich, fudgy, and ready when you are!
Melt Butter and Prepare the Mug
Place the 0.25 cup unsalted butter in a microwave-safe mug. Microwave for 20-30 seconds until completely melted—it should be smooth and glossy, not bubbling. While it melts, grab another identical mug for your second cake.
Here’s the thing—this butter isn’t just for flavor, it’s the secret to that tender crumb. If it looks watery after melting, give it 10 more seconds. You want it silky, not greasy. Once melted, set aside and let it cool slightly for 10 seconds—just until it’s warm to the touch but not scalding.
Mix Wet Ingredients for Perfect Texture
To the melted butter, add the 0.25 cup granulated sugar and 1 tsp vanilla extract. Stir vigorously for 10 seconds until the sugar dissolves completely and the mixture becomes bubbly. You’ll see tiny air pockets form—this creates that light, airy texture we’re after.
Next, crack in 1 whole large egg (use a small bowl to avoid shells) and stir for 15 seconds until fully combined. Then add the 0.125 tsp salt and 0.125 cup milk. Mix for another 10 seconds until smooth. The batter should be thin enough to pour easily but thick enough to coat the back of the spoon.
Combine Dry Ingredients for Light Crumb
In a small bowl, whisk together the 0.25 cup all-purpose flour and 0.5 cup semi-sweet chocolate chips. Sift the flour first if you have time—this prevents lumps and gives that perfect cake texture. I know it seems like too much flour, but trust me, it’s exactly what we need for that tender crumb.
Now, gently fold the dry mixture into your wet ingredients using a fork. Be careful not to overmix—just combine until the chocolate chips are evenly distributed. The batter will look thick and streaky, but that’s perfect. Divide the batter evenly between your two prepared mugs, filling each about ¾ full.
Microwave to Golden Perfection
Place both mugs side by side in the microwave. Microwave on high power for 90 seconds. When the timer goes off, you’ll see the cakes puff up dramatically—this is normal! They should look domed with slightly golden edges, but still soft in the center.
Here’s the critical part: don’t open the microwave door immediately. Let the cakes sit for 1 full minute—this resting time lets them set properly. Then, carefully run a knife around the edges to loosen, and invert each cake onto a plate. The chocolate chips should still be gooey inside, and the edges should be just set.
Serve Warm with Your Favorite Toppings
Let the cakes cool for 2 minutes before serving—just enough time for them to firm up slightly but still stay warm. The centers should be fudgy with melted chocolate, while the edges have that perfect cake texture. You can enjoy them plain or add a dollop of whipped cream, a drizzle of chocolate sauce, or a sprinkle of powdered sugar.
Real talk: these cakes are best eaten immediately, but if you must wait, store them at room temperature for up to 2 hours. The texture changes as they cool, so enjoy them warm for that restaurant-quality experience every time!
Pro Tips For Making 3 Minute Chocolate Cake
- MELT BUTTER FULLY: I learned this the hard way—when butter has even one grainy bit, your cake turns out dense instead of fudgy. Use a microwave-safe bowl, heat in 20-second bursts, and stir between each until completely smooth. No thermometer? It’s done when it looks like liquid gold, not a sad, lumpy mess.
- WHISK EGGS LIKE YOUR LIFE DEPENDS ON IT: The recipe says “whisk eggs,” but I’m telling you: go full speed for 30 seconds with a hand mixer. You’re not just mixing—you’re emulsifying that sugar and butter into tiny, airy pockets. Skip this, and your cake will be heavy, not light and airy. (Yes, even if you’re impatient like me.)
- SIFT FLOUR—NO EXCUSES: Dumping flour straight from the bag compacts it, and your cake will taste like cardboard. Sift it directly into the bowl, then give it a quick whisk to break up any clumps. This isn’t the prettiest method, but it’s the thing that matters most for that tender crumb.
- DON’T OVERMIX AFTER FLOUR: As soon as you fold in the flour, stop. One turn of the spoon is all it takes. Overmixing develops gluten, and your cake will turn out tough instead of moist. I used to ignore this, and my cakes always ended up chewy—now I count to three and move on.
Essential equipment for 3 minute chocolate cake
Microwave-Safe Mug
You only need one microwave-safe mug for this recipe, but I always use two identical mugs to make two cakes at once. Look for mugs labeled “microwave-safe”—I recommend Pyrex or CorningWare because they distribute heat evenly and prevent hot spots.
Avoid mugs with metallic trim or decorative patterns that could interfere with microwave performance. A standard 12-ounce coffee mug works perfectly, but if you’re making a larger cake, go for a 16-ounce mug—just adjust the cooking time by 10-15 seconds if needed. 🔥
Mixing Tools
A small mixing bowl and fork or silicone spatula are all you need for combining ingredients. I prefer a silicone spatula because it’s flexible and won’t scratch your mugs.
For cracking eggs, use a small bowl to avoid shells in your batter—trust me, nothing ruins a cake faster than a surprise shell. If you’re making this frequently, a mini whisk comes in handy for sifting flour quickly, but a fork works just fine.
Keep your tools clean and dry to prevent lumps in the batter.
Measuring Tools
Precision matters here! Use a liquid measuring cup for the milk, melted butter, and vanilla extract to ensure accurate measurements.
For dry ingredients like flour, sugar, and chocolate chips, a standard measuring cup and spoon set works, but I love using spoon-and-level technique for flour to avoid packing it down.
A small kitchen scale (if you have one) is ideal for chocolate chips—70 grams is the perfect amount for this recipe. Pro tip: Wipe your measuring spoons between uses to avoid cross-contamination with spices or salt.
Knife and Plate
A small, sharp knife is essential for two tasks: loosening the cake from the mug after microwaving and inverting it onto a plate. I use a serrated knife because it glides through the edges cleanly.
For serving, a heat-resistant plate (like melamine or ceramic) prevents warping from the warm cake. If you’re feeling fancy, line your mug with parchment paper before baking—it makes removal effortless and keeps your mug clean for next time. 💫
Optional Extras
For toppings, keep powdered sugar, whipped cream, or chocolate sauce on hand. A small squeeze bottle makes drizzling chocolate sauce easy, and a pastry brush helps dust powdered sugar evenly.
If you’re adding extra chocolate chips as a garnish, use mini chips (like Enjoy Life brand) so they melt beautifully on top. For storage, a small airtight container keeps leftovers fresh for up to 2 days, though these cakes are best enjoyed fresh out of the microwave!
Nutrition facts
Frequently asked questions
Can I make this chocolate cake in a regular oven?
This recipe is designed specifically for the microwave—it relies on the quick, even heat to create that perfect fudgy texture in just 3 minutes. If you try baking it in a conventional oven, you’ll need to adjust the time and temperature significantly (around 350°F for 15-20 minutes), but the texture won’t be the same. The microwave method creates a unique, melt-in-your-mouth consistency that’s hard to replicate in an oven.
What if I don’t have chocolate chips? Can I use a chocolate bar?
Use a 2-ounce semi-sweet chocolate bar (about 57 grams) instead of chocolate chips. Chop it finely or grate it for even distribution. Dark chocolate works too, but reduce the amount to 1.5 ounces to avoid overpowering the flavor. Just make sure the chocolate is high-quality—this is what gives your cake that rich, decadent taste.
Why does my cake come out too dense or dry?
Overmixing or using cold ingredients are the most common culprits. Stir the batter just until combined—don’t overwork it. Also, ensure your eggs and butter are at room temperature (not cold). If the cake still turns out dry, try adding 1 extra tablespoon of milk to the batter. The microwave can dry out edges quickly, so always cover the mug loosely with a paper towel during cooking to help retain moisture.
Can I make this cake gluten-free?
Yes! Replace the 0.25 cup all-purpose flour with 0.25 cup gluten-free 1:1 baking flour (like Bob’s Red Mill or King Arthur). For best results, also add 0.5 teaspoon xanthan gum to help bind the texture. The cake will still be tender but slightly denser than the original. Test with a small batch first to adjust the texture to your preference.
How do I make this recipe for just one serving?
Halve all ingredients: use 0.25 cup chocolate chips, 1 large egg, 0.125 cup flour, 0.125 cup sugar, 0.125 cup butter, 0.5 tsp vanilla, 0.06 tsp salt, and 0.06 cup milk. Cook in a small microwave-safe ramekin (about 6-8 ounces) for 60-75 seconds instead of 90. The smaller volume cooks faster, so watch closely to avoid overcooking.

- 3lb Prime Rib Roast Recipe: Juicy Pink Center Guaranteed in 3 Hours - October 31, 2026
- 5 Spice Cake Recipe: Warmly Spiced Layers With Crunchy Top - October 31, 2026
- 1950’s Macaroni and Cheese Recipe: Nostalgic Creamy Cheese Sauce with Buttery Noodles - October 31, 2026