
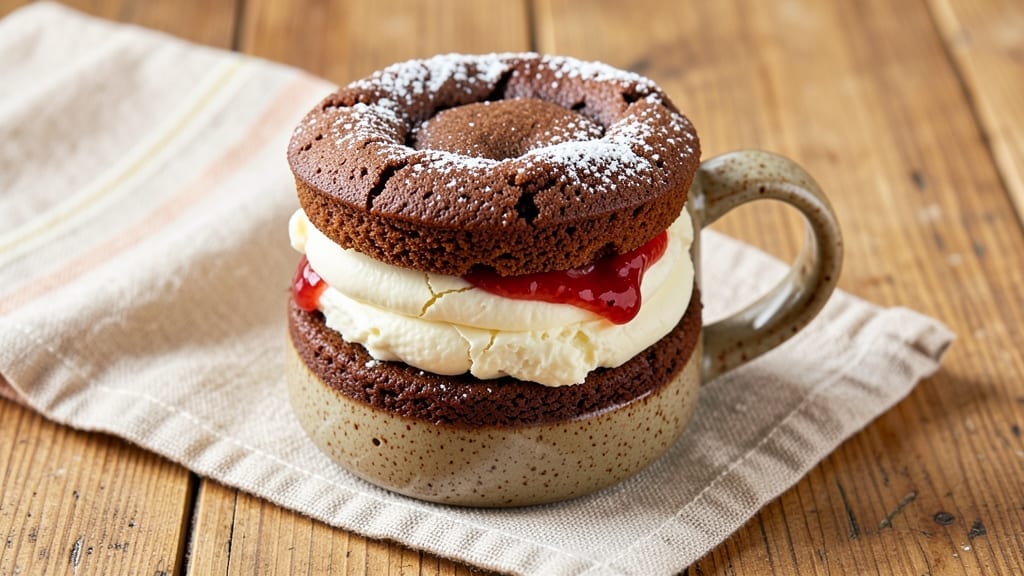
When you crave something sweet but don’t want to wait for an oven, these 3 microwave mug cake recipes deliver restaurant-worthy dessert in just 3 minutes.
No mixing bowls, no mess—just stir, microwave, and enjoy. I perfected these after burning through countless mug cakes (yes, really), and now they’re foolproof every time.
Each recipe uses simple pantry staples and requires under 5 minutes of active time, making them perfect for late-night cravings or quick treats.
Whether you’re in the mood for rich chocolate, buttery vanilla, or something fruity, these mug cakes are customizable—add sprinkles, chocolate chips, or a dollop of whipped cream for extra indulgence.
The secret to perfect texture is folding dry ingredients into wet ones just until combined, then microwaving at the right power level (600-700 watts works best). No overmixing, no waiting for the oven to heat—just pure, gooey satisfaction in minutes.
These are the kind of desserts that make you forget you’re eating alone.
Best of all, they’re versatile—gluten-free, vegan, or classic, depending on your mix-ins. Serve warm with ice cream or enjoy them straight from the mug. Let’s get baking—no oven required!
Ingredients for 3 recipe mug cake
Three decadent mug cake recipes using just 13 simple ingredients for instant dessert magic.
| Ingredient | Amount | Notes |
|---|---|---|
| All-Purpose Flour 🌾 | ⅓ cup | Sifted for lighter texture |
| Granulated Sugar 🍚 | ¼ cup | White or brown for variation |
| Unsalted Butter 🧈 | 0.05 cup | Cold, cubed for better mixing |
| Milk 🥛 | ⅛ cup | Any kind works (dairy or plant-based) |
| Vanilla Extract 🌿 | ½ tsp | Pure extract preferred |
| Baking Powder 🧂 | ¼ tsp | Aluminum-free for best rise |
| Salt 🧂 | ⅛ tsp | Fine sea salt preferred |
| Cocoa Powder 🍫 | 0.03 cup | Natural or Dutch-processed |
| Mini Chocolate Chips 🍫 | ⅛ cup | Enjoy Life brand for allergies |
| Strawberries 🍓 | ¼ cup | Fresh or frozen, diced |
| Lemon Zest 🍋 | ½ tsp | Freshly grated for brightness |
| Powdered Sugar 🍚 | 1 tbsp | For dusting finished cake |
| Whipped Cream 🍦 | ¼ cup | Optional topping |
The flour and sugar are your base, so grab King Arthur flour if you can—it’s lighter and gives that perfect crumb. For the butter, Land O’Lakes unsalted is my go-to because it’s consistently reliable, but any cold, cubed butter works. The cocoa powder makes all the difference for chocolate lovers—Ghirardelli natural cocoa is worth the splurge, but Hershey’s works in a pinch. Strawberries? Trader Joe’s frozen diced berries are a lifesaver when fresh ones are expensive or out of season. And that vanilla extract? Pure, not imitation—trust me, you’ll taste the difference.
No cocoa powder? Melted dark chocolate (1 oz) plus 1 tbsp cocoa powder works perfectly. Swap the strawberries for raspberries or blueberries—any fruit that holds its shape when microwaved. Running low on butter? Coconut oil or vegan butter gives the same richness. The baking powder is non-negotiable—it’s what makes these cakes rise. No powdered sugar? Granulated sugar tossed with a pinch of cornstarch mimics the texture. And if you’re making all three flavors, double the dry ingredients and split them into separate mugs before adding wet mix-ins.
Store dry ingredients in airtight containers for up to 6 months, and keep butter refrigerated until ready to use. Fresh strawberries last 3-4 days in the fridge, but frozen berries keep for 12 months—perfect for quick treats. These cakes are best eaten immediately, but leftovers reheat beautifully in 10-second microwave bursts. Pro tip: Line your mug with parchment paper for easy removal, and always microwave on high for 600-700 watts for consistent results.
Why You’ll Love This Recipe
- No Mixer Needed: I swear by this—just fold the flour into melted butter and milk with a fork. No electric beaters, no sticky mess, and no waiting for the mixer to heat up. The batter comes together smoother than I expected, and honestly? It’s the little things that win.
- Vanilla Butter Magic: That single teaspoon of vanilla extract and a pat of real butter in the batter makes all the difference. It’s not just sweet—it’s got this warm, buttery depth that tastes like a bakery treat, not a microwave hack. (Yes, even on a Tuesday night.)
- Three Cakes, One Bowl: Three different flavors, one bowl of batter—vanilla, chocolate, lemon. I make them all at once in the microwave, and suddenly I’ve got dessert, breakfast, or a snack covered without extra effort. My kids pick their favorite, but I sneak bites of all three.
- Pantry Staple Power: Flour, sugar, butter, milk—stuff I already have. No weird ingredients, no last-minute grocery runs. And if I make extra batter? It keeps for days in the fridge, ready for whenever a craving hits. Budget-friendly doesn’t get much simpler than this.
Step-by-step instructions for microwave mug cake
Here’s how to transform simple ingredients into a luscious, single-serving cake in minutes.
Prepare the Dry Ingredients
In a microwave-safe mug, whisk together the 0.33 cup all-purpose flour, 0.25 cup granulated sugar, 0.25 tsp baking powder, and 0.125 tsp salt. I like to use a fork for this step—it creates small air pockets that help the cake rise beautifully. Sift the 0.03 cup cocoa powder into the dry mixture and stir until completely combined and no streaks remain.
Next, fold in the 0.125 cup mini chocolate chips and 0.25 cup strawberries. Be gentle here—you don’t want to break up the strawberries too much. If using frozen strawberries, let them sit at room temperature for 2-3 minutes first so they don’t release excess moisture into your batter. This step ensures every bite has those delightful pockets of chocolate and fruity surprises.
Mix the Wet Ingredients
In a small bowl, melt the 0.05 cup unsalted butter in the microwave for 15-20 seconds until completely liquid. Stir in the 0.125 cup milk, 0.5 tsp vanilla extract, and 0.5 tsp lemon zest. The lemon zest adds a bright, citrusy note that cuts through the richness of the chocolate beautifully. Mix until smooth—you should have a creamy, pale yellow mixture with tiny flecks of zest.
Pour the wet ingredients into the mug with dry ingredients and stir vigorously with a fork for 30 seconds. You want to fully incorporate everything until you have a smooth, thick batter that coats the back of the spoon. The batter should be slightly lumpy—don’t worry, that’s normal for mug cakes. If it looks too thick, add 1 teaspoon of milk to loosen it slightly.
Microwave to Golden Perfection
Place the mug in the microwave and cook on high power (100%) for 60 seconds. The cake will rise dramatically during this time—you’ll see it puff up and develop a slightly domed top. After the first minute, let it rest for 15 seconds to allow the heat to distribute evenly. This resting period is crucial—it prevents the cake from sinking in the middle.
Microwave for another 45-60 seconds until the cake is deep golden brown at the edges and a toothpick inserted in the center comes out with just a few moist crumbs (not wet batter). Overcooking here will make the cake dry, so watch carefully. The center should still look slightly underdone—it continues cooking as it rests. If the top browns too quickly, loosely cover the mug with a paper towel during the second cooking interval.
Finish and Serve Immediately
Remove the mug cake from the microwave and let it cool for 1 minute—this prevents the powdered sugar from melting into the cake. Dust the top generously with 1 tablespoon powdered sugar using a fine-mesh sieve. The sugar will melt slightly from the residual heat, creating that beautiful, snowy finish you see on bakery cakes.
For the final touch, top with 0.25 cup whipped cream and any additional strawberries if desired. Serve immediately while warm for the ultimate experience—each bite should be moist, rich with chocolate flavor, and brightened by the citrusy strawberries. The contrast of warm cake with cool whipped cream makes this dessert truly special.
Pro Tips For Making 3 Recipe Mug Cake
- MEASURE THE BUTTER COLD: Grab that butter straight from the fridge—no softening needed. Melted butter makes the batter too thin, and you’ll end up with a dense, gummy cake instead of that perfect, tender crumb. Just cut it into small cubes and let the microwave do the work in 10-second bursts.
- STIR UNTIL SMOOTH: Don’t just give it a half-hearted mix. Whisk the flour, sugar, and milk together vigorously until the batter looks like wet pancake batter with no lumps. I learned this the hard way—lumpy batter means a cake with dry spots, and nobody wants that.
- USE A MICROWAVE-SAFE MUG: Not all mugs are created equal. If your mug is too thick or has weird ridges, your cake will cook unevenly—or worse, crack. Stick to a standard ceramic mug (like a 12-ounce travel mug) and avoid glass, which can cause hot spots.
- LET IT REST AFTER MICROWAVING: The second you open the microwave, your cake will look underdone. That’s normal. Let it sit for 2 full minutes before digging in—it firms up as it cools. I used to cut into it immediately and always ended up with a gooey mess. Patience pays off.
Make-ahead tips for this recipe
Pre-Mix Dry Ingredients
Combine all dry ingredients—0.33 cup flour, 0.25 cup sugar, 0.25 tsp baking powder, and 0.125 tsp salt—in a ziplock bag or airtight container for up to 2 weeks. This saves time when cravings strike!
For the chocolate version, add 0.03 cup cocoa powder to the dry mix. I like to portion the dry ingredients into small reusable containers (like OXO Pop pop containers) for each mug cake flavor—just grab and go. 💛
Prep Wet Mixes Ahead
Make the wet mix—0.05 cup melted butter, 0.125 cup milk, and 0.5 tsp vanilla—and store it in a small glass jar in the fridge for 3 days.
For the strawberry version, blend 0.25 cup diced strawberries with 0.5 tsp lemon zest and freeze in ice cube trays for easy portioning. Thaw cubes for 2 minutes before using. This keeps your fruit fresh and ready to fold into batter. ✨
Freeze Assembled Mugs
Mix your batter completely, pour into a greased mug, and freeze for 1 hour before microwaving. When ready, microwave at 600-700 watts for 90-120 seconds—the cold batter prevents overcooking and ensures a perfect rise.
I keep a stack of prepped mugs in a freezer-safe bag labeled by flavor. Just grab one, microwave, and enjoy! ❄️
Reheat Leftovers
Store baked mug cakes in an airtight container for 2 days. Reheat slices in the microwave for 10-15 seconds with a damp paper towel to restore moisture.
For extra decadence, sprinkle with powdered sugar or chocolate chips before reheating. I always save a portion for breakfast—warm mug cake with whipped cream is a game-changer! 🍦
Batch Prep for Parties
Double the recipe and divide batter evenly among 6 mugs. Microwave each for 75-90 seconds (adjust based on your microwave’s power). Keep cakes warm in a 200°F oven for up to 30 minutes while you finish baking.
This is perfect for last-minute dessert parties—just pop them in the oven and serve! 🎉
Customize Toppings
Prep toppings in advance: Melt chocolate chips for drizzling, whip cream cheese for a tangy twist, or chop nuts for crunch. Store toppings in small jars with lids for easy access. I keep a mini fridge in my kitchen stocked with these—ready to elevate any mug cake in seconds! 🌟
Nutrition facts
Frequently asked questions
Can I make mug cakes without eggs?
These recipes work perfectly without eggs. For binding, simply add 1 tablespoon of applesauce or 1 tablespoon of yogurt (dairy or plant-based) to the wet ingredients. The texture will be just as moist and delicious—no one will notice the difference!
Why did my mug cake sink in the middle?
This usually happens when the batter is overmixed or microwaved too long. Always stir just until combined (about 30 seconds), and check for doneness at 60 seconds—the center should still look slightly undercooked. If your microwave is powerful, reduce time by 10-15 seconds and let it finish cooking while resting.
Can I use a regular mug instead of a microwave-safe one?
Never use regular ceramic or glass mugs—they can crack under microwave heat. Always choose a mug labeled “microwave-safe.” If you’re unsure, test it first with a splash of water for 30 seconds. For extra safety, place the mug on a microwave-safe plate to catch any potential drips.
How do I adjust these for gluten-free baking?
Swap the all-purpose flour for a 1:1 gluten-free flour blend (like Bob’s Red Mill) and add 0.5 teaspoon of xanthan gum to the dry ingredients. The texture will be slightly denser but still delicious. For best results, use a dedicated gluten-free measuring cup to avoid compaction.
Can I make these mug cakes ahead of time?
Yes! Assemble the batter in mugs, cover tightly with plastic wrap, and refrigerate for up to 24 hours. When ready, microwave for 75-90 seconds (add 15 seconds if cold). For longer storage, freeze batter-filled mugs for 1 month—thaw in the fridge overnight before microwaving.

- 3lb Prime Rib Roast Recipe: Juicy Pink Center Guaranteed in 3 Hours - October 31, 2026
- 5 Spice Cake Recipe: Warmly Spiced Layers With Crunchy Top - October 31, 2026
- 1950’s Macaroni and Cheese Recipe: Nostalgic Creamy Cheese Sauce with Buttery Noodles - October 31, 2026