
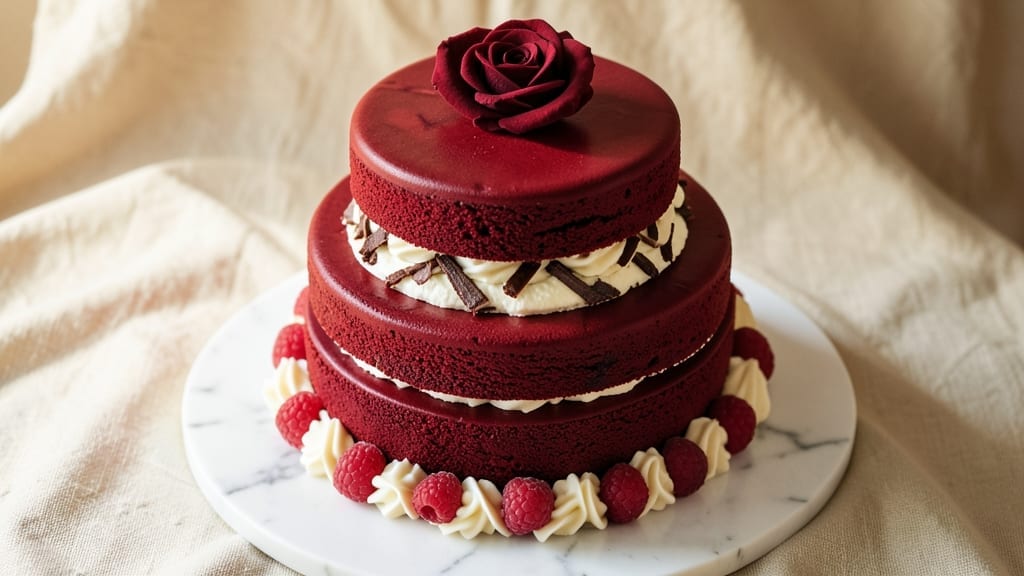
This 3-tier red velvet cake recipe delivers the perfect balance of moist, tender layers and velvety cream cheese frosting that’s become a classic for celebrations.
The secret lies in precise baking techniques—like using buttermilk for that signature tang and cake flour for a delicate crumb—that transform this dessert into a showstopper.
Every slice reveals layers of rich cocoa depth and subtle vanilla notes, making it a crowd-pleaser for birthdays, weddings, or any occasion that calls for something truly special.
The foolproof method ensures stability with dowels and careful layering, so your cake stands tall and elegant. We’ll cover everything from baking three perfect tiers to creating a smooth, pipeable frosting that clings beautifully.
Whether you’re a seasoned baker or tackling this for the first time, the step-by-step instructions make the process manageable—and the results undeniably impressive.
What makes this recipe stand out is the creamy texture that stays moist for days, thanks to a simple trick with sour cream in the batter. The frosting, a perfect marriage of tangy cream cheese and sweet buttercream, adds that signature red velvet flair.
Each tier is designed to complement the others, creating a harmonious dessert that’s as delicious as it is visually stunning.
Ready to elevate your baking game? This cake isn’t just about layers—it’s about mastering the art of balance, from the precise measurements to the careful assembly.
Whether you’re going traditional or exploring vegan adaptations, the result is always a masterpiece worth every effort. Let’s get started on creating your showstopping centerpiece.
Ingredients for 3 tier red velvet cake
These carefully chosen ingredients create the perfect balance of moist crumb and velvety cream cheese frosting for your showstopping 3-tier red velvet cake.
| Ingredient | Amount | Notes |
|---|---|---|
| All-Purpose Flour 🌾 | 3 ½ cups | Sifted for lightness |
| Cake Flour 🌾 | ½ cup | For tender crumb texture |
| Granulated Sugar 🍚 | 2 ½ cups | Superfine preferred |
| Light Brown Sugar 🍚 | ½ cup | Packed for moisture |
| Unsalted Butter 🧈 | 1 ½ cups | Room temperature, cubed |
| Large Eggs 🥚 | 4 whole | Room temperature for even baking |
| Buttermilk 🥛 | 1 ½ cups | Room temperature |
| Red Food Coloring 🎨 | 1 tsp | Gel-based for vibrant color |
| Vanilla Extract 🌿 | 2 tsp | Pure, high-quality |
| Cocoa Powder 🍫 | ½ cup | Dutch-processed for smoothness |
| Sour Cream 🥛 | ½ cup | Full-fat for moisture |
| Baking Soda 🧂 | 1 ½ tsp | Freshly opened |
| Salt 🧂 | ½ tsp | Fine sea salt |
| Cream Cheese 🧀 | 16 oz | Room temperature, full-fat |
| Powdered Sugar 🍚 | 4 cups | For smooth frosting |
| Heavy Cream 🥛 | 1 cup | Cold for whipping |
| Vanilla Bean Paste 🌿 | 1 tbsp | For authentic vanilla flavor |
The secret to that signature moist crumb lies in the buttermilk and sour cream—both work together to keep this cake tender for days. For the flour, King Arthur brand is my go-to for reliability, but any high-quality all-purpose will work. The Dutch-processed cocoa powder is non-negotiable here—it dissolves smoothly without bitterness. Grab the Wilton brand gel food coloring if you want vibrant red layers without altering the texture. And don’t skip the vanilla bean paste—it adds depth that regular extract can’t match. Pro tip: measure your dry ingredients by weight if you have a kitchen scale—it ensures perfect consistency every time.
No buttermilk? Mix 1 cup milk with 1 tbsp vinegar or lemon juice and let it sit for 5 minutes. Running short on sour cream? Plain Greek yogurt works in a pinch (use the same amount). For the frosting, cream cheese brands vary in fat content—Philadelphia Original is the most reliable for this recipe. If you can’t find powdered sugar, blend granulated sugar in a food processor for a few seconds. The heavy cream needs to be cold when you whip it—this is the only time you want it straight from the fridge. And if you’re worried about color intensity, add the food coloring to the wet ingredients first—it blends more evenly.
Store cake layers wrapped tightly in plastic wrap at room temperature for up to 2 days—this keeps them perfectly moist. The frosting can be made 2 days ahead and stored in the fridge, then whipped back to smoothness with a hand mixer. For the full experience, assemble the cake the day of serving so the frosting sets properly. If you’re prepping ahead, freeze the unfrosted layers for up to 1 month—thaw at room temperature before decorating. And remember: dowels are your best friend for that perfect multi-tiered presentation—use wooden skewers or cake dowels available at any baking supply store.
Why You’ll Love This Recipe
- No Stand Mixer Needed: I’ll be real—this cake only calls for a whisk and a bowl. The buttercream comes together with just a hand mixer (or even a fork in a pinch), and the layers? A spatula and steady hands do the trick. No fancy tools, no stress.
- Velvet Magic: That deep cocoa-butter combo? It’s next-level. The brown sugar keeps it moist while the cake flour gives it that signature tender crumb—no dryness, no heaviness. Honestly, the first time I bit into a slice, I immediately texted my mom, “You have to try this.”
- Party Ready: Three tiers mean you can dress it up for birthdays, weddings, or just because. Between us, I’ve used the leftovers for breakfast sandwiches (trust me, it’s genius) and my book club adores the mini slices for potlucks. It’s the one dessert that works for every celebration.
- Budget-Friendly Luxury: All-purpose flour and butter make this a steal—no specialty ingredients, no markup. I’ve made this twice in a month for my kid’s soccer team fundraisers, and the PTA still asks for seconds. Plus, the leftovers? They disappear faster than I can say “frosting.”
Step-by-step instructions for creating a three-tiered red velvet cake
Here’s how to build a showstopping red velvet masterpiece with perfectly moist layers and velvety frosting.
Prepare the Cake Batter for Maximum Moisture
Preheat your oven to 350°F and grease three 8-inch round cake pans, lining the bottoms with parchment paper. In a medium bowl, whisk together the 3.5 cups all-purpose flour, 0.5 cup cake flour, 1.5 tsp baking soda, and 0.5 tsp salt. Sift this dry mixture directly into a large mixing bowl to aerate it thoroughly.
In a separate large bowl, cream together the 1.5 cups unsalted butter and 2.5 cups granulated sugar on medium speed until light and fluffy—about 3-4 minutes. Add the 4 whole large eggs one at a time, mixing well after each addition. The mixture should nearly double in volume and become pale.
Here’s the secret to that signature moisture: in a small bowl, whisk together the 1.5 cups buttermilk, 0.5 cup sour cream, 1 tsp red food coloring, 2 tsp vanilla extract, and 0.5 cup cocoa powder until completely smooth. With the mixer on low speed, gradually add this wet mixture to the butter-sugar mixture, alternating with the sifted dry ingredients. Begin and end with the wet mixture to ensure even distribution.
Bake the Layers to Perfect Doneness
Divide the batter evenly among the prepared cake pans, filling each about two-thirds full. Tap the pans gently on the counter to remove any air bubbles. Bake for 25-30 minutes or until a toothpick inserted into the center comes out clean. The cakes should spring back gently when pressed in the center.
I’ve found that removing the cakes from the oven just as they begin to pull away from the sides of the pans gives the best results. Let them cool in their pans for 10 minutes before transferring to a wire rack to cool completely. This gradual cooling prevents cracking as they set.
While the cakes cool, prepare your work surface by lining it with parchment paper. You’ll want to level the tops of each cake once they’re completely cool to ensure even layers. Use a serrated knife and a ruler to trim any domed tops, creating perfectly flat surfaces for stacking.
Create the Cream Cheese Frosting Foundation
In the bowl of a stand mixer fitted with the paddle attachment, beat the 16 oz cream cheese on medium speed until completely smooth and free of lumps—about 2-3 minutes. This step is crucial for achieving that silky, velvety texture that makes red velvet frosting so special.
Gradually add the 4 cups powdered sugar and mix on low speed until combined. Then increase the speed to medium and beat for another 2-3 minutes until the frosting is light and airy. Scrape down the sides of the bowl as needed to ensure even mixing.
In a small bowl, whip together the 1 cup heavy cream and 1 tbsp vanilla bean paste until soft peaks form. Gently fold this whipped cream mixture into the cream cheese frosting using a spatula, being careful not to deflate the airiness you’ve just created. The frosting should be thick but spreadable—if it’s too stiff, add 1-2 tablespoons milk or buttermilk to reach the perfect consistency.
Assemble the Three-Tiered Cake
Place the first cake layer on your prepared cake stand or dowel. Using an offset spatula, spread a generous layer of frosting over the top, extending slightly over the edges. This “crumb coat” is essential for preventing crumbs from getting into your final frosting layer.
Place the second cake layer on top and repeat the process, spreading frosting and creating another crumb coat. Chill the partially assembled cake in the refrigerator for 15-20 minutes to help the frosting set slightly. This makes the final assembly much cleaner and more professional-looking.
Once chilled, spread a final layer of frosting over the entire cake, creating a smooth surface. Use an offset spatula to create clean, straight edges. Repeat this process for the second tier, allowing it to chill again before adding the third and final layer. For the top tier, you can create a simple dome shape or more elaborate design depending on your skill level and desired aesthetic.
Decorate and Finish with Confidence
For a classic finish, pipe a border of frosting around the top and sides of the cake using a star tip. You can also add decorative elements like fresh berries, chocolate shavings, or edible flowers. The key is to work quickly once you’ve removed the cake from the chiller to prevent the frosting from melting.
Let the cake sit at room temperature for 30 minutes before serving to allow the frosting to set slightly. This final resting period ensures that each slice comes out cleanly and maintains its beautiful presentation. Cut into generous slices and serve immediately—every bite should deliver that perfect balance of moist red velvet cake and tangy cream cheese frosting.
Pro Tips For Making 3 Tier Red Velvet Cake
- Sift the Flours Together: Don’t just dump the all-purpose and cake flour into the mixer—sift them together first. The cake flour’s fine texture is what gives red velvet its signature tenderness, and sifting removes lumps that’ll make your tiers dense. (Yes, even if you’re in a hurry, take the 30 seconds.)
- Cream Butter and Sugars Slowly: Let the butter and sugars sit at room temp for 30 minutes before creaming, then mix on low for the first 2 minutes. I learned this the hard way—overmixing traps air but doesn’t emulsify properly, leading to a cake that collapses when cooling. Patience here means your tiers stay light.
- Check Doneness with a Toothpick: Skip the timer. The cake’s done when a toothpick comes out with moist crumbs, not wet batter. Overbaking dries out the layers, and underbaking makes them gummy—especially in a 3-tier setup where heat distribution varies. Pull them when the edges spring back but the center still feels slightly soft.
- Swap Brown Sugar for White: Use all granulated sugar in the batter if you’re short on time. The brown sugar adds moisture and depth, but if you’re rushing, the extra molasses flavor isn’t as critical as getting the structure right. (Save the brown sugar for the cream cheese frosting—it’s where it shines.)
Storing and reheating this dish
Room-Temp Storage
Keep your 3-tier red velvet cake at room temperature for up to 2 days when properly stored. Wrap each tier individually in plastic wrap, then place them in an airtight cake box to maintain moisture.
Store in a cool, dry place away from direct sunlight—this prevents the frosting from melting or the cake from drying out. I always label my cakes with the date so I can track freshness. 🌟
Fridge Preservation
For longer storage, refrigerate the unfrosted cake layers for up to 3 days in airtight containers. Wrap each layer tightly in plastic wrap to prevent drying. The frosting can be made 2 days ahead and stored in the fridge—just whip it back to smoothness with a hand mixer before assembling.
When ready to decorate, let all components sit at room temperature for 30 minutes to soften slightly. This step is crucial for smooth piping. ❄️
Freezer-Friendly Layers
Freeze unfrosted cake layers for up to 1 month by wrapping them tightly in plastic wrap, then placing them in a freezer bag with all air removed. Thaw at room temperature overnight before assembling.
The frosting doesn’t freeze well, so prepare it fresh the day of serving. For the best texture, avoid freezing the fully assembled cake—it can cause sogginess in the layers. 🧊
Reheating Slices
If you have leftover slices, warm them gently in the microwave for 10-15 seconds to restore moisture. Cover the slice with a damp paper towel to prevent drying. For a stovetop method, place the slice on a baking sheet and warm in a 300°F oven for 5-7 minutes.
This method preserves the cake’s texture better than microwave reheating. Always serve warm slices for the best cream cheese frosting experience. 🔥
Frosting Refresh
If your frosting loses its smoothness after refrigeration, simply whip it with a hand mixer for 1-2 minutes until creamy again. Add 1-2 tablespoons of milk or buttermilk if it becomes too thick.
For a quick fix, spread a thin layer of warm frosting over the cake and let it set for 10 minutes before applying fresh frosting. This technique creates a perfect base for decorating. ✨
Stability Tips
When storing a 3-tier cake, place the largest tier at the bottom and secure each layer with wooden dowels before frosting. For transport, use a sturdy cake board and wrap the entire cake in plastic wrap to prevent shifting.
If storing vertically, position the tiers with the largest at the base and secure with cake bands for extra stability. This ensures your masterpiece stays intact until serving time. 💪
Nutrition facts
Frequently asked questions
How do I prevent my 3-tier cake from collapsing?
Use wooden dowels (or skewers) to support each tier before frosting. Place them vertically through the cake layers, spacing them evenly around the edges. Also, chill the cake for 15-20 minutes between layers to help the frosting set. Never skip the crumb coat—it creates a strong base for the final frosting layer.
Can I make this cake without buttermilk?
Yes! Mix 1 cup milk with 1 tbsp vinegar or lemon juice and let it sit for 5 minutes to curdle. This DIY buttermilk works perfectly in the recipe. For extra moisture, you can also replace 0.25 cup of the buttermilk with plain Greek yogurt. The tangy flavor remains intact.
What’s the best way to level my cake layers?
Use a serrated knife and a ruler to create perfectly flat tops. Place the ruler on top of the cake and gently drag the knife along the edge to trim any domed areas. Work in one smooth motion to avoid crumbling. Leveling ensures even frosting distribution and a professional finish.
How do I get smooth sides on my cake?
Apply a crumb coat first—spread a thin layer of frosting over the entire cake and chill for 15 minutes. This traps crumbs. Then apply the final frosting layer using an offset spatula, working in smooth, even strokes. For extra precision, dip your spatula in warm water between layers to create clean edges.
Can I substitute cream cheese frosting with buttercream?
While possible, the tangy flavor is what makes red velvet special! For a buttercream version, replace the cream cheese with 1 cup softened butter and add 1 tsp vinegar or lemon juice to mimic the tang. However, the texture will be slightly denser. The classic cream cheese version remains the gold standard for this recipe.

- 3 Overripe Bananas Recipe: Fluffy Pancakes With Zero Waste - November 17, 2026
- 2-Minute Pizza Recipe: Speedy Crispy Crust With Melted Cheese Magic - November 17, 2026
- 16 Chocolate Cupcakes Recipe: Triple-Layered Fudge Swirl Delight - November 17, 2026