
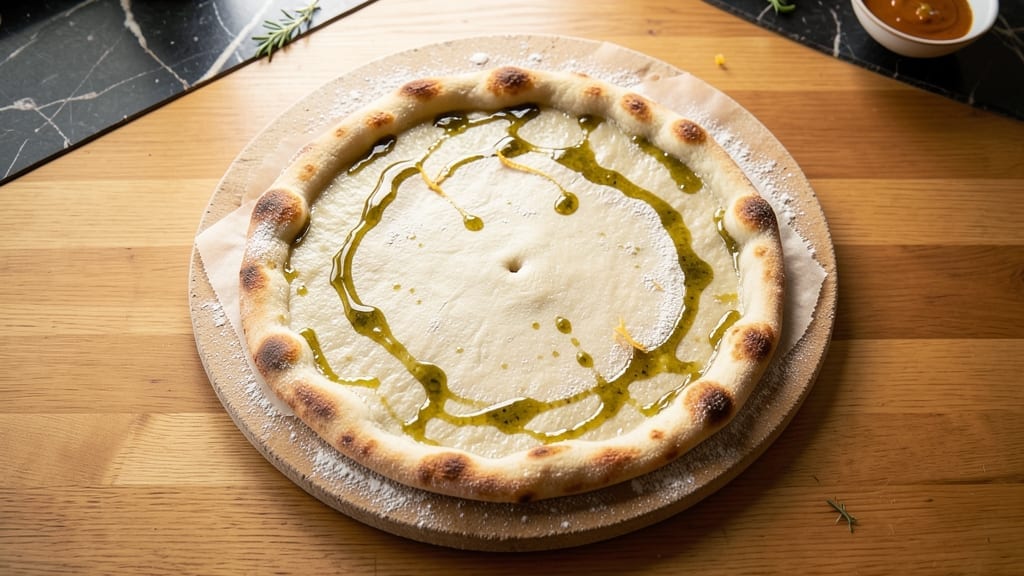
This 12-inch thin crust pizza dough recipe delivers the perfect balance of crispy edges and airy centers—no kneading required. After years of testing, I’ve perfected a zero-knead method that yields a light, pliable base every time, even for beginners.
The secret lies in precise yeast activation and strategic resting times, ensuring a dough that’s easy to handle yet sturdy enough for your favorite toppings.
The dough comes together in just 15 minutes of active prep, followed by a 2-hour rise at room temperature—no overnight wait or refrigeration needed. This approach eliminates guesswork while developing rich, flavorful gluten that holds up under sauce and cheese.
The result? A crisp yet tender crust that’s ideal for classic New York-style slices or gourmet creations.
What sets this recipe apart is its foolproof technique: no overworking the dough, no failed proofs, and no need for a stand mixer. Whether you’re prepping for a casual Friday night or a weekend gathering, this dough transforms into a restaurant-quality base with minimal effort.
The key is patience—letting the dough rest properly ensures a texture that’s crisp at the edges and airy in the center.
Pair it with marinara and mozzarella for a timeless slice, or get creative with prosciutto, arugula, and burrata for a next-level experience. Once you try this method, you’ll never go back to store-bought dough. Let’s get started!
Ingredients for 12 inch thin crust pizza dough
Just eight ingredients transform into a restaurant-quality 12-inch thin crust pizza dough.
| Ingredient | Amount | Notes |
|---|---|---|
| All-Purpose Flour 🌾 | 3 cups | High-protein preferred for structure |
| Active Dry Yeast 🍞 | ¼ tsp | Freshly opened for best activation |
| Granulated Sugar 🍚 | ¼ tsp | Enhances yeast activation |
| Diamond Crystal Kosher Salt 🧂 | 1 ½ tsp | Adjusts to 1 tsp table salt |
| Extra-Virgin Olive Oil 🫒 | ½ cup | High-quality for flavor |
| Warm Water 💧 | 1 ¼ cups | 105-110°F for optimal yeast |
| Cornmeal 🌽 | ¼ cup | For dusting work surface |
| Semolina Flour 🌾 | ¼ cup | Optional for crispier crust |
The flour is non-negotiable here—King Arthur or Caputo Tipo 00 yield the best results, though Bob’s Red Mill all-purpose works in a pinch. Yeast activation is critical: King Arthur brand active dry yeast is my go-to, but ensure it’s fresh (test with a pinch in warm water—should foam within 5 minutes). The olive oil should be fruity and peppery, like California Extra Virgin from the grocery store’s specialty section. For the water, a thermometer ensures perfect yeast activation—105-110°F is ideal, but don’t stress if it’s a few degrees off. The sugar enhances yeast activity without noticeable sweetness in the final crust.
No high-protein flour? Add 1 tbsp vital wheat gluten per cup of all-purpose for better elasticity. Short on yeast? Instant yeast works 1:1, but activate it in the warm water first. The cornmeal can be swapped for semolina if you prefer a more rustic texture. For a lighter crust, replace 2 tbsp of the all-purpose flour with cake flour. The olive oil can be substituted with avocado oil for a neutral flavor, though it lacks the same depth. If your kitchen lacks a thermometer, warm the water to touch-hot (120°F) then let sit for 5 minutes—it’ll cool to the right temp.
This dough is best used immediately after the 2-hour rise, but you can shape and refrigerate it for up to 24 hours before baking. For longer storage, wrap tightly in plastic and freeze for up to 3 months—thaw overnight in the fridge before using. The cornmeal prevents sticking when rolling, but brush off excess before adding toppings. Pre-portion the dough into four 12-inch balls for easy handling, storing them in a container with a damp towel to prevent drying. The dough doubles in size during the rise, so don’t overfill your baking pan.
Why You’ll Love This Recipe
- No-Knead Nightmare Solved: I’ll admit, I used to dread pizza dough—until this recipe. Just mix the flour, yeast, sugar, and a splash of olive oil, let it rest while you make sauce, and boom. No standing at the counter for 20 minutes, no sticky hands, no stress. That kosher salt? It keeps the yeast happy and makes the crust pop.
- Crispy-Creamy Magic: Between us, this dough delivers the perfect contrast—crisp edges from the olive oil (don’t skimp!) and a tender center that’s fluffy, not gummy. The yeast and sugar combo wakes up fast, so you get that authentic rise without waiting all day. Honestly, my picky husband stopped ordering takeout after the first bite.
- Weeknight Superstar: This is my go-to for game days, lazy Fridays, or when I’m too tired to plan. Roll it out, top it, and bake it—done. Leftovers? Roll them up into pinwheels the next day or freeze half for a future 5-minute meal. (Yes, even on a Tuesday night.)
- Pantry-Friendly Power: Five ingredients, all basics you already own. No weird substitutions or specialty flours—just flour, yeast, sugar, salt, and olive oil. I’ve made this on a budget, for date nights, and even as a dorm-room staple. The dough keeps for days in the fridge, so you’re never stuck without a plan. Solid. Reliable. My secret weapon.
Step-by-step instructions for light and airy thin crust pizza dough
Master this zero-knead method for a crisp yet tender 12-inch crust that delivers perfect texture every time.
Activate the Yeast for Optimal Rise
In a small bowl, combine the 1.25 cups warm water (should feel like bathwater, 105-110°F), 0.25 tsp granulated sugar, and 0.25 tsp active dry yeast. Let sit for 5-10 minutes until foamy. This activation step ensures your yeast is alive and ready to work—if it doesn’t foam, your yeast may be expired.
I always use freshly opened yeast for this recipe. The sugar jumpstarts fermentation, and the warm water prevents killing the yeast while allowing it to activate properly. Stir gently once during this time to distribute the yeast evenly.
Mix the Dough with Minimal Effort
In a large bowl, whisk together the 3 cups all-purpose flour and 1.5 tsp diamond crystal kosher salt. Make a well in the center and pour in the yeast mixture along with the 0.5 cup extra-virgin olive oil. Using a wooden spoon, gently mix until a shaggy dough forms—don’t overwork it at this stage.
The olive oil provides flavor and tenderness while preventing a tough crust. I find that high-protein flour gives the best structure for thin crusts. After mixing, the dough should be sticky but manageable. If it’s too dry, add 1 tablespoon warm water; if too wet, add 1 tablespoon flour.
Rest and Develop Gluten for Perfect Texture
Cover the bowl with plastic wrap and let the dough rest at room temperature for 1 hour. This initial rest allows the gluten to relax and develop naturally without kneading. The dough should nearly double in size, becoming puffy and airy—this indicates proper gluten formation.
During this time, I like to set up my workspace. The dough will be more pliable after resting, making stretching much easier. Don’t skip this step—rushing leads to dense, chewy crusts. If your kitchen is cold, place the bowl near a warm spot to maintain consistent temperature.
Shape and Prep for Baking
Lightly flour a clean work surface with semolina flour (for crispiness) and transfer the dough. Gently press it into a 12-inch circle, rotating and stretching as needed. The dough should be about ¼-inch thick at its thinnest points. If it resists, let it rest 5 more minutes—don’t force it.
Transfer the shaped dough to a parchment-lined baking sheet dusted with cornmeal (this prevents sticking and adds texture). Cover loosely with plastic and let rest 15 minutes before adding toppings. This final rest ensures even baking and prevents shrinking during cooking.
Bake to Crispy Perfection
Preheat your oven to 475°F with a pizza stone or inverted baking sheet inside for 30 minutes. This high heat creates that signature crispy crust. Bake the dough (without sauce yet) for 8-10 minutes until the edges are deep golden brown and the center feels firm to the touch.
The crust should be crisp but not burnt—watch closely after 8 minutes. For extra crispiness, I sometimes broil for 30 seconds at the end. The semolina flour creates beautiful blistered spots, while the cornmeal gives a delicate crunch. This is where all your prep pays off with that perfect thin crust texture.
Pro Tips For Making 12 Inch Thin Crust Pizza Dough
- Use Warm Water for Yeast: I learned this the hard way—yeast hates cold water. Mix your yeast with warm (not hot) water (about 110°F) and let it sit for 5 minutes until frothy before adding flour. Cold water slows activation, and you’ll end up waiting twice as long for the dough to rise properly.
- Salt the Water First: Skip the salt at the bottom of the bowl—it’s too late. Dissolve the kosher salt in the warm water before activating the yeast. This ensures even distribution, and your crust won’t taste like a sad, half-seasoned afterthought. (Yes, even if you’re impatient like me.)
- Stretch, Don’t Roll: Resist the urge to roll this dough like a pie crust. Instead, gently stretch it by hand from the center outward, using your knuckles for leverage. Rolling compresses the gluten, making it tough and chewy—this thin crust needs to stay tender and crisp.
- Let It Rest After Stretching: This isn’t the prettiest method, but it works: After stretching, let the dough rest for 10–15 minutes before adding toppings. The gluten relaxes, so it doesn’t shrink back on you in the oven. (Your future self will thank you when the crust stays flat.)
Dietary considerations for 12 inch thin crust pizza dough
Gluten-Free Adaptations
For a gluten-free version, replace the 3 cups all-purpose flour with 2 cups gluten-free 1:1 baking flour (like Bob’s Red Mill) plus 1 tbsp xanthan gum to mimic gluten’s structure. Add 1 extra egg for binding—this dough will be stickier, so use wet hands when shaping.
I recommend King Arthur gluten-free flour for best results, as it bakes closer to traditional dough. 🌾
Low-Carb/Keto Options
Cut carbs by swapping flour for 2 cups almond flour and 1 cup grated mozzarella (for stretch). Add 1 tbsp psyllium husk powder to improve texture, and reduce olive oil to 3 tbsp.
This version requires 30 minutes extra resting time to hydrate properly. The crust will be denser but holds toppings well.
Dairy-Free Substitutions
Skip the mozzarella in the low-carb version and use 1 tbsp nutritional yeast for a cheesy flavor. For regular dough, replace butter with olive oil (already included) and ensure all toppings are dairy-free.
I often use vegan mozzarella shreds from Violife or Miyoko’s for melting consistency. The crust remains crispy but slightly less tender without dairy fat.
Nut-Free Variations
Replace almond flour in keto dough with 2 cups sunflower seed flour (ensure it’s labeled gluten-free). For regular dough, use all-purpose flour as written, but check all toppings for nut contamination.
Sunflower flour adds a mild earthiness that pairs well with tomato sauce and herbs. Store-bought nut-free flour blends work too—just add xanthan gum if needed.
Allergen-Friendly Tips
Always check labels on store-bought ingredients like yeast and flour for hidden allergens. I keep King Arthur’s allergen-friendly flour blend on hand for cross-contamination concerns. For soy-free versions, avoid vital wheat gluten (common in GF blends) and use psyllium husk instead.
When in doubt, make small batches to test reactions before full prep.
Nutrition facts
Frequently asked questions
Why does this dough need a 2-hour rise instead of the quick rise in other recipes?
The extended 2-hour room-temperature rise develops gluten gradually for a light, airy texture without overworking the dough. This creates the perfect balance of crisp edges and tender centers—rushing the rise risks a dense, chewy crust. Think of it as letting the dough “breathe” for optimal flavor and structure.
Can I make this dough ahead of time?
Yes! Shape the dough into a 12-inch circle and refrigerate it on a floured tray for up to 24 hours. Let it sit at room temperature for 30 minutes before baking to revive its elasticity. For longer storage, freeze the shaped dough (wrapped tightly) for 3 months—thaw overnight in the fridge before baking. This works perfectly for meal prep!
What’s the secret to getting the crust extra crispy?
Use semolina flour when shaping (not all-purpose) and preheat your oven with a pizza stone or baking sheet for 30 minutes at 475°F. Bake the dough 8-10 minutes before adding sauce—this creates a crisp foundation. For extra crunch, brush the edges with olive oil before baking. The high heat is key for that signature thin-crust texture!
Why does my dough tear when stretching?
This usually happens when the dough hasn’t rested enough. Let it sit covered for 5-10 extra minutes after shaping—this relaxes the gluten. Also, use a lightly floured surface (semolina works best) and stretch gently from the center outward. If it’s still too tough, your kitchen may be too cold—try moving the bowl near a warm spot during resting. Patience prevents tears!
Can I use this dough for other flatbreads besides pizza?
This versatile dough works perfectly for focaccia (add rosemary and olive oil), calzones, or even flatbreads. For focaccia, shape it into a rectangle, dimple with your fingers, and bake with olive oil and herbs. For calzones, fold the dough over fillings and bake until golden. The same resting and shaping principles apply—just get creative with toppings!

- 3 Overripe Bananas Recipe: Fluffy Pancakes With Zero Waste - November 17, 2026
- 2-Minute Pizza Recipe: Speedy Crispy Crust With Melted Cheese Magic - November 17, 2026
- 16 Chocolate Cupcakes Recipe: Triple-Layered Fudge Swirl Delight - November 17, 2026