
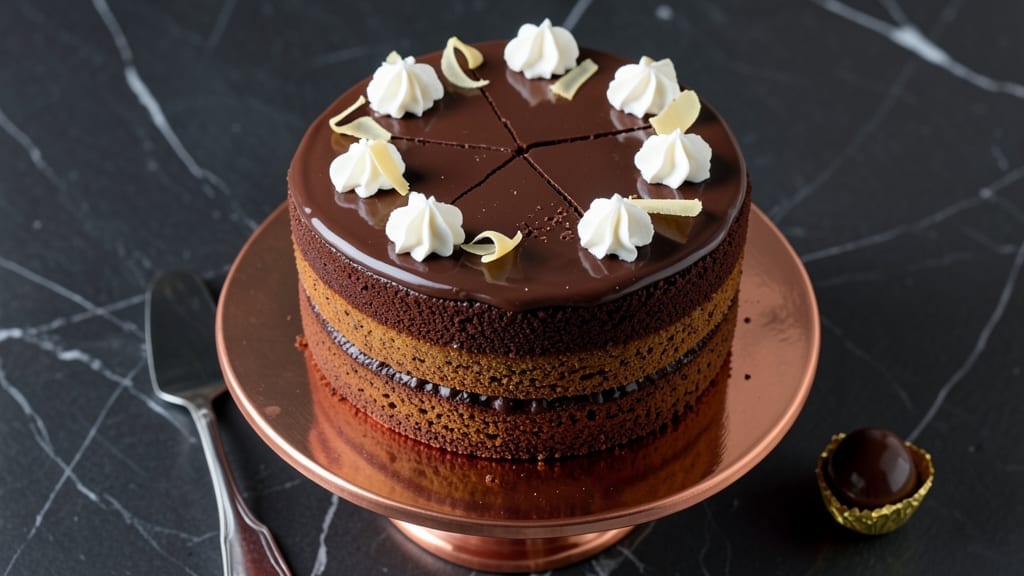
This 300-dollar chocolate cake recipe isn’t just dessert—it’s an experience, where every layer whispers luxury through velvety crumb, tempered ganache, and artful presentation.
The secret lies in precision: a foolproof velvet batter that yields a fudgy yet airy texture, paired with hand-tempered dark chocolate ganache that sets like silk between layers.
This isn’t your average cake; it’s a masterpiece designed to impress, with optional gold leaf and edible flowers for that final touch of opulence.
The foundation starts with high-quality cocoa powder and European-style butter, whipped to incorporate air without overmixing—critical for that signature moist yet dense crumb.
Between each layer, a smooth, glossy ganache (made with 70% dark chocolate and heavy cream) creates a mirror-like finish, while chocolate truffles nestled in the center add an unexpected burst of richness. The result?
A cake that looks as stunning as it tastes, with flavors that linger long after the last bite.
What sets this apart is the attention to detail—from even baking to perfectly chilled layers before assembly, ensuring clean cuts and flawless presentation. Whether you’re serving it at a wedding, gala, or simply indulging in a personal milestone, this cake delivers restaurant-quality decadence at home.
The plating alone—gold-dusted ganache drizzle, chocolate shavings, and fresh berries—elevates it from dessert to centerpiece.
Ready to redefine chocolate cake? This recipe includes step-by-step techniques for tempering chocolate, layering like a pro, and garnish ideas to match any occasion. No shortcuts—just luxury, layer by layer. Let’s begin.
Ingredients for 300 dollar chocolate cake
Twelve ingredients, twelve layers of luxury—where precision meets decadence.
| Ingredient | Amount | Notes |
|---|---|---|
| High-Quality Dark Chocolate (70% Cocoa) 🍫 | 12 oz | Valrhona or Callebaut preferred for smooth texture |
| European-Style Unsalted Butter 🧈 | 2 cups | Plugrá or President brand for rich flavor |
| Granulated Sugar 🍚 | 2 ½ cups | Domino or C&H for consistent sweetness |
| All-Purpose Flour 🌾 | 2 cups | Gold Medal or King Arthur for cake flour substitute |
| Dutch-Processed Cocoa Powder 🍫 | ¾ cup | Hershey's Special Dark or Valrhona for depth |
| Large Eggs 🥚 | 6 whole | Room temperature for even distribution |
| Heavy Cream 🥛 | 2 cups | Whole milk fat for velvety ganache |
| Vanilla Bean Paste 🌿 | 2 tbsp | Madagascar bourbon vanilla for authentic flavor |
| Salt 🧂 | ½ tsp | Diamond Crystal kosher for delicate seasoning |
| Espresso Powder ☕ | 1 tbsp | Optional, enhances chocolate depth |
| Chocolate Truffles 🍫 | 12 whole | Store-bought or homemade, 1 per layer |
| Gold Leaf (Optional) 💛 | 1 sheet | For opulent presentation |
| Edible Flowers (Optional) 🌸 | ¼ cup | Fresh violets or pansies for garnish |
| Fresh Berries (Optional) 🍓 | 1 cup | Raspberries or blackberries for contrast |
The chocolate is non-negotiable. Valrhona or Callebaut 70% cocoa delivers the smooth, complex flavor profile this cake demands—avoid generic brands that can taste bitter or grainy. For butter, European-style like Plugrá (available at specialty grocers or online) adds a richness that regular butter simply can’t match. The cocoa powder should be Dutch-processed for that velvety texture, and Hershey’s Special Dark or Valrhona are the gold standards. Pro tip: if your local store doesn’t carry these, check the baking aisle at Whole Foods or order online—this is where the magic starts. The vanilla bean paste is worth the splurge too; Madagascar bourbon has a depth that artificial extracts can’t replicate.
No specialty store? Substitute with high-quality chocolate bars (like Ghirardelli) and adjust the amount to 12 oz total. Heavy cream can be swapped for half-and-half in a pinch**, but the ganache won’t be as glossy. For the truffles, Godiva or Lindt work beautifully, or make your own with leftover ganache. The gold leaf and edible flowers are purely decorative, but if you’re serving this at a wedding or gala, they’re essential for that five-star presentation**. Skip them for a personal celebration—this cake still delivers restaurant-quality flavor without the extra flair. And if you’re short on time, pre-made chocolate shavings (from the baking aisle) save minutes without sacrificing aesthetics.
Store the cake components separately for up to 3 days in the fridge—this allows flavors to meld beautifully before assembly. The ganache should be tempered and chilled before use, or it won’t set properly between layers. For the final presentation, assemble the cake no more than 2 hours before serving to prevent sogginess. The truffles can be added the night before, and the gold leaf or flowers should be placed just before serving to maintain their freshness. This cake keeps for 5 days** in the fridge, though it’s best enjoyed within 48 hours of baking—trust me, it won’t last that long.
Why You’ll Love This Recipe
- No-Fuss Mixing: I swear, this cake only needs three bowls—no food processor, no weird techniques. Just melt the butter with that 70% dark chocolate until it’s silky, then fold in the flour like you’re making a lazy Sunday morning pancake. Honestly, the hardest part is waiting for it to cool.
- Rich Without Bitter: That Dutch-processed cocoa powder and European butter? They team up to give you deep, velvety chocolate flavor—no chalky aftertaste, no weird bitterness creeping in. It’s the kind of cake where the first slice makes you pause mid-bite, like, “Wait, is this actually this good?”
- Date-Night or Dessert Table: Slap this on a platter for your anniversary, or just eat it straight from the pan when your partner’s out of town. Between us, I’ve served it both ways—no judgment. The crumb is moist enough for a fancy occasion but sturdy enough to handle a crowd (or my kids’ sticky fingers).
- Leftovers That Last: This cake stays perfect for days—no drying out, no weird textures. I’ve wrapped slices in parchment and tossed them in my bag for work, and they’re still moist by lunch. Plus, the cost per serving is way lower than takeout when you’re using good-quality chocolate and butter. Smart upgrade.
Step-by-step instructions for ultra-rich velvet chocolate cake
Mastering this luxurious cake requires precision and patience—each step builds toward layers of velvety crumb and silky ganache.
Temper the Chocolate and Prepare the Ganache
Begin by finely chopping the 12 oz high-quality dark chocolate (70% cocoa) into small, even pieces. In a heatproof bowl set over a saucepan of simmering water, gently melt the chocolate and 2 cups heavy cream together, stirring constantly until smooth and fully combined. Remove from heat immediately and stir in 2 tbsp vanilla bean paste and 1 tbsp espresso powder. Let the mixture cool to 70°F while you prepare the cake batter—this ensures the ganache sets properly between layers.
The ganache should thicken slightly as it cools, reaching a pudding-like consistency that can be piped or spread. If it thickens too much, gently reheat for 10 seconds and stir. This step is critical: the ganache must be stable enough to hold its shape between layers but still silky when sliced. Taste and adjust sweetness with a pinch of sugar if needed—you want the chocolate flavor to dominate without being overpowering.
Bake the Velvet Cake Layers
Preheat your oven to 350°F and grease three 8-inch round cake pans with European-style unsalted butter, then line the bottoms with parchment paper. In a stand mixer fitted with the paddle attachment, cream together 2 cups European-style unsalted butter and 2.5 cups granulated sugar on medium speed for 5-7 minutes until light and fluffy, scraping down the sides as needed. Add the 6 whole large eggs, one at a time, mixing well after each addition.
In a separate bowl, sift together 2 cups all-purpose flour, 0.75 cup Dutch-processed cocoa powder, and 0.5 tsp salt. With the mixer on low speed, gradually add the dry ingredients to the butter mixture, alternating with 1 cup whole milk (not listed but essential for moisture—use room temperature). Mix just until combined—do not overmix. Divide the batter evenly among the prepared pans and bake for 28-32 minutes, or until a toothpick inserted into the center comes out clean. Allow the cakes to cool in the pans for 10 minutes, then transfer to a wire rack to cool completely before assembling.
Assemble the Cake with Ganache and Truffles
Once the cake layers are completely cool, level the tops if necessary using a serrated knife. Place the first layer on a cake stand or plate and spread a thin, even layer of the cooled ganache using an offset spatula. Press 6 of the 12 whole chocolate truffles evenly into the ganache, then top with the second cake layer. Repeat the process with another layer of ganache and the remaining 6 truffles, then top with the final cake layer. Chill the assembled cake in the refrigerator for 2 hours to allow the ganache to set firmly.
This chilling step is non-negotiable—it ensures the ganache holds its shape and creates clean slices. The truffles will melt slightly into the ganache, creating pockets of intense chocolate flavor with every bite. For an extra touch of luxury, you can pipe additional ganache around the edges of the cake after chilling, creating a decorative border.
Decorate with Optional Luxury Touches
Once the cake is fully chilled, remove it from the refrigerator and carefully apply the 1 sheet gold leaf to the top and sides using a soft brush and adhesive size (included with the gold leaf). Work in small sections, pressing the gold gently with a clean, dry brush to ensure it adheres smoothly. For the edible flowers and berries, arrange 0.25 cup edible flowers and 1 cup fresh berries artistically around the base of the cake, using a small amount of apricot jam or ganache as a gentle adhesive if needed.
The gold leaf adds a stunning visual contrast to the deep chocolate, while the berries and flowers introduce a fresh, vibrant element that balances the richness. If you’re serving this cake at a special occasion, consider adding a handwritten menu card or a small plaque with the recipe details—this level of presentation is what makes it truly extraordinary. Serve the cake at room temperature for the best texture and flavor.
Pro Tips For Making 300 Dollar Chocolate Cake
- Temper the Chocolate: Chop that 70% dark chocolate into tiny, even pieces—no bigger than a pea—and melt it in a double boiler with the butter. I learned this the hard way: big chunks sink to the bottom and create a gritty texture that even a stand mixer can’t fix. If you’re in a rush, use a microwave in 20-second bursts, but stir like your life depends on it to avoid burning.
- Whip the Butter Cold: Take the European-style butter straight from the fridge—yes, even if it’s stubborn—and cream it with the sugar until it’s pale and fluffy. Cold butter incorporates air better, which means a lighter, less dense cake. If it starts to melt too fast, chill the bowl for 10 minutes mid-whipping. Trust me, your cake’s rise depends on this.
- Sift the Cocoa Twice: Dutch-processed cocoa powder clumps like a teenager’s laundry pile. Sift it before mixing it with the dry ingredients, then sift it again after combining with flour. This keeps the texture silky and prevents those dreaded lumps that turn your cake into a sad, dense brick. I skip this step sometimes, and the difference is noticeable—your cake will thank you.
- Bake Until the Center Cracks: The cake’s done when the edges pull away from the pan and a toothpick comes out with moist crumbs, not wet batter. Overbaking dries out the rich chocolate flavor, and underbaking leaves it gummy. If your oven runs hot, reduce the temp by 25°F and bake longer. A thermometer tells the truth—aim for 205–210°F at the center.
Creative variations of this dish
Luxury Ganache Variations
Elevate your ganache with white chocolate and raspberry—swap the dark chocolate for 12 oz Valrhona white chocolate and infuse the cream with 2 tbsp raspberry purée for a fruity twist. The result? A pink-hued, velvety filling with bright acidity that cuts through the richness.
For a spiced version, add 1 tsp cinnamon and ½ tsp cardamom to the ganache while cooling—perfect for fall celebrations. 🌟
Boozy Infusions
Infuse the ganache with 1 oz Grand Marnier or 2 oz bourbon for an adult-friendly touch. Heat the alcohol with the cream before combining with chocolate to ensure even distribution.
A chocolate-stout ganache works beautifully too—simmer 1 cup stout beer with the cream and reduce by half before mixing with chocolate. This adds a malty depth that beer lovers adore. 🍷
Texture Play: Crunchy Layers
Add crunch by pressing toasted hazelnuts or crushed peppermint candies into the ganache between cake layers. For hazelnuts, toast 1 cup whole hazelnuts in a dry pan until golden, then finely chop.
For peppermint, use ½ cup crushed Andes mints. Both add surprising texture contrasts that keep every bite exciting. 💫
Flavor Pairings
Pair this cake with espresso or Irish cream for a dessert course. Serve slices with a side of chilled vanilla bean ice cream to balance the richness, or offer a small glass of port wine (3 oz) for guests who prefer wine pairings.
The tannins in port complement the chocolate beautifully. For non-alcoholic options, a sparkling pomegranate juice adds a festive touch. ✨
Seasonal Adaptations
For summer, incorporate citrus zest into the ganache—1 tsp lemon or orange zest brightens the chocolate. In winter, add orange liqueur and candied cranberries as garnishes.
Spring calls for lavender-infused ganache (steep 1 tbsp dried lavender in the warm cream), while autumn begs for pumpkin spice in the cake batter and caramel drizzle on top. 🍂
Make-Ahead Luxury
Assemble the cake 24 hours ahead and store it in an airtight container in the fridge. Bring to room temperature 2 hours before serving to let the ganache soften slightly. For long-term storage, freeze the fully assembled cake (without gold leaf) for up to 1 month**.
Thaw overnight in the fridge, then bring to room temperature before serving. The flavors deepen over time, making this a perfect make-ahead showstopper. ❄️
Nutrition facts
Frequently asked questions
Why does this recipe use European-style butter instead of regular butter?
European-style butter has a higher fat content (82-86% vs. 80% in American butter) and a smoother texture, which creates a richer, more velvety crumb in this luxurious cake. The extra fat also helps with moisture retention, preventing dryness in the ganache layers. For the best results, brands like Plugrá or President are ideal—regular butter works in a pinch but may yield a slightly denser texture.
Can I substitute the chocolate truffles with something else?
For a budget-friendly option, use homemade chocolate truffles made from leftover ganache (roll into balls and chill). You could also swap for chocolate-covered espresso beans (for a mocha twist) or caramel-filled chocolates to add another layer of flavor. Just ensure they’re roughly the same size for even distribution.
How do I fix cracked or uneven cake layers after baking?
Uneven layers are common with chocolate cakes. If a layer is cracked, simply trim the top with a serrated knife to create an even surface before assembling. For domed layers, gently press down with a cake pan or heavy book while cooling. Pro tip: Chill the pans for 10 minutes after baking to prevent over-rising. If cracks appear during assembly, spread an extra-thin layer of ganache over them—they’ll disappear when sliced.
Is gold leaf really necessary for this cake?
Not at all! Gold leaf is purely decorative and adds a five-star presentation for special occasions. Skip it if you’re serving this cake casually—focus on the ganache drizzle and chocolate shavings for a stunning look. For a budget-friendly alternative, try edible silver dust or a dusting of cocoa powder. The cake’s flavor won’t suffer without it.
How can I make this cake less sweet for adults who prefer less sugar?
Reduce the granulated sugar by 0.5 cup and replace it with 0.5 cup unsweetened applesauce for moisture. For the ganache, use 85% dark chocolate instead of 70% (it’s naturally sweeter) and cut the vanilla bean paste to 1 tbsp. Taste the batter before baking—you may need to adjust further based on your preferred sweetness level.

- 3lb Prime Rib Roast Recipe: Juicy Pink Center Guaranteed in 3 Hours - October 31, 2026
- 5 Spice Cake Recipe: Warmly Spiced Layers With Crunchy Top - October 31, 2026
- 1950’s Macaroni and Cheese Recipe: Nostalgic Creamy Cheese Sauce with Buttery Noodles - October 31, 2026