
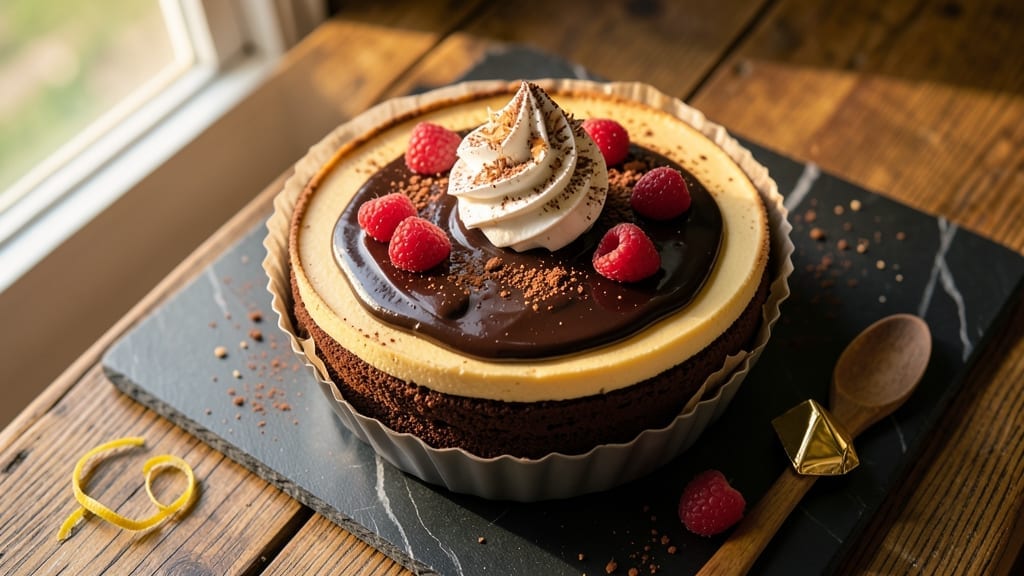
Celebrating a 30th anniversary deserves a dessert that’s equal parts decadent and elegant—this double-layered chocolate cake cheesecake delivers exactly that.
The secret lies in a perfectly balanced combination of rich, moist chocolate cake and velvety cheesecake, bound together with a luscious ganache drizzle that ties every bite into a symphony of textures.
I’ve refined this recipe over years of special occasions, ensuring each layer is baked to perfection for maximum flavor and presentation.
The foundation begins with a foolproof chocolate cake that’s dense yet tender, providing the sturdy base for the cheesecake layer above. Meanwhile, the cheesecake itself is crafted with a creamy, tangy filling that sets just enough to hold its shape while remaining silky smooth.
What sets this apart is the ganache drizzle—a rich, glossy finish that adds both visual appeal and an extra layer of chocolatey indulgence.
By the time you serve this dessert, you’ll have a showstopper that’s restaurant-quality without requiring advanced baking skills. The chocolate cake provides a deep, fudgy contrast to the lighter cheesecake, while the ganache adds a glossy, professional finish that makes it look as impressive as it tastes.
Each slice reveals layers of flavor and texture that will leave your guests in awe.
Perfect for anniversary celebrations, milestone birthdays, or any occasion calling for a luxurious dessert. The recipe scales beautifully for larger gatherings, and optional decorative elements like fresh berries or gold leaf elevate it to an even more extravagant finish. Let’s create this showstopper together.
Ingredients for 30th anniversary chocolate cake cheesecake
Twelve ingredients, three layers of decadence—this anniversary dessert is restaurant-quality without the fuss.
| Ingredient | Amount | Notes |
|---|---|---|
| All-Purpose Flour 🌾 | 2 ½ cups | Sifted for light texture |
| Unsweetened Cocoa Powder 🍫 | ¾ cup | Natural or Dutch-processed |
| Granulated Sugar 🍚 | 2 cups | Superfine preferred for smoothness |
| Light Brown Sugar 🍚 | ½ cup | Packed firmly for moisture |
| Baking Soda 🧂 | 1 ½ tsp | Pure, not baking powder |
| Salt 🧂 | ½ tsp | Fine sea salt preferred |
| Vanilla Extract 🌿 | 2 tsp | Pure Madagascar bourbon |
| Large Eggs 🥚 | 2 whole | Room temperature for even mixing |
| Whole Milk 🥛 | 1 cup | Room temperature for smooth batter |
| Vegetable Oil 🫒 | ½ cup | Light, neutral flavor |
| Cream Cheese 🧀 | 16 oz | Full-fat, room temperature |
| Sour Cream 🥛 | ½ cup | Full-fat for richness |
| Powdered Sugar 🍚 | 1 ½ cups | Confectioners' sugar for smoothness |
| Heavy Whipping Cream 🥛 | 1 cup | Cold for stiff peaks |
| Dark Chocolate Chips 🍫 | 1 ½ cups | 70% cocoa for ganache |
| Heavy Cream 🥛 | ½ cup | For ganache richness |
| Butter 🧈 | ¼ cup | Unsalted, room temperature |
| Vanilla Bean Paste 🌿 | 1 tsp | For intense vanilla flavor |
| Graham Cracker Crumbs 🍪 | 1 ½ cups | Fine, for crust texture |
| Melted Butter 🧈 | ½ cup | For crust binding |
The cocoa powder makes all the difference here. Valrhona or Guittard are my go-tos for that deep, velvety flavor—don’t skimp on quality. For the ganache, Ghirardelli 70% dark chocolate chips melt perfectly without graininess. The cream cheese? Philadelphia brand is the most reliable for texture, but any full-fat block works if you let it sit at room temperature for 2 hours. Pro tip: measure your flour by weight if you can—280g is ideal for this recipe, but the cup measure works fine too. The graham crackers? Honey Maid or Keebler are the most widely available and crush perfectly.
No cocoa powder? Melted dark chocolate at 1:1 ratio works in a pinch, though texture may vary slightly. Running short on cream cheese? Substitute with mascarpone plus an extra 2 tbsp sour cream—it’s lighter but still creamy. The vanilla bean paste is non-negotiable for that professional touch, but pure vanilla extract works in a bind. For the ganache, if you can’t find 70% chocolate, 60% works but add 1 extra tbsp cream. The crust can be made ahead—just press it into your pan and refrigerate for up to 3 days. And if you’re feeling fancy, swap the graham crackers for crushed Oreos or speculoos cookies.
This dessert is all about timing—bake the cake first, then let it cool completely before adding the cheesecake layer. The ganache should be poured over the cooled cheesecake, not warm. Store the assembled cake in the fridge for up to 5 days, though it’s best served within 3 days for maximum freshness. For make-ahead convenience, assemble everything except the ganache, refrigerate overnight, then add the ganache just before serving. The ganache keeps at room temperature for 2 days in an airtight container, so you can make it ahead too. Bring components to room temperature before assembling for the best texture.
Why You’ll Love This Recipe
- No Mixer Needed: The cake layer comes together with just a whisk—no stand mixer, no fuss. That rich cocoa powder and brown sugar combo gives it depth without extra effort, and honestly? The texture is better when you let the batter rest for five minutes. It’s the kind of recipe that lets you chat with guests while the oven does the work.
- Double Chocolate Bliss: That first bite? Crumbly cake with a velvety cheesecake center—both packed with cocoa’s deep, bittersweet punch. The brown sugar caramelizes just enough to balance the chocolate, and the baking soda keeps it light, not dense. It’s the kind of dessert that makes people close their eyes and sigh.
- Celebration in a Box: This isn’t just for anniversaries—it’s my go-to for birthdays, holidays, or even a “we survived another week” treat. The cake layer holds up well, so you can slice it ahead and assemble later. (Yes, even on a Tuesday night.) Plus, the leftovers? Still just as good the next day—if they last that long.
- Budget-Friendly Luxury: You’d never guess it’s made with pantry staples. The cocoa powder and all-purpose flour stretch the filling, so you get two layers of decadence without breaking the bank. I’ll be real: I’ve made this for 12 people for under $20. That’s a win for any occasion.
Step-by-step instructions for double-layered chocolate cake cheesecake
Here’s how to build this decadent two-layer masterpiece with perfect texture and presentation.
Bake the Chocolate Cake Layer
Preheat your oven to 350°F and grease a 9-inch springform pan generously with butter, then line the bottom with parchment paper. In a large mixing bowl, whisk together the 2.5 cups all-purpose flour, 0.75 cup unsweetened cocoa powder, 2 cups granulated sugar, 0.5 cup light brown sugar, 1.5 tsp baking soda, and 0.5 tsp salt. In a separate bowl, beat the 2 whole large eggs with the 2 tsp vanilla extract until smooth, then whisk in the 1 cup whole milk and 0.5 cup vegetable oil. Combine the wet and dry ingredients gently until just mixed – don’t overmix.
Pour the batter into your prepared pan and smooth the top. Bake for 30-35 minutes until a toothpick inserted in the center comes out clean. Let the cake cool completely in the pan before proceeding – this prevents the cheesecake layer from becoming soggy. The cake should have a fudgy texture with moist crumbs that hold together when pressed.
Prepare the Graham Cracker Crust
While the cake bakes, make the crust by combining the 1.5 cups graham cracker crumbs with the 0.5 cup melted butter in a small bowl. Press this mixture firmly into the bottom of a 9-inch springform pan, creating an even layer about ¼-inch thick. Use a glass to compact it well – you want this to be solid enough to support the cheesecake layer without breaking. Chill the crust in the freezer while you prepare the filling.
Here’s the thing – this crust needs to be completely set before adding the cheesecake batter. If it’s too soft, your beautiful layers will slide apart. I like to give it 15 minutes in the freezer to ensure stability. While it chills, beat the 16 oz cream cheese with the 0.5 cup sour cream and 1.5 cups powdered sugar until completely smooth and lump-free.
Assemble the Cheesecake Layer
Once your cake has cooled completely and the crust is frozen solid, carefully transfer the cake layer to the prepared crust pan. You’ll need to work quickly but carefully – press the cake layer gently into the crust so it sits flat and even. This creates that signature double-layer effect while maintaining structural integrity.
In a separate bowl, whip the 1 cup heavy whipping cream to stiff peaks, then gently fold it into the cream cheese mixture along with the 1 tsp vanilla bean paste. Pour this filling over the cake layer, spreading it evenly to the edges. The filling should be about ½-inch thick over the cake – this ensures each slice has that perfect balance of cake and cheesecake.
Bake and Chill the Cheesecake
Place the assembled cheesecake in a water bath – wrap the bottom of the springform pan with aluminum foil and place it in a larger pan, then fill the larger pan with hot water up to about halfway up the sides of the springform. Bake at 325°F for 50-60 minutes until the edges are set but the center still has slight wobble. This gentle baking prevents cracking while allowing the filling to set properly.
Remove from the oven and let cool completely at room temperature, then refrigerate uncovered for 4 hours or overnight. This slow cooling prevents condensation and ensures clean slices. The cheesecake should be firm but still slightly yielding when pressed – it’s ready when it holds its shape but still has that perfect creamy texture.
Prepare the Chocolate Ganache
To make the ganache, combine the 1.5 cups dark chocolate chips and 0.5 cup heavy cream in a heatproof bowl. Place this bowl over a pot of simmering water (double boiler) and stir gently until the chocolate melts completely and the mixture becomes smooth. Let it cool slightly to 100°F – it should be thick enough to coat the back of a spoon but still pourable.
Once cooled, pour the ganache over the top of the chilled cheesecake, spreading it evenly with an offset spatula. Let it set at room temperature for 10 minutes before refrigerating again for 30 minutes to firm up. This creates that beautiful glossy finish while keeping the cake perfectly stable for slicing. The ganache should be thick enough to hold its shape when sliced but still have that luxurious melt-in-your-mouth quality.
Pro Tips For Making 30th Anniversary Chocolate Cake Cheesecake
- Sift the Cocoa: I learned this the hard way—lumpy cocoa powder ruins the texture. Sift it with the flour and baking soda before mixing, especially if your cocoa powder is clumpy. No sifter? Press it through a fine-mesh strainer with a spoon. Trust me, your cake will thank you.
- Preheat Like a Boss: This isn’t just about temperature—it’s about speed. Preheat your oven to 350°F (175°C) and let it sit for 15 minutes while you prep. A cold oven means uneven baking, and that’s the last thing you want for a 30th anniversary cake. Place the cake pan inside while it heats—yes, even if it’s greased.
- Don’t Overmix the Batter: The moment your mixer starts fighting you, stop. Overmixing adds gluten and makes the cake dense. Mix just until the dry ingredients disappear—about 30 seconds—then fold in any remaining dry bits by hand. Your cake will be lighter, and you’ll save your arm.
- Ice the Cake Cold: Sounds weird, but it works: chill the cake layer for 10 minutes in the fridge before spreading the cheesecake filling. Cold layers set faster and smoother, so you avoid that messy, crumbly middle. Just don’t skip the icing—it’s the glue that holds this hybrid together.
Wine and beer pairings for these flavors
Rich Red Wine
For this decadent dessert, a bold red wine like Cabernet Sauvignon or Merlot is my go-to choice. The tannins in these wines complement the chocolate and cream beautifully, creating a perfect balance of flavors.
I recommend a Napa Valley Cabernet Sauvignon with its rich dark fruit notes and velvety texture—it stands up to the ganache’s intensity while harmonizing with the cake’s depth. Serve slightly chilled to enhance the wine’s complexity and let guests savor each sip alongside the dessert’s luxurious layers. 🍷
Port Wine
If you’re looking for something truly special, a Ruby Port or Tawny Port is an excellent pairing. The caramel and dried fruit notes in Tawny Port mirror the ganache’s richness, while Ruby Port’s boldness cuts through the creaminess of the cheesecake.
I love pairing this dessert with a 10-Year Tawny Port—its nutty undertones elevate the chocolate flavors to new heights. Serve at room temperature for the best experience. 🍷
Chocolate Liqueur Cocktails
For a festive touch, consider serving chocolate martinis or Godiva martinis alongside your dessert. These cocktails feature Godiva liqueur or crème de cacao, which mirror the dessert’s chocolate notes while adding a sophisticated twist.
A classic Godiva Martini (vodka, Godiva liqueur, and heavy cream) complements the ganache perfectly. Garnish with cocoa powder for an elegant finish that ties everything together. 🍸
Dessert Wine Options
If you prefer something sweeter, a Moscato d’Asti or Late-Harvest Riesling works wonderfully. The effervescence of Moscato cleanses the palate between bites, while the honeyed sweetness of Riesling enhances the dessert’s chocolatey flavors.
I often reach for a chilled Moscato—its light bubbles and fruity notes make it a refreshing contrast to the rich cake. These wines are especially great for guests who prefer something lighter but still indulgent. 🍷
Coffee Pairings
For coffee lovers, a strong espresso or dark roast coffee with a hint of chocolate is ideal. The bitterness in coffee enhances the dessert’s flavors, creating a perfect balance. I recommend serving a cold brew concentrate mixed with a splash of cream—it’s smooth, rich, and complements the ganache beautifully.
For an extra touch, add a sprinkle of cocoa powder to the coffee for a cohesive flavor experience. ☕
Nutrition facts
Frequently asked questions
Can I make this dessert ahead of time?
This recipe is perfect for prepping. Bake the cake and crust 1 day ahead, then assemble the cheesecake layer and refrigerate overnight. The ganache should be made 2 hours before serving so it sets properly. Store all components separately in airtight containers – the cake and crust keep at room temperature, while the cheesecake and ganache need refrigeration.
How do I prevent the layers from sliding apart?
Use a completely cooled cake and a firmly chilled crust (freeze for 15 minutes) before assembly. Press the cake layer gently but firmly into the crust, and ensure the cheesecake filling is only ½-inch thick. Chill the assembled dessert uncovered for 4 hours before adding ganache – this helps everything set properly.
Can I substitute the graham cracker crust?
Yes! For a more decadent option, use crushed Oreos or speculoos cookies mixed with melted butter. For a nutty twist, try pecan or almond flour combined with 2 tbsp melted butter. Just ensure your alternative crust is pressed firmly and chilled thoroughly to support the cheesecake layer. The texture will vary slightly but still work beautifully.
What’s the best way to slice this dessert?
Use a hot knife (dip in hot water and wipe dry between slices) for clean cuts. Serve at room temperature for 10-15 minutes before slicing to make it easier. Cut into 12 equal wedges for a party, or 8 generous slices for a smaller gathering. The ganache will be more manageable when slightly warmed.
Can I make this gluten-free?
Yes, with modifications. Replace the all-purpose flour with a 1:1 gluten-free baking flour blend (like Bob’s Red Mill) and use gluten-free graham crackers for the crust. The cake texture will be slightly denser, but the flavor remains rich. For the cheesecake layer, regular cream cheese is gluten-free, but always check labels. The ganache remains unchanged.

- 3lb Prime Rib Roast Recipe: Juicy Pink Center Guaranteed in 3 Hours - October 31, 2026
- 5 Spice Cake Recipe: Warmly Spiced Layers With Crunchy Top - October 31, 2026
- 1950’s Macaroni and Cheese Recipe: Nostalgic Creamy Cheese Sauce with Buttery Noodles - October 31, 2026