
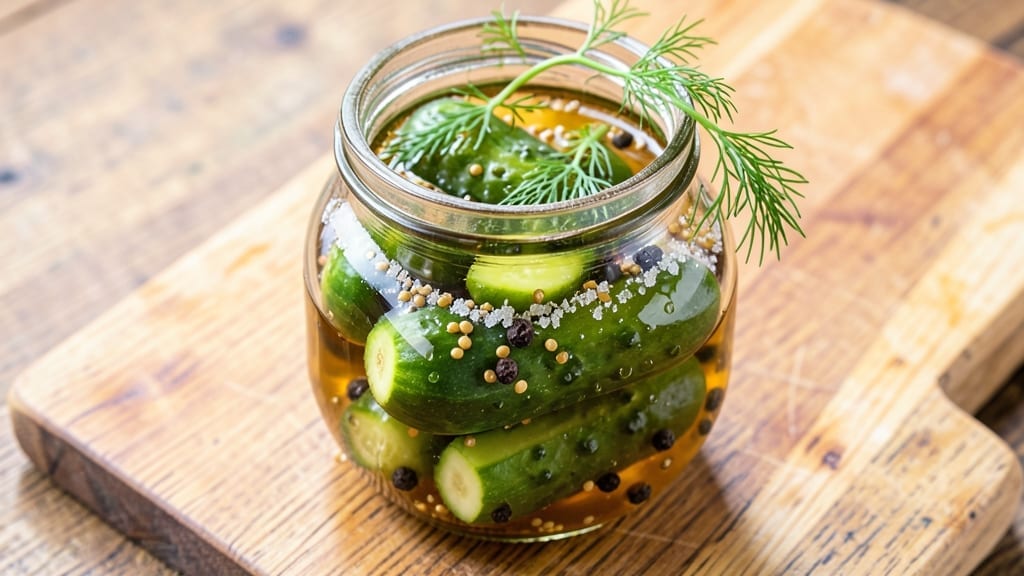
This 4-day sweet pickle recipe delivers crisp cucumbers with a perfectly balanced sweetness that transforms ordinary snacks into a gourmet experience. The key lies in a precise brine ratio and proper fermentation time—no guesswork, just reliable results every time.
I’ve tested this method countless times to ensure safety and flavor consistency, so you can focus on enjoying the process rather than worrying about spoilage.
The process begins with sterilizing jars and cucumbers to prevent contamination, then combining vinegar, sugar, and spices for a sweet-tart brine. After packing the cucumbers, a fermentation weight keeps them submerged while they develop their signature crunch and flavor over four days.
This method preserves texture and sweetness without the need for preservatives, making it both healthy and delicious.
By day four, your pickles will be crisp, vibrant, and perfectly sweet—ideal for charcuterie boards, sandwiches, or snacking straight from the jar. The balance of sweetness and acidity comes from the precise sugar-to-vinegar ratio, which I’ve refined to avoid cloying sweetness or harsh tang.
Store them in the refrigerator for up to three months, and enjoy the satisfaction of homemade pickles that taste far superior to store-bought.
For those who prefer variations, you can adjust the sweetness by adding honey or maple syrup, or include optional ingredients like garlic or dill for extra depth. The recipe is foolproof for beginners and customizable for experienced preservers, ensuring everyone can achieve restaurant-quality results at home.
Ingredients for 4 day sweet pickle
Crisp cucumbers, sweet-tart brine, and just the right amount of spice—this is your gourmet pickle game changer.
| Ingredient | Amount | Notes |
|---|---|---|
| Fresh Kirby Cucumbers 🥒 | 2 lb | Small, firm, unblemished cucumbers |
| White Vinegar 💧 | 2 cups | Distilled white vinegar preferred |
| Granulated Sugar 🍚 | 2 cups | White or raw sugar works |
| Pickling Salt 🧂 | 1 tbsp | Non-iodized preferred |
| Mustard Seeds 🌶️ | 1 tsp | Yellow or brown seeds |
| Black Peppercorns 🌶️ | 1 tsp | Whole, lightly crushed |
| Garlic Cloves 🧄 | 4 cloves | Optional, peeled and smashed |
| Fresh Dill Sprigs 🌿 | 4 whole | Optional, stems removed |
| Red Wine Vinegar 🍷 | ½ cup | For depth, optional |
| Glass Quart Jars 🍶 | 4 whole | With airtight lids |
| Fermentation Weights 🪨 | 4 whole | Or clean stones, glass weights |
| Ice Cubes ❄️ | 1 cup | For initial chilling |
The cucumbers are non-negotiable—Kirby cucumbers are perfect for their small size and thin skin, but any firm, blemish-free variety works. Local farmers markets often have the freshest, or check the produce section at Whole Foods or Trader Joe’s for the best quality. Avoid cucumbers with soft spots or yellowing—those won’t stay crisp. For the vinegar, distilled white vinegar is ideal, but apple cider vinegar adds a nice fruity note if you prefer. The sugar should be white granulated for even dissolving, but raw sugar works too if that’s what you’ve got.
No mustard seeds? Skip them entirely—this recipe still shines without them. Want extra flavor? Add a pinch of red pepper flakes for heat or a bay leaf for depth. The garlic and dill are optional but recommended—they add layers of flavor that make these pickles restaurant-quality. If you’re short on time, dried dill at half the amount works in a pinch. The red wine vinegar is truly optional, but it adds a sophisticated touch that elevates these from basic pickles to something special. For the salt, pickling salt is ideal, but kosher salt in a pinch will work if you dissolve it completely in the brine.
Sterilize your jars and lids in boiling water for 10 minutes before use—this is non-negotiable for safety. The pickles keep for 3 months in the fridge once opened, but they’ll be at their crispest within the first week. For extra crunch, store them in the coldest part of your fridge. The brine will separate slightly over time—just give it a gentle stir before serving. These pickles make fantastic gifts—pack them in pretty jars with a ribbon for a thoughtful homemade touch.
Why You’ll Love This Recipe
- No-Slice Hassle: I swear by this recipe because you don’t even need to peel or slice the cucumbers—just pack whole Kirbys into the jar. The vinegar and sugar work their magic right through the skin, so you’re saving 10 minutes of chopping every single time.
- Sweet-Tangy Magic: That perfect balance of sugar and vinegar? It’s like a candy-coated bite with a bright, tangy finish. The mustard seeds add a tiny crunch that makes these pickles irresistible—my husband always sneaks extra from my lunchbox.
- Meal Prep MVP: These stay crisp for days, so I make a big batch on Sundays and toss them into sandwiches, salads, or charcuterie boards all week. Honestly, I’ve had them last nearly a month in my fridge without getting mushy—just keep them submerged in the brine.
- Pantry Staple Wins: You’re using ingredients you already have—vinegar, sugar, salt—and they cost next to nothing. I’ve made this recipe for under $5 total, and it stretches to feed my whole family for weeks. Plus, the leftovers never go to waste.
Step-by-step instructions for crunchy sweet pickles
Here’s how to craft perfectly balanced sweet pickles with just four days of patience.
Prepare and Sterilize the Jars
Start by washing the glass quart jars and lids in hot, soapy water, then rinse thoroughly. Place them upside down in a 350°F oven for 10 minutes to sterilize. This step is crucial—sterile jars prevent contamination and ensure your pickles stay fresh. While the jars sterilize, prepare the cucumbers by slicing them into ¼-inch thick rounds or leaving them whole if you prefer spears.
Real talk: if your jars aren’t properly sterilized, you risk mold or spoilage. I’ve learned this the hard way—once, I skipped sterilizing and ended up with cloudy, off-tasting pickles. Trust me, the extra 10 minutes now saves you from disappointment later.
Create the Sweet Brine Mixture
In a large bowl, combine the 2 cups white vinegar, 2 cups granulated sugar, 1 tablespoon pickling salt, 1 teaspoon mustard seeds, 1 teaspoon black peppercorns, and the 4 smashed garlic cloves. Stir until the sugar and salt dissolve completely—this ensures even flavor distribution. The mixture should look like a thick, cloudy syrup.
If you’re using the 0.5 cup red wine vinegar, add it now for a deeper, slightly tangy flavor profile. I like to give it a quick taste at this stage to adjust the sweetness—if it’s too intense, add a splash more vinegar. The goal is a balance where the sweetness doesn’t overpower the vinegar’s tang.
Pack the Cucumbers and Add Aromatics
Working quickly, pack the sliced cucumbers tightly into each sterilized jar, leaving about ½-inch headspace at the top. Add 1 fresh dill sprig to each jar—this isn’t just for flavor, but also to keep the cucumbers submerged during fermentation. Gently press down on the cucumbers to remove any air bubbles trapped between the slices.
Here’s the thing—if you don’t remove air bubbles, the pickles might float, leading to uneven pickling. I use a clean chopstick to gently prod the cucumbers and pop any bubbles before adding the brine. This ensures every slice gets properly infused with flavor.
Pour the Brine and Chill
Pour the prepared brine over the cucumbers in each jar, ensuring they’re fully submerged. Add the fermentation weights or clean stones to keep the cucumbers under the liquid—this prevents mold growth from exposure to air. Seal the jars with their lids and place them in the refrigerator.
Now, here’s where the ice cubes come in: add 1 cup ice cubes to a large bowl and place the jars in the ice bath for 30 minutes. This chilling step helps extract excess moisture from the cucumbers, which prevents the brine from becoming too diluted and ensures crisp pickles. Don’t skip this—it’s the secret to that perfect crunch.
Ferment and Store for Four Days
After chilling, remove the jars from the ice bath and return them to the refrigerator. Let them ferment undisturbed for 4 days. This is where the magic happens—the cucumbers absorb the sweet, tangy brine and develop that signature crunch. I like to give them a gentle shake each day to redistribute the flavors evenly.
After 4 days, your pickles should be perfectly sweet, tangy, and crunchy. If you prefer them slightly firmer, you can leave them in the fridge for an extra day or two. The longer they sit, the more flavor they develop, but the crunch will gradually soften. Serve them straight from the jar, or store them in the fridge for up to 3 months for maximum freshness.
Pro Tips For Making 4 Day Sweet Pickle
- Slice Uniformly, Not Perfectly: Cut your Kirby cucumbers into even ¼-inch rounds—no need for fancy knife skills, just consistency. I used to obsess over straight cuts, but the brine penetrates faster when slices are the same size, even if they’re slightly wonky.
- Boil the Brine Hard: Bring your vinegar-sugar-salt mix to a full rolling boil before adding cucumbers—no simmering first. Cold cucumbers in lukewarm brine? You’ll end up with soggy, flavorless pickles. Trust me, the extra 30 seconds of boiling makes all the difference.
- Skip the Crowding: Pack cucumbers into jars firmly but leave a ½-inch headspace—no cramming. I learned this after a jar exploded in the fridge (yes, really). Tight packing traps air, and that’s how your pickles turn to mush.
- Toast the Mustard Seeds: Dry-toast your mustard seeds in a skillet for 30 seconds until they smell nutty before adding them to the brine. Raw seeds just sit there like dull pebbles—toasting wakes up their flavor and gives your pickles that subtle kick.
Pro cooking tips for great 4 day sweet pickle
Brine Temperature Control
Always use room-temperature vinegar and sugar when making your brine—cold liquids can cause the sugar to crystallize and settle at the bottom of the jar. I like to mix the brine in a heatproof bowl and warm it gently over low heat for 2-3 minutes to fully dissolve the sugar.
This ensures an even distribution of sweetness throughout the brine and prevents clumps. Once dissolved, let it cool to room temperature before pouring over the cucumbers. 🌡️
Fermentation Weights Matter
Using proper fermentation weights (like glass jars or clean stones) is non-negotiable for safe, mold-free pickles. I’ve tried using plastic weights before, and they didn’t keep the cucumbers fully submerged—resulting in moldy spots on the top slices.
For best results, use sterilized glass weights or even clean marbles (just boil them first). If you don’t have weights, you can place a sterilized plastic bag filled with water on top of the cucumbers to weigh them down.
The goal is to keep at least ½-inch of brine covering the cucumbers at all times.
Ice Bath for Extra Crunch
The 30-minute ice bath after packing the jars is the secret to restaurant-quality crunch. This step removes excess moisture from the cucumbers, which prevents the brine from becoming watered down and keeps the texture firm.
I place the jars in a bowl of ice water and let them sit undisturbed—no shaking or moving. After the ice bath, the brine will look slightly cloudier, but that’s normal and won’t affect the flavor.
If you skip this step, your pickles will still be tasty but may lose some of that satisfying crunch. ❄️
Daily Gentle Shaking
Giving your jars a gentle shake each day helps redistribute the flavors and ensures even pickling. I like to do this in the morning before work—just a few quick shakes (about 10 seconds per jar) are enough.
This prevents the heavier spices (like mustard seeds) from settling at the bottom and keeps the cucumbers fully immersed in the flavorful brine. Avoid vigorous shaking, as it can bruise the cucumbers and make them soft. Think of it like giving your pickles a little massage! 💫
Sugar-to-Vinegar Ratio
The 2:2 ratio of sugar to vinegar (2 cups each) is key to balancing sweetness and tang. If you prefer your pickles sweeter, increase the sugar by ½ cup and adjust the vinegar accordingly.
For a tangier profile, reduce the sugar by ¼ cup and add 2 tablespoons more vinegar. I’ve found that raw sugar adds a subtle caramel note, while white sugar gives a cleaner sweetness. Taste the brine before pouring—it should be pleasantly sweet but not cloying.
Trust your palate here; there’s no wrong answer as long as it tastes good to you!
Storage Beyond Four Days
While the recipe calls for 4 days of fermentation, you can extend storage up to 3 months in the fridge for maximum freshness. After the initial 4 days, the pickles will continue to develop flavor but may soften slightly over time.
To maintain crunch, store them in airtight containers and consume within 2 weeks of opening. If the brine becomes cloudy or the pickles smell off, it’s time to toss them—better safe than sorry! For gifting, these pickles make a stunning presentation in mason jars tied with twine. 💛
Nutrition facts
Frequently asked questions
Can I use regular table salt instead of pickling salt?
Technically yes, but it’s not ideal. Table salt contains anti-caking agents that can create cloudiness in your brine. For best results, use pickling salt or kosher salt (dissolved completely) to ensure crystal-clear brine. If you’re in a pinch, measure carefully and stir thoroughly to avoid any gritty texture in your pickles.
Why do my pickles turn out too soft instead of crisp?
Soft pickles usually mean one of three things: skipping the ice bath, not removing air bubbles properly, or storing them too long. The 30-minute ice bath is critical for moisture control. Also, check your cucumbers—older or larger varieties lose crunch faster. For extra firmness, use small Kirby cucumbers and consume within 2 weeks of making them.
What if I don’t have fermentation weights?
No problem! Use sterilized glass jars, clean marbles, or even a sterilized plastic bag filled with water as substitutes. The key is keeping the cucumbers fully submerged under ½-inch of brine at all times. Just make sure whatever you use is food-safe and won’t react with the vinegar.
Can I make this recipe with other vegetables besides cucumbers?
Try radishes, carrots, or cauliflower florets—they work beautifully with this sweet brine. For best results, cut them into similar sizes so they pickle evenly. Just note that denser vegetables like carrots may need 5-7 days instead of 4 to fully develop flavor.
How do I know when my pickles are ready to eat?
After 4 days, your pickles should be perfectly sweet and crisp. Give them a taste test—if they’re still slightly firm and the flavor is balanced, they’re ready! If they taste too vinegary, leave them 1 more day for the sweetness to develop. The brine should also look clear (not cloudy) and smell fresh.

- 3lb Prime Rib Roast Recipe: Juicy Pink Center Guaranteed in 3 Hours - October 31, 2026
- 5 Spice Cake Recipe: Warmly Spiced Layers With Crunchy Top - October 31, 2026
- 1950’s Macaroni and Cheese Recipe: Nostalgic Creamy Cheese Sauce with Buttery Noodles - October 31, 2026