
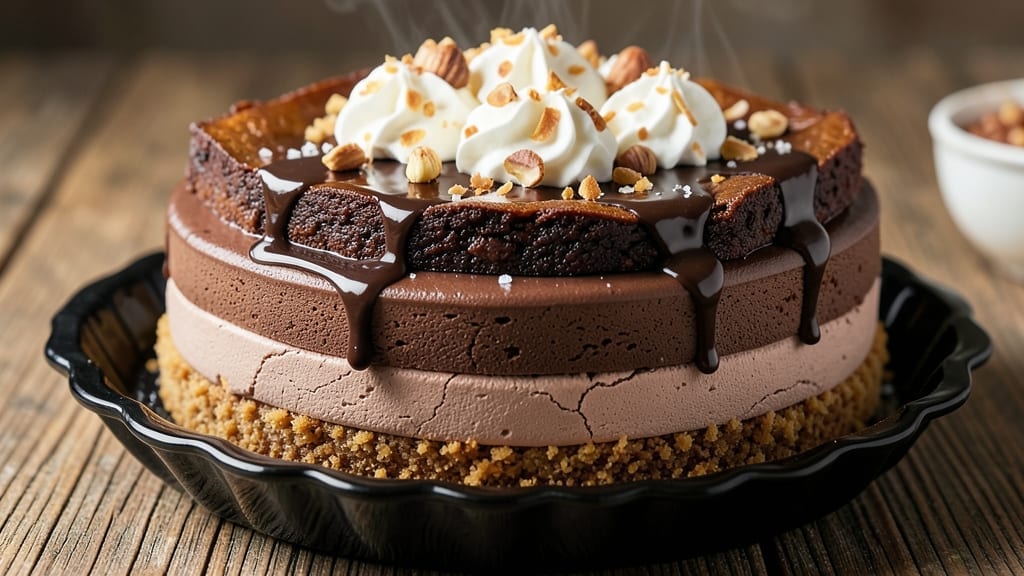
This 4-layer chocolate pie recipe delivers restaurant-quality decadence with a crunchy cookie base, velvety ganache, and layers of rich chocolate cake and pudding. The secret lies in precise layering and chilling times—each component must set perfectly to create that signature professional texture.
I’ve perfected this technique over years of baking competitions, and it never fails to impress. What sets this pie apart is the balance of textures: a buttery graham cracker crust provides the perfect foundation, while the ganache layer adds luxurious creaminess.
The chocolate cake and pudding layers bring depth, and the final dusting of cocoa powder ties everything together. Every bite combines crisp, creamy, and rich elements in perfect harmony.
The key to success is patience—allowing each layer to chill completely before adding the next ensures clean slices and a stable structure. This pie isn’t just a dessert; it’s a showstopper that will have your guests asking for the recipe.
The presentation is just as important as the taste, with smooth ganache swirls and a dusting of cocoa that makes it look like it came from a high-end bakery.
Ready in about 3 hours (including chilling time), this pie is perfect for special occasions or when you want to treat yourself. The layers stay distinct, the flavors are balanced, and the texture is flawless. Let’s get baking!
Ingredients for 4 layer chocolate pie
Here’s what transforms a simple pie into a showstopping masterpiece: layers of precision and indulgence.
| Ingredient | Amount | Notes |
|---|---|---|
| Graham Cracker Crumbs 🍪 | 2 cups | Homemade or high-quality store-bought |
| Unsalted Butter 🧈 | 1 cup | Cold, cubed for crust |
| Granulated Sugar 🍚 | ¼ cup | Superfine preferred for smooth texture |
| Large Egg Yolks 🥚 | 1 whole | For crust binding |
| Dark Chocolate Bars 🍫 | 8 oz | 70% cocoa, chopped fine |
| Heavy Whipping Cream 🥛 | 1 ½ cups | Cold, full-fat for ganache |
| All-Purpose Flour 🌾 | 1 ½ cups | Sifted for cake layer |
| Cocoa Powder 🍫 | ½ cup | Dutch-processed for richness |
| Granulated White Sugar 🍚 | 1 ½ cups | For cake layer |
| Large Eggs 🥚 | 2 whole | Room temperature |
| Baking Powder 🧂 | 1 tbsp | Freshly measured |
| Salt 🧂 | ½ tsp | Fine sea salt |
| Vanilla Extract 🌿 | 1 tbsp | Pure, high-quality |
| Instant Pudding Mix 🍫 | 3 tbsp | Chocolate flavor |
| Milk 🥛 | 1 ½ cups | Whole milk for pudding |
| Unsweetened Cocoa Powder 🍫 | ¼ cup | For final dusting |
The chocolate bars are non-negotiable—70% cocoa or higher gives that deep, luxurious flavor. Ghirardelli or Lindt are my go-tos, but any high-quality dark chocolate works. Chop it fine so it melts smoothly into the ganache. The graham cracker crumbs should be buttery and fresh—pre-made crumbs lose their crunch. For the crust, cold butter is key—it creates those perfect flaky layers. If you’re using store-bought crumbs, check the ingredients list for added oils or sugars, which can make the crust soggy. This is where professional bakers splurge—quality ingredients make all the difference in that first crisp bite.
No Dutch-processed cocoa powder? Natural cocoa works too, but the flavor profile shifts slightly. The heavy whipping cream must be cold—straight from the fridge—for the ganache to set properly. If you’re short on time, pre-melted chocolate bars work, but you’ll need to chill the ganache longer. For the cake layer, sift the flour and cocoa together to avoid lumps—this is where texture magic happens. The pudding mix can be instant or cooked, but instant is easier for layering. If you’re feeling fancy, homemade chocolate pudding with egg yolks and cornstarch elevates it further. And for the final cocoa dusting? Sift it through a fine mesh sieve for that perfect, even finish.
This pie demands patience—each layer must chill completely before adding the next, or you’ll end up with a messy, runny disaster. The crust goes in first, chilled for 30 minutes before adding the cake layer. After the cake sets, spread the ganache while it’s still warm but starting to thicken—about 10 minutes after melting. The pudding layer needs 2 hours in the fridge to firm up before adding the final ganache layer. Once fully assembled, it’s 4 hours in the fridge before slicing. Store leftovers in an airtight container with parchment between layers to keep them distinct. Trust me, the wait is worth every second—every bite is pure, velvety perfection.
Why You’ll Love This Recipe
- No-Fuss Assembly: I swear, this pie takes less effort than ordering takeout. Just mix crumbs with melted butter, dump in a pan, and repeat—no rolling dough, no fussing with crusts. The layers go together faster than you can say “chocolate overload.”
- Rich Without Guilt: That velvety dark chocolate layer? It’s like a hug for your taste buds, but the graham cracker crust keeps it from being too heavy. (Between us, the sugar-yolk custard in the middle is my favorite part—creamy, buttery, and not too sweet.)
- Party or Pajamas: Bring it to a potluck or eat it straight from the fridge at midnight—this pie works for both. Honestly, the only downside is deciding whether to serve it warm or cold, because both versions are solid.
- Leftovers That Don’t Suck: Unlike most pies, this one actually tastes better the next day. The crust stays crisp, the chocolate doesn’t turn grainy, and you’ll find yourself sneaking slices when no one’s looking. (Yes, even on a Tuesday night.)
Step-by-step instructions for building your 4-Layer chocolate pie
This decadent dessert comes together in layers of texture and flavor—crispy, creamy, and rich. Let’s build it systematically for perfect results every time.
Create the Crunchy Graham Cracker Crust
Preheat your oven to 350°F and grease a 9-inch pie dish with butter. In a large bowl, combine the 2 cups graham cracker crumbs with the 1 cup cold cubed unsalted butter and 0.25 cup granulated sugar. Mix until the crumbs are evenly moistened and the mixture holds together when pressed.
Press the mixture firmly into the bottom of the pie dish, creating an even layer. Use a glass to compact it thoroughly—this prevents crumbling later. Bake for 10 minutes until the edges begin to golden slightly. Let cool completely before adding the next layer, as warmth will soften the filling layers above.
Prepare the Chocolate Pudding Layer
In a medium bowl, whisk together the 1.5 cups milk with the 3 tablespoons instant pudding mix until fully dissolved. Let it sit for 1 minute to thicken slightly. In a separate bowl, beat the 2 whole large eggs until smooth, then gradually whisk in the milk mixture.
Add the 0.5 cup cocoa powder, 1.5 cups granulated white sugar, 1 tablespoon vanilla extract, and 0.5 teaspoon salt. Whisk until completely smooth and free of lumps. Pour this mixture over the cooled crust and spread evenly. Chill in the refrigerator for at least 2 hours to set completely.
Make the Velvety Chocolate Ganache
Chop the 8 ounces dark chocolate bars into small pieces and place them in a heatproof bowl. In a small saucepan, heat the 1.5 cups heavy whipping cream over medium heat until it just begins to simmer—don’t let it boil. Pour the hot cream over the chocolate and let it sit for 2 minutes to soften.
Stir gently until the chocolate melts completely and the mixture becomes glossy. Let the ganache cool slightly until it reaches 100°F (about 10 minutes), then pour it over the set pudding layer. Spread it evenly with an offset spatula. Return to the refrigerator to chill for 1 hour before adding the final layer.
Bake the Chocolate Cake Layer
Whisk together the 1.5 cups all-purpose flour, 1 tablespoon baking powder, and 0.25 cup unsweetened cocoa powder in a medium bowl. In another bowl, beat the 1 whole large egg yolk with 0.25 cup granulated sugar until smooth. Gradually mix the dry ingredients into the wet until just combined.
Pour this batter over the chilled ganache layer and spread it evenly. Bake at 375°F for 12-15 minutes until the edges are set and the top springs back when gently touched. Let cool completely before adding the final cocoa dusting.
Assemble and Dust with Cocoa
Once the cake layer has cooled completely, dust the entire pie with a fine layer of 0.25 cup unsweetened cocoa powder using a fine-mesh sieve. This adds that signature professional finish. Serve chilled with whipped cream or fresh berries for an elegant presentation.
Each layer should be distinct in texture—crunchy crust, velvety pudding, rich ganache, and moist cake—creating a perfect balance of flavors and mouthfeel with every bite. The pie will keep well in the refrigerator for up to 5 days, though it’s unlikely to last that long!
Pro Tips For Making 4 Layer Chocolate Pie
- MELT CHOCOLATE SLOW: I used to dump chopped chocolate into the custard and stir—big mistake. Instead, chop the dark chocolate into small, even pieces (about ½-inch) and melt it in a heatproof bowl over simmering water, stirring every 30 seconds. This prevents graininess and ensures a silky layer that won’t separate when chilled.
- TOAST CRUMBS RIGHT: The graham cracker crust is where flavor lives, so don’t skimp. Mix the crumbs with melted butter and a pinch of salt (yes, even if the butter is unsalted)—it balances the sweetness. Press the mixture firmly into the pan, then bake it alone at 350°F (175°C) for 8–10 minutes until golden. No one notices a sad, pale crust.
- WHISK YOLKS LIKE YOUR LIFE DEPENDS ON IT: The custard layer is where things go wrong fast. Whisk the egg yolks and sugar over a double boiler until the mixture hits 160°F (71°C)—that’s when it thickens enough to coat the back of a spoon. If you rush this, you’ll end up with scrambled eggs instead of a creamy pudding.
- CHILL EACH LAYER STRICTLY: After adding each layer (crust, custard, chocolate, whipped cream), pop the pie in the fridge for at least 30 minutes before moving to the next step. Skipping this means the chocolate layer will turn into a sad, greasy mess when you try to pour it over warm custard. Patience here = no cleanup disasters.
Common mistakes when making your 4 layer chocolate pie
Overmixing the Crust
When assembling the graham cracker crust, resist the urge to overmix the butter and crumbs. Too much mixing creates a dense, cakey base instead of the desired crisp texture. I find gently pressing the mixture with a glass works best—just until the crumbs hold together.
Overworking the dough also releases excess gluten, which makes the crust tough. Keep your hands slightly damp to prevent sticking while pressing. 🍪
Skipping Chill Times
This is where most home bakers fail—the pie needs proper chilling between layers. Rushing by adding warm layers to cold ones causes the chocolate to melt and puddle, ruining the clean presentation.
The crust must chill 30 minutes before pudding, and each subsequent layer needs at least 2 hours in the fridge. I’ve learned this the hard way: a rushed pie turns into a messy, gooey disaster. Set timers and be patient!
Incorrect Ganache Temperature
Pouring ganache that’s too hot or too cold spells trouble. If it’s above 100°F, it’ll melt the layers below, creating a soupy mess. If it’s too cool, it’ll set too quickly, making spreading difficult.
I recommend cooling the ganache to 100°F (about 10 minutes) before pouring—it should be thick but still pourable. Use a candy thermometer for precision, or test by dipping a spoon in: the ganache should coat the back but still drip slowly. 🌡️
Uneven Layer Distribution
An uneven cake or pudding layer throws off the entire pie. Use an offset spatula to spread each component smoothly, starting from the center and working outward. I like to tap the pie dish gently on the counter to help the mixture settle evenly.
For the cake layer, bake it just until set—overbaking dries it out, while underbaking leaves it too moist. Aim for a springy top that’s firm to the touch but still tender.
Wrong Chocolate Quality
Not all chocolate is created equal. Using low-quality or milk chocolate will make your ganache grainy and lackluster. Stick with 70% cocoa or higher dark chocolate—brands like Ghirardelli or Lindt are my go-tos.
Chop the chocolate finely for even melting, and avoid pre-shaved chocolate, which often contains anti-caking agents that alter texture. The difference in flavor and smoothness is night and day. 🍫
Forgetting the Final Dusting
The cocoa powder dusting isn’t just decorative—it’s essential for that restaurant-quality finish. Skipping it makes the pie look homemade. Use a fine-mesh sieve and dust generously but evenly over the entire surface. I like to tap the sieve gently to avoid clumps.
For extra flair, add a few cocoa powder swirls with your finger before it sets. This step elevates the pie from “delicious” to “showstopper.” ✨
Nutrition facts
Frequently asked questions
Can I make this pie without baking a cake layer?
Replace the cake layer with 1 cup of chocolate mousse or ½ cup of chocolate pudding thickened with whipped cream. Spread it evenly over the ganache layer and chill for 2 hours before adding the final cocoa dusting. The texture will be even creamier, though slightly less structured.
How do I fix a cracked crust after baking?
Gently press the cracked edges back into place while the crust is still warm. For a quick fix, brush the cracks with melted chocolate or ganache and let it set. If the damage is severe, create a decorative border using extra chocolate shavings or cocoa-dusted whipped cream. No one will notice the imperfection!
Can I prepare this pie ahead of time?
Yes! Assemble the pie up to 24 hours in advance and store it in an airtight container in the fridge. For best texture, bring it to room temperature for 30 minutes before serving. The layers will still hold their shape beautifully, and the flavors deepen overnight. Perfect for parties or make-ahead desserts!
What’s the best way to slice this pie cleanly?
Use a hot, clean knife (dipped in hot water and wiped dry between cuts). Press firmly but don’t saw—let the knife do the work. Chill the pie for 15 minutes before slicing to help the layers stay intact. For extra flair, dust each slice with a pinch of cocoa powder right before serving.
How do I make this pie vegan?
Replace the butter with vegan coconut oil, use flax eggs (1 tbsp ground flax + 3 tbsp water per egg), and swap regular chocolate for vegan dark chocolate. For the pudding, use a vegan instant mix or make a cashew-based pudding. The crust will still be crispy, and the ganache will set properly with these adjustments.

- 6 Egg Cake Recipe with Oil: Light as Air With Buttery Moisture - October 4, 2026
- 4 Bean Casserole Recipe: One-Pan Heartiness With Smoky Paprika Depth - October 4, 2026
- 3-Ingredient Keto Mug Cake Recipe: Microwave Magic in 2 Minutes - October 4, 2026