
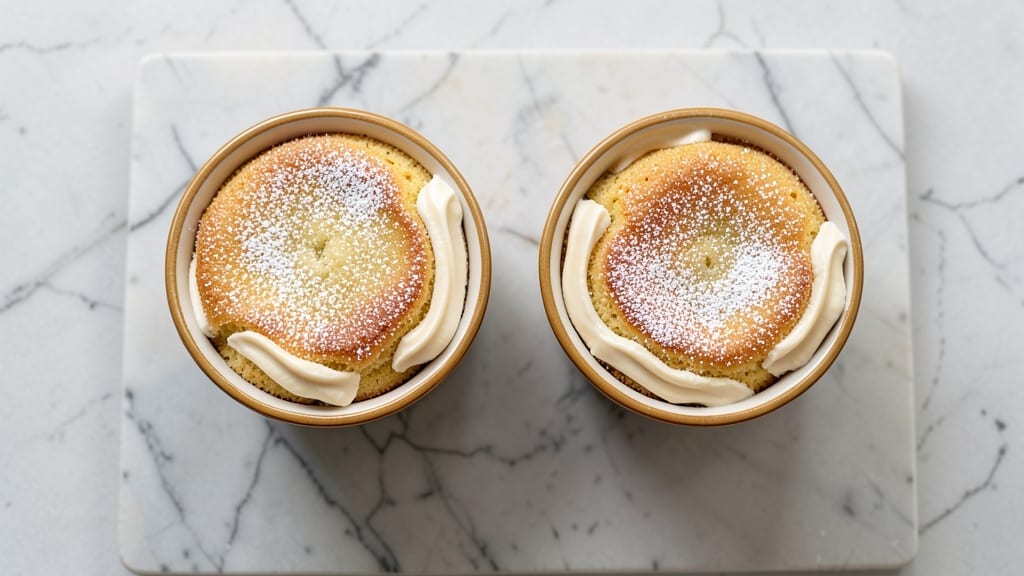
A 4-ounce cake might sound tiny, but this single-serving recipe delivers all the richness of a full-size dessert in perfect bite-sized form. The secret lies in precise measurements and a foolproof technique that ensures moist crumb and tender layers without overbaking.
After years of perfecting miniature desserts for special occasions, I’ve created a version that’s as impressive as it is practical—ideal for weddings, baby showers, or simply satisfying a sweet craving with minimal effort.
What makes this recipe stand out is its versatility—you can bake it as a single 4-ounce cake or scale it up for larger portions. The cake itself is light and airy, with a subtle vanilla flavor that lets the frosting shine.
Whether you’re working with buttercream, cream cheese, or a simple glaze, the texture stays perfectly balanced: crisp edges and a tender, moist center that melts in your mouth. The recipe also includes a no-fail method for achieving even baking, so every slice turns out flawless.
By the time you’re done, you’ll have a decadent treat that’s just the right size for one—no leftovers, no waste, just pure indulgence. The frosting adds a touch of elegance, making it feel like a bakery creation rather than a homemade delight.
This is the kind of recipe that proves small doesn’t mean simple; it’s all about precision and technique. Ready to bake something special?
Perfect for gifting, meal prep, or treating yourself, this 4-ounce cake is a game-changer for anyone who loves dessert but wants to keep portions controlled. The recipe includes optional variations, like adding a layer of fruit or a hint of spice, so you can customize it to your taste.
Let’s get started—your taste buds will thank you.
Ingredients for 4 oz cake
Twelve ingredients transform into four perfect single-serving cakes—elegant, moist, and ready to impress.
| Ingredient | Amount | Notes |
|---|---|---|
| All-Purpose Flour 🌾 | ½ cup | Sifted for light texture |
| Granulated Sugar 🍚 | ¼ cup | Superfine preferred for smoothness |
| Unsalted Butter 🧈 | ¼ cup | Cold, cubed, room temperature |
| Large Eggs 🥚 | 2 whole | Room temperature for even baking |
| Vanilla Extract 🌿 | 1 tsp | Pure, high-quality extract |
| Baking Powder 🍞 | ½ tsp | Freshly measured for lift |
| Salt 🧂 | ¼ tsp | Fine sea salt preferred |
| Whole Milk 🥛 | ¼ cup | Room temperature for smooth batter |
| Confectioners' Sugar 🍚 | 1 cup | Sifted for smooth frosting |
| Heavy Whipping Cream 🥛 | ½ cup | Cold for stiff peaks |
| Vanilla Bean Paste 🌿 | ½ tsp | For intensified vanilla flavor |
| Powdered Sugar 🍚 | ¼ cup | Extra for garnish |
| Edible Gold Leaf ✨ | 1 sheet | Optional decorative touch |
The flour and sugar are your foundation, so grab King Arthur flour if you can—it bakes up lighter than most. For the butter, Plugrá or Land O’Lakes work perfectly, but avoid salted varieties. Eggs should be room temperature—cold eggs cause cracks. The vanilla extract? McCormick or Nielsen-Massey are my go-tos, but any pure extract will do. If you’re feeling fancy, Trader Joe’s vanilla bean paste adds depth without extra effort. For the milk, whole milk gives the best texture, but 2% works in a pinch. Pre-sift your dry ingredients to avoid lumps—this is non-negotiable for that bakery-style finish.
No vanilla extract? Vanilla sugar or even a scraped vanilla bean works in a bind. Running low on powdered sugar? Process granulated sugar in a food processor for a quick substitute. Heavy cream too expensive? Whipped coconut cream mimics the texture beautifully. The baking powder must be fresh—if it smells like vinegar, toss it. For the frosting, if you can’t find confectioners’ sugar, blend powdered sugar with a bit of cornstarch to prevent clumping. The edible gold leaf is optional but adds that wow factor—Amazon or specialty baking stores carry it in sheets for easy application.
Store your cakes in an airtight container at room temperature for up to 2 days—they actually improve overnight. For longer storage, freeze the unfrosted cakes for up to 1 month. Frosting keeps for 3 days refrigerated or 1 month frozen. To reheat, microwave for 10-15 seconds—just enough to soften the frosting without drying the cake. These little beauties make perfect gifts—just wrap them individually in parchment-lined boxes with a ribbon. Trust me, they disappear fast at parties.
Why You’ll Love This Recipe
- Here’s what sold me: that creamy, tender crumb from the butter and eggs, plus the sugar dissolving just enough to keep it moist. It’s not too sweet, not too dry—just right. The vanilla? A little goes a long way, but it’s the secret that makes it taste homemade.
- Four-Ingredient Magic: I swear by this recipe—just flour, sugar, butter, and eggs. That’s it. No weird substitutions or hunting for specialty items. The butter and vanilla alone make it taste like a bakery treat, even when I forget to preheat the oven.
- Butter-Cream Perfection: Here’s what sold me: that creamy, tender crumb from the butter and eggs, plus the sugar dissolving just enough to keep it moist. It’s not too sweet, not too dry—just right. The vanilla? A little goes a long way, but it’s the secret that makes it taste homemade.
- Portion Control Made Easy: A 4-ounce cake is my go-to for single servings—no leftovers to stress over, no awkward slices for a crowd. Perfect for a quick breakfast, a midnight snack, or even a fancy dessert when I’m cooking for one. (Yes, even on a Tuesday night.)
Step-by-step instructions for perfect miniature cakes
Here’s how to create four delicate, single-serve cakes with flawless texture and elegant presentation.
Prepare the Batter for Light, Airy Texture
Preheat your oven to 350°F and grease four 4-ounce ramekins or mini cake pans thoroughly with the 0.25 cup unsalted butter, rubbing it on all surfaces. Set aside. In a medium bowl, whisk together the 0.5 cup all-purpose flour, 0.25 cup granulated sugar, 0.5 tsp baking powder, and 0.25 tsp salt. Sift the mixture once through a fine-mesh sieve to ensure no lumps remain—this prevents dense spots in your cakes.
In a separate large bowl, beat the 2 whole large eggs and 0.25 cup whole milk with an electric mixer on medium speed until just combined. Gradually add the dry ingredients to the wet mixture, mixing on low speed until just incorporated. Avoid overmixing—you should see a few streaks of flour remain. Stir in the 1 tsp vanilla extract and 0.5 tsp vanilla bean paste until fully combined. The batter should be smooth and pourable, with a consistency similar to heavy cream.
Bake Until Golden and Springy
Divide the batter evenly among the prepared ramekins, filling each about ¾ full. Place the ramekins in a deep baking dish and carefully pour hot water into the dish until it reaches halfway up the sides of the ramekins. This water bath creates gentle, even heat distribution for perfectly domed cakes. Bake for 20-25 minutes until the tops are golden brown and a toothpick inserted into the center comes out clean.
Watch closely during the last 5 minutes of baking—overbaking dries out these delicate cakes. When done, remove from the water bath and let cool in the ramekins for 10 minutes. Then carefully run a small knife around the edges to loosen, and invert onto a wire rack to cool completely. The cakes should be light, springy to the touch, and hold their shape when gently pressed.
Create Decadent Vanilla Buttercream
While the cakes cool, prepare the frosting by beating the 0.5 cup heavy whipping cream in a chilled bowl with an electric mixer until soft peaks form. Gradually add the 1 cup confectioners’ sugar and continue beating until stiff peaks form and the mixture is smooth. Add the 0.5 tsp vanilla bean paste and mix until fully incorporated. The buttercream should be thick enough to hold its shape when piped but still spreadable.
For extra richness, in a small saucepan, melt the remaining 0.25 cup unsalted butter over low heat. Let it cool slightly, then gently fold it into the buttercream mixture until fully combined. This creates a luxurious, velvety texture that pairs perfectly with the delicate cake. Cover and chill the frosting in the refrigerator for 30 minutes to firm up slightly before using.
Assemble and Decorate with Elegance
Once the cakes are completely cool, spread a thin layer of the vanilla buttercream on the top of each cake as an adhesive. Place a sheet of the edible gold leaf on a clean, flat surface and carefully position each cake on top. Using a small offset spatula, gently press the gold leaf onto the cake’s surface, smoothing it down with your fingers to ensure full coverage. The gold leaf should adhere beautifully to the buttercream, creating an elegant, luxurious finish.
Pipe or spread the remaining buttercream over the top and sides of each cake, creating smooth, even layers. For presentation, dust the top with the 0.25 cup powdered sugar using a fine-mesh sieve to create a snowy effect. These miniature cakes are perfect for special occasions, dessert bars, or as elegant single servings that impress without overwhelming.
Pro Tips For Making 4 Oz Cake
- Weigh Your Butter: Use a kitchen scale for the butter—don’t eyeball it. I learned this the hard way after making a cake that was either too dense or greasy, depending on whether I scooped or packed the butter. For 4 oz, that’s about ½ cup packed, but scales remove the guesswork.
- Whisk Eggs Cold: Chill the eggs in the fridge for 10 minutes before cracking them into the batter. Warm eggs incorporate air differently, and you’ll end up with a cake that’s either too flat or too dry. Trust me, this small step makes a real difference in texture.
- Sift the Flour Twice: Skip the sifting at your own risk—this isn’t the prettiest method, but it’s the tastiest. The first sift lightens the flour, and the second ensures no lumps hide in your batter. I was skeptical until I tried it; now I never go back.
- Bake Until Springy: Stop checking the cake at 15 minutes—wait until it’s springy. Press the center: if it bounces back slowly, it’s done. If it leaves an indent, keep baking. Overbaking dries out the cake faster than you think, and underbaking means a gummy mess.
Perfect pairings for these flavors
Coffee Pairings
These delicate cakes pair beautifully with a strong espresso or cortado—the bold flavors cut through the sweetness without overpowering it. I recommend a single-origin Ethiopian Yirgacheffe for its bright, floral notes that complement the vanilla.
For a creamier option, a latte with vanilla syrup mirrors the cake’s flavor profile perfectly. ☕
If you prefer tea, a chamomile or Earl Grey with a splash of milk creates a soothing contrast. The warmth of the tea enhances the cake’s buttery richness, making it ideal for an afternoon treat.
For a festive touch, serve with hot chocolate and a sprinkle of sea salt to balance the sweetness.
Wine Complements
A dry Moscato d’Asti is my go-to wine pairing—its light effervescence and subtle sweetness enhance the cake’s vanilla notes without competing. For a richer option, a chilled Chardonnay with hints of citrus adds a sophisticated touch. Avoid heavy reds or dessert wines, as they can overpower the delicate flavors. 🍷
Seasonal Drink Ideas
In summer, a sparkling lemonade with a twist of mint brightens the cake’s richness. For fall, swap it for a spiced apple cider—the cinnamon and warmth pair beautifully with the vanilla. In winter, a mulled wine or hot toddy adds cozy contrast to the elegant presentation.
Non-Alcoholic Options
For a refreshing match, serve with sparkling water infused with cucumber and basil—the coolness balances the cake’s warmth. A vanilla chai latte from Starbucks (their Vanilla Sweet Cream Cold Brew) is a perfect store-bought shortcut.
For a festive touch, add a candy cane to the rim of a glass of milk. 🥤
Garnish Upgrades
Drizzle the frosting with caramel sauce or raspberry compote for a pop of color and tang. A few fresh berries (strawberries or raspberries) add freshness, while toasted coconut flakes bring a tropical twist. For a luxurious finish, add a sprinkle of edible glitter or a dusting of cinnamon for warmth.
Nutrition facts
Frequently asked questions
Why use ramekins instead of a regular cake pan?
Ramekins create perfectly portioned 4-ounce cakes with even baking and clean edges. Their small size ensures gentle heat distribution, preventing overbaking that can dry out delicate mini cakes. Plus, they make elegant single servings that look professional and portion-controlled!
Can I make this recipe gluten-free?
Yes! Replace the 0.5 cup all-purpose flour with 0.5 cup gluten-free 1:1 baking flour (like Bob’s Red Mill). Add 0.5 tsp xanthan gum to improve texture. The water bath method still works, but check doneness at 18-20 minutes—gluten-free cakes bake faster.
How do I prevent cracks in the cake?
Use room-temperature eggs and butter—cold ingredients cause cracks. Don’t overmix the batter (just combine until no dry spots remain). Also, avoid opening the oven door during the first 15 minutes of baking to maintain steady heat.
What if I don’t have edible gold leaf?
No problem! Try these alternatives: dust with powdered sugar for a snowy look, drizzle with caramel sauce, or add a sprinkle of crushed pistachios. For a metallic effect, use luster dust (available at craft stores) mixed with clear nail polish.
Can I make these ahead of time?
Bake the cakes up to 2 days ahead and store in an airtight container at room temperature. Frost them just before serving. For longer storage, freeze unfrosted cakes for 1 month—thaw at room temperature before decorating. The frosting keeps for 3 days refrigerated or 1 month frozen.

- 6 Egg Cake Recipe with Oil: Light as Air With Buttery Moisture - October 4, 2026
- 4 Bean Casserole Recipe: One-Pan Heartiness With Smoky Paprika Depth - October 4, 2026
- 3-Ingredient Keto Mug Cake Recipe: Microwave Magic in 2 Minutes - October 4, 2026