
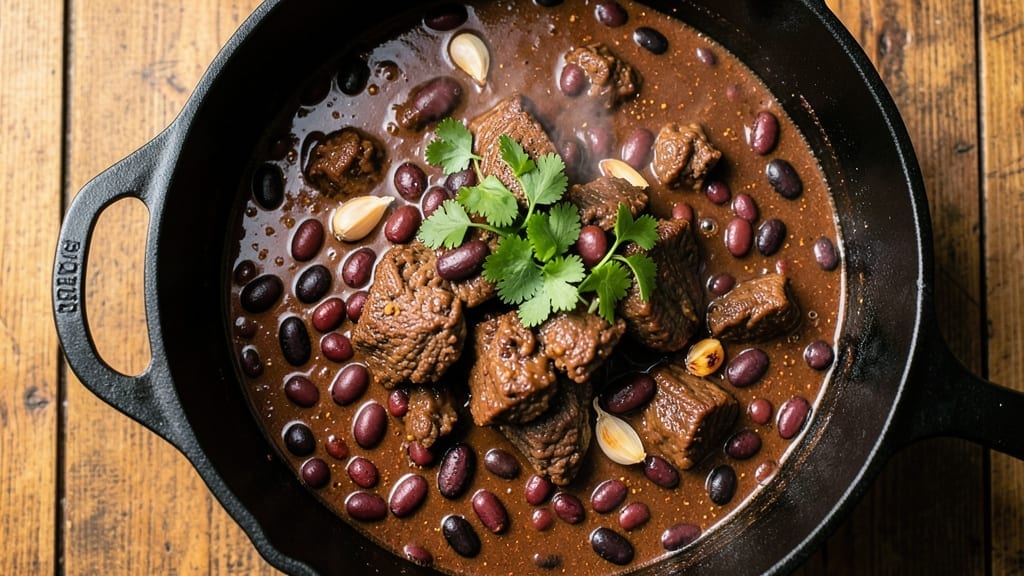
This 4-quart chili recipe delivers the kind of deep, smoky flavor that transforms a simple pot of beans and meat into a hearty centerpiece for any gathering. The secret lies in slow-cooking the ingredients until they meld into a rich, thick stew that only gets better overnight.
I’ve perfected this version over years of testing, ensuring every bite delivers that perfect balance of spice, meatiness, and tender beans.
The process starts with browning the meat—this crucial step develops deep, caramelized flavors that form the foundation of the chili. Then, it’s all about patience as the ingredients simmer together, allowing the spices to bloom and the beans to absorb the rich, meaty broth.
The result is a chili that’s thick enough to hold its shape but still tender enough to melt in your mouth.
By the time you’re ready to serve, you’ll have a 4-quart pot of chili that’s packed with bold flavors and hearty texture. The smoky spices linger on your palate, while the tender meat and beans create a satisfying bite.
This recipe scales perfectly for a crowd, making it ideal for game days, family dinners, or meal prep.
Serve it with all the classic toppings—sour cream, shredded cheese, chopped onions, or fresh cilantro—to customize each bowl. The chili tastes even better the next day, so double the batch if you can. Here’s how to make it happen.
Ingredients for 4 quart chili
Fourteen ingredients. One pot. Smoky, hearty chili that gets better overnight.
| Ingredient | Amount | Notes |
|---|---|---|
| Ground Beef (Chuck Roast) 🥩 | 2 lb | 80% lean, pre-cubed preferred |
| Kidney Beans 🌱 | 1 lb | Drained and rinsed canned |
| Black Beans 🌱 | 1 lb | Drained and rinsed canned |
| Chili Powder 🌶️ | 3 tbsp | Smoked chili preferred |
| Ground Cumin 🌿 | 1 tbsp | Toasted for deeper flavor |
| Garlic Cloves 🧄 | 6 cloves | Minced for even distribution |
| Onion (Yellow) 🧅 | 1 whole | Diced, medium size |
| Tomato Paste 🍅 | ½ cup | Squeeze tube or canned |
| Beef Broth 💧 | 3 cups | Low-sodium preferred |
| Water 💧 | 1 cup | For thinning if needed |
| Dark Brown Sugar 🍚 | 1 tbsp | Enhances smoky depth |
| Cayenne Pepper 🔥 | ½ tsp | Adjust for heat preference |
| Salt 🧂 | 1 ½ tsp | Kosher or sea salt |
| Black Pepper 🌶️ | ½ tsp | Freshly ground preferred |
| Olive Oil 🫒 | 1 tbsp | For browning meat |
The beef is non-negotiable here—chuck roast gives you that melt-in-your-mouth texture. Costco or Walmart usually have pre-cubed chuck at a great price, but if you’re buying a whole roast, ask the butcher to cube it. Look for good marbling—it’s what makes the chili rich. The beans can be any mix, but kidney and black beans give you that classic chili texture. I always grab the no-salt-added cans to control the seasoning myself. For the spices, Penzeys or bulk bins at Whole Foods have the best quality, but honestly, the regular grocery store stuff works fine if it’s fresh.
No chili powder? Substitute smoked paprika plus a pinch of cayenne—it’s the closest you’ll get. Running low on cumin? Ground coriander at half the amount works in a pinch. The tomato paste can be the squeeze tube kind (no waste!) or canned. If you’re making this ahead, freeze the raw chili before adding water—it keeps better that way. The onions can be yellow or red, but yellow has a slightly sweeter flavor. And if you’re worried about the chili being too thin, just add more tomato paste or a splash of broth later—it thickens as it sits.
This chili tastes even better the next day, so make it a day ahead if you can. Store in an airtight container in the fridge for up to 5 days, or freeze for 3 months. I always double the batch—one for tonight, one for leftovers. The flavors meld beautifully overnight, so don’t rush it. And if you’re serving a crowd, use a slow cooker—it’s foolproof.
Why You’ll Love This Recipe
- One-Pot Simplicity: I swear by this recipe because it’s literally dump-and-stir. Brown the chuck roast in one pot, toss in the beans and spices, and let it simmer—no chopping, no fuss. Even on nights when I’m too tired to think, this chili still delivers.
- Deep, Smoky Richness: The cumin and chili powder work magic here—earthy, warm, and just spicy enough to linger. Honestly, the way the chuck roast breaks down into tender chunks while soaking up the bean broth? That’s the kind of flavor that makes you reach for seconds without thinking.
- Meal Prep MVP: This recipe begs to be made in bulk. The four-quart batch stretches across lunches, dinner leftovers, and even a quick reheat for a lazy weekend. I freeze half of mine right after cooking—no defrosting needed, just pop it in a pot with a splash of water.
- Budget-Friendly Powerhouse: Ground chuck roast and dried beans keep costs low, but the taste? Unbeatable. Between us, this is the recipe I turn to when grocery money’s tight—it feeds four for under $10 and still feels like a restaurant-worthy meal. (Yes, even on a Tuesday night.)
Step-by-step instructions for smoky spiced beans and meat chili
This chili gets better overnight—here’s how to build deep, complex flavor from scratch.
Brown the Ground Beef Thoroughly
Heat the 1 tablespoon olive oil in a large Dutch oven over medium-high heat. Add the 2 lb ground beef (chuck roast) and break it apart with a wooden spoon, spreading it evenly across the pan. Cook undisturbed for 3-4 minutes until the meat loses its raw color and starts to crisp around the edges.
This initial browning creates the rich, meaty foundation of your chili. Break the beef into smaller pieces as it cooks, but don’t stir constantly—let it develop that deep, caramelized crust. Once the beef is about 80% browned, drain all but 1 tablespoon of the fat from the pan using a slotted spoon. You want just enough fat to help build your flavors without making the chili greasy.
Sauté the Aromatics and Spices
Reduce the heat to medium and add the 1 whole diced yellow onion to the Dutch oven. Cook for 5-6 minutes until the onions soften and become translucent. Add the 6 minced garlic cloves and cook for another 30 seconds until fragrant—this is where the magic starts happening.
Now stir in the 3 tablespoons chili powder, 1 tablespoon ground cumin, 1.5 teaspoons salt, 0.5 teaspoon black pepper, and 0.5 teaspoon cayenne pepper. Toast the spices for 1 minute until you can smell their warm, earthy aromas filling your kitchen. This step develops the complex spice profile that makes this chili so special.
Build the Chili Base
Pour in the 0.5 cup tomato paste and stir to combine with the spices. Cook for 2 minutes until the paste darkens slightly and begins to thicken. Add the 3 cups beef broth and 1 cup water, scraping up any browned bits from the bottom of the pan—these contain concentrated flavor.
Bring the mixture to a gentle boil, then reduce heat to low and let it simmer for 10 minutes. This step lets all the spices and aromatics meld together before adding the beans. The chili should look rich and thick, with a deep red color developing as the tomato paste breaks down.
Add Beans and Simmer
Stir in the 1 lb kidney beans and 1 lb black beans, along with the 1 tablespoon dark brown sugar. The sugar enhances the smoky depth of the chili while balancing the heat. Bring the chili back to a gentle simmer and cook uncovered for 30 minutes, stirring occasionally.
Here’s where the chili starts developing its signature texture. The beans will begin to soften slightly, and you’ll notice the flavors coming together. Taste the chili now—it should be rich and complex, with the spices and meat flavors melding beautifully. If it’s too thick, add a splash of water to reach your preferred consistency.
Rest and Serve
Remove the chili from heat and let it rest for 15 minutes before serving. This resting period allows all the flavors to fully develop and the chili to thicken slightly. The longer it sits, the better it gets—this is why it tastes even better the next day.
Serve the chili hot with your favorite toppings like shredded cheese, sour cream, or chopped green onions. Each bite should deliver a perfect balance of smoky, spiced meat and tender beans with deep, complex flavors that keep getting better with time.
Pro Tips For Making 4 Quart Chili
- Brown the Beef Well: I learned this the hard way—skimp on browning, and your chili will taste like a sad, greasy stew. Chuck roast needs 10-12 minutes on medium-high heat until it’s deep brown, not just pink. Break it up with a wooden spoon, but don’t rush; let those caramelized bits form—they’re the flavor foundation.
- Soak Beans Overnight: Canned beans are fine in a pinch, but dried beans make a real difference. Soak kidney and black beans for 8+ hours (or quick-soak 2 hours in boiling water), then drain. This cuts cooking time and prevents that gummy texture that ruins texture. Rinse them well before adding to the pot—no one wants bean water in their chili.
- Simmer Low and Slow: After the initial sear, drop the heat to a bare simmer—think tiny bubbles, not a rolling boil. Too much heat and your beans turn mushy, the spices burn, and the beef stays tough. Cover the pot and let it cook for at least 2 hours (3+ is better). Patience here means the difference between good and great chili.
- Toast the Spices First: Dry-toast your chili powder and cumin in a separate pan over medium heat for 30 seconds until fragrant. This wakes up their flavors way more than just sprinkling them in. Add them to the pot with the beans, but don’t let them burn—just enough to smell the earthy, smoky aroma. It’s the thing that makes your chili taste homemade, not store-bought.
Storing and reheating your 4 quart chili
Refrigerator Storage
Let your chili cool to room temperature for no more than 2 hours before transferring to airtight containers—I swear by glass Pyrex with snap-on lids. Store it in the fridge at 40°F or below for up to 5 days.
The flavors actually deepen overnight as the spices meld together, so it’s worth making a day ahead. I always double the batch—one pot for tonight, one for leftovers. 🌟
Freezer Storage Tips
For longer storage, freeze your chili in quart-sized freezer bags with 1 inch of headspace—this prevents freezer burn and makes thawing easier. I label each bag with the date and portion size.
This chili keeps its quality for up to 3 months in the freezer, though I’ve had great results even after 4 months with minimal texture loss. 🧊
Stovetop Reheating
My preferred method is stovetop reheating because it preserves the best texture. Pour chili into a heavy-bottomed pot and add ¼ cup water or beef broth to prevent sticking. Heat over medium-low heat for 10-15 minutes, stirring occasionally.
Taste and adjust seasonings—chili often needs a pinch of salt after reheating. The low heat prevents scorching while bringing back that rich, smoky flavor. 🔥
Microwave Reheating
For quick meals, microwave individual portions covered with a damp paper towel. Heat on 70% power for 2-3 minutes, stir, then continue in 1-minute intervals until reaching 165°F.
Add a splash of water if it looks dry—this helps restore the perfect chili consistency. I always reheat leftovers before serving to ensure food safety and the best texture. ⚡
Slow Cooker Option
If you’re reheating a large batch, use a slow cooker on low heat for 2-3 hours with the lid slightly ajar. This gentle method keeps the chili from becoming mushy while ensuring even heating.
Stir occasionally and add a splash of broth if needed. It’s perfect for feeding a crowd without overworking your stove. 🍲
Serving After Reheating
Once reheated, let the chili rest for 5 minutes before serving. This helps the flavors settle and prevents a watery bowl. Top with your favorites—I love shredded cheddar, sour cream, and chopped green onions.
The reheated chili should still have that rich, smoky depth you fell in love with the first time. 💛
Nutrition facts
Frequently asked questions
Can I use ground turkey instead of beef in this chili?
Yes, but you’ll need to adjust the cooking time. Ground turkey cooks faster than beef, so brown it completely first, then add the aromatics. The chili will be slightly leaner, so consider adding 1 tablespoon olive oil at the end to restore richness. For best results, use a 93% lean/7% fat ratio to maintain moisture.
Why does my chili taste bland after reheating?
Reheating often mutes flavors because heat can dull spices. Fix this by adding ½ teaspoon smoked paprika or a pinch of cayenne while reheating. Also, stir in 1 tablespoon tomato paste to restore depth. Always reheat on low heat to prevent scorching, which can make flavors bitter.
How can I make this chili vegetarian?
Swap the beef for 1 lb crumbled tempeh or 1 lb extra-firm tofu (pressed and cubed). Replace beef broth with mushroom broth and add 1 tablespoon soy sauce for umami. For texture, include ½ cup cooked quinoa or 1 cup diced portobello mushrooms. The beans will still be the star!
What’s the best way to thicken chili that’s too thin?
Simmer uncovered for 10-15 minutes to reduce naturally. For quicker results, mix 1 tablespoon cornstarch with 2 tablespoons cold water, stir into the chili, and cook for 2-3 minutes**. Avoid flour—it can make the chili gummy. If using tomato paste, add it gradually to prevent clumping.
Can I make this chili in a slow cooker?
Brown the meat in a skillet first, then transfer everything to the slow cooker. Cook on low for 6-8 hours or high for 3-4 hours. The slow cooker enhances the smoky flavors as the spices infuse longer. Just skip the initial 10-minute simmer on the stovetop—it’s not needed.

- 3lb Prime Rib Roast Recipe: Juicy Pink Center Guaranteed in 3 Hours - October 31, 2026
- 5 Spice Cake Recipe: Warmly Spiced Layers With Crunchy Top - October 31, 2026
- 1950’s Macaroni and Cheese Recipe: Nostalgic Creamy Cheese Sauce with Buttery Noodles - October 31, 2026