
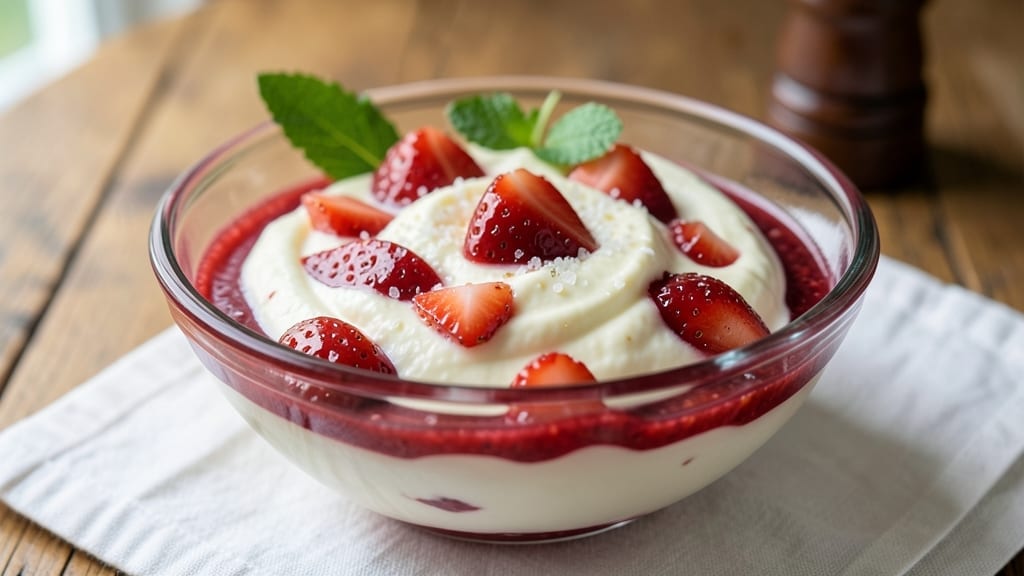
This 4-quart homemade strawberry ice cream recipe delivers the kind of velvety, ultra-creamy texture that store-bought versions can’t match—with bursts of fresh strawberry flavor in every bite.
The secret lies in blending ripe strawberries with heavy cream and a touch of sugar, then churning it to perfection for that signature smoothness. I’ve perfected this method over years of summer dessert-making, ensuring every scoop is rich, fruity, and foolproof.
The process is simpler than you’d think: no fancy equipment required, just a few key ingredients and a little patience. You’ll start with a base of sweetened cream and condensed milk, then fold in fresh strawberries for that vibrant, natural sweetness.
The churning step transforms this mixture into a luscious, creamy dessert that’s impossible to resist. This recipe makes enough for a crowd, so you can enjoy it all week long.
What you’ll end up with is a creamy, dreamy ice cream that’s perfectly balanced between sweet and tart, with pockets of real strawberry throughout.
The texture is smooth yet slightly chewy, thanks to the natural fruit content, and the flavor is so intense it’ll make you forget about store-bought alternatives. This is the kind of dessert that turns ordinary summer evenings into something special.
Serve it in bowls with fresh berries, a drizzle of honey, or a sprinkle of crushed nuts for extra crunch. The possibilities are endless, but the most important part is that it’s made with love—and zero artificial ingredients. Let’s get churning!
Ingredients for 4 quart homemade strawberry ice cream
Fresh strawberries and rich cream create this ultra-creamy, dreamy ice cream that’s perfect for summer gatherings.
| Ingredient | Amount | Notes |
|---|---|---|
| Fresh Strawberries 🍓 | 1 ½ lb | Hull and chop roughly |
| Heavy Whipping Cream 🥛 | 3 cups | Full-fat for best texture |
| Sweetened Condensed Milk 🥛 | 1 can | 14 oz can, unopened |
| Granulated Sugar 🍚 | ½ cup | Adjust to taste |
| Vanilla Extract 🌿 | 1 tbsp | Pure vanilla preferred |
| Salt 🧂 | ¼ tsp | Kosher or sea salt |
| Lemon Juice 🍋 | 1 tbsp | Freshly squeezed |
| Unsalted Butter 🧈 | 1 tbsp | Cold, cut into small cubes |
| Whipped Cream 🥛 | 1 cup | Optional for swirls |
| Crushed Nuts 🌰 | ¼ cup | Optional topping |
The strawberries are the heart of this recipe, so pick ripe, vibrant ones—they should be deep red and smell sweet. Trader Joe’s and Whole Foods usually have the best quality, but your local farmers market is perfect if you’re there in summer. The condensed milk is non-negotiable here—it’s what gives that signature creamy texture. Grab the 14-ounce can from any grocery store, but check the expiration date. Heavy cream is another key player—full-fat is a must for that luscious texture. If you’re worried about dairy, store it in the coldest part of your fridge and use it within 3 days of opening.
No fresh strawberries? Frozen works perfectly—just don’t thaw them first. Want to adjust the sweetness? Add 1-2 tbsp more sugar if you prefer it sweeter, or skip the extra sugar if you like it tart. The vanilla extract can be swapped for vanilla bean paste if you’re feeling fancy. For the swirls, whipped cream is ideal, but you can also use melted white chocolate for a different flavor. The butter cubes add richness, but if you’re watching calories, you can reduce it to 0.5 tbsp without sacrificing too much creaminess.
This ice cream keeps beautifully in the freezer for up to 2 months. For the best texture, let it sit at room temperature for about 10 minutes before scooping. Store it in an airtight container with parchment paper between layers to prevent freezer burn. If you make extra, portion it into smaller containers—it’s perfect for impromptu dessert parties or late-night cravings. The crushed nuts or berries on top stay fresh for about 3 days in the fridge, so add them just before serving.
Why You’ll Love This Recipe
- No waste here: the leftovers stay creamy for weeks, and the condensed milk stretches every dollar. Plus, it’s cheaper than store-bought and way better. (My kids don’t even know it’s homemade—they just know it’s their favorite.)
- No Blender Needed: I’ll be real—this recipe only needs a whisk and a bowl. Mash those strawberries by hand (or pulse in a food processor if you’re impatient), mix in the cream and condensed milk, then freeze. That’s it. No ice cream maker, no fancy gadgets—just pure, creamy magic.
- Strawberry Perfection: The combo of fresh strawberries and sweetened condensed milk is chef’s kiss—naturally sweet but bright, not cloying. A splash of vanilla ties it all together, so you get that summer-picked flavor without the muddled taste of overripe fruit. (Yes, even on a Tuesday night.)
- Crowd-Pleaser Basics: This makes four quarts—enough to feed a family picnic, impress guests, or stash in the freezer for lazy Sundays. Split it into pints for gifts, or keep it whole for a big dessert spread. Honestly, it’s the one recipe I always have on hand.
Step-by-step instructions for ultra creamy strawberry ice cream
Here’s how to transform fresh strawberries into velvety-smooth ice cream with perfect swirls and bursts of fruit.
Prepare the Strawberry Purée
Begin by hulling and chopping the 1.5 lb fresh strawberries into rough chunks. Transfer them to a blender or food processor and blend until completely smooth. I like to strain the purée through a fine-mesh sieve to remove any remaining seeds, which creates an ultra-silky texture. The purée should yield about 2 cups—this is your fruit base.
In a small saucepan, combine the strawberry purée with 0.5 cup granulated sugar and 1 tbsp lemon juice. Cook over medium heat for 5-7 minutes, stirring constantly, until the mixture thickens slightly and the sugar dissolves completely. Remove from heat and let it cool to room temperature. This step enhances the strawberry flavor while preventing ice crystals later.
Mix the Ice Cream Base
In a large mixing bowl, combine the cooled strawberry mixture with 1 can sweetened condensed milk, 3 cups heavy whipping cream, 1 tbsp vanilla extract, and 0.25 tsp salt. Whisk vigorously for 2-3 minutes until fully incorporated and smooth. The sweetened condensed milk adds natural sweetness and richness, while the salt balances the flavors.
Add the 1 tbsp cold unsalted butter, cut into small cubes, and mix until melted and evenly distributed. This step ensures a velvety texture and prevents iciness. Taste the mixture and adjust sweetness if needed—you want it to be just slightly sweeter than your preferred final taste, as freezing intensifies flavors.
Chill and Whip the Cream Swirls
Refrigerate the strawberry mixture for at least 4 hours, or overnight, to fully chill. This step is crucial—it allows the flavors to meld and ensures the ice cream sets properly. While the base chills, prepare the whipped cream swirls by whipping 1 cup whipped cream to stiff peaks. Fold in the 0.25 cup crushed nuts if using, reserving a small amount for garnish.
Here’s a pro tip: Use a stand mixer for the whipped cream to avoid overworking it. Over-whipped cream can turn grainy, ruining the silky texture of your ice cream. Keep the bowl and beaters chilled in the freezer for 10 minutes before whipping to achieve even better stability.
Assemble and Freeze
Pour half of the chilled strawberry mixture into a 4-quart loaf pan or freezer-safe container. Spoon dollops of the whipped cream mixture on top, then add the remaining strawberry mixture. Use a knife to gently swirl the cream into the strawberry base, creating marbled patterns. Cover the pan tightly with plastic wrap, pressing it directly onto the surface to prevent ice crystals.
Freeze for 4-6 hours until completely firm. For best results, I recommend freezing overnight. Before serving, let the ice cream sit at room temperature for 5-10 minutes to soften slightly—this makes it easier to scoop. The contrast between the creamy swirls and the bright strawberry base will be stunning.
Serve and Enjoy
Scoop the ice cream into bowls and garnish with additional crushed nuts if desired. The texture should be smooth, with no ice crystals, and the flavor should burst with fresh strawberry notes. Serve immediately for the creamiest experience, or store leftovers in an airtight container for up to 2 weeks—though it rarely lasts that long!
This recipe delivers on the promise of homemade ice cream with a professional-quality finish. The key is patience—chilling the base thoroughly and freezing slowly ensures that creamy, dreamy texture we all love. Enjoy your homemade masterpiece!
Pro Tips For Making 4 Quart Homemade Strawberry Ice Cream
- Freeze Cream First: The condensed milk and cream mix will thicken faster if you chill the bowl and whisk before adding anything. I used to skip this and end up with a gummy texture—now I pop the mixing bowl in the freezer for 10 minutes first. Works like magic, especially in warm kitchens.
- Hull Strawberries Fast: Skip the tedious hulling by cutting the strawberries in half first, then running them under cold water while holding them with a slotted spoon. The hulls float off effortlessly, and you save 20 minutes of manual peeling. (Yes, even if you’re impatient like me.)
- Use Cold Whipped Cream: Whip the heavy cream after it’s been in the fridge for at least 4 hours—preferably overnight. Warm cream whips to stiff peaks but collapses when frozen, turning your ice cream into a soupy mess. Cold cream holds its shape and gives that dreamy, scoopable texture.
- Blend in Sugar Gradually: Add the granulated sugar to the strawberry mixture in 2 stages: half at the start, half after blending. Dumping it all in first makes the mix too thick and clumpy. Stirring in stages ensures even sweetness and prevents a grainy texture when churning. (Your future self will thank you.)
Common mistakes when making your 4 quart homemade strawberry ice cream
Skipping the Chill Step
Rushing the 4-hour chill (or worse, skipping it entirely) is the fastest way to ruin your texture. The base needs time to fully cool and stabilize before freezing—this prevents ice crystals from forming.
I’ve seen home cooks impatiently freeze the mixture after just 30 minutes, and the result? A grainy, icy mess. Trust me, the overnight chill is worth it for that silky perfection. 🥶
Overworking the Whipped Cream
When whipping the cream for swirls, it’s easy to overbeat it, turning it from fluffy to buttery. Use a stand mixer with the whisk attachment and stop as soon as you reach stiff peaks.
Overworking breaks down the fat molecules, making the cream grainy and ruining the ice cream’s velvety mouthfeel. Chill your bowl and beaters first—this helps stabilize the cream and gives you more working time. 🥛
Using Warm Ingredients
Cold ingredients are non-negotiable for creamy ice cream. If your strawberry purée, cream, or condensed milk isn’t fully chilled before mixing, the fat in the cream won’t stabilize properly. This leads to separation (oily pockets) or a icy texture.
Always refrigerate your mixing bowl and utensils beforehand, and let ingredients sit in the fridge for at least 30 minutes before combining. A quick ice bath for the bowl works too! ❄️
Not Pressing Plastic Wrap
Covering your ice cream with plastic wrap is essential, but pressing it directly onto the surface is the real game-changer. This step eliminates air pockets, which would otherwise turn into ice crystals.
Skimp here, and you’ll end up with a freezer-burned, crunchy texture. Press the wrap firmly, then smooth it out—it’s worth the extra 30 seconds of effort. 💫
Freezing Too Quickly
Dumping the mixture into the freezer and expecting it to be ready in 2 hours is a recipe for disaster. Rapid freezing creates large ice crystals, making your ice cream gritty. Instead, freeze it for 4-6 hours (or overnight) to ensure a slow, even freeze.
For extra insurance, place your container in the back of the freezer, where temps are most stable. Patience here = creamy perfection. ⏳
Ignoring the Sugar Balance
Strawberries are naturally tart, so the sweetness in this recipe is carefully calibrated. Adding extra sugar to the base or skipping the condensed milk can throw off the flavor balance. Taste your mixture before freezing—it should be just slightly sweeter than your final preference, since freezing intensifies sweetness.
If it tastes perfect now, it’ll be heavenly after freezing. Trust the recipe’s ratios! 🍯
Nutrition facts
Frequently asked questions
Can I substitute frozen strawberries instead of fresh?
Yes! Use 1.5 cups frozen strawberries (thawed or straight from frozen) instead of fresh. No need to cook them first—just blend them with the sugar and lemon juice as directed. Frozen strawberries work perfectly and save money during off-season months.
What if I don’t have an ice cream maker?
No problem! This recipe works beautifully without one. After chilling the mixture, pour it into a 4-quart loaf pan and freeze for 6 hours, stirring vigorously with a fork every 1-2 hours to break up ice crystals. The texture will be slightly icier but still delicious. For extra creaminess, add 1 extra tbsp corn syrup to the base.
How do I make this recipe dairy-free?
Replace the heavy cream with 3 cups full-fat coconut cream (chilled overnight) and use 1 can coconut condensed milk instead of dairy condensed milk. The texture will be lighter but still creamy. Note:** Coconut condensed milk is harder to find—check specialty stores or make your own by simmering coconut milk with sugar.
Why does my ice cream have ice crystals?
Ice crystals form when air gets trapped or the mixture freezes too quickly. Always press plastic wrap directly on the surface before freezing, and avoid opening the container until serving. For extra insurance, add 1 tsp vodka or rum to the base—it lowers the freezing point slightly for a smoother texture.
Can I make this ahead of time?
This ice cream freezes beautifully for up to 2 months. For best results, portion it into individual containers and freeze. Let it sit at room temperature for 10 minutes before scooping to maintain that creamy consistency. The flavors actually improve with time—it’s perfect for making ahead for summer gatherings!

- 303 Sauce Recipe: Smoky Chipotle and Tomato Base for Bold Flavors - October 4, 2026
- 00 Flour Pasta Recipe No Egg: Al Dente in 10 Minutes Without Gluten - October 4, 2026
- 2 Ingredient Funnel Cake Recipe: Crispy Bites With Zero Fuss - October 4, 2026