
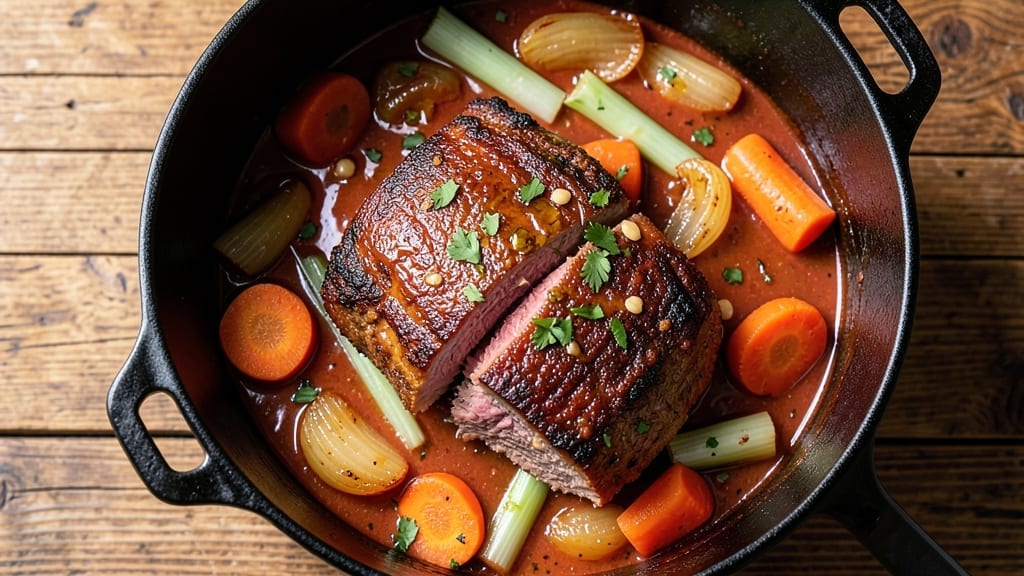
A 5-hour no-peek beef stew transforms tough cuts into melt-in-your-mouth perfection while avoiding the common pitfall of overcooked, stringy meat. The secret lies in slow, uninterrupted simmering—no peeking—allowing the collagen to break down naturally and develop deep, caramelized flavors.
This method ensures tender beef, rich gravy, and a dish that tastes like it simmered all day, even if you only have a few hours to spare.
The process begins with a proper sear to build flavor, followed by sautéing onions, garlic, and herbs to create a fragrant base. Aromatic vegetables like carrots and celery add sweetness and texture, while red wine and beef broth deepen the sauce.
The no-peek technique is critical—resisting the urge to check the pot prevents premature evaporation and maintains consistent heat, resulting in silky meat and a velvety broth.
By the time you’re ready to serve, your stew will be thick, flavorful, and packed with fork-tender beef chunks swimming in a glossy, caramelized sauce. The aroma alone will have everyone gathering around the table, eager for a taste of this restaurant-quality comfort food.
Serve with crusty bread or roasted potatoes to soak up every last drop of that rich, savory goodness.
This recipe is designed for foolproof results, making it ideal for beginners and experienced cooks alike. The long simmering time ensures maximum flavor extraction, while the hands-off approach means minimal effort for maximum reward.
Whether you’re feeding a family or meal prepping for the week, this stew delivers hearty, satisfying comfort with every bite.
Ingredients for 5 hour no peek beef stew
These fifteen ingredients transform tough beef into melt-in-your-mouth perfection through slow, uninterrupted simmering.
| Ingredient | Amount | Notes |
|---|---|---|
| Chuck Roast 🥩 | 3 lb | Well-marbled for tenderness |
| Yellow Onions 🧅 | 2 whole | Medium size, sliced thick |
| Carrots 🥕 | 4 whole | Medium size, peeled, cut into chunks |
| Celery Stalks 🧄 | 4 whole | Trimmed, cut into 1-inch pieces |
| Garlic Cloves 🧄 | 6 cloves | Peeled, smashed slightly |
| Tomato Paste 🍅 | 2 tbsp | Smooth consistency, not chunky |
| Dry Red Wine 🍷 | 1 cup | Bold variety like Cabernet Sauvignon |
| Beef Broth 💧 | 4 cups | Low-sodium preferred |
| Fresh Thyme 🌿 | ¼ cup | Leaves only, stems removed |
| Fresh Rosemary 🌿 | ¼ cup | Needles finely chopped |
| Bay Leaves 🍃 | 2 whole | Dried, standard size |
| All-Purpose Flour 🌾 | 2 tbsp | For thickening gravy |
| Olive Oil 🫒 | ½ cup | Extra-virgin for richness |
| Salt 🧂 | 1 ½ tsp | Kosher or sea salt |
| Ground Black Pepper 🌶️ | 1 tsp | Freshly ground preferred |
The chuck roast is non-negotiable—its marbling ensures tender results. Grab the pre-cut version from Costco or your butcher counter to save time, but look for good marbling if buying a whole roast. Fresh thyme and rosemary elevate the dish, so pick them from the grocery store’s refrigerated section—they should smell vibrant, not wilted. The tomato paste? Squeeze tubes from Trader Joe’s work perfectly here, eliminating waste. For the wine, any bold red will do—Cabernet Sauvignon or Merlot are foolproof choices, but whatever’s open in your cabinet works too.
No red wine? Substitute beef broth with a splash of balsamic vinegar—it mimics the depth. Fresh herbs unavailable? Dried thyme and rosemary at one-third the amount get you close, though fresh is ideal. The bay leaves can be skipped if you’re out, but they add that subtle earthiness that makes the difference. For the flour, King Arthur or Gold Medal brands work best for thickening. If you’re using pre-cut vegetables, rinse them well to remove any dirt or debris before chopping—no one wants grit in their stew.
This stew tastes even better the next day, so make extra. Store in airtight containers in the fridge for up to 5 days or freeze for 3 months. The beef will pull apart effortlessly, and the sauce will thicken beautifully. For meal prep, portion into individual containers—one for lunch, one for dinner. Reheat gently on the stove with a splash of broth to restore richness. Leftovers make incredible sandwiches or tacos too—just don’t skip the garnish.
Why You’ll Love This Recipe
- Garlic Bomb Depth: That chuck roast? It soaks up all the caramelized onion, celery, and garlic until every bite is rich, savory, and packed with flavor—like a hug in a bowl. Honestly, the first time I tried it, I nearly burned my mouth from how good it was.
- Leftovers That Win: This stew only gets better the next day. I make a double batch on Sundays, freeze half, and still have hearty lunches for the week. Even my picky husband asks for seconds—rare, but true.
- Budget-Buster Feast: A chuck roast and a few veggies stretch into six servings without breaking the bank. Between us, this is my go-to for feeding a crowd or stretching meals when groceries feel tight. (Yes, even on a Tuesday night.)
Step-by-step instructions for 5-Hour no-peek beef stew
Here’s how to build rich, caramelized flavor without opening the pot—just patience and technique.
Sear the Chuck Roast for Deep Flavor
Heat the 0.5 cup olive oil in a heavy Dutch oven over medium-high heat until shimmering. Pat the 3 lb chuck roast thoroughly with paper towels—this ensures maximum browning. Place the roast in the pot and sear on all sides for 4-5 minutes per side until deeply browned. You want that dark, crusty exterior because it will dissolve into the stew later, creating layers of flavor. If the oil starts smoking excessively, reduce heat slightly to maintain control.
Remove the roast and set it aside on a plate. You’ll notice the oil is now rich and golden—this is your flavor foundation. Don’t wipe out the pot; those browned bits are pure taste waiting to happen. Here’s the thing—this initial sear is where the magic starts. The longer you sear, the deeper the flavor, but don’t rush it. Patience at this stage pays off in every bite later.
Build the Aromatic Vegetable Base
In the same Dutch oven, add the 2 whole yellow onions, 4 whole carrots, and 4 whole celery stalks, all cut to similar sizes. Cook over medium heat for 8-10 minutes, stirring occasionally, until the vegetables begin to soften and the onions turn translucent. This is where the sweetness of the carrots and the earthiness of the celery will meld with the onions’ natural sugars, creating a flavorful base.
Add the 6 cloves garlic cloves and cook for another 1 minute until fragrant. This quick cooking prevents the garlic from burning, which would make the stew bitter. Next, stir in the 2 tbsp tomato paste and cook for 2 minutes until it darkens slightly. This paste will thicken the stew and add a subtle sweetness that balances the richness of the beef. The paste should coat the vegetables evenly, creating a sticky, flavorful layer that will caramelize beautifully during the long cook.
Deglaze and Add Liquids for Richness
Pour in the 1 cup dry red wine, scraping up all those browned bits from the bottom of the pot with a wooden spoon. This deglazing step captures all the flavor you’ve built so far. Let the wine simmer for 3-4 minutes until it reduces by about half and the alcohol cooks off. You’ll notice the aroma becomes more complex and inviting—this is the moment the stew starts to come together.
Add the 4 cups beef broth, 0.25 cup fresh thyme, 0.25 cup fresh rosemary, 2 whole bay leaves, 1.5 tsp salt, and 1 tsp ground black pepper. Return the chuck roast to the pot, making sure it’s fully submerged in the liquid. The herbs will infuse the broth with their aromatic qualities, while the salt and pepper season the meat and vegetables evenly. Bring the stew to a gentle simmer, then reduce heat to low so it’s just barely bubbling—this is where the no-peek method begins.
Cook Low and Slow for Tender Perfection
Cover the Dutch oven and transfer it to a 300°F oven (or keep it on the stovetop at low heat). Here’s where the real magic happens—leave the stew completely undisturbed for 4 hours. This long, slow cook allows the connective tissue in the chuck roast to break down into gelatin, which will make the stew incredibly tender and rich. The vegetables will soften beautifully, absorbing all the flavors from the broth and meat.
After 4 hours, check the internal temperature of the beef using a meat thermometer. It should read 200-205°F—this is the perfect range for fork-tender beef. If it’s not quite there, return the stew to the oven (or stovetop) for another 30-60 minutes, still covered and undisturbed. The key here is patience. Rushing will result in tough meat, but this slow method guarantees melt-in-your-mouth tenderness. The stew should smell heavenly—like a symphony of caramelized flavors and aromatic herbs.
Thicken and Serve with Confidence
Remove the chuck roast from the stew and let it rest on a cutting board for 10 minutes. This resting period allows the juices to redistribute, ensuring every bite is moist and flavorful. While the meat rests, skim off any excess fat from the surface of the stew (if desired) and return the pot to medium heat. Stir in the 2 tbsp all-purpose flour and cook for 2-3 minutes, stirring constantly, until the flour is fully dissolved and the stew begins to thicken.
Return the chuck roast to the pot, slicing it against the grain into ¼-inch thick slices as you serve. The stew should now have a velvety consistency with a glossy sheen—this is the sign of a perfectly balanced sauce. Ladle the stew over the sliced beef, garnishing each serving with additional fresh thyme and rosemary if desired. Serve immediately with crusty bread to soak up every last drop of that rich, caramelized broth. The result is a hearty, comforting stew that’s packed with deep flavor and tenderness—all achieved without a single peek during the cooking process.
Pro Tips For Making 5 Hour No Peek Beef Stew
- SEAR THE CHUCK ROAST: That first brown crust on the beef isn’t just for looks—it’s where all the flavor hides. After patting the roast very dry with paper towels, hit it with high heat in your Dutch oven for 3-4 minutes per side until deep brown. I used to rush this, and the stew always tasted flat—don’t skip the blackened edges.
- CHOP VEGETABLES UNIFORM: Carrots and celery in random sizes mean uneven cooking—some mushy, some crunchy. Cut all veggies into ½-inch chunks before browning the meat, and don’t skip the onions (they’re the flavor backbone). My grandmother swore by this, and she was right: consistent pieces = consistent texture.
- DON’T CROWD THE POT: After searing the beef, resist the urge to dump everything in at once. Let the onions, carrots, and celery sizzle in the same pot for 5-6 minutes first—they’ll soften and deepen in flavor before the beef goes in. I learned this the hard way when my stew tasted like boiled veggies instead of rich, caramelized goodness.
- SKIP THE PRE-CUT GARLIC: Fresh garlic cloves smashed with the side of your knife release more flavor than pre-minced. Peel and smash 4-5 cloves (no need to chop) right before adding them to the pot in the last 30 minutes of cooking. Sounds weird, but it works—your stew will smell like a French bistro, not a can of garlic powder.
Storing and reheating your 5 hour no peek beef stew
Refrigerator Storage
Let your stew cool completely before transferring to airtight containers—I use glass Pyrex with snap-on lids for best results. Store at 40°F or below for up to 5 days, though I find the flavor actually improves after 24 hours as the meat continues to tenderize.
The sauce will thicken slightly, creating that perfect velvety texture we all love. 💫
Freezer Prep Tips
For long-term storage, portion stew into quart-sized freezer bags (squeeze out excess air to prevent freezer burn). Label with the date and freeze for up to 3 months. I recommend using flat freezer bags—they stack neatly and thaw faster than containers.
Leave 1 inch headspace for expansion when frozen. Thaw overnight in the fridge for best texture.
Stovetop Reheating
My preferred method is reheating on the stove—it preserves the stew’s rich texture beautifully. Transfer to a heavy-bottomed pot and warm over medium-low heat for 10-15 minutes, stirring occasionally. Add 2-3 tablespoons of beef broth if the stew looks too thick.
Taste and adjust seasoning—stew often needs a pinch of salt after reheating. Keep it covered to prevent evaporation. 🔥
Microwave Shortcuts
For quick meals, microwave individual portions covered with a microwave-safe lid or damp paper towel. Heat on 50% power for 3-4 minutes, stir, then continue in 1-minute intervals until reaching 165°F.
Add a splash of broth if it looks dry. This method works best for single servings and saves time when you’re in a hurry.
Leftovers Reinvention
Transform leftover stew into new meals! Use as a filling for beef stew sandwiches with crusty bread, or serve over mashed potatoes for a hearty dinner. For tacos, warm the stew and serve in corn tortillas with shredded cheese and sour cream.
The possibilities are endless—just don’t skip the garnish of fresh herbs. 💡
Gravy Rescue
If your reheated stew is too thick, thin it with warm beef broth—start with 1 tablespoon at a time until you reach your desired consistency. For extra richness, stir in 1 teaspoon of cornstarch mixed with 1 tablespoon cold water and simmer for 2-3 minutes.
This trick works wonders for restoring that perfect sauce texture. Always taste as you go! ✨
Nutrition facts
Frequently asked questions
Why does the beef need 5 hours of cooking?
The 5-hour slow cook transforms tough chuck roast into melt-in-your-mouth perfection by breaking down collagen naturally. This creates a rich, gelatinous sauce that coats every bite. The no-peek method ensures consistent, gentle heat without evaporation or temperature spikes that could toughen the meat.
Can I use a slow cooker instead of the oven?
Transfer the stew to a 6-quart slow cooker after the searing step, then cook on low heat for 7-8 hours or high heat for 4-5 hours. The key is maintaining a gentle simmer—never let it boil. The slow cooker’s insulated lid helps maintain steady heat, just like the oven.
What if my stew is too watery after cooking?
Simmer the stew uncovered for 10-15 minutes to reduce the liquid naturally. For instant thickening, mix 1 tablespoon cornstarch with 2 tablespoons cold water, stir into the stew, and simmer for 2-3 minutes until thickened. Pro tip: Skim excess fat from the surface before thickening for a cleaner sauce.
How do I know when the beef is perfectly tender?
Use a meat thermometer to check for 200-205°F internal temperature. The beef should pull apart easily with a fork—this is the perfect tenderness level. If it’s not quite there, return to low heat for 30-60 more minutes. Never rush this step; patience ensures melt-in-your-mouth results.
Can I make this stew in a pressure cooker?
Yes, but with adjustments. After searing, add all ingredients and pressure cook on high pressure for 45 minutes, then do a natural release. The beef will be tender, but the sauce may be thinner. For richness, reduce it uncovered on the stovetop afterward. Note: Pressure cooking reduces the total time but changes the texture slightly.

- 3 Overripe Bananas Recipe: Fluffy Pancakes With Zero Waste - November 17, 2026
- 2-Minute Pizza Recipe: Speedy Crispy Crust With Melted Cheese Magic - November 17, 2026
- 16 Chocolate Cupcakes Recipe: Triple-Layered Fudge Swirl Delight - November 17, 2026