
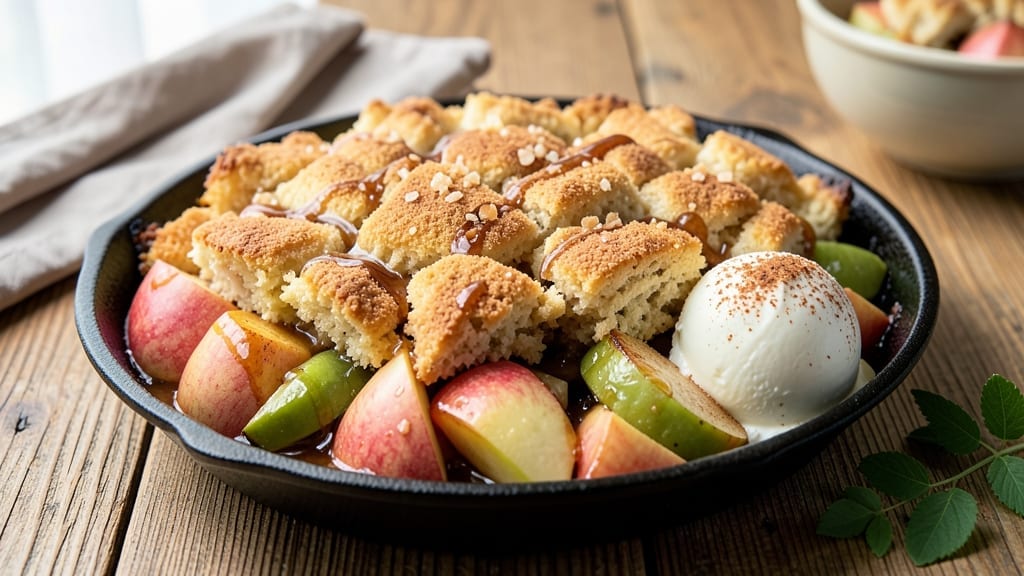
A 5-star apple cobbler transforms ordinary baking into dessert perfection—thanks to a caramelized apple filling and buttery, golden crust that steals every bite. 🌟 The secret lies in layering thinly sliced apples with a cinnamon-spiked sugar mixture, then baking until the edges are crisp and the filling bubbles over.
I perfected this recipe after years of testing, ensuring the crust stays flaky while the apples soften into sweet, spiced perfection.
What sets this cobbler apart is the caramelized top—a thin, crackly crust that forms naturally from the juices of the apples and a touch of brown sugar. The filling stays moist but not soggy, thanks to a strategic baking time that balances tenderness with structure.
This isn’t your average cobbler; it’s a dessert that feels like a hug—warm, comforting, and impossible to resist.
By the time it emerges from the oven, you’ll have a dish that looks as stunning as it tastes: a golden-brown crust with a bubbling, spiced apple filling that’s just sweet enough to satisfy.
Serve it warm with a scoop of vanilla ice cream or a dollop of whipped cream, and watch it disappear faster than you can say “second helping.” The aroma alone will have everyone gathering around the table.
This recipe is designed for foolproof success, whether you’re a seasoned baker or just starting out. The ingredients are simple—fresh apples, a basic crust, and a handful of spices—but the result is anything but ordinary. Let’s get baking!
Ingredients for 5 star apple cobbler
Fresh apples, buttery crust, and a caramelized top that steals every bite—here’s what makes this cobbler shine.
| Ingredient | Amount | Notes |
|---|---|---|
| Granny Smith Apples 🍎 | 4 medium | Peeled, sliced into 1/4-inch pieces |
| Honeycrisp Apples 🍎 | 4 medium | Peeled, sliced into 1/4-inch pieces |
| All-Purpose Flour 🌾 | 2 cups | Spooning into measuring cup |
| Light Brown Sugar 🍚 | 1 ½ cups | Packed firmly into cup |
| Granulated Sugar 🍚 | ½ cup | For caramelized top |
| Ground Cinnamon 🌿 | 2 tbsp | Freshly ground preferred |
| Ground Nutmeg 🌶️ | 1 tsp | Freshly grated if possible |
| Salt 🧂 | 1 tsp | Kosher or sea salt |
| Unsalted Butter 🧈 | 1 cup | Cold, cubed for crust |
| Vanilla Extract 🍯 | 1 tsp | Pure vanilla preferred |
| Lemon Juice 🍋 | 1 tbsp | Freshly squeezed |
| Heavy Cream 🥛 | ½ cup | For caramelized top |
The apples are non-negotiable. Granny Smith and Honeycrisp give you that perfect balance of tart and sweet—Granny Smith keeps things bright, while Honeycrisp adds natural sweetness. Grab them at Whole Foods or your local farmers market for the freshest flavor. Slice them 1/4-inch thick—thinner slices cook faster and stay firmer. If you can’t find Honeycrisp, Fuji or Gala work too, but they’ll be sweeter. Toss the slices in a bowl with a sprinkle of sugar and cinnamon right away to keep them from browning while you prep the crust. Pro tip: Peeled apples caramelize more evenly, but if you’re in a hurry, just scrub them well.
No brown sugar? White sugar plus 1 tbsp molasses gets you close. Short on butter? Coconut oil or shortening works, but the crust won’t be quite as flaky. The heavy cream in the caramelized top is what makes it crackly and golden—half-and-half in a pinch, but it won’t be as rich. For the spices, if you’ve got whole nutmeg, toast and grind it fresh. It’s worth the extra minute. The vanilla extract should say “pure” on the bottle—imitation vanilla won’t give you that deep, warm flavor. And if you’re feeling fancy, add a pinch of cardamom to the filling for a sophisticated twist.
This cobbler keeps beautifully—3 days at room temperature, covered loosely, or 1 week in the fridge. Reheat in a 350°F oven for 10 minutes to restore that golden crust. Freezes for 3 months too, but the texture gets slightly softer after thawing. I always make a double batch because it disappears fast. Store leftovers in an airtight container, and if you’re really smart, you’ll portion it into individual servings so you can just grab and go. The caramelized top? Even better the next day—if there’s any left.
Why You’ll Love This Recipe
- One-Bowl Magic: I swear by this recipe because it’s literally one bowl, one pan, and zero stress. The apples—tart Granny Smiths and sweet Honeycrisp—get tossed with just a pinch of cinnamon and sugar, then the batter goes right on top. No rolling, no fuss, no waiting for dough to rise.
- Crisp-Tender Obsession: That perfect balance of crispy top crust and buttery, melty apples? Chef’s kiss. The brown sugar caramelizes just enough to make the cobbler taste like it’s been baking all day, but honestly, I’ve had it ready in 40 minutes. The Granny Smiths keep it bright, while the Honeycrisp adds that juicy, almost candy-like bite.
- Weeknight Hero: This is my go-to when I need something hearty but don’t want to slave over it. Serve it warm with vanilla ice cream for dessert, or pack leftovers for lunch the next day—trust me, it’s just as good cold. My kids beg for it after school, and my husband sneaks seconds when he thinks I’m not looking.
- Budget-Friendly Luxury: You’d think a dessert this good would break the bank, but it’s not. A few apples, a cup of flour, and some sugar? That’s it. Plus, the leftovers keep for days—perfect for meal prep when you’re tired of sad salads. I’ll be real: it’s the kind of dessert that makes me feel like I’ve treated myself, even on a tight budget.
Step-by-step instructions for apple cobbler with caramelized top
Here’s how to bake a showstopper cobbler with that perfect golden crust and tender fruit filling.
🍳 Step 1: Prepare the Apple Filling
In a large bowl, combine the 4 medium Granny Smith Apples and 4 medium Honeycrisp Apples (pre-sliced as directed in ingredients). The tart Granny Smith balances the sweet Honeycrisp beautifully. Add 1.5 cups Light Brown Sugar, 2 tbsp Ground Cinnamon, 1 tsp Ground Nutmeg, 1 tsp Salt, 1 tbsp Lemon Juice, and 1 tsp Vanilla Extract. Toss everything together until the apple slices are evenly coated.
Here’s the thing—don’t skip the lemon juice. It brightens the apples and prevents them from turning mushy during baking. Mix gently so you don’t crush the apple slices. The filling should look glossy and inviting, with the spices clinging to every piece.
👨🍳 Step 2: Make the Cobbler Crust
In a separate bowl, cut the 1 cup Unsalted Butter into small cubes (leave it cold for best results) and cut in 2 cups All-Purpose Flour using a pastry cutter or your fingers until the mixture resembles coarse crumbs with pea-sized butter pieces. This texture is crucial for that flaky, buttery crust.
Add 0.5 cup Granulated Sugar to the butter-flour mixture and work it in until evenly distributed. The sugar will caramelize beautifully during baking, creating that gorgeous golden top. Press half of this mixture into the bottom of a greased 9×13-inch baking dish, spreading it evenly. This creates your base layer.
🥘 Step 3: Assemble and Bake the Cobbler
Spread the apple filling evenly over the crust in the baking dish. You want the apples to be in a single layer, not piled high. This ensures even cooking and prevents the top from being too thick in some spots. Press down gently on the apples to compact them slightly.
Sprinkle the remaining crust mixture over the top of the apples. Here’s where it gets fun—use your fingers to gently press the crumb topping into the apples, creating peaks and valleys. This creates those beautiful caramelized pockets when baked. Bake at 375°F for 45-50 minutes until the top is deep golden brown and the filling is bubbling.
🔥 Step 4: Add the Cream Topping
About 15 minutes before the cobbler is done, remove it from the oven. In a small bowl, whisk together 0.5 cup Heavy Cream and 2 tablespoons of the caramelized juices from the baking dish. This creates a silky, glossy topping that’ll caramelize beautifully.
Pour this cream mixture evenly over the hot cobbler and return it to the oven for 5-7 minutes until the cream bubbles and turns golden. Watch it carefully—you want it to caramelize but not burn. The kitchen should smell absolutely amazing at this point. The cream topping adds that restaurant-quality finish that makes this a 5-star dessert.
⏰ Step 5: Rest and Serve
Remove the cobbler from the oven and let it cool for 10-15 minutes before serving. This resting time allows the juices to redistribute, making every bite moist and flavorful. The crust will be crisp, the apples tender, and the caramelized cream topping will be irresistibly gooey.
Serve warm with a scoop of vanilla ice cream or a dollop of whipped cream. The contrast of warm cobbler and cold ice cream is pure perfection. This cobbler keeps well in the refrigerator for up to 3 days, though I doubt it’ll last that long in your house!
Pro Tips For Making 5 Star Apple Cobbler
- Peel Apples Partially: Cut Granny Smiths and Honeycrisp apples into wedges, then peel only the sides—leave the core intact. This keeps the fruit from turning to mush while still letting the caramelized sugars shine through.
- Brown the Sugar: Before adding the flour mixture, sprinkle 2 tablespoons of brown sugar over the fruit and let it sit for 5 minutes. The oven’s heat will melt it into a sticky, caramelized layer—this is what makes the top actually taste like dessert, not breading.
- Skip the Overmixing: Stir the flour, butter, and sugar just until crumbly—about 10 seconds with a fork. Overworking it turns the topping into a dense, cakey mess. Lumps? That’s fine. They’ll melt into pockets of buttery goodness.
- Bake Until Golden: Ignore the recipe’s suggested time and check at 25 minutes. The cobbler’s done when the edges are deep golden (almost honey-colored) and the center is just set—like a warm, slightly underbaked cookie. If it looks pale, it’ll taste bland.
Make-ahead tips for leftovers
Prep Ahead Basics
Start by prepping the apple filling the night before—toss sliced apples with sugar, cinnamon, and lemon juice, then store in an airtight container. The acids prevent browning while letting flavors meld beautifully.
I always do this because it saves time on baking day and intensifies the apple flavor. Keep it refrigerated until ready to assemble. 🍎
Crust Prep Shortcut
Make the crust mixture up to 2 days ahead and store it in the fridge wrapped in plastic wrap. When ready to bake, simply press it into the dish and proceed with the filling.
For extra convenience, use a food processor to pulse the butter and flour into crumbs—this cuts prep time by half. Just don’t overmix or the crust will get tough. 🧈
Fully Assembled Storage
Assemble the cobbler completely (including the cream topping) and refrigerate for up to 12 hours before baking. This gives the apples time to release juices, creating an even more flavorful filling.
When you’re ready to bake, simply add the cream topping and finish in the oven. The texture stays perfect—no soggy bottoms here! ⏰
Freezer-Friendly Method
For a true make-ahead dessert, assemble the cobbler completely (without the cream topping) and freeze it in a baking dish for up to 3 months. When ready to bake, thaw in the fridge overnight, then add the cream topping and bake as directed.
The crust stays crisp, and the apples remain tender. Just add an extra 10 minutes to the baking time if thawing from frozen. ❄️
Caramelized Top Hack
Pre-mix the heavy cream and caramelized juices in a small container and refrigerate it until baking day. This saves time and ensures the topping is ready to go when you need it.
I like to label it clearly so I don’t forget to add it later—trust me, you’ll thank yourself when that golden crust forms perfectly. 💫
Reheating Leftovers
Slice and reheat individual portions in a 350°F oven for 10-15 minutes to restore that golden crust. For quick servings, microwave covered for 45-60 seconds**—just watch closely to avoid drying out the apples. I always reheat leftovers because the flavors deepen overnight, making every bite even more delicious. 🔥
Nutrition facts
Frequently asked questions
Can I use frozen apples instead of fresh?
Frozen apples work in a pinch, but they’ll release more moisture during baking, which can make the crust soggy. If you must use them, thaw completely first, then pat them very dry with paper towels to remove excess liquid. For best results, stick with fresh apples—they caramelize beautifully and keep the texture perfect.
What’s the secret to the caramelized top?
The golden crust comes from three key elements: the heavy cream topping, the granulated sugar in the crumb mixture, and baking at the right time. Add the cream topping only in the last 5-7 minutes of baking—this gives it time to bubble and caramelize without burning. The sugar in the crust also helps create that crackly, crackly finish.
Can I make this cobbler in a smaller pan?
Yes, but adjust the baking time. For a 9×9-inch dish, reduce the recipe by half and bake for 30-35 minutes. The smaller surface area means faster cooking. If using a round 9-inch pie dish, expect 40-45 minutes—watch closely as the edges brown quicker. The cream topping should still get 5-7 minutes at the end.
Why did my crust turn out greasy?
Overmixing the butter and flour creates a greasy crust. The butter should remain in pea-sized pieces when mixed with the flour—this creates flaky layers. If your crust looks oily, try cutting more cold butter into the mixture or chilling the dough for 30 minutes before pressing it into the pan. Work quickly when handling cold butter to avoid melting.
How do I make this vegan?
Swap the butter for vegan butter or coconut oil, use heavy cream substitute (like coconut cream), and ensure your vanilla extract is vegan-certified. For the crust, 1 tbsp apple cider vinegar helps mimic the tang of lemon juice in the filling. The texture will be slightly different but still delicious—just expect a more delicate crust.

- 3lb Prime Rib Roast Recipe: Juicy Pink Center Guaranteed in 3 Hours - October 31, 2026
- 5 Spice Cake Recipe: Warmly Spiced Layers With Crunchy Top - October 31, 2026
- 1950’s Macaroni and Cheese Recipe: Nostalgic Creamy Cheese Sauce with Buttery Noodles - October 31, 2026