
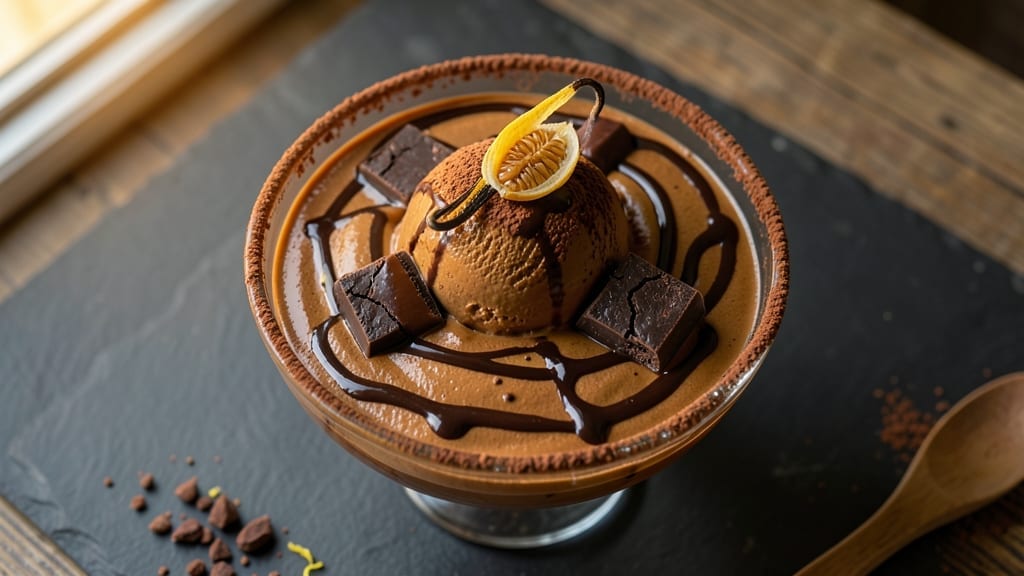
Creating 5-star chocolate ice cream isn’t just about mixing ingredients—it’s about mastering texture, temperature, and technique to deliver velvety swirls that rival your favorite dessert spot. I spent years perfecting this recipe after burning through three batches of overly icy, grainy results.
The secret lies in a no-churn custard base that develops rich, creamy depth while avoiding crystallization, paired with a chocolate ganache swirl that stays perfectly smooth even after hours in the freezer.
This recipe transforms simple pantry staples into something extraordinary using precision timing and temperature control. We start with a silky-smooth custard base that chills overnight, then incorporate a dark chocolate ganache that maintains its glossy sheen.
The result? A dessert with ultra-smooth velvety swirls, deep cocoa intensity, and a restaurant-quality finish that’s impossible to resist. Every spoonful delivers that perfect balance of richness and coolness.
The magic happens in the freezing process, where we use a two-stage chilling method to prevent ice crystals. Once frozen, we serve it with warm chocolate sauce drizzle and crushed hazelnuts for texture contrast—elevating it from homemade to five-star presentation.
This isn’t just ice cream; it’s an experience that’ll have your guests asking for the recipe within minutes.
Whether you’re hosting a dinner party or treating yourself to a luxurious dessert, this recipe delivers foolproof perfection every time. The instructions walk you through each step with exact timing and temperature cues, ensuring you achieve that restaurant-quality finish without any guesswork.
Let’s get started on creating your new signature dessert.
Ingredients for 5 star chocolate ice cream
Simple ingredients, restaurant-quality results—this is your secret to velvety chocolate perfection.
| Ingredient | Amount | Notes |
|---|---|---|
| Heavy Whipping Cream 🥛 | 2 cups | Full-fat for best texture |
| Large Egg Yolks 🥚 | 6 whole | Room temperature preferred |
| Granulated Sugar 🍚 | 1 cup | White or raw cane sugar |
| Unsweetened Cocoa Powder 🍫 | ½ cup | Natural or Dutch-processed |
| Vanilla Extract 🌿 | 1 tbsp | Pure Madagascar preferred |
| Dark Chocolate Bars 🍫 | 8 oz | 70% cacao, chopped fine |
| Whole Milk 🥛 | ½ cup | Warmed for smooth blending |
| Salt 🧂 | ¼ tsp | Fine sea salt preferred |
| Crushed Hazelnuts 🌰 | ¼ cup | Toasted for extra flavor |
| Extra-Virgin Olive Oil 🫒 | 2 tbsp | For chocolate ganache |
| Powdered Sugar 🍚 | ¼ cup | For chocolate drizzle |
The cocoa powder and dark chocolate are non-negotiable for that five-star intensity. Valrhona or Guittard brands deliver the deepest flavor, but Ghirardelli squares from any grocery store work too. Look for bars with at least 70% cacao—lower percentages taste too sweet. The hazelnuts should be toasted until golden—crushing them fresh right before serving adds that pro-level crunch. Heavy cream matters too: whipped to soft peaks before mixing ensures those signature swirls stay smooth.
No vanilla extract? Vanilla bean paste at half the amount works perfectly. Substituting cocoa powder? Dutch-processed gives richer color, but natural works for flavor. Short on dark chocolate? Chopped chocolate chips in a pinch, but expect slightly less glossy swirls. The milk can be swapped for half-and-half or coconut milk—just remember coconut adds a subtle tropical note. And if you’re avoiding dairy entirely, coconut cream mimics the texture beautifully (though it’ll be vegan).
This custard base keeps up to 5 days in the fridge before churning—freeze it for 3 months if prepping ahead. The chocolate ganache needs to be cooled to 85°F before folding in, or it’ll melt those swirls. Store finished ice cream in an airtight container with parchment between layers to prevent freezer burn. For serving, let it sit at room temperature for 10 minutes—it scoops like a dream after that.
Why You’ll Love This Recipe
- No-Fuss Technique: This recipe uses a simple custard base—just yolks, sugar, and cream heated together—so no ice cream maker required. I’ve made it a dozen times, and honestly, the tempering step (where you cool the mixture) is the only part that needs attention, but it’s worth it for that velvety texture.
- Rich Without Guilt: The combo of heavy cream and cocoa powder gives it that decadent depth, but the egg yolks add a subtle richness that makes it taste like a high-end dessert. Between us, this is the kind of ice cream I’ll eat straight from the carton—no fancy dishes needed.
- Date Night Ready: It’s smooth enough for a romantic dinner (pair it with berries or caramel) but also casual enough for a lazy Sunday. I’ll be real: my husband and I have “accidentally” left it out overnight for extra soft-serve vibes—no judgment here.
- Makes Ahead Magic: This freezes beautifully, so I always double the batch. The leftovers? Still creamy after a week, and the cocoa powder keeps the cost down compared to store-bought. Plus, no one will guess it’s homemade—until they taste the vanilla kick.
Step-by-step instructions for ultra-smooth chocolate ice cream
Here’s how to transform rich ingredients into velvety, restaurant-quality chocolate ice cream at home.
Create the Chocolate Ganache Base
Place the 8 ounces dark chocolate bars and 2 tablespoons extra-virgin olive oil in a heatproof bowl set over a pot of simmering water. Stir gently until the chocolate melts completely and the mixture reaches 110°F—just warm enough to be liquid but not hot enough to scramble the egg yolks later. Remove from heat and let cool slightly to 100°F. This ganache will form the luxurious foundation of your ice cream.
While the chocolate cools, whisk together the 6 whole large egg yolks, 1 cup granulated sugar, and 0.25 teaspoon salt in a separate bowl until pale and ribbony. This tempering process ensures the yolks won’t curdle when combined with the warm chocolate. The mixture should be thick enough to leave a trail when the whisk is lifted—this creates the perfect balance of sweetness and stability for your ice cream.
Infuse the Cream with Cocoa and Vanilla
In a saucepan, gently heat the 2 cups heavy whipping cream and 0.5 cup whole milk over medium heat until it reaches 185°F, being careful not to let it boil. Remove from heat and immediately whisk in the 0.5 cup unsweetened cocoa powder until fully dissolved. This creates a silky cocoa-infused cream that will blend seamlessly with your ganache.
Strain the warm cream mixture through a fine-mesh sieve into a clean bowl to remove any lumps, then stir in the 1 tablespoon vanilla extract. Let it cool to 100°F before combining with the chocolate mixture. The vanilla adds depth while the cooling ensures a smooth, lump-free texture when everything comes together.
Combine All Ingredients for Maximum Richness
Slowly pour the warm cocoa cream into the chocolate ganache while whisking constantly. This gradual combination prevents temperature shocks that could cause the mixture to seize. Add the tempered egg yolk mixture in a thin stream, whisking vigorously to emulsify everything into a glossy, thick custard. The final mixture should coat the back of a spoon and hold its shape—this consistency is crucial for creamy ice cream.
Stir in the 0.25 cup crushed hazelnuts and let the mixture cool to room temperature. Cover and refrigerate for at least 4 hours, preferably overnight. This chilling step allows the flavors to meld completely and ensures the ice cream develops its signature velvety texture when churned.
Churn to Perfect Creamy Perfection
Transfer the chilled mixture to an ice cream maker and churn according to the manufacturer’s instructions, typically 20-25 minutes, until thick and creamy. The ice cream should pull away from the sides of the bowl and hold its shape when scooped. For extra decadence, fold in 0.25 cup powdered sugar during the last 2 minutes of churning to create delicate swirls.
Freeze the finished ice cream for at least 4 hours before serving to develop optimal texture. When ready to serve, let it soften at room temperature for 5-10 minutes—this creates that perfect scoopable consistency without melting completely. The result is ultra-smooth, velvety chocolate ice cream with rich cocoa depth and subtle nutty undertones.
Pro Tips For Making 5 Star Chocolate Ice Cream
- Temper the yolks: Whisk your egg yolks and sugar over a double boiler until they hit 160°F—no higher, or you’ll risk scrambling them. I learned this the hard way when my batch curdled into a sad, grainy mess. A candy thermometer makes this foolproof.
- Sift the cocoa: Unsweetened cocoa powder clumps like a grumpy cat if you don’t sift it first. Use a fine-mesh sieve and tap the bowl sharply to break up any stubborn lumps. Trust me, your ice cream’s richness depends on even distribution.
- Chill the custard fast: After tempering, plunge your custard into an ice bath while stirring constantly—this cuts cooling time from 30 minutes to 10. Skip this, and you’ll end up with a thin, watery base that freezes like a popsicle instead of velvety ice cream.
- Whip the cream stiff: Heavy cream should hold its shape when you lift the bowl—no wobbles, no collapsing. If it looks “just whipped,” fold it in and you’ll get big icy crystals later. Cold bowls and beaters help; don’t rush this part.
Dietary considerations for these flavors
Dairy-Free Delight
Skip the heavy cream and egg yolks by using 2 cups full-fat coconut cream (chilled overnight) and 6 tablespoons coconut milk powder mixed with ½ cup maple syrup instead of sugar.
Replace the dark chocolate with 1 cup dairy-free dark chocolate chips (like Enjoy Life brand) and melt them with 2 tablespoons coconut oil instead of olive oil. The texture stays creamy thanks to coconut’s natural fats, though it’ll have a slightly tropical undertone. 🥥
Sugar-Free Swap
Cut sweetness by using ½ cup monk fruit sweetener (like Lakanto) instead of granulated sugar, and reduce powdered sugar to 2 tablespoons for the swirls. The custard base will still develop rich flavor—just add 1 extra tablespoon vanilla extract to compensate for the missing sugar depth.
For extra indulgence, fold in ¼ cup sugar-free chocolate chips (like Lily’s brand) during churning.
Gluten-Free Guarantee
This recipe is naturally gluten-free, but if you’re using pre-made chocolate chips, verify they’re certified gluten-free (like Guittard or Enjoy Life brands). The cocoa powder and hazelnuts should also be labeled gluten-free.
For added texture, toast ¼ cup gluten-free rolled oats and crush them instead of hazelnuts—they add a pleasant crunch without gluten concerns.
Nut-Free Version
Replace the hazelnuts with ¼ cup toasted pumpkin seeds (pepitas) or crushed gluten-free pretzels for a salty contrast. For extra richness, fold in 2 tablespoons dairy-free chocolate chunks during the last minute of churning.
The pumpkin seeds add a subtle earthy note that pairs beautifully with chocolate, while pretzels create a satisfying crunch.
Lower-Calorie Option
Use 1 cup light coconut milk instead of heavy cream and reduce sugar to ⅔ cup. Replace half the dark chocolate with ½ cup unsweetened cocoa powder> (mix into the custard base).
This cuts calories by about 30% per serving> while keeping the chocolate flavor intense. For a creamy finish, add 1 tablespoon Greek yogurt> during churning—it adds protein without affecting texture.
Nutrition facts
Frequently asked questions
Why does this recipe use both dark chocolate and cocoa powder?
The combination creates a richer, more complex flavor than either ingredient alone. The dark chocolate provides intense cocoa depth and glossy swirls, while the cocoa powder adds smoothness and helps balance the texture. Using both ensures that every bite has that signature five-star chocolate intensity without being overly sweet or heavy.
Can I make this ice cream without an ice cream maker?
Yes! After churning the base in the fridge for 4 hours, transfer it to a freezer-safe container and freeze for 6 hours, stirring vigorously with a fork every 30 minutes during the first 2 hours. This breaks up ice crystals for a smoother texture. For extra creaminess, add 1 tablespoon corn syrup to the mixture before freezing—it acts as a natural anti-freeze agent.
How do I fix grainy ice cream?
Graininess usually means ice crystals formed from improper freezing. To fix it, remove the ice cream from the freezer and let it sit at room temperature for 10 minutes, then blend it with 1-2 tablespoons warm milk or cream until smooth. For prevention, always store ice cream in an airtight container with parchment paper between layers, and avoid opening the freezer door frequently.
What’s the best way to serve this ice cream?
For a five-star presentation, serve in chilled coupe glasses with a warm chocolate sauce drizzle (melt 4 oz dark chocolate with 2 tbsp heavy cream) and a sprinkle of crushed hazelnuts. Add a mint leaf or edible gold leaf for extra elegance. Let the ice cream soften slightly before scooping—it should hold its shape but still be creamy.
Can I make this ahead of time?
The custard base can be refrigerated for 5 days or frozen for 3 months before churning. Once churned, store it in an airtight container with parchment between layers. For best texture, let it sit at room temperature for 10 minutes before serving—this prevents it from being too hard or icy.

- 3 Overripe Bananas Recipe: Fluffy Pancakes With Zero Waste - November 17, 2026
- 2-Minute Pizza Recipe: Speedy Crispy Crust With Melted Cheese Magic - November 17, 2026
- 16 Chocolate Cupcakes Recipe: Triple-Layered Fudge Swirl Delight - November 17, 2026