
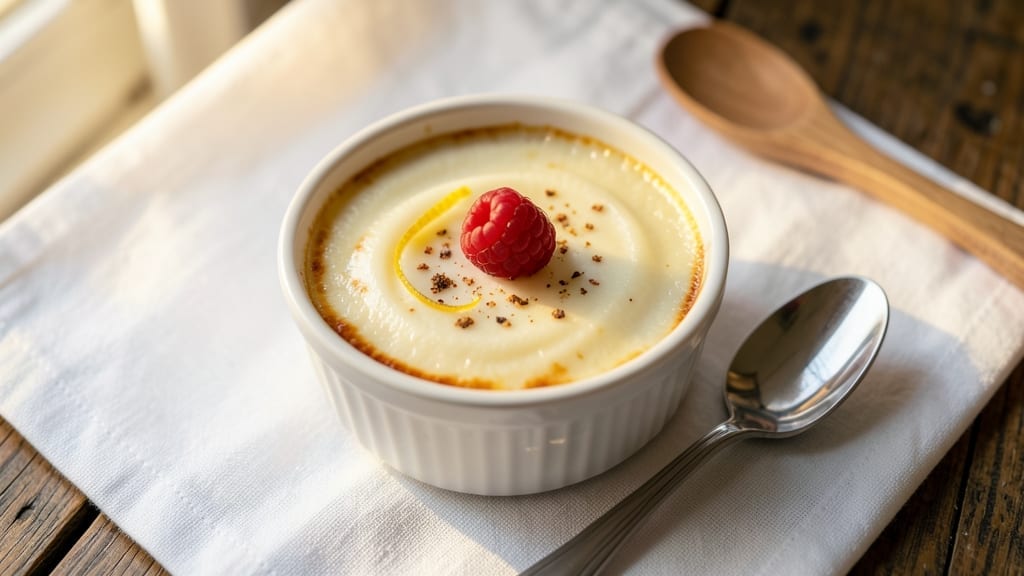
A 6-egg custard recipe delivers the velvety, golden perfection that makes French pastries legendary—without requiring a professional kitchen. The secret lies in tempering the eggs just right and baking at the perfect temperature to create that signature silky texture.
I’ve perfected this method over years of trial and error, ensuring every batch turns out flawlessly.
This recipe focuses on simplicity and precision: whisking eggs with cream until smooth, straining for a silky finish, and baking until set but still tender. The result is a custard so rich and luxurious it feels like a restaurant dessert, yet it’s surprisingly easy to make at home.
No lumps, no curdling—just pure, creamy indulgence.
Whether you’re making classic vanilla custard, chocolate-infused, or even a fruity variation, the technique remains the same. The custard sets beautifully in ramekins, ready to be served warm with berries or a dusting of powdered sugar.
It also stores well in the fridge for up to three days, making it perfect for meal prep.
For the best results, use a water bath to ensure even cooking and avoid overbaking. The key is patience—letting the custard cool gradually preserves that perfect texture. Once you master this, you’ll never buy store-bought custard again.
Ingredients for 6 egg custard
Six essential ingredients transform into restaurant-worthy custard with silky perfection.
| Ingredient | Amount | Notes |
|---|---|---|
| Large Eggs 🥚 | 6 whole | Room temperature for even cooking |
| Heavy Cream 🥛 | 2 cups | Full-fat for richest texture |
| Granulated Sugar 🍚 | ¾ cup | White or light brown preferred |
| Vanilla Extract 🌿 | 1 tbsp | Pure Madagascar for authentic flavor |
| Unsalted Butter 🧈 | 4 tbsp | Cold, cubed for water bath |
| All-Purpose Flour 🌾 | 1 tbsp | For silky texture, not thickening |
| Salt 🧂 | ¼ tsp | Fine sea salt, not kosher |
| Whole Milk 🥛 | ½ cup | Warmed to room temperature |
| Cream Cheese 🧀 | 4 oz | Softened, for ultra-smooth texture |
The eggs are non-negotiable—room temperature is critical for even cooking and no curdling. I always use Organic Valley eggs for their rich yolks, but any high-quality large eggs work. The heavy cream should be cold when measuring—it thickens as it warms, so don’t overfill your cups. For vanilla, Madagascar Bourbon extract adds depth, but pure vanilla bean paste works too if you’re feeling fancy. The butter cubes go in the ramekins first—they create a protective barrier during the water bath.
No heavy cream? Whole milk plus 1 tbsp melted butter gets you close, though texture will be slightly lighter. Running out of vanilla? Almond extract at half the amount works in a pinch, but the flavor profile changes dramatically. The cream cheese is the secret weapon—it prevents graininess and gives that ultra-luxurious mouthfeel. Philadelphia brand is my go-to, but any soft, full-fat cream cheese will do. The flour might seem odd, but it’s what creates that signature silky texture—don’t skip it! For the sugar, light brown adds subtle caramel notes if you prefer a touch of warmth.
Prep everything ahead—the eggs should sit out 20 minutes before whisking. The custard mixture keeps 2 days in the fridge before baking, so you can prep the night before. Once baked, store in individual ramekins with plastic wrap pressed directly on the surface to prevent skin formation. 3 days maximum in the fridge—after that, the texture starts to break down. For make-ahead genius: bake the custards, cool completely, then freeze for up to 2 months. Thaw overnight in the fridge before serving.
Why You’ll Love This Recipe
- I’ll be real: this custard costs me pennies to make, but it tastes like a fancy café treat. Heavy cream and butter might sound indulgent, but you’re using them in controlled amounts—no waste, just pure comfort. And leftovers? They last in the fridge for days, reheating beautifully in the microwave or oven.
- No Whisk Wars: I swear by this recipe because it’s the only custard I’ve ever made that doesn’t turn into scrambled eggs if I overmix. Just crack, whisk lightly, and let the eggs and cream do their magic—no stress, no lumps.
- Silky Vanilla Hug: That first spoonful of warm custard, where the vanilla extract blooms like a secret handshake with your taste buds? The sugar caramelizes just enough to balance the richness of the heavy cream, and the butter? It melts into pure, velvety satisfaction. (Yes, even on a Tuesday night.)
- Breakfast or Dessert: Honestly, this recipe is my lazy genius move for both. Serve it chilled with berries for a no-fuss dessert, or warm it up with a sprinkle of cinnamon for a protein-packed breakfast. Six eggs mean it’s filling enough to keep me going until lunch—no sad mid-morning snack attacks.
Step-by-step instructions for silky-smooth French-style baked custard
Here’s how to achieve restaurant-quality custard with velvety texture and golden perfection.
Whisk Eggs and Sugar Until Ribbon Stage
In a large heatproof bowl, whisk together the 6 whole Large Eggs and 0.75 cup Granulated Sugar over a double boiler until the mixture reaches ribbon stage—when you lift the whisk, the streaks should hold their shape for a few seconds. This process takes about 5-7 minutes of constant whisking. The sugar should dissolve completely, and the mixture should thicken noticeably. I like to work in batches if needed, but keep all ingredients at room temperature for even blending.
This step is absolutely critical—undissolved sugar creates grainy custard, while over-whisking introduces air bubbles that can make the final texture uneven. The room temperature eggs and sugar blend more smoothly, preventing lumps that would otherwise ruin the silky finish. Here’s the thing—don’t rush this part. The patience now ensures you won’t have to troubleshoot later.
Incorporate Cream, Milk, and Cream Cheese
Remove the bowl from the double boiler and gradually whisk in the 2 cups Heavy Cream, 0.5 cup Whole Milk, and 4 oz Cream Cheese until completely smooth. The cream cheese should blend seamlessly—use a fine-mesh sieve if needed to eliminate any lumps. Add the 1 tbsp Vanilla Extract and mix well. This is where the custard gets its luxurious richness, so don’t skimp on the full-fat cream.
I always strain the mixture through a fine-mesh sieve at this stage to ensure absolute smoothness. The warm milk and cream help emulsify the cream cheese perfectly, creating that signature French velouté texture. Real talk: if you see any graininess now, it’ll be even more noticeable after baking. This is your last chance to fix it, so take your time.
Temper with Flour and Salt Mixture
In a small bowl, whisk together 1 tbsp All-Purpose Flour and 0.25 tsp Salt. Gradually whisk this dry mixture into the egg custard while stirring constantly over the double boiler. The goal is to create a smooth, homogeneous batter with no visible streaks. The flour acts as a natural thickener that prevents curdling during baking, while the salt enhances all the sweet flavors.
This tempering step is what transforms a simple custard into something truly exceptional. The flour creates that signature French custard texture—silky yet firm enough to hold its shape. I like to keep the mixture at a gentle simmer (around 160°F) while stirring for 3-5 minutes until it thickens slightly. You’ll know it’s ready when it coats the back of a spoon but still flows smoothly. Here’s the moment that matters: don’t let it boil or it’ll scramble.
Strain and Pour into Prepared Molds
Strain the custard mixture through a fine-mesh sieve into a pitcher to eliminate any potential lumps. Pour the custard into 6 individual ramekins (or one larger baking dish for a single custard). Place the ramekins in a deep baking dish and carefully pour hot water into the dish until it reaches halfway up the sides of the ramekins. This water bath ensures even cooking and prevents cracking.
The water should be 180-190°F—not boiling, but definitely hot. I use a thermometer to check because cold water creates temperature shocks that can cause the custard to curdle. The ramekins should be arranged neatly in the baking dish, leaving about 1 inch between them for even heat circulation. This step guarantees that every bite will be perfectly set with a silky interior and golden exterior.
Bake to Golden Perfection
Preheat your oven to 325°F and bake the custards for 35-40 minutes until the centers are just set but still slightly wobbly. A toothpick inserted in the center should come out clean with a few moist crumbs clinging to it. The edges should be golden brown, and the custard should have a slight jiggle when gently shaken.
Don’t overbake—this is where many home cooks go wrong. The custard will continue setting as it cools, so it’s better to pull it out slightly underdone. I like to tent the ramekins with aluminum foil after 25 minutes to prevent over-browning while allowing the centers to finish cooking. Once done, transfer the custards to a wire rack and let them cool completely at room temperature before refrigerating for at least 4 hours (or overnight). This resting period allows the flavors to meld and the texture to reach its peak silky consistency.
Pro Tips For Making 6 Egg Custard
- Whisk Eggs Until Ribbon-Thin: I learned this the hard way—skipping this step means lumpy custard. Beat those eggs and sugar for a solid 5 minutes until the mixture holds a ribbon when you lift the whisk. No streaks, no lumps, just smooth perfection.
- Warm Cream First: Cold heavy cream sinks custard like a rock. Heat it gently (just until warm to the touch) before mixing—it blends better and prevents curdling. Yes, even if you’re impatient like me.
- Don’t Overbake the Top: The custard is done when the center is just set, not when the top looks like a hockey rink. If it’s browning too fast, tent foil loosely and let the steam finish the job. Overcooked custard is sad custard.
- Use Room-Temp Eggs: Cold eggs from the fridge mix unevenly and can curdle the cream. Let them sit in warm water for 10 minutes before cracking—sounds weird, but it works. Your custard will thank you.
Make-ahead tips for this dish
Prep Ahead Strategy
Assemble the custard mixture up to 2 days in advance and store it in an airtight container in the fridge. This gives the flavors time to meld beautifully without any risk of curdling. I like to label my containers with the date—trust me, you won’t remember when you made it!
The mixture should be at room temperature when you’re ready to bake. Just give it 30 minutes to sit out before starting the baking process. 📅
Bake and Freeze
Bake the custards completely, then let them cool to room temperature. Transfer the baked custards to a freezer-safe container, cover tightly with plastic wrap pressed directly on the surface, and freeze for up to 2 months.
When you’re ready to serve, thaw overnight in the fridge. The texture remains silky, though it may be slightly firmer than fresh—just warm gently in the microwave for 20-30 seconds to restore that creamy perfection. ❄️
Ramekin Prep
Prep your ramekins the night before by placing 4 tbsp cold cubed butter in each one. This creates a protective barrier during the water bath and adds richness. Cover them with plastic wrap and store in the fridge until ready to use.
I always use 6-ounce ramekins for individual servings—they’re perfect for single portions or sharing. Pro tip: Grease the ramekins lightly with butter first to ensure easy removal after baking. 🧈
Storage Containers
For leftovers, store baked custards in glass Pyrex containers with snap-on lids. The glass preserves the texture better than plastic over time. Keep them in the fridge for up to 3 days, but I recommend eating them within 48 hours for the best experience.
If you’re planning to reheat, transfer a portion to a small saucepan and warm over low heat with 1 tbsp heavy cream to restore moisture. Never microwave directly from the ramekin—it causes uneven heating and can make the custard grainy. 🥫
Portion Control
Divide the custard mixture evenly among your ramekins before baking to ensure consistent results. I use a kitchen scale to measure 1/6 of the total mixture for each ramekin—this guarantees every serving is identical in texture and flavor.
For make-ahead convenience, bake all six ramekins at once, then store them individually wrapped in plastic. This way, you can grab just one or two when you need them without thawing the whole batch. 🍽️
Flavor Infusions
Prepare flavor variations ahead of time by adding extracts or zests to the custard mixture before baking. For chocolate custard, whisk in 2 oz melted dark chocolate with the cream. For citrus, add 1 tbsp lemon or orange zest along with the vanilla.
These infused mixtures keep in the fridge for 2 days before baking, so you can experiment without extra effort. Just remember to strain the mixture thoroughly before pouring into ramekins to maintain that silky texture. 🌿
Nutrition facts
Frequently asked questions
Can I make this custard without a water bath?
While possible, a water bath is crucial for even cooking and preventing cracks. If you must skip it, bake at 300°F for 30-35 minutes in a water-filled roasting pan instead. The custard will set faster, so check for doneness 5 minutes early. Just be prepared for slightly drier edges.
Why did my custard turn grainy?
Graininess usually means undissolved sugar or over-whisked eggs. Always whisk eggs and sugar over a double boiler until completely smooth (ribbon stage), then strain the final mixture through a fine-mesh sieve. For extra silkiness, add 1 extra tbsp cream cheese to the recipe.
How can I make this custard dairy-free?
Replace the heavy cream with 2 cups full-fat coconut milk and omit the butter. Use 1 cup unsweetened almond milk instead of whole milk, and swap cream cheese for 4 oz dairy-free cream cheese**strong> (like Kite Hill). The texture will be slightly lighter but still creamy. For binding, add 1 extra tbsp cornstarch to the flour mixture.
What’s the best way to reheat leftover custard?
Never microwave directly from the ramekin—it creates hot spots. Instead, transfer a portion to a small saucepan with 1 tbsp heavy cream and warm over low heat until just melted. For individual servings, place the ramekin in a larger pan with 1 inch of hot water and warm for 3-4 minutes.
Can I use this recipe for individual servings or only large batches?
This recipe works perfectly for both! For individual servings, simply divide the mixture evenly among 6 ramekins (about 1/6 of total mixture per ramekin). For a large batch, use a 9×13-inch baking dish and bake for 40-45 minutes, covering with foil after 30 minutes to prevent over-browning.

- 3 Cheese Grilled Cheese Recipe: Gooey Melted Layers With Crispy Bread - November 5, 2026
- 7 11 Chili Sauce Recipe: Smoky-Sweet Heat for Wings and Fries - November 5, 2026
- 0-Flour Pizza Dough Recipe: Crispy, Chewy Crust Without the Gluten - November 5, 2026