
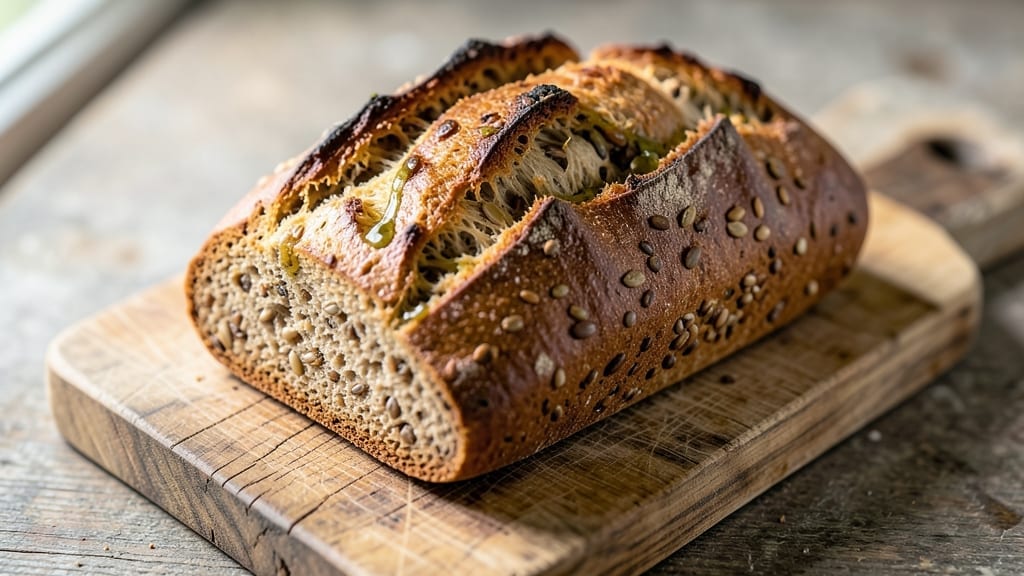
This 6-grain bread recipe delivers a nutty crust and hearty texture that transforms your dinner table—no store-bought loaves needed. 🌾 The blend of whole grains creates a complex flavor profile with every bite, while the slow fermentation process develops deep, satisfying depth.
Perfect for sandwiches, toast, or serving alongside soups, this bread is a game-changer for home bakers.
What sets this recipe apart is the balanced grain combination—wheat berries, rye, barley, and more—that delivers both texture and nutrition. The dough requires 30 minutes of hands-on mixing followed by 2 hours of proofing, but the results are worth every minute.
You’ll end up with a loaf that’s crisp on the outside, tender inside, and packed with flavor.
The baking process is straightforward but critical: 425°F oven for 35-40 minutes until golden brown. A Dutch oven helps trap steam, creating that perfect crust. Once cooled, the bread stays fresh for 5-7 days when stored properly—ideal for meal prep.
Optional additions like seeds or herbs can customize the flavor to your taste.
This recipe is perfect for whole-grain lovers who want restaurant-quality texture at home. Whether you’re a beginner or experienced baker, the step-by-step instructions ensure success. Let’s get started on your first loaf!
Ingredients for 6 grain bread
Six whole grains, one magical loaf—this is your bread game-changer.
| Ingredient | Amount | Notes |
|---|---|---|
| Wheat Berries 🌾 | 1 cup | Soaked overnight for best texture |
| Rye Flour 🌾 | 1 ½ cups | Dark rye for deep flavor |
| Barley Flour 🌾 | 1 cup | Ground from pearled barley |
| Whole Wheat Flour 🌾 | 1 ½ cups | Unbleached for nutty taste |
| Spelt Flour 🌾 | 1 cup | Lightly toasted for aroma |
| Buckwheat Flour 🌾 | ½ cup | Rich, earthy flavor profile |
| Active Dry Yeast 🍞 | 2 ¼ tsp | Fresh yeast preferred |
| Honey 🍯 | 2 tbsp | Wildflower for floral notes |
| Extra-Virgin Olive Oil 🫒 | ½ cup | High-quality, fruity |
| Warm Water 💧 | 1 ½ cups | 110°F for yeast activation |
| Sea Salt 🧂 | 2 tsp | Fine grain preferred |
| Flaxseeds 🌱 | 2 tbsp | Ground for binding |
| Sesame Seeds 🌿 | 1 tbsp | Optional for topping |
The grains are the heart of this recipe, so source them carefully. Bob’s Red Mill or King Arthur Flour have excellent pre-ground flours, but if you’re grinding your own, use a high-quality grinder—stone-ground is ideal. Wheat berries need soaking for 12+ hours, so plan ahead. For the flours, rye and buckwheat are non-negotiable—they bring that deep, nutty complexity. Pro tip: Toast the flours lightly in a dry pan before mixing to wake up their flavors. And if you’re feeling fancy, foraged rye from a specialty grocer adds an extra layer of earthiness.
No wheat berries? Substitute with extra whole wheat flour, but the texture won’t be quite the same. Running short on buckwheat? Amaranth flour works in a pinch, though it’s pricier. Honey out of stock? Maple syrup or agave keeps things vegan-friendly. The flaxseeds are optional but add a lovely crunch—chia seeds work too. For the yeast, if it’s past its expiration, proof it first by dissolving in warm water with a pinch of sugar. If your dough feels too sticky, add 1 tbsp more flour gradually. And trust me, the extra 20 minutes of kneading makes all the difference in that oven-spring.
This dough is a patient loaf—proof it for 2 hours, then shape and let it rise another hour before baking. For the best crust, bake in a Dutch oven if you have one, or use a baking stone. Once cooled, store wrapped in a clean kitchen towel for 5-7 days. Freeze slices for up to 3 months—toast straight from frozen. The first loaf is always the best, but once you master this, you’ll be baking weekly. And if you’re feeling adventurous, try adding sunflower seeds or rosemary to the dough for extra flavor.
Why You’ll Love This Recipe
- No-Knead Nightmare Over: I’ll admit—this bread looks intimidating with all those grains, but the dough comes together in 10 minutes flat. No stand mixer, no fancy techniques: just mix, shape, and let the yeast do the work while you watch a show.
- Earthy Crunch Magic: That first bite? The wheat berries add a satisfying chew, while the rye and barley give it a deep, almost toasty flavor—like a sourdough hug for your sandwich. Honestly, it’s the kind of bread that makes store-bought taste like cardboard.
- Meal Prep MVP: Slice it fresh, toast it later. It keeps for days in the fridge, freezes like a dream, and turns even the simplest lunch into a gourmet moment. (Yes, even on a Tuesday night.)
- Pantry Stash Gold: You’re already using these flours? Perfect. No extra shopping—just repurpose what’s sitting there. And since it’s dense and filling, one loaf stretches across breakfasts, sandwiches, and open-faced dinners without waste. Budget win.
Step-by-step instructions for 6-Grain bread with nutty crust
Here’s how to craft a rustic, multi-grain loaf with perfect texture and flavor—every step matters!
👨🍳 Step 1: Prepare the Wheat Berries and Hydrate the Yeast
Start by soaking the 1 cup wheat berries in 1.5 cups warm water (about 110°F) overnight in the refrigerator. This pre-soaking transforms them into tender, flavorful bites that add texture to your bread. Drain them well before using—discard the soaking water as it contains anti-nutrients that can interfere with yeast activity.
In a separate bowl, whisk together the 2.25 tsp active dry yeast, 2 tbsp honey, and ½ cup warm water (again, 110°F). Let this mixture sit for 5-10 minutes until it becomes frothy and bubbly. This confirms your yeast is active and ready to work its magic. If it doesn’t bubble, your yeast may be dead—start fresh with a new packet.
👨🍳 Step 2: Mix the Dough with Wet and Dry Ingredients
In a large mixing bowl, combine all the flours: 1.5 cups rye flour, 1 cup barley flour, 1.5 cups whole wheat flour, 1 cup spelt flour, and ½ cup buckwheat flour. Add the 2 tsp sea salt and mix well to distribute evenly. Create a well in the center and pour in the yeast mixture, ½ cup extra-virgin olive oil, and the drained wheat berries.
Gradually add the 1.5 cups warm water while stirring with a wooden spoon or dough whisk. The dough will be shaggy and sticky at first—this is normal! Once combined, sprinkle the 2 tbsp ground flaxseeds over the top and mix until fully incorporated. The flaxseeds act as a natural binder, helping the dense flours hold together.
🍳 Step 3: Knead the Dough Until Elastic
Transfer the dough to a lightly floured surface (use a mix of your flours to keep it consistent) and knead vigorously for 8-10 minutes. You’re aiming for a smooth, slightly tacky dough that springs back when pressed. The whole grains make this dough denser than traditional bread, so don’t worry if it doesn’t look like classic bread dough—it should still be cohesive and elastic.
If the dough feels too sticky, wet your hands slightly and keep kneading. If it’s too dry, add 1 tsp warm water at a time. Once kneaded, place the dough in a lightly oiled bowl, cover with a damp towel, and let it rise in a warm place for 1-2 hours, or until it has nearly doubled in size. You’ll see bubbles forming on the surface and the dough will feel light and airy when pressed gently.
🔥 Step 4: Shape and Proof the Loaf
Punch down the risen dough to release air, then shape it into a round loaf on a parchment-lined baking sheet. Dimple the top lightly with your fingers—this helps steam escape during baking and creates that beautiful crust. Cover the dough again and let it proof for another 30-45 minutes until it rises slightly and looks puffy.
Preheat your oven to 375°F with a Dutch oven inside for 30 minutes. This step is crucial for creating that signature crispy crust. Once preheated, carefully transfer the dough (still on parchment) into the hot Dutch oven. Bake covered for 30 minutes, then remove the lid and bake uncovered for another 15-20 minutes until the bread is deep golden brown and sounds hollow when tapped on the bottom.
⏰ Step 5: Cool and Finish with Sesame Seeds
Remove the bread from the oven and let it cool on a wire rack for at least 1 hour. This resting period allows the crumb to set and prevents a gummy texture. While cooling, brush the top with a little extra-virgin olive oil and sprinkle with 1 tbsp sesame seeds for a nutty, crunchy finish.
Slice into thick pieces to reveal the hearty, open crumb and nutty crust. Serve warm with butter or as part of a charcuterie board—this bread is packed with texture and flavor from every grain. Store leftovers wrapped in a cloth bag at room temperature for up to 3 days, or freeze for longer storage.
Pro Tips For Making 6 Grain Bread
- Soak Wheat Berries Overnight: I learned this the hard way—skipping the overnight soak leaves your wheat berries chewy and underdeveloped. Cover them in water (about 1:3 berry-to-water ratio) with a pinch of salt, and let them sit 12+ hours. They’ll triple in size and soften just enough to blend smoothly into the dough.
- Sift Flours Together: Rye, barley, and spelt flours pack tightly, and that means uneven mixing. Sift them all together first—even if you’re not using a sifter, just pour through a fine-mesh strainer—then add the whole wheat. This guarantees no dry pockets and a more consistent crumb.
- Don’t Over-Knead the Dough: This isn’t pizza dough—you’re not chasing gluten. Mix until just combined, then let the dough rest. Overworking it turns the rye and barley flours gummy, and your bread will taste dense. Stop when it holds together, then let it relax for 20 minutes before shaping.
- Use a Dutch Oven: Your home oven won’t mimic a bakery’s steam. Shape the loaf, place it in a cold Dutch oven, then bake with the lid on for 20 minutes. The trapped steam gives you that open, airy crumb instead of a tough crust. (Yes, even if you’re lazy about preheating—just make sure the oven’s hot.)
Make-ahead tips for this dish
Prep Ahead Strategy
This bread is a meal prep powerhouse—start by soaking the 1 cup wheat berries in 1.5 cups warm water the night before. Store them in the fridge overnight, then drain and refrigerate until ready to use.
This step saves 12+ hours of active prep time and ensures perfect texture. 🌾
Dough Mixing Shortcut
Mix all dry ingredients (flours, salt, flaxseeds) in a large bowl and store in an airtight container for up to 3 days. When ready to bake, simply add the yeast mixture, olive oil, and soaked wheat berries. This keeps your workspace clean and organized—ideal for busy weeknights.
Proofing Flexibility
Shape the dough into a loaf and refrigerate it overnight for a cold proof. This slow rise (up to 12 hours) enhances flavor and makes shaping easier. Bake directly from the fridge—just add 10-15 extra minutes to the baking time. The result? A deeper, more complex flavor profile.
Baking in Batches
Make two loaves at once by doubling the recipe (use a 9×5-inch loaf pan for each). Bake them side by side in your oven for even heat distribution. Store one loaf in the freezer while enjoying the other fresh—perfect for weekly meal prep. 🍞
Freezing for Later
Slice the cooled bread and freeze individual portions on a tray before bagging. This prevents soggy slices when reheated. Toast directly from frozen for 2-3 minutes until crispy. Label bags with the date—frozen slices stay fresh for up to 3 months without losing texture.
Equipment Prep
Preheat your Dutch oven and baking stone together while the oven heats. This ensures they reach the ideal 375°F temperature simultaneously. Keep a spray bottle of water handy to mist the dough before baking—this creates steam for that signature crust.
Pro tip: Use a digital thermometer** to verify oven temp accuracy. 🔥
Nutrition facts
Frequently asked questions
Why does this recipe use so many different flours?
Each grain brings unique texture and flavor—rye adds depth, buckwheat contributes earthiness, and spelt provides a light, nutty taste. The combination creates a complex, satisfying bite that single-grain breads can’t match. The whole grains also boost fiber and nutrition while keeping the bread hearty and satisfying.
Can I make this bread without a Dutch oven?
Yes! Use a baking stone or cast iron skillet instead. For extra crust development, place a metal bowl filled with boiling water in the oven while baking—this creates steam. Expect slightly less crispiness, but the interior texture will still be excellent. Preheat your substitute for 30 minutes at 375°F for best results.
How do I know when the dough is fully proofed?
Look for these signs: the dough should have doubled in size, have visible bubbles on the surface, and feel light when pressed gently. For whole-grain doughs, it may not rise as dramatically as white bread—focus on the airiness rather than volume. If using a cold proof overnight, the dough will be firm but still springy when poked.
What’s the best way to store leftover bread?
Wrap cooled bread in a clean kitchen towel or beeswax wrap to maintain freshness for 5-7 days at room temperature. For longer storage, slice and freeze portions on a tray before bagging—they’ll stay crispy when toasted. Avoid plastic bags, which trap moisture and make bread soggy.
Can I add seeds or herbs to this recipe?
Try sunflower seeds, chia seeds, or fresh rosemary (1-2 tbsp) for extra flavor. For best results, mix them into the dough during the final kneading stage. Herbs like thyme or sage pair beautifully with the nutty grains. Just remember—whole grains absorb more moisture, so you may need to adjust your water slightly if adding extra mix-ins.

- 3lb Prime Rib Roast Recipe: Juicy Pink Center Guaranteed in 3 Hours - October 31, 2026
- 5 Spice Cake Recipe: Warmly Spiced Layers With Crunchy Top - October 31, 2026
- 1950’s Macaroni and Cheese Recipe: Nostalgic Creamy Cheese Sauce with Buttery Noodles - October 31, 2026