
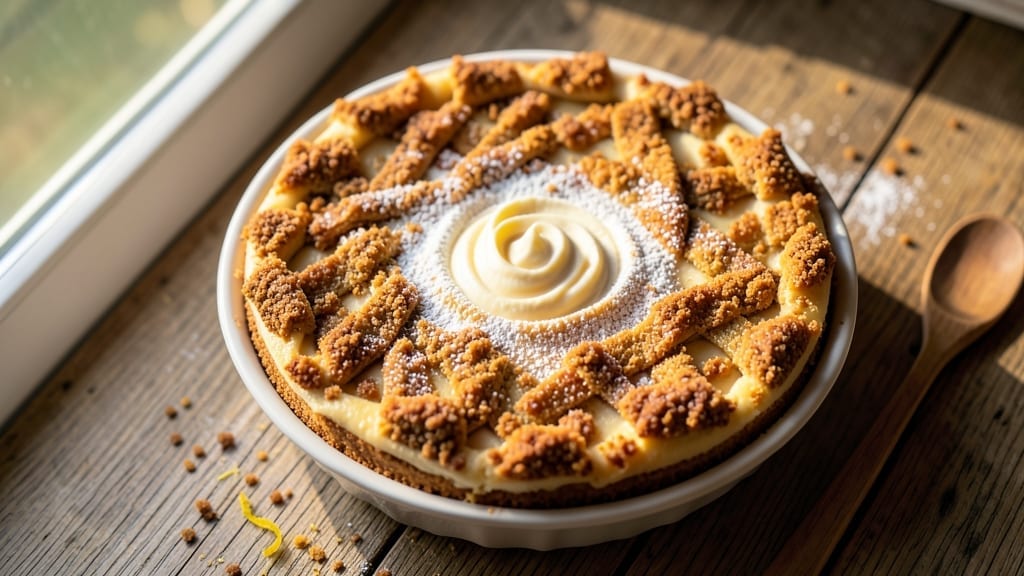
A 6-inch baked cheesecake recipe delivers all the creamy, velvety perfection of its full-size cousin—just in a single-serving format that bakes in under an hour. This recipe solves the classic dilemma of waiting for a whole cheesecake to cool while delivering restaurant-quality texture and flavor.
The secret lies in precise ingredient ratios and a water bath that prevents cracking, ensuring every bite is smooth and rich without the usual risks.
What sets this recipe apart is its foolproof technique for achieving a silky-smooth filling with a golden, crack-free top, all while using standard kitchen tools. The crust is made with just 6 ingredients and requires no special equipment beyond a 6-inch springform pan.
Baking at 325°F for 40-45 minutes guarantees even doneness without overcooking, while the water bath creates that signature tender crumb.
By the time you’re done, you’ll have a perfectly set cheesecake with a clean break for easy slicing—no waiting days for it to firm up. The texture is creamy yet firm, with a delicate balance that stays intact even when served chilled.
Top it with fresh berries, a drizzle of caramel, or a dusting of powdered sugar for an elegant finish that looks as impressive as it tastes.
This recipe is ideal for special occasions when you want dessert without the commitment, or for satisfying a single craving without leftovers. The single-serving size makes it perfect for date nights, romantic dinners, or treating yourself after a long week. Let’s get started on creating your own decadent cheesecake experience.
Ingredients for 6 inch baked cheesecake
Six ingredients for the crust, eight for the filling—all professional-grade for perfect texture.
| Ingredient | Amount | Notes |
|---|---|---|
| Full-Fat Cream Cheese 🧀 | 8 oz | Room temperature for blending |
| Granulated Sugar 🍚 | ½ cup | Superfine preferred for smoothness |
| Light Corn Syrup 🍯 | 2 tbsp | Prevents graininess |
| Large Eggs 🥚 | 2 whole | Room temperature |
| Vanilla Extract 🌿 | 1 tsp | Pure Madagascar preferred |
| All-Purpose Flour 🌾 | 1 tbsp | For filling stability |
| Salt 🧂 | ¼ tsp | Fine sea salt |
| Graham Cracker Crumbs 🍪 | ½ cup | Finely ground, no sugar added |
| Unsalted Butter 🧈 | ¼ cup | Melted, cooled slightly |
| Light Brown Sugar 🍚 | 2 tbsp | Packed, for crust sweetness |
| Vanilla Bean Paste 🌿 | ½ tsp | Optional for depth |
| Heavy Whipping Cream 🥛 | ¼ cup | For topping, optional |
The cream cheese quality is non-negotiable here. Philadelphia brand is the industry standard, but Kraft Natural works equally well. Room temperature is critical—cold cheese creates lumps that ruin the silky texture. For the crust, Honey Maid graham crackers yield the best crumb texture, but any quality brand works. The brown sugar should be packed—don’t scoop it loosely. If you’re feeling fancy, toast the crumbs with a pinch of cinnamon for extra depth, though it’s not required for the classic flavor. The vanilla extract matters too—Madagascar bourbon has the most complex profile, but pure vanilla will suffice.
No corn syrup? Honey or maple syrup at half the amount works in a pinch, though it may slightly alter the texture. Substituting full-fat sour cream for cream cheese (equal weight) gives a tangier profile, but the filling will be slightly less stable. For the crust, digestive biscuits or crushed Oreos can replace graham crackers, though the flavor will differ. The vanilla bean paste adds a luxurious touch—if you’re using extract, double the amount for similar depth. And for the topping, whipped cream with powdered sugar makes an elegant finish without altering the cheesecake’s integrity.
Prevent cracking by letting the cheesecake cool gradually at room temperature for 1 hour before refrigerating. Store in an airtight container for 4-5 days in the fridge, though it’s best enjoyed within 2 days for peak texture. For make-ahead convenience, bake the crust a day in advance and refrigerate it—it keeps perfectly for 3 days. The filling mixture can be prepped 6 hours ahead and stored in the fridge, though it’s best used immediately for optimal blending. When serving, let it sit at room temperature for 10 minutes before slicing for clean, clean edges.
Why You’ll Love This Recipe
- No-Fuss Mixing: I swear by this recipe’s five-ingredient blend—just beat the cream cheese until smooth, then fold in the sugar, corn syrup, and eggs. No food processor, no stress. That light corn syrup keeps it from cracking, even if I rush.
- Velvet Smooth Center: The magic happens when you bake it low and slow—the full-fat cream cheese and vanilla extract create this ridiculously creamy texture. Not too sweet, not too tangy, just pure, rich satisfaction in every bite.
- Weeknight Dessert Fix: Slice it into wedges, and it’s the perfect after-dinner treat—no fancy plating needed. I keep a 6-inch pan in the freezer for spontaneous cravings, and it thaws in under an hour. (Yes, even on a Tuesday night.)
- Budget-Friendly Luxury: Full-fat cream cheese feels indulgent, but a single 8-ounce block stretches to two pans. The corn syrup cuts costs while keeping it moist, and you’ll have leftovers that taste just as good reheated as fresh. My wallet and my taste buds thank me.
Step-by-step instructions for 6-Inch baked cheesecake
Master this method and you’ll achieve a perfectly smooth, creamy cheesecake with a golden crust every time.
Prepare the Crust Mixture
In a medium bowl, combine the 0.5 cup graham cracker crumbs, 0.25 cup unsalted butter (melted and cooled slightly), 2 tbsp light brown sugar, and 0.25 tsp salt. Mix until the crumbs are uniformly moistened and the texture resembles damp sand. The butter should coat each crumb without creating large clumps.
Press this mixture firmly into the bottom of a 6-inch springform pan, using the back of a spoon to create an even layer. Gently tap the pan on the counter to help the crust settle. Chill in the refrigerator while you prepare the filling—this prevents the crust from softening when you add the hot cheesecake batter.
Blend the Cheesecake Filling
Place the 8 oz full-fat cream cheese in a large mixing bowl and beat with an electric mixer on medium speed until completely smooth—no lumps should remain. This step is critical for achieving that silky texture we’re after. Gradually add the 0.5 cup granulated sugar and 2 tbsp light corn syrup, mixing on medium-high speed for 2-3 minutes until the mixture lightens in color and becomes thick and creamy.
Add the 2 whole large eggs one at a time, mixing just until each is fully incorporated after each addition. Scrape down the sides of the bowl as needed to ensure even blending. Stir in the 1 tsp vanilla extract and 0.5 tsp vanilla bean paste (if using), then fold in the 1 tbsp all-purpose flour and 0.25 tsp salt with a spatula until just combined.
Assemble and Bake the Cheesecake
Pour the filling over the chilled crust, spreading it evenly to the edges. Place the springform pan on a baking sheet lined with parchment paper—this catches any potential drips. Bake in a preheated 325°F oven for 45-50 minutes, until the edges are set but the center still jiggles slightly when shaken gently. A toothpick inserted should come out with a few moist crumbs, not wet batter.
Turn off the oven, crack the door open slightly, and let the cheesecake cool inside for 1 hour. This gradual cooling prevents cracking. Remove from the oven and let it cool completely at room temperature before refrigerating for at least 4 hours or overnight. Patience here ensures that perfect slice texture.
Add the Optional Topping (If Using)
Just before serving, whip the 0.25 cup heavy whipping cream to soft peaks and spread it over the chilled cheesecake. The cream should be thick enough to hold its shape but still spreadable. For extra flair, dust with powdered sugar or top with fresh berries. Serve immediately for the creamiest texture, or refrigerate for up to 2 hours before serving.
The result should be a perfectly domed cheesecake with a golden crust and a velvety filling that melts in your mouth. The light corn syrup prevents graininess, while the gradual cooling ensures that signature smooth finish we all love in a baked cheesecake.
Pro Tips For Making 6 Inch Baked Cheesecake
- Preheat Like It’s Hot: Your oven needs to hit 325°F before the batter goes in—no exceptions. I learned this the hard way when my first cheesecake took 45 minutes to even start setting. Pop that pan in the oven right after preheating, then adjust the rack to the middle position. That’s where the magic happens for even baking.
- Whip Cream Cheese Cold: Take the full-fat blocks straight from the fridge—room temp softens them too fast, and you’ll end up with lumps. Use a hand mixer (not a stand mixer) to beat them until completely smooth, then fold in the sugar and syrup. If you see streaks, you didn’t mix enough. Trust me, your cheesecake will thank you.
- Skip the Overmixed Batter: Once the eggs are fully incorporated, stop mixing the second the batter loses its shine. Overworking it adds air, which causes cracks. My grandmother swore by this, and she was right: a dull, slightly thick batter is what you want. Pour it in and tap the pan gently to settle any bubbles.
- Water Bath Without the Drama: Wrap your springform pan in heavy-duty foil first—no tears when you pull it out. Fill the water bath with hot (not boiling) water, about halfway up the pan. This keeps the center creamy without steaming the whole thing. And for heaven’s sake, don’t open the oven door for the first 45 minutes. Patience, yes, even if you’re impatient like me.
Storing and reheating this dish
Refrigerator Storage
Store your baked cheesecake in an airtight container with a piece of parchment paper between layers if stacking. Keep it refrigerated at 40°F or below for up to 4-5 days, though the texture is best within 2 days.
The crust stays crisp, and the filling maintains its creamy consistency when properly sealed. 🧀
Freezer Preservation
For longer storage, freeze the cheesecake in a single layer (no stacking) wrapped tightly in plastic wrap followed by aluminum foil. Label with the date and freeze for up to 2 months.
Thaw overnight in the fridge before serving to preserve texture. Avoid freezing with toppings—they may become soggy.
Room-Temperature Serving
Let your cheesecake sit at room temperature for 10-15 minutes before slicing to achieve clean edges. This brief warm-up prevents the filling from sticking to your knife. Serve immediately for the creamiest texture, especially when topped with whipped cream or fresh berries. 🍓
Reheating Methods
Avoid reheating cheesecake—it alters the delicate texture. Instead, serve it chilled or at room temperature. If you must warm a slice, use a microwave on low power (30%) for 10-15 seconds to gently soften the filling. For the crust, a quick 5-second zap restores crispness without overcooking the top.
Crust Refresh Tips
If the crust loses crispness after storage, revive it by placing the cheesecake on a baking sheet and warming in a 300°F oven for 5-7 minutes. This reheats the filling slightly while crisping the crust back up. Works best for cheesecakes stored longer than 3 days.
Topping Preservation
Add toppings like berries or whipped cream only 30 minutes before serving to prevent sogginess. For prepped toppings, store them separately in the fridge and assemble just before eating. If using powdered sugar, dust immediately before serving to maintain its fluffy texture. ✨
Nutrition facts
Frequently asked questions
Why does my 6-inch cheesecake crack?
Cracking happens when the cheesecake cools too quickly or the oven temperature fluctuates. The solution? Bake at 325°F for 45-50 minutes, then let it cool inside the oven with the door slightly open for 1 hour before refrigerating. The corn syrup in the recipe also helps prevent graininess that can contribute to cracks.
Can I use a different pan size?
This recipe is specifically designed for a 6-inch springform pan to ensure proper baking time and texture. If you must use a different size, adjust baking time by 3-5 minutes per inch of diameter (e.g., an 8-inch pan would need 60-70 minutes
How do I prevent a soggy crust?
Chill the crust for 15-20 minutes before adding the filling, and make sure your butter is only slightly melted (not liquid). Press the crust firmly into the pan and use a 6-inch round cutter to trim excess crumbs. The filling should be at room temperature to avoid melting the butter prematurely.
Can I make this cheesecake ahead of time?
Bake the crust 1 day ahead and store it refrigerated. The filling can be prepped 6 hours ahead and refrigerated (though it blends best fresh). Assemble and bake as directed, then refrigerate the finished cheesecake for 4-5 days. For best texture, serve within 2 days of baking.
What’s the secret to a perfectly smooth filling?
The key is blending the cream cheese until completely smooth with no lumps, then mixing the sugar and corn syrup on medium-high speed for 2-3 minutes to emulsify properly. Room-temperature ingredients blend more easily, and adding eggs one at a time prevents curdling. The light corn syrup also helps create that signature velvety texture.

- 6 Egg Cake Recipe with Oil: Light as Air With Buttery Moisture - October 4, 2026
- 4 Bean Casserole Recipe: One-Pan Heartiness With Smoky Paprika Depth - October 4, 2026
- 3-Ingredient Keto Mug Cake Recipe: Microwave Magic in 2 Minutes - October 4, 2026