
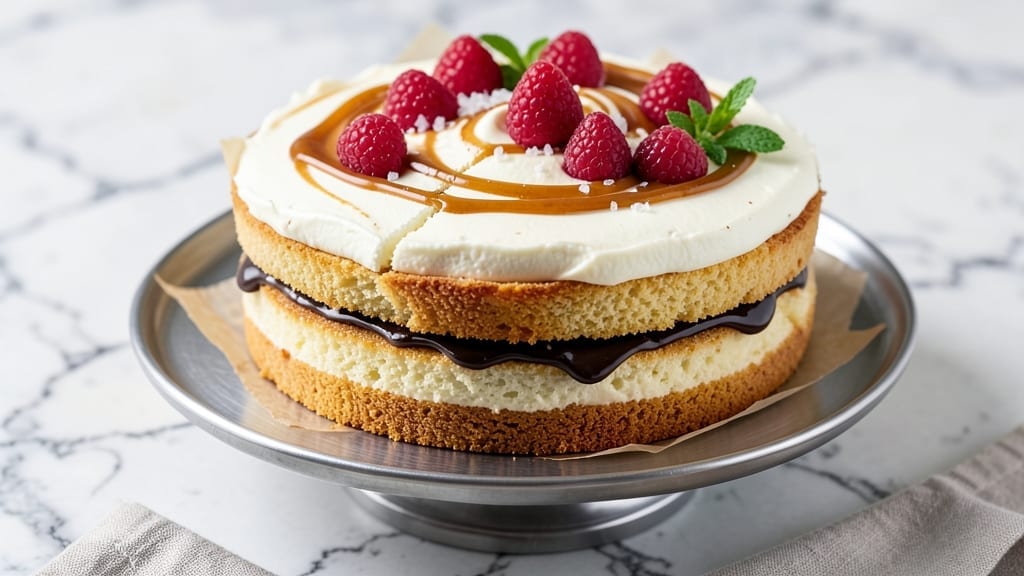
A 6-inch ice cream cake recipe delivers all the indulgence of a full-sized dessert in a perfectly portable package—ideal for parties, gifts, or satisfying a single craving.
The secret lies in a sturdy cookie crust that holds up to layers of rich ice cream and velvety frosting, all while maintaining clean slices. I’ve perfected this technique over years of baking, ensuring each bite stays cool, creamy, and structurally sound.
This recipe starts with a buttery, crispy cookie base baked in a 6-inch pan, providing the perfect foundation for your favorite ice cream flavors. The key to stability is chilling each layer thoroughly before adding frosting or additional ice cream, preventing meltdowns.
Whether you choose vanilla, chocolate, or a mix of flavors, the result is a decadent, restaurant-worthy dessert that’s surprisingly simple to assemble.
By the time you’re done, you’ll have a golden, layered masterpiece with a crisp exterior and creamy interior—no soggy bottoms or messy slices. The frosting adds a smooth, glossy finish, while optional toppings like sprinkles or fresh berries elevate it to showstopper status.
This cake is perfect for celebrations, potlucks, or even a cozy night in.
Serve immediately for the best texture, or chill for up to 24 hours to enhance the flavors. The 6-inch size makes it easy to share (or not), and the technique scales effortlessly for larger cakes if you’re feeling ambitious. Let’s get baking!
Ingredients for 6 inch ice cream cake
Buttery crust, velvety frosting, and layers of ice cream—this mini masterpiece packs full-sized flavor.
| Ingredient | Amount | Notes |
|---|---|---|
| All-Purpose Flour 🌾 | 1 ½ cups | Sifted for even texture |
| Unsalted Butter 🧈 | 1 cup | Cold, cubed for crisp crust |
| Granulated Sugar 🍚 | ¾ cup | Superfine preferred for smoothness |
| Large Eggs 🥚 | 2 whole | Room temperature for blending |
| Vanilla Extract 🌿 | 1 tbsp | Pure, high-quality extract |
| Salt 🧂 | ½ tsp | Fine sea salt preferred |
| Vanilla Ice Cream 🍦 | 2 cups | High-fat, premium brand |
| Heavy Whipping Cream 🥛 | 1 cup | Cold for stable frosting |
| Powdered Sugar 🍚 | 2 cups | Sifted for smooth frosting |
| Vanilla Bean Paste 🌿 | 1 tsp | For intense vanilla flavor |
| Fresh Raspberries 🍓 | ½ cup | For garnish, optional |
| Chocolate Sprinkles 🍫 | ¼ cup | For decorative finish |
| Parchment Paper 📄 | 1 sheet | For easy removal |
The cookie crust is where magic happens. European-style butter from Plugrá or Land O’Lakes gives that signature richness—don’t skimp on quality here. For the flour, King Arthur or Gold Medal brands are my go-tos; their protein content ensures a sturdy base. The vanilla extract? Madagascar Bourbon from McCormick or Lake Champlain elevates everything. Chill your butter cubes for at least 30 minutes before mixing to prevent melting during baking. Pro tip: Toast your sprinkles lightly in a dry pan for 30 seconds—they’ll pop with extra flavor when sprinkled on top.
No vanilla ice cream? High-fat cookie dough ice cream works perfectly, or even homemade custard-style if you’re ambitious. The heavy whipping cream needs to be stone-cold for the frosting—skip the warm carton straight from the fridge. Powdered sugar? Domino or C&H are fine, but sift it first to avoid lumps. Want to switch up flavors? Swap vanilla ice cream for chocolate or strawberry, but keep the same chilling times between layers. The vanilla bean paste is non-negotiable for that authentic depth—Nestlé or House of Flavor brands are my favorites, but any pure paste will do.
This cake is all about timing. Bake the crust, cool completely, then freeze for 15 minutes before adding ice cream—prevents melting. The frosting should sit at room temp for 10 minutes before spreading. Store assembled cakes in the freezer for up to 2 weeks—just let them sit at room temp for 10 minutes before serving. For parties, assemble the day before and keep refrigerated; the flavors meld beautifully overnight. The sprinkles and berries? Add them just before serving so they stay vibrant and crisp.
Why You’ll Love This Recipe
- No-Fuss Layers: I swear by this recipe because it’s basically a cake in a mug—just mix the dry ingredients (flour, sugar), cream the butter and eggs, fold in vanilla, and bake. The secret’s in the ratio: enough structure to hold the ice cream but light enough to disappear when you’re done.
- Butter-Sugar Magic: That creamed butter and sugar combo? It’s the real MVP. The cake stays tender but sturdy, so when you pipe in the ice cream, it doesn’t turn into a soggy mess. (Yes, I’ve tried. Don’t.) The vanilla ties it all together—warm, cozy, and just sweet enough to make you want to skip dinner.
- Birthday or Boredom: Honestly, this cake is my go-to for anything—birthday parties, lazy Sundays, or when I just need dessert without the fuss. The 6-inch size is perfect for one person’s craving or a small gathering. Plus, it’s way easier to decorate than a full sheet cake (looking at you, fondant failures).
- Leftovers? More Like Leftovers: Between us, I always make two. The cake itself keeps for days in the fridge, and the ice cream layer? Freeze it in slices for a quick treat later. Budget-friendly too—you’re not using fancy ingredients, just good basics that taste like a bakery’s secret. (Spoiler: It’s not.)
Step-by-step instructions for 6-Inch ice cream cake
Here’s how to create a perfectly layered, restaurant-quality ice cream cake that’s light, creamy, and packed with flavor.
Bake the Delicate Crust
Preheat your oven to 350°F and line a 6-inch round cake pan with the sheet of parchment paper. In a stand mixer fitted with the paddle attachment, cream together the 1 cup unsalted butter and 0.75 cup granulated sugar on medium speed for 3-4 minutes until light and fluffy. This step is crucial for creating that signature crisp yet tender crust.
Add the 2 whole large eggs, one at a time, mixing well after each addition. Then whisk in the 1 tablespoon vanilla extract, 0.5 teaspoon salt, and the 1.5 cups all-purpose flour that’s been sifted. Mix just until combined—overmixing develops gluten and makes the crust tough. Spread the batter evenly into the prepared pan.
Bake for 12-15 minutes or until the edges are lightly golden and a toothpick inserted comes out clean. Let the crust cool completely in the pan before removing it—this prevents cracking when you add the filling later. The crust should be firm enough to support the ice cream layers without breaking.
Prepare the Vanilla Bean Frosting
In a chilled mixing bowl, whip the 1 cup heavy whipping cream with an electric mixer until soft peaks form. Gradually add the 2 cups powdered sugar and 1 teaspoon vanilla bean paste, mixing on low speed until just combined. Increase the speed to medium and whip until the frosting is thick, glossy, and holds stiff peaks.
Here’s the thing—your frosting needs to be perfectly stable. If it’s too warm, it won’t hold its shape. I like to chill my bowl and beaters in the freezer for 5 minutes before whipping, especially in warm kitchens. The frosting should be thick enough to pipe cleanly but still light enough to spread easily between layers.
Assemble the Ice Cream Layers
Line a 9×13-inch baking sheet with the second sheet of parchment paper. Place the cooled crust on top. Spread 1 cup of vanilla ice cream evenly over the crust, creating a thin, even layer. Here’s where it gets fun—pipe a generous layer of the vanilla bean frosting over the ice cream, spreading it to the edges with an offset spatula.
Add another 1 cup of vanilla ice cream on top, spreading it evenly. The key is to work quickly—ice cream softens as you handle it. If it starts to melt too much, chill the cake for 10 minutes before adding the next layer. Repeat with the final layer of frosting, creating a smooth, domed top. Chill the assembled cake for at least 2 hours to let everything set properly.
Decorate and Serve
When ready to serve, spread the remaining 0.5 cup vanilla ice cream over the top of the cake, creating a smooth surface. Arrange the 0.5 cup fresh raspberries decoratively around the edges, pressing them gently into the frosting so they stay in place. Finally, sprinkle the 0.25 cup chocolate sprinkles evenly over the top and sides for that perfect bakery finish.
Slice the cake with a warm, slightly damp knife for clean cuts. The contrast between the crisp crust, creamy ice cream layers, and rich frosting makes every bite unforgettable. Serve immediately for the best texture—this cake is designed to be enjoyed fresh from the freezer to the plate.
Pro Tips For Making 6 Inch Ice Cream Cake
- CHILL THE BATTER: Mix your cake batter in a bowl that’s been sitting in the fridge for 10 minutes—it keeps the butter from melting into a greasy mess when you add the eggs. I learned this the hard way when my first batch turned out more like a dense, oily pudding than a light cake.
- WEIGH YOUR FLOUR: Scoop and level that flour like you’re packing a snowball—too much and your cake will be dense, too little and it’ll collapse. A kitchen scale makes this foolproof, but if you’re eyeballing it, use a spoon to scoop and sweep off the excess with a knife.
- BAKE UNTIL COOL: Don’t pull that cake out of the oven when it’s still warm—wait until the center is completely cool before adding the ice cream layer. I’ve seen too many cakes where the ice cream just melts into a sad, soupy mess because the cake wasn’t set.
- USE ROOM-TEMP EGG WHITES: Whisk those egg whites at room temperature—they’ll whip up fluffier and hold their volume longer, giving your cake that light, airy texture. Cold whites? They’ll fight you, and your meringue won’t cooperate.
Essential equipment for perfect results
Must-Have Baking Tools
Start with a 6-inch round cake pan—I recommend a Wilton Perfect Results pan for even baking. The stand mixer (like KitchenAid Artisan) is non-negotiable for the crust and frosting.
A paddle attachment ensures smooth butter-sugar blending, while the whisk attachment creates fluffy frosting. Don’t skip these—they make all the difference! 🥄
Precision Measuring Gear
Use a digital kitchen scale for butter and flour to avoid packing errors. I swear by the OXO Good Grips scale—it’s accurate and easy to use. For measuring powdered sugar, a fine-mesh sifter prevents lumps in your frosting.
A microplane comes in handy for zesting citrus if you’re adding a fruity twist. Precision here keeps your cake stable and delicious.
Assembly Essentials
An offset spatula (like Mercer Culinary) is perfect for spreading frosting between layers. For clean cuts, a hot knife—just dip it in warm water between slices—works wonders. A parchment-lined baking sheet prevents messes when assembling. Trust me, these tools save you from frosting disasters and uneven layers. ✨
Chilling & Storage
Invest in a deep freezer-safe container (like Rubbermaid Brilliance) for storage. A thermometer helps monitor your kitchen’s temperature—ideal frosting whips at 65-68°F. For decorating, a small piping bag with a star tip adds professional flair to your toppings.
These tools keep your cake looking fresh and tasting perfect for days.
Optional Upgrades
Want to elevate further? A food processor helps crush cookies for a crumb crust variation. A pastry brush ensures even butter glazes on your crust. For showstopping decor, edible gold leaf or melted chocolate drizzle tools take it to the next level.
These aren’t essential, but they’re fun for special occasions! 💛
Nutrition facts
Frequently asked questions
Can I use store-bought cookies for the crust instead of baking from scratch?
Yes! For a quick version, press 12-15 graham crackers or digestive biscuits (about 1.5 cups crushed) into the pan. The homemade crust adds extra flavor and texture, but store-bought works in a pinch. Just make sure to toast the cookies lightly to prevent sogginess when adding the ice cream.
What if my frosting doesn’t hold its shape?
Your frosting needs to be perfectly chilled and whipped to stiff peaks. If it’s too warm, try chilling your bowl and beaters in the freezer for 5 minutes before whipping again. Add 1 tablespoon powdered sugar at a time until it reaches the right consistency—it should hold its shape when piped but still spread smoothly.
How do I prevent ice cream meltdown between layers?
Work quickly and chill the cake between each layer. Freeze the crust for 15 minutes before adding ice cream, and chill the assembled cake for at least 2 hours before decorating. Use a spatula to spread ice cream evenly, and avoid overmixing—this keeps the layers firm and stable.
Can I make this cake ahead of time?
Assemble the cake up to 24 hours ahead and store it in the freezer. Let it sit at room temperature for 10 minutes before serving to soften slightly. The flavors meld beautifully overnight, making it perfect for parties or gifts. Just avoid thawing it completely before slicing.
What’s the best way to slice cleanly without crumbs?
Use a hot knife—dip it in warm water between slices. This melts the frosting slightly, creating a clean cut. For extra precision, chill the cake for 10 minutes before slicing to firm up the layers.

- 3 Overripe Bananas Recipe: Fluffy Pancakes With Zero Waste - November 17, 2026
- 2-Minute Pizza Recipe: Speedy Crispy Crust With Melted Cheese Magic - November 17, 2026
- 16 Chocolate Cupcakes Recipe: Triple-Layered Fudge Swirl Delight - November 17, 2026