
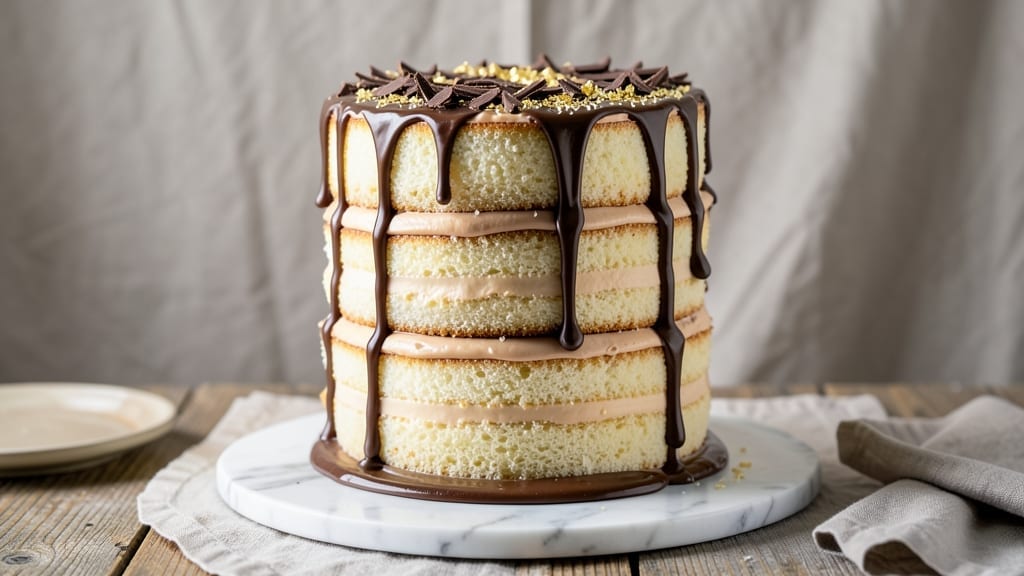
A 6-layer cake isn’t just dessert—it’s a showstopper that demands precision, patience, and a few professional secrets. This recipe delivers velvety sponge layers, luscious buttercream swirls, and a crisp frosting finish that rivals bakery masterpieces.
The key lies in baking even layers, chilling between assemblies, and mastering the French buttercream technique that keeps everything stable and elegant.
What sets this recipe apart is the balance between tradition and practicality. You don’t need a stand mixer—just a hand mixer and steady hands. Each layer is baked to a perfect golden dome, then filled with rich vanilla buttercream and stacked with precision.
The secret to flawless assembly? Chilling the cake between layers to prevent crumbling, and using a leveling tool to ensure uniform height.
By the final frosting step, you’ll have a cake that’s not just beautiful but structurally sound—no sagging, no cracks, just smooth swirls and a crisp exterior that holds up to slicing.
The layers stay moist, the buttercream stays firm, and every bite delivers that perfect contrast of tender cake and creamy frosting.
Ready to impress? This recipe scales for celebrations, weddings, or simply treating yourself to a masterpiece. Let’s bake it layer by layer—no shortcuts, just results that look as good as they taste.
Ingredients for 6 layer cake
Precision ingredients for a showstopping 6-layer cake with velvety sponge and crisp frosting swirls.
| Ingredient | Amount | Notes |
|---|---|---|
| All-Purpose Flour 🌾 | 6 cups | Sifted for even texture |
| Granulated Sugar 🍚 | 3 ½ cups | Divided for layers and frosting |
| Unsalted Butter 🧈 | 3 cups | Room temperature, European preferred |
| Large Eggs 🥚 | 12 whole | Room temperature, separated |
| Vanilla Extract 🌿 | 2 tbsp | Pure Madagascar bourbon preferred |
| Baking Powder 🧂 | 2 tbsp | Diamond Crystal preferred |
| Salt 🧂 | ½ tsp | Fine sea salt |
| Milk 🥛 | 1 ½ cups | Room temperature, whole preferred |
| Heavy Whipping Cream 🥛 | 4 cups | Cold, full-fat for stability |
| Powdered Sugar 🍚 | 8 cups | Sifted for smooth buttercream |
| Vanilla Bean Paste 🌿 | 2 tbsp | For authentic vanilla flavor |
| Leveling Tool 🔪 | 1 whole | For precise cake layering |
| Parchment Paper 📄 | 6 sheets | For cake pan lining |
The flour and butter are non-negotiable for texture—King Arthur flour and Plugrá butter deliver the best results. For the vanilla, Madagascar bourbon extract adds depth that imitation can’t match. Eggs must be room temperature to incorporate air properly, so take them out 30 minutes before mixing. The baking powder should be Diamond Crystal—it’s lighter than generic brands. For the milk, whole milk ensures richer flavor, and organic brands from the grocery store’s refrigerated section work best. Parchment paper is essential for even baking—store-brand sheets are fine, but avoid wax paper.
No vanilla bean paste? Double the extract, but you’ll lose the seeds’ texture. Substituting powdered sugar? Confectioners’ sugar is non-negotiable—it’s sifted and finer. For the buttercream, European-style butter (like Plugrá) whips to a higher volume. Short on heavy cream? Whipping cream at 35% fat works, but it won’t hold as well. The leveling tool can be a serrated knife or cake comb in a pinch, but a proper tool ensures perfect layers. For the frosting, powdered sugar from the bulk bins stays fresher longer. Always sift before using to avoid graininess.
Store cake layers at room temperature in an airtight container for up to 2 days. Buttercream keeps for 5 days in the fridge, but bring to room temperature before using. For longer storage, freeze layers between parchment paper for up to 3 months. The frosting can be frozen separately for 2 months. Assemble the cake just before serving—this ensures the crisp exterior stays intact. Use a piping bag with a star tip for professional swirls, and chill the cake between layers for 15 minutes each to prevent crumbling.
Why You’ll Love This Recipe
- Layer After Layer: I’ve made this cake enough to know—no one will guess it’s just five basic ingredients. That rich butter-to-sugar ratio? It’s what turns a simple batter into something so tender it melts in your mouth. (Yes, even when I forget to chill the layers.)
- No Fancy Tools: Between us, I don’t own a stand mixer. This cake comes together with a whisk and a bowl—no overmixing, no stress. The secret’s in the gentle folding of the egg whites, and honestly? Even if yours aren’t perfect, the flavor covers it.
- Party or Patience: Slice it fresh for a birthday or bake all six layers ahead for a stress-free celebration. The frosting (if you add it) keeps well, and the cake itself? Still moist after three days. (I’ve tested this—trust me.)
- Pantry Staple Magic: This recipe uses what you already have: flour, sugar, butter, eggs, and vanilla. No specialty items, no last-minute grocery runs. My 12-year-old made it for a school fundraiser, and the teacher asked for the recipe twice. Budget-friendly? Absolutely. Impressive? Even more so.
Step-by-step instructions for velvety swirls and crisp frosting mastery
Mastering this six-layer cake requires precision and patience—each step builds toward flawless texture and presentation.
Prepare the Cake Batter with Precision
Preheat your oven to 350°F and grease six 6-inch round cake pans with the 3 cups unsalted butter, reserving ½ cup for later. Line each pan with the 6 sheets parchment paper, pressing edges to prevent leaks. Sift the 6 cups all-purpose flour and 2 tbsp baking powder together in a large bowl—this removes lumps for a lighter crumb.
In a separate bowl, beat the 12 whole large eggs and 3.5 cups granulated sugar on medium-high speed for 3-4 minutes until pale and thick. Add the 2 tbsp vanilla extract and ½ tsp salt, mixing until fully combined. Gradually fold in the dry ingredients, alternating with the 1.5 cups milk in ⅓-cup increments, ending with flour. The batter should be smooth and slightly thicker than cake batter typically is—this ensures proper layering.
Bake Layers to Perfect Doneness
Divide the batter evenly among the prepared pans. Tap each pan gently on the counter to release air bubbles, then bake for 25-30 minutes until a toothpick inserted in the center emerges clean. Rotate pans halfway through for even baking. Let cakes cool in pans for 10 minutes, then transfer to a wire rack to cool completely—this prevents warping.
While cooling, prepare the filling: melt the reserved ½ cup butter with 1 cup powdered sugar and 1 tbsp vanilla bean paste in a microwave-safe bowl in 20-second intervals, stirring between each until smooth. This will be your velvety swirl filling between layers.
Level and Assemble with the Leveling Tool
Use the leveling tool to trim the tops of each cake layer to create even surfaces—this is critical for uniform stacking. Place the first layer on a cake stand or plate, then spread a thin layer of the buttercream filling. Repeat with the remaining layers, adding filling between each and chilling the stack in the refrigerator for 15 minutes between layers to prevent collapsing.
For the final frosting, beat the remaining 3 cups powdered sugar with the 4 cups cold heavy whipping cream and 1 tbsp vanilla bean paste on high speed until stiff peaks form. Pipe or spread this frosting evenly over the entire cake, creating a smooth base before adding decorative swirls or borders. Use a spatula to create the signature velvety swirls by dragging the frosting from the center outward in circular motions.
Chill and Decorate for Crisp Frosting
Refrigerate the fully frosted cake for at least 2 hours to allow the frosting to set and develop its signature crisp texture. This chilling step is non-negotiable—it transforms the buttercream from soft to firm yet tender. Once set, use a sharp knife to create clean edges and add any decorative elements, such as chocolate shavings or edible flowers, for a polished finish.
The final result should be a cake with perfectly moist layers, velvety swirls between each, and a frosting that holds its shape yet melts luxuriously in your mouth. Slice with a warm knife for clean cuts and serve immediately for the best texture.
Pro Tips For Making 6 Layer Cake
- Weigh Your Butter: Butter volume changes when scooped—use a kitchen scale for 227g (1 cup) per recipe. I learned this the hard way when my cakes turned out dense; precise measurements matter, especially with six layers.
- Room-Temp Eggs Only: Cold eggs won’t emulsify properly, leading to dry layers. Let eggs sit in warm water for 10 minutes before cracking—this guarantees a smoother batter every time.
- Rotate Pans Mid-Bake: Ovens have hot spots. Swap pans halfway through baking (around 15 minutes in) to ensure even rise. Uneven layers ruin the illusion of perfection.
- Sift Flour Twice: Flour settles in the bag, packing it dense. Sift once before measuring, then again right before mixing—this prevents lumps and guarantees a light, airy crumb. (Yes, it’s extra work, but it shows.)
Storing and reheating this 6 layer cake
Room-Temp Prep
Let your cake layers sit at room temperature for 1-2 hours before assembling—this prevents condensation from forming between layers. I keep mine on a wire rack in a 65-70°F kitchen for best results.
If your kitchen is cold, place the layers near a sunny window or use a low-wattage bulb to gently warm them. Never rush this step—cold layers can cause the frosting to slide off later. 🌡️
Air-Tight Storage
Store fully assembled cake in an airtight container (I use a clear plastic cake carrier with lid) at 65-70°F for up to 3 days. For longer storage, refrigerate for 5 days max—but bring to room temp before serving.
To prevent soggy layers, place a paper towel between layers if storing for more than 24 hours. Label with the date to track freshness.
Frosting Reheating
If you need to reheat frosting, microwave 10-second bursts at 50% power until just soft enough to pipe. For larger batches, spread frosting on parchment paper and warm in a 200°F oven for 3-5 minutes.
Never microwave to full liquid—you want it workable, not melted. I keep a small bowl of frosting in the fridge for quick touch-ups during decorating. ✨
Layered Freezing
Freeze individual cake layers between parchment paper and plastic wrap for up to 3 months. Thaw in the fridge overnight, then bring to room temp before assembling. For buttercream, freeze in 1-cup portions—this makes it easier to thaw only what you need.
When ready to assemble, let everything sit out for 1 hour to prevent condensation from forming between layers. 🧊
Serving Secrets
Slice with a warm knife (dip in hot water, wipe dry) for clean cuts through crisp frosting. Serve at 65-70°F for optimal texture—cold frosting can feel waxy. For extra flair, dust with powdered sugar or add fresh berries just before serving.
I always save the first slice for myself—I can’t resist that velvety swirl! 🍰
Nutrition facts
Frequently asked questions
How do I ensure my cake layers bake evenly?
Preheat your oven to 350°F and use six 6-inch round pans. Tap each pan gently on the counter to release air bubbles before baking. Rotate pans halfway through the 25-30 minute bake time, and let them cool in the pans for 10 minutes before transferring to a wire rack. This prevents warping and ensures even doneness.
Can I substitute boxed cake mix for this recipe?
You can adapt it, but expect a denser texture. Replace the flour with the mix’s dry ingredients, add 1 extra egg for structure, and increase milk by ¼ cup. Bake times may vary—test with a toothpick. For professional results, stick to the original recipe’s precision.
Why is my buttercream too soft after chilling?
Cold ingredients are key! Use cold heavy whipping cream and room-temperature butter. Beat on high for 3-4 minutes until stiff peaks form. If still too soft, chill the bowl in an ice bath while mixing. For extra stability, add 1 tbsp powdered sugar at a time until firm.
How do I fix a collapsed cake?
If it collapses during assembly, place the cake in the fridge for 15 minutes to firm up. Rebuild layers with extra buttercream as “glue,” then chill again. For severe collapses, use a cake board for support. The frosting should hold after a 2-hour final chill.
What’s the best way to decorate the top?
For a classic look, pipe a smooth base layer, then create swirls by dragging frosting from the center outward with an offset spatula. Add a thin border of contrasting color for definition. Top with fresh berries, edible flowers, or chocolate curls for a showstopper finish.

- 3lb Prime Rib Roast Recipe: Juicy Pink Center Guaranteed in 3 Hours - October 31, 2026
- 5 Spice Cake Recipe: Warmly Spiced Layers With Crunchy Top - October 31, 2026
- 1950’s Macaroni and Cheese Recipe: Nostalgic Creamy Cheese Sauce with Buttery Noodles - October 31, 2026