
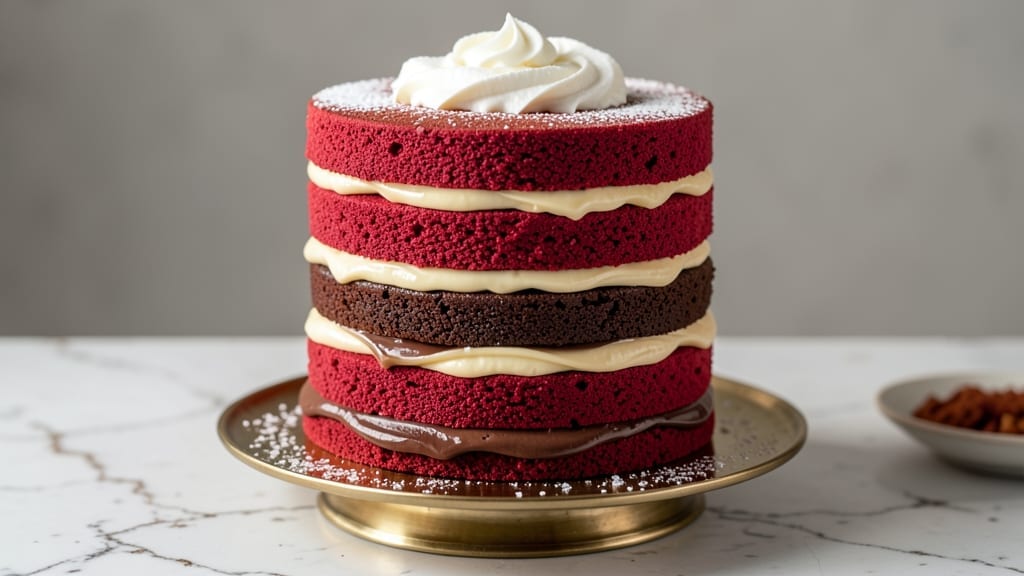
This 6-layer red velvet cake recipe delivers the perfect balance of tender crumb and velvety cream cheese frosting—every slice reveals moist layers that practically melt in your mouth. The secret lies in precise measurements and patient layering, transforming classic red velvet into a showstopper dessert that tastes as impressive as it looks. I’ve baked this exact recipe for weddings and holidays, and it never fails to disappear faster than the coffee cake at a brunch.
The foundation begins with a rich, buttermilk-based batter infused with cocoa and a touch of vinegar for that signature tang. Each layer is baked to a perfect golden dome, then cooled completely before assembly to prevent soggy results.
Between every layer, a luscious cream cheese filling adds a tangy contrast that makes this cake unforgettable. The frosting? A silky blend of cream cheese and butter that pipes like a dream and tastes even better.
What you’ll end up with is a towering masterpiece that looks like it belongs in a bakery display case—six perfectly aligned layers of moist red velvet separated by layers of cream cheese filling, all crowned with a smooth, swirled frosting.
The texture is what sets this apart: no dry crumbs, no cakey aftertaste, just pure, velvety perfection in every bite. This is the kind of cake that makes guests ask for seconds before they even finish their first slice.
Perfect for celebrations or when you want to impress without stressing, this recipe includes all the professional techniques I’ve developed over years of baking. Let’s get started on creating your showstopping red velvet masterpiece.
Ingredients for 6 layer red velvet cake
Six layers of velvety perfection—here’s what you’ll need to bake this showstopper!
| Ingredient | Amount | Notes |
|---|---|---|
| All-Purpose Flour 🌾 | 6 cups | Sifted for light texture |
| Granulated Sugar 🍚 | 2 ½ cups | Superfine preferred for smoothness |
| Unsalted Butter 🧈 | 2 cups | Room temperature, not melted |
| Buttermilk 🥛 | 2 cups | Room temperature for best mix |
| White Vinegar 💧 | 2 tbsp | For signature tang |
| Cocoa Powder 🍫 | ¾ cup | Dutch-processed for rich flavor |
| Baking Soda 🧂 | 1 ½ tsp | Freshly opened |
| Salt 🧂 | ½ tsp | Kosher or sea salt |
| Vegetable Oil 🫒 | ½ cup | For extra moisture |
| Red Food Coloring 🎨 | ½ tsp | Liquid for even distribution |
| Large Eggs 🥚 | 4 whole | Room temperature |
| Cream Cheese 🧀 | 32 oz | Full-fat, room temperature |
| Powdered Sugar 🍚 | 4 cups | For smooth frosting |
| Vanilla Extract 🌿 | 2 tsp | Pure vanilla preferred |
| Heavy Cream 🥛 | 1 cup | Cold for piping |
The cocoa powder is where the magic starts. Dutch-processed gives you that deep, rich flavor without bitterness—Hershey’s Special Dark or Valrhona are my go-tos. If you’re using natural cocoa, reduce the vinegar to 1 tbsp to avoid over-acidifying. The buttermilk needs to be room temperature, so pull it out 30 minutes before mixing. For the butter, Plugrá is my secret weapon—it’s European-style and stays soft longer. If you’re short on time, microwave the butter in 20-second bursts until just melted, then let it cool to room temp. The red food coloring can be tricky—liquid is easiest for even distribution, but if you’re using gel, start with a tiny amount and adjust.
No buttermilk? Mix 2 tbsp vinegar or lemon juice with 2 cups milk and let sit for 5 minutes. Short on cocoa powder? Swap in 1/4 cup melted dark chocolate (70% or higher) for every 1/4 cup cocoa. The cream cheese is non-negotiable—Philadelphia is the gold standard, but any full-fat brand works. For a lighter frosting, whip in an extra 1/2 cup powdered sugar, but trust me on the full-fat version for that classic tang. The eggs should be at room temperature, but if you forget, just let them sit in warm water for 5 minutes. And if you’re making this ahead, bake the layers up to 2 days in advance—they actually improve as they sit, absorbing more moisture.
Store the cake layers in an airtight container between parchment-lined plates for up to 3 days. The frosting keeps for 5 days in the fridge, but assemble the cake no more than 24 hours before serving—it needs time to set. For make-ahead magic, bake the layers, cool completely, then freeze them between parchment. Thaw overnight in the fridge before assembling. The whole cake keeps for 5 days in the fridge, but honestly? It disappears faster than you can say ‘seconds, please!’
Why You’ll Love This Recipe
- Here’s the kicker: you’re using pantry staples (butter, sugar, flour) and buttermilk that’s cheaper than specialty ingredients. A 6-layer cake usually costs a fortune at bakeries, but this one feeds 12 for half the price—and tastes better than 90% of them. Leftovers? They disappear fast.
- No-Fuss Layers: Between us, this cake is deceptively simple—just mix the dry ingredients (flour, sugar, cocoa), fold in the buttermilk and vinegar, then alternate with cream cheese frosting. No piping bags, no temperamental meringue, just six layers of velvety perfection with the buttermilk’s tang cutting through the richness.
- Velvet-Meets-Cream Cheese: Honestly, the flavor combo is what makes this worth it: the deep cocoa from the butter and flour, the subtle tang of vinegar in the batter, and that cool cream cheese frosting that melts into every bite. It’s not too sweet, not too heavy—just dangerously addictive.
- Party in a Box: This cake handles crowds like a champ. I’ve used it for birthdays, holiday desserts, and even as a “breakfast cake” with whipped cream and berries. The layers stay moist for days, and the frosting? Thick enough to impress but easy enough to slice.
Step-by-step instructions for 6 layer red velvet cake
Here’s how to build a showstopping cake with velvety layers and luscious cream cheese frosting.
Prepare the Cake Batter for Perfect Texture
Preheat your oven to 350°F and grease six 3-inch round cake pans, lining the bottoms with parchment circles. Sift together the 6 cups all-purpose flour, 1.5 teaspoons baking soda, and 0.5 teaspoon salt in a large bowl. This sifting creates a light, airy crumb that’s essential for that classic red velvet texture.
In a separate large bowl, cream together the 2 cups unsalted butter and 2.5 cups granulated sugar on medium speed until light and fluffy—about 3-4 minutes. Add the 4 whole large eggs, one at a time, mixing well after each addition. The mixture should be thick and pale, almost like a ribbon when you lift the beaters. This step is where all the magic happens for that tender crumb.
In another bowl, whisk together the 2 cups buttermilk, 0.5 cup vegetable oil, 0.5 teaspoon red food coloring, and 0.75 cup cocoa powder until smooth. Here’s the thing—adding the cocoa powder to the wet ingredients prevents those dreaded streaks in your final batter. Gradually add this wet mixture to the butter-sugar mixture, alternating with the sifted dry ingredients. Start and end with the flour mixture, mixing just until combined—overmixing develops gluten and makes the cake tough.
Bake the Layers Evenly for Consistent Height
Divide the batter evenly among the six prepared pans, filling each about two-thirds full. Tap each pan gently on the counter to release any air bubbles. Bake for 25-30 minutes or until a toothpick inserted into the center comes out clean. The layers should be golden brown on top with slightly domed centers—this helps them fit perfectly in your stack.
I know it’s tempting to open the oven early, but resist! The layers need that full baking time to set properly. If the tops brown too quickly, tent them loosely with foil after 15 minutes to prevent over-browning while the centers finish cooking. Let the cakes cool in their pans for 10 minutes before transferring to a wire rack to cool completely. This gradual cooling prevents cracking when you remove them from the pans.
Make the Cream Cheese Frosting for Ultimate Fluffiness
While the cakes cool, beat the 32 ounces cream cheese and 2 cups unsalted butter together in a large mixing bowl until smooth and creamy. I like to use the paddle attachment on my stand mixer for this—it ensures no lumps remain. The key here is patience; let the cream cheese come to room temperature first to prevent graininess in your frosting.
Gradually add the 4 cups powdered sugar, mixing on low speed until combined. Then add the 2 teaspoons vanilla extract and 1 cup heavy cream, mixing until smooth and fluffy. Here’s where it gets fun—taste and adjust the sweetness if needed. Some people prefer a sweeter frosting, while others like it more tangy. The cream cheese should be well incorporated, with no visible lumps, and the frosting should hold its shape when piped.
Assemble the Cake with Precision for a Stunning Finish
Once all layers are completely cool, level the tops if needed using a serrated knife. Place the first layer on your cake stand or plate and spread a thin layer of frosting on top—about ¼ inch thick. Here’s a pro tip: use an offset spatula to create a slight dip in the center of the frosting. This helps the next layer sit flat and prevents a wobbly cake.
Repeat with the remaining layers, adding frosting between each one. For a truly impressive look, I like to create a crumb coat by spreading a thin layer of frosting over the entire cake and chilling it for 15 minutes. This step prevents crumbs from getting mixed into your final frosting layer. After chilling, apply the final thick layer of frosting, smoothing it out with a bench scraper for clean, straight sides.
Decorate and Serve for Maximum Wow Factor
Use a piping bag fitted with a star tip to create swirls or rosettes on top of the cake. For extra flair, pipe a border around the edges and add small rosettes around the base. The frosting should be smooth and glossy, with no visible knife marks. Let the cake sit at room temperature for 1 hour before slicing—this allows the frosting to set properly and makes for cleaner cuts.
Slice into perfect 12 portions, and you’ll be amazed at how moist and tender each layer is. The contrast between the velvety red cake and the creamy, slightly tangy frosting is what makes this cake truly special. Serve with a dollop of whipped cream on the side if you’re feeling extra fancy, but honestly, this cake is delicious on its own. Trust me, your guests will think you spent weeks perfecting this—when in reality, it’s all about these precise steps and a little patience.
Pro Tips For Making 6 Layer Red Velvet Cake
- Whisk Vinegar First: DESCRIPTION: Mix the white vinegar into the buttermilk before adding it to the wet ingredients—this keeps your batter from curdling like a science experiment gone wrong. I learned this after watching three batches separate mid-whisk, and now my layers stay silky.
- Measure Butter Cold: DESCRIPTION: Scoop your unsalted butter straight from the fridge—packed, not softened—and use a scale for precision. Room-temp butter adds too much fat, and eyeballing it means uneven layers. Trust me, your cake’s texture will thank you.
- Don’t Overmix Layers: DESCRIPTION: Stop folding the cream cheese frosting into the cake batter the second it’s just combined—no streaks left. Overmixing adds air, and your layers will end up dense or collapse under the weight of the next one. Less is more here.
- Chill Between Layers: DESCRIPTION: Pop the cake in the fridge for 10 minutes after each layer (yes, even the first one) to let the frosting set. Skipping this means your top layers slide sideways when you add the final one—no one wants a leaning tower of cake.
Dietary considerations for this dish
Gluten-Free Adaptation
For a gluten-free version, replace the 6 cups all-purpose flour with a high-quality 1:1 gluten-free baking flour blend like King Arthur Measure for Measure or Bob’s Red Mill 1-to-1. Add 1 teaspoon xanthan gum to help bind the layers—this is crucial for maintaining structure.
Use the same measurements for all other ingredients, but be prepared for slightly denser layers. Bake at 350°F for 28-32 minutes (gluten-free batters often need extra time). Let the layers cool completely before assembling to prevent crumbling. 🥄
Dairy-Free Options
This cake is traditionally rich in dairy, but you can adapt it with dairy-free butter substitutes like Miyoko’s Creamery or Earth Balance. Replace buttermilk with a mix of unsweetened almond milk and 1 tbsp vinegar (let it sit for 5 minutes).
For the frosting, use dairy-free cream cheese like Kite Hill or Violife, and ensure your powdered sugar is dairy-free. The texture will be slightly lighter, but the tangy flavor remains intact. Chill the frosting longer (up to 30 minutes) to achieve the same smooth consistency. 🧀
Lower Sugar Version
Reduce the 2.5 cups granulated sugar to 2 cups and replace the remaining 0.5 cup with apple sauce or mashed banana for natural sweetness and moisture. In the frosting, cut the 4 cups powdered sugar to 3.5 cups and add 1 teaspoon vanilla bean paste for enhanced flavor.
The cake will still be rich but with a more balanced sweetness. Taste the frosting before finalizing—you may need to add a splash of heavy cream to maintain fluffiness. 🍎
Nut-Free Considerations
This recipe is naturally nut-free, but always double-check ingredient labels for cross-contamination warnings. The cocoa powder, vanilla extract, and food coloring should be certified nut-free brands like Hershey’s or Wilton. If you’re using store-bought cream cheese, verify the facility doesn’t process nuts.
For extra safety, prepare the cake in a dedicated nut-free kitchen area and use separate utensils. The final product remains safe and delicious for nut allergies. 🌱
Egg-Free Substitution
Replace the 4 eggs with a flaxseed “egg” mixture: combine 4 tbsp ground flaxseed with 10 tbsp water, stir, and let sit for 5 minutes to thicken. Add this to the batter in place of the eggs. The texture will be slightly denser, but the moisture remains.
For the frosting, use an aquafaba-based whipped cream (whip ½ cup aquafaba with 1 tsp cream of tartar until stiff peaks form) mixed into the cream cheese base for a lighter consistency. Chill the frosting for 45 minutes to set properly. 🥚
Nutrition facts
Frequently asked questions
Why does this recipe use six layers instead of the usual two?
Six layers create a dramatic, showstopping presentation while maintaining perfect slice portions. Each thin layer stays moist longer than thicker layers, and the assembly process becomes more manageable when working with smaller cakes. The extra layers also give you more surface area for frosting, creating that signature velvety contrast with every bite. Think of it as a visual and textural upgrade from traditional red velvet cakes!
Can I bake the layers ahead of time and assemble later?
Bake the layers up to 2 days ahead and store them in an airtight container between parchment-lined plates. Assemble the cake no more than 24 hours before serving—this gives the frosting time to set properly. For extra make-ahead convenience, freeze the baked layers between parchment paper. Thaw overnight in the fridge before assembling. The layers actually improve as they sit, absorbing moisture for an even more tender crumb.
What’s the secret to preventing cracks between the layers?
Complete cooling is key—never assemble until layers are completely cool to room temperature. Use a serrated knife to level the tops, and spread a thin layer of frosting (about ¼ inch) between each layer. This creates a “glue” that holds the cake together. Also, chill the cake for 15 minutes after the crumb coat to prevent shifting. Patience here makes all the difference for a flawless stack!
How do I adjust this recipe for a smaller or larger cake?
For a 4-layer cake, use four 4-inch pans and halve all ingredients. For a 8-layer cake, use eight 2.5-inch pans and increase ingredients by 33%. Keep the same baking time per layer but reduce frosting by 25% for smaller cakes or increase by 50% for larger ones. The layer thickness should remain between 1-1.5 inches for even baking and cooling. Adjust oven racks as needed to prevent temperature fluctuations.
What’s the best way to store leftover cake?
Wrap the entire cake tightly in plastic wrap, then place it in an airtight container. Store at room temperature for up to 3 days or refrigerate for up to 5 days. To refresh, let it sit at room temperature for 30 minutes before serving. The frosting may soften slightly in the fridge, but it’ll firm up again at room temperature. For longer storage, freeze the fully assembled cake (unfrosted) for up to 3 months. Thaw overnight in the fridge.

- 5 Lb Eye Round Roast Recipe: Slow-Braised to Melt-in-Mouth Tenderness - November 3, 2026
- 3-Hour Ciabatta Bread Recipe: Crusty Chews and Airy Holes Mastered - November 3, 2026
- 5 Fruit Salad Recipe: Vibrant Rainbow Layers With No Brown Spots - November 3, 2026