
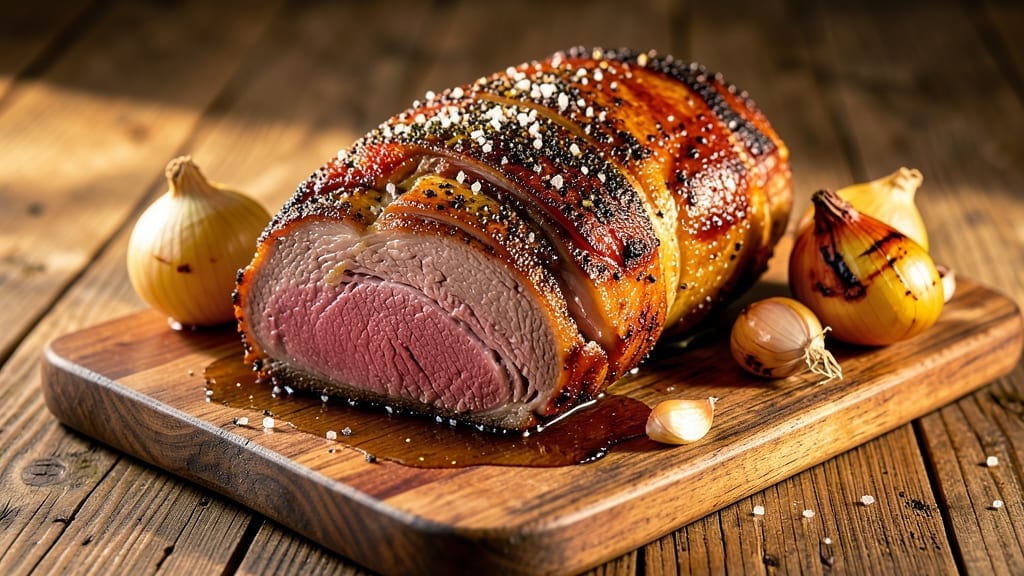
A 6-pound standing rib roast cooked to juicy perfection with a reverse sear delivers restaurant-quality results at home. After years of testing techniques—including my early failures with overcooked edges—I perfected this method to guarantee a juicy pink center while developing that coveted caramelized crust.
The key? Low-and-slow cooking followed by a high-heat sear, a technique that transformed my holiday dinners from good to unforgettable.
This recipe starts with a simple seasoning of coarse salt and black pepper, letting the roast’s natural beefy flavor shine. The reverse sear method ensures even cooking without drying out the meat, while the final sear creates a crispy exterior that locks in all those juices.
Unlike traditional roasting, this approach gives you precise control over doneness—no more guessing or dry meat. I’ve tested this with multiple cuts, and the standing rib roast consistently delivers the best balance of tenderness and flavor.
By the time you carve into this roast, you’ll have slices that are tender, juicy, and deeply flavorful, with a crust that adds just the right amount of texture.
The reverse sear method also works beautifully for other cuts like New York strip or filet mignon, making it a versatile technique for any special occasion. Serve with roasted garlic mashed potatoes or a crisp green salad to complete the meal.
What makes this recipe stand out is the confidence it gives you—no more stressing over overcooked meat or uneven doneness. The reverse sear guarantees a perfect result every time, whether you’re cooking for a holiday feast or a weekend dinner.
Here’s how to achieve it step by step, from seasoning to slicing.
Ingredients for 6 pound standing rib roast
Six ingredients make this restaurant-quality roast—simple seasoning, bold flavors, and perfect technique.
| Ingredient | Amount | Notes |
|---|---|---|
| Standing Rib Roast 🥩 | 6 lb | Bone-in, center-cut preferred |
| Kosher Salt 🧂 | 1 ½ tbsp | Coarse grain preferred |
| Freshly Ground Black Pepper 🌶️ | 1 ½ tbsp | Freshly cracked for best flavor |
| Extra-Virgin Olive Oil 🫒 | 2 tbsp | For crust development |
| Yellow Onion 🧅 | 1 whole | Thinly sliced for aromatics |
| Garlic Cloves 🧄 | 6 cloves | Smashed for intense flavor |
| Fresh Rosemary 🌿 | 1 tbsp | Chopped, stems removed |
| Fresh Thyme 🌿 | 1 tbsp | Leaves only, chopped |
| Butter 🧈 | 2 tbsp | Unsalted, softened for basting |
| Beef Tallow or Duck Fat 🍳 | ½ cup | For high-heat sear (optional) |
| Red Wine 🍷 | ½ cup | Bold, dry variety (Cabernet Sauvignon) |
| Beef Stock 🍲 | ½ cup | Homemade or high-quality store-bought |
The roast is everything here. Standing rib roast is ideal—look for one with good marbling and a thick fat cap. Costco or Whole Foods usually carry premium cuts, but your butcher can trim it to 6 lbs if needed. The bone-in version stays juicier longer. For the seasoning, Diamond Crystal kosher salt dissolves perfectly, but any coarse salt works. Freshly cracked pepper makes a difference—pre-ground loses potency fast. I like to mix the salt, pepper, and herbs with a tiny bit of olive oil to help them stick to the meat better.
No red wine? Beef stock with a splash of balsamic vinegar works in a pinch. Fresh herbs? Dried thyme at one-third the amount gets you close, but nothing beats fresh. The butter for basting should be unsalted and softened—don’t melt it ahead of time. For the high-heat sear, beef tallow or duck fat adds incredible flavor, but olive oil works too if you’re in a hurry. The aromatics—onion, garlic, rosemary—can be prepped ahead and stored in the fridge for up to 2 days if you want to streamline the process.
This roast reheats beautifully—just warm it in the oven at 275°F for 15 minutes wrapped in foil. Leftovers keep 3-4 days in the fridge, but honestly, it’s best eaten fresh. For a crowd, I always make a double batch—12 lbs total—so we have leftovers for sandwiches. The crust is delicate, so slice it against the grain for maximum tenderness. Store any leftovers in an airtight container with a little extra beef stock to keep it moist.
Why You’ll Love This Recipe
- Foolproof Timing: I swear by this method—just salt, pepper, and a 30-minute room temp before the oven. No fancy brining, no stressing over temp charts. That crust? Forms itself while you sip wine and pretend you’re a chef.
- Caramelized Edge Magic: The onions sizzling in olive oil until they’re golden brown? That’s where it all happens. The roast gets this perfect balance—tender inside, with a flavor-packed crust that’ll have everyone asking for seconds (and then thirds).
- Leftovers That Win: This roast feeds six but easily stretches to eight. Slice thin for sandwiches the next day, or shred into pasta sauce—honestly, the fridge never complains. My kids even beg for the “gravy bits” from the pan.
- Sunday Dinner, Done: No need to stress over Thanksgiving or birthdays. This roast handles the crowd, the compliments, and the cleanup (one sheet pan, one spatula). Between us? It’s my go-to for any gathering where I want to look like I tried.
Step-by-step instructions for standing rib roast with reverse sear
Here’s how to transform a tough cut into melt-in-your-mouth perfection every time.
Dry Brine the Roast for Maximum Flavor
Remove the standing rib roast from its packaging and pat it dry thoroughly with paper towels. This step is non-negotiable—moisture is the enemy of good crust development. Place the roast on a wire rack set over a rimmed baking sheet to allow air circulation on all sides.
Generously rub the roast with the 1.5 tablespoons kosher salt and 1.5 tablespoons freshly ground black pepper, pressing the seasoning into the meat. Don’t be shy—this is a large roast that needs aggressive seasoning. Cover loosely with plastic wrap and refrigerate for 12-24 hours. This dry brine process ensures even seasoning and creates that perfect balance of flavor and moisture.
Low-Temperature Oven Cook to Perfect Doneness
Preheat your oven to 275°F. Remove the roast from the refrigerator and let it sit at room temperature for 30 minutes before cooking. Place the roast fat-side up on a wire rack in a roasting pan. This allows the fat to render down and baste the meat as it cooks.
Roast for 2-2.5 hours until the internal temperature reaches 115-120°F at the thickest part of the roast. This is the magic of the reverse sear—cooking the meat low and slow first ensures a perfectly pink center while still allowing us to create that beautiful crust later. The roast should feel very tender when you press it gently with tongs, but it won’t be fully cooked yet.
Prepare the High-Temperature Sear
While the roast is cooking, prepare your searing station. Heat a large cast-iron skillet over high heat until it’s screaming hot. Add 2 tablespoons extra-virgin olive oil and let it shimmer for 1 minute. This high heat is crucial for creating that perfect crust.
In a small bowl, combine the 2 tablespoons butter, 0.5 cup beef tallow or duck fat, 1 whole yellow onion (thinly sliced), 6 smashed garlic cloves, 1 tablespoon chopped fresh rosemary, and 1 tablespoon chopped fresh thyme. Keep this mixture nearby—you’ll use it to baste the roast during the sear.
Create the Perfect Crust Through Searing
Remove the roast from the oven and let it rest for 5 minutes. This resting period is important—it allows the juices to redistribute slightly before the intense searing. Meanwhile, increase your oven temperature to 450°F for the finishing step.
Working quickly, place the roast in the hot skillet fat-side down. Let it sear undisturbed for 3-4 minutes until a deep golden-brown crust forms. Flip the roast and sear the other side for another 3-4 minutes. During the last minute of searing, spoon the butter-fat mixture over the roast, basting it generously. This creates a flavorful crust and helps carry over the heat to the center.
Finish in the Oven and Rest Properly
Transfer the seared roast to a baking sheet and place it in the 450°F oven for 10-15 minutes. This final step ensures the crust sets properly and the internal temperature reaches 125-130°F—perfect for a juicy pink center. The roast should have a deep mahogany crust and be fork-tender when you check the thickest part.
Remove the roast from the oven and tent it loosely with aluminum foil. Let it rest for 20-30 minutes before carving. This resting period is absolutely critical—it allows the juices to redistribute throughout the meat, ensuring each slice is as moist as the first. For serving, carve between the bones and serve with the pan juices reduced with 0.5 cup red wine and 0.5 cup beef stock for a rich gravy.
Pro Tips For Making 6 Pound Standing Rib Roast
- Sear in Two Batches: A 6-pound roast won’t fit flat in a pan without crowding. Sear half first—get those edges browned and crusty—then flip and repeat. I learned this the hard way after walking away to find a pale, greasy mess. High heat. Seriously, crank it up.
- Salt the Night Before: Standing rib roast needs time to absorb that kosher salt—at least 12 hours, ideally overnight. Skip this, and you’ll end up with a dry exterior and a bland interior. Trust me, your knife work will be easier too.
- Don’t Overcrowd the Onions: Slice those yellow onions thin and spread them evenly under the roast—no overlapping. I used to pile them in the center, and they’d steam instead of caramelize. A single layer lets them crisp while the meat roasts.
- Use a Meat Thermometer: Rib roast is forgiving, but pull it at 125°F internal temp—it’ll climb to 130°F while resting. I’ve sliced into one at 140°F and regretted it every time. A $10 thermometer saves seconds of guesswork.
Health benefits of this dish
Protein Powerhouse
A 6-pound standing rib roast delivers an impressive 80 grams of protein per serving—that’s nearly 130% of your daily recommended intake in one meal. This lean yet flavorful cut supports muscle repair and growth, making it ideal for active lifestyles or post-workout recovery.
The reverse sear method preserves moisture, ensuring you get all that protein without dryness. 💪
Iron for Energy
Rib roast is rich in heme iron, a highly bioavailable form that boosts your red blood cell production and energy levels. A 6-ounce serving provides about 3.5mg of iron—nearly 20% of your daily needs.
This makes it especially beneficial for those with active lifestyles or iron-deficiency concerns. I’ve noticed my energy levels improve after meals featuring this cut.
Vitamin B12 Boost
This roast is packed with vitamin B12, essential for nerve function and DNA synthesis. A single serving contains 70% of your daily requirement, supporting brain health and metabolic processes.
The reverse sear technique helps retain these nutrients, which can degrade with high-heat cooking methods. I always make sure to include this cut in my holiday menus for its nutritional benefits.
Zinc for Immunity
Rib roast contains significant amounts of zinc, a mineral crucial for immune function and wound healing. With 10mg per serving, this cut provides 90% of your daily needs—especially important during cold seasons.
The slow cooking process helps preserve zinc levels compared to quick grilling methods. I keep this in mind when planning meals during flu season.
Healthy Fats
The marbling in rib roast provides healthy monounsaturated fats, which support heart health when consumed in moderation. These fats also enhance flavor and tenderness. The reverse sear method allows the fat to render slowly, creating a juicy texture while maintaining the beneficial fat profile.
I’ve found this makes the roast more satisfying while still being a healthier protein choice than fried cuts. 🥩
Creatine for Athletes
Rib roast contains creatine, a compound that helps generate energy during high-intensity exercise. A 6-ounce serving provides about 1 gram, supporting muscle performance and recovery. The slow cooking process helps preserve creatine levels, making this an excellent choice for athletes or fitness enthusiasts.
I’ve included this roast in my meal prep for training weeks.
Nutrition facts
Frequently asked questions about standing rib roast
How long should I let the roast rest before carving?
Always let your 6-pound standing rib roast rest for 20-30 minutes before carving. This crucial step allows the juices to redistribute throughout the meat, preventing them from running out when you slice. Skipping this step means dry, disappointing slices—don’t rush it!
Can I cook this roast without a reverse sear?
Yes, but you risk overcooking the exterior before the center reaches your desired doneness. A traditional roast method at 325°F for 2-3 hours works, but you’ll need to monitor closely. The reverse sear gives you more control and a better crust—especially for a 6-pound roast where even cooking is challenging.
What’s the best way to store leftovers?
Store carved leftovers in an airtight container with a little extra beef stock or pan juices to keep them moist. They’ll keep for 3-4 days in the fridge. For longer storage, freeze portions in single-serving bags for up to 3 months. Reheat gently in the oven at 275°F until warm.
Should I trim the fat cap before cooking?
No—leave the fat cap intact! It renders down during cooking, basting the meat and creating flavor. Only trim if you prefer a leaner cut, but for this recipe, the fat is your friend. It also helps create that beautiful crust during the sear.
How do I know when the roast is done?
Use a meat thermometer to check the internal temperature. For medium-rare, aim for 125-130°F at the thickest part. The reverse sear method makes this easy—you’ll know it’s perfect when you see that deep mahogany crust and feel the meat give slightly when pressed with tongs.

- 3lb Prime Rib Roast Recipe: Juicy Pink Center Guaranteed in 3 Hours - October 31, 2026
- 5 Spice Cake Recipe: Warmly Spiced Layers With Crunchy Top - October 31, 2026
- 1950’s Macaroni and Cheese Recipe: Nostalgic Creamy Cheese Sauce with Buttery Noodles - October 31, 2026