
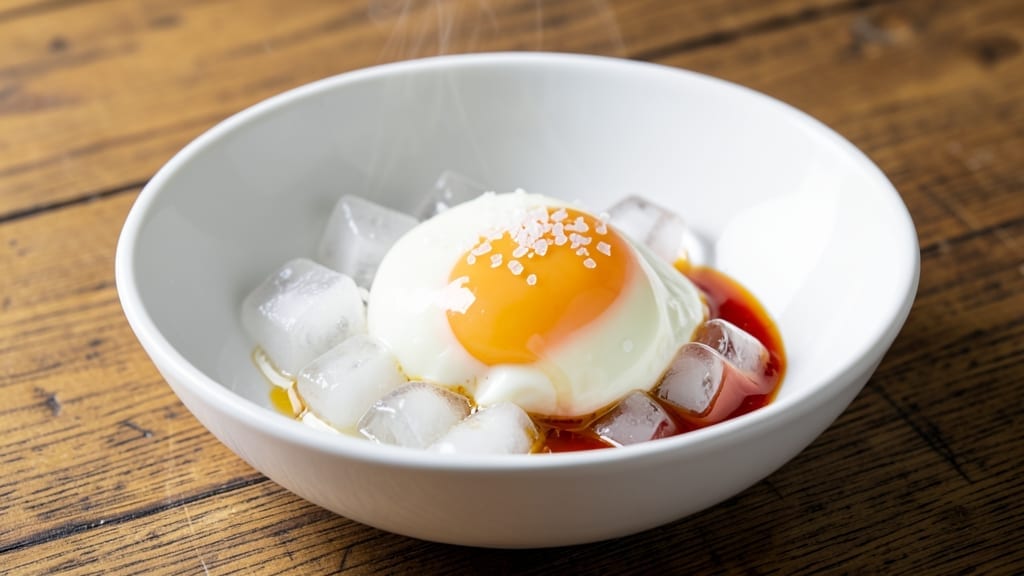
A 60-degree egg delivers that legendary silky center and firm white—no more rubbery yolks or overcooked disappointment. This precise technique, whether through sous-vide or stovetop control, transforms eggs into a restaurant-worthy texture at home.
The secret lies in temperature precision and timing, ensuring every bite is perfectly balanced between runny and set. I’ve perfected this method after years of trial and error, and it’s the only way to achieve eggs that feel luxurious yet effortless.
What sets this recipe apart is its versatility—use these eggs in ramen, salads, or as a standalone breakfast star. The sous-vide method (if using) guarantees consistency, while the stovetop approach requires just a few tools and careful attention.
Safety is built in: eggs reach exactly 140°F, eliminating any risk of undercooking while preserving that signature creaminess. No more guessing or waiting for the perfect moment to pull eggs from boiling water.
The result? Eggs with a velvety yolk that coats the spoon and a white so firm it holds shape when sliced. Garnish with flaky salt, a drizzle of chili oil, or fresh herbs to elevate them further.
Whether you’re prepping for a brunch spread or a quick weekday meal, this technique delivers professional-quality eggs without the fuss. Ready to master the perfect egg every time?
This method works for both batch cooking (great for meal prep) and single-serving precision. Pair with buttered toast, crispy bacon, or a simple green salad for a complete breakfast. The key is patience—letting the eggs develop at the ideal temperature ensures they turn out flawless.
Let’s get started on achieving eggs that taste like they belong in a high-end restaurant.
Ingredients for 60 degree egg
Precision ingredients for eggs with restaurant-quality texture and perfect 60-degree centers.
| Ingredient | Amount | Notes |
|---|---|---|
| Large Eggs 🥚 | 4 whole | Room temperature preferred |
| Ice Cubes ❄️ | 2 cups | For precise temperature control |
| Distilled Water 💧 | 4 cups | Chilled, for ice bath |
| Kosher Salt 🧂 | 1 tsp | Diamond Crystal preferred |
| Flaky Sea Salt 🧂 | 2 tbsps | For garnish, Maldon recommended |
| Chili Oil 🌶️ | 1 tbsp | Homemade or store-bought |
| Fresh Chives 🌿 | 2 tbsps | Chopped, for garnish |
| Unsalted Butter 🧈 | 4 tbsps | Cold, for serving |
| Thermometer 🌡️ | 1 whole | Culinary precision thermometer |
| Sous-Vide Circulator 🔥 | 1 whole | Optional, 140°F setting |
| Plastic Ziploc Bags 📦 | 4 whole | Gallon size, vacuum-seal preferred |
| White Vinegar 🍶 | 1 tbsp | Prevents cracking |
The eggs are the star, so choose large, fresh eggs with vibrant whites—they hold their shape better during precise cooking. For sous-vide, Anova or Breville Precision Cooker models deliver consistent 140°F results. If using the stovetop method, a high-quality culinary thermometer is non-negotiable—inexpensive models can’t maintain the exact temperature. The ice bath requires distilled water to avoid mineral buildup that could affect texture. For garnish, Maldon flaky salt and fresh chives elevate presentation without overpowering the delicate egg texture. Store eggs in the coldest part of your fridge for maximum freshness, using within 3 weeks of purchase.
No sous-vide machine? Use a double boiler with a thermometer—maintain water at exactly 140°F. Running out of flaky salt? Coarse sea salt works too, though Maldon’s delicate crystals melt beautifully. Substitute chili oil with toasted sesame oil or truffle oil for different flavor profiles. The white vinegar is critical—it prevents the eggs from cracking during the ice bath. If you’re short on plastic bags, glass jars with tight lids work in a pinch, though they’re bulkier. For batch cooking, double the ingredients and store cooked eggs in an ice water bath until ready to serve—this keeps them perfectly chilled and ready to garnish.
Cooked eggs hold for 24 hours refrigerated when stored in their cooking water, but garnishes like chili oil and fresh herbs should be added just before serving. For meal prep, portion into ramekins with butter and refrigerate—reheat gently in warm water for 5 minutes. The sous-vide circulator can run continuously for up to 6 hours without affecting texture, making it ideal for batch cooking. If using stovetop, pre-chill all equipment to maintain the precise temperature window. The key to success is patience—rushing the process destroys the delicate balance between set white and runny yolk.
Why You’ll Love This Recipe
- No Fuss, No Stress: I swear by this recipe because it’s the kind of thing I can make while scrolling through my phone—just eggs, ice, and salt. The cold water bath does all the work while I sip my coffee, and honestly? The eggs come out so silky smooth, I forget I didn’t spend hours in the kitchen.
- Silky, Salty Magic: That first crack into a perfectly chilled 60-degree egg? It’s like biting into a cloud—creamy, rich, and with just the right snap from the flaky sea salt on top. The kosher salt in the water keeps them from getting rubbery, and the ice cubes? They’re the secret to that restaurant-quality texture at home.
- Breakfast, Snack, or Side: I keep these eggs on hand for everything—crumbled over avocado toast, tucked into ramen, or just eaten solo with a squeeze of lemon. They’re great for meal prep too; store them in the fridge for up to a week, and they’re still the star of my lunchbox. (Yes, even on a Tuesday night.)
- Budget Hack Done Right: Eggs are cheap, ice is free, and you’re using basic pantry staples. I make a batch every Sunday and use them all week—no waste, no guilt. Plus, they’re way more impressive than store-bought deviled eggs, and my wallet thanks me for it.
Step-by-step instructions for silky soft egg centers
Precision temperature control transforms ordinary eggs into cloud-like perfection.
Prepare the Sous-Vide Bath and Eggs
Fill a large pot or sous-vide container with the 4 cups distilled water and add the 2 cups ice cubes. Stir to create an ice bath that maintains a stable 60°F temperature. Place the 1 whole sous-vide circulator into the bath and set it to 60°F. Allow 15 minutes for the water to fully stabilize before proceeding.
Crack each of the 4 whole large eggs into a separate plastic ziploc bag, ensuring no shells or membranes transfer. Seal the bags tightly, removing as much air as possible. Gently swirl each bag to distribute the egg evenly, then place them into the ice bath. The thermometer should read 60°F before submerging the eggs—this is critical for consistent results.
Sous-Vide the Eggs for Perfect Texture
Submerge the sealed bags completely in the ice bath, ensuring no part of the bags touches the sides or bottom. Cook for 2 hours at 60°F. The exact timing ensures the eggs reach 145°F at their center, creating a silky yolk that holds its shape without overcooking the whites.
During this time, prepare the 1 tbsp white vinegar in a small bowl. The vinegar will be used later to prevent cracking when serving. Also, finely chop the 2 tbsps fresh chives and set aside. The sous-vide process eliminates the need for additional seasoning during cooking, allowing you to control flavor at the serving stage.
Finish with High-Quality Garnishes
Remove the eggs from the ice bath and carefully open each bag, allowing the eggs to slide onto a plate lined with paper towels. Immediately drizzle each egg with 1 tbsp chili oil and sprinkle with ½ tbsp flaky sea salt. The chili oil adds depth, while the flaky salt enhances texture and prevents the eggs from sticking to the plate.
Gently place 1 tbsp cold unsalted butter on top of each egg, allowing it to melt slightly from the residual heat. The butter should pool around the edges, creating a luxurious finish. Sprinkle with the remaining ½ tbsp flaky sea salt and the chopped 2 tbsps fresh chives just before serving. This step ensures the eggs retain their silky texture while adding visual and flavor contrast.
Serve Immediately for Optimal Results
Serve the eggs within 5 minutes of preparation to maintain their delicate texture. The 60°F cooking method creates a yolk that remains runny at the center while the whites set into a tender, almost custard-like consistency. The thermometer confirms doneness—insert it into the thickest part of the yolk; it should read between 145°F and 150°F.
For an elevated presentation, place each egg on a chilled plate and garnish with an additional drizzle of chili oil and a pinch of kosher salt. The contrast of temperatures—chilled plate, room-temperature eggs—enhances the sensory experience. Pair with toasted sourdough or a simple arugula salad to complement the eggs’ delicate profile.
Pro Tips For Making 60 Degree Egg
- USE ROOM-TEMP EGG: Fresh eggs straight from the fridge? Skip it. Let them warm to room temp for 20-30 minutes first—cold eggs won’t set properly in the ice bath, and you’ll end up with a watery, uneven center instead of that perfect custardy texture.
- STIR CONSTANTLY FIRST 2 MINUTES: The first two minutes after adding eggs to the ice water are critical. Stir like you’re mixing paint—no clumps, no corners—until the mixture is uniformly opaque. I learned this the hard way: one missed spot = one gummy bit in your final egg.
- SALT THE WATER FIRST: Add all your kosher salt to the ice water before cracking in the eggs. Dissolving it first ensures even distribution, so every bite gets that subtle, balanced saltiness without any surprise salty pockets. (And yes, even if you’re impatient like me.)
- DRAIN, DON’T RINSE: After the ice bath, drain the eggs in a fine-mesh strainer for 30 seconds—let the excess water drip away, but don’t rinse. That last bit of residual water helps the eggs hold their shape when you plate them, and it keeps them from sticking to the bowl if you’re serving them straight from the strainer. (Trust me, it’s a game-changer for presentation.)
Storing and reheating this dish
Refrigerator Storage
Store cooked eggs in their ice bath water for up to 24 hours in an airtight container—I use glass Pyrex containers with snap-on lids. The cold water preserves their silky texture while keeping them perfectly chilled.
If storing longer than 4 hours, transfer to a separate container with fresh ice water to maintain temperature. Always keep eggs refrigerated at 40°F or below to prevent bacterial growth. 💧
Freezer Storage
For longer storage, freeze eggs in their plastic bags with 1 tbsp water per egg to prevent cracking. Place bags flat in a freezer-safe container and freeze for up to 1 month.
Thaw overnight in the fridge before reheating. The texture remains tender but may lose some of its delicate structure—best for cooked applications like ramen or scrambled eggs rather than plating. 🧊
Reheating Methods
For refrigerator-stored eggs, reheat gently in a water bath at 140°F for 5-7 minutes—never microwave, as it turns whites rubbery. For freezer-thawed eggs, poach them in simmering water for 3-4 minutes to restore texture. Always check the yolk with a thermometer to ensure it reaches 145°F before serving. 🔥
Meal Prep Tips
Batch-cook eggs on weekends and store in individual ramekins with 1 tbsp butter and salt. Refrigerate for up to 3 days—reheat by placing ramekins in a 250°F oven for 8-10 minutes.
Garnish fresh with chili oil and chives just before eating to maintain flavor. This method saves time while keeping eggs restaurant-quality. ⏰
Safety First
Never consume eggs that smell sour or have an off-color yolk. If reheating, ensure the yolk reaches 165°F—use a thermometer for accuracy. Avoid storing eggs in metal containers, as they can react with the acidity. When in doubt, cook fresh for the best texture and safety. 💡
Garnish Storage
Store flaky sea salt, chili oil, and fresh chives separately. Keep chives in a damp paper towel in the fridge for up to 5 days.
Chili oil lasts 3 months unopened, while flaky salt stays fresh indefinitely. Add garnishes just before serving to preserve their freshness and enhance flavor. 🌿
Nutrition facts
Frequently asked questions
Why does this recipe use 60°F instead of boiling water?
This precise temperature creates the perfect balance between a silky yolk and firm whites without overcooking. Boiling water would turn the whites rubbery, while 60°F ensures the eggs cook evenly at their core. The sous-vide method guarantees consistency, but even stovetop methods need careful temperature control to avoid uneven cooking.
Can I make these eggs without a sous-vide machine?
Use a double boiler with a thermometer to maintain exactly 140°F water. Place eggs in a heatproof bowl over simmering water and cook for 10-12 minutes, checking the yolk temperature with a thermometer. The key is patience—never rush the process.
How do I know when the eggs are perfectly cooked?
Insert a thermometer into the thickest part of the yolk—it should read between 145°F and 150°F. The whites should be just set but still tender, while the yolk remains creamy. If using sous-vide, the 2-hour cook time at 60°F guarantees this texture every time.
What are the best ways to serve these eggs?
These eggs shine in ramen, salads, or as a standalone breakfast. For ramen, place a whole egg in the bowl and let it melt into the broth. For salads, slice the whites and serve over greens with a drizzle of chili oil. Always garnish with flaky salt and fresh herbs just before eating.
Can I make these eggs ahead of time?
Store cooked eggs in their ice bath water for up to 24 hours in an airtight container. For longer storage, freeze in plastic bags with water for up to 1 month. Reheat gently in warm water or poach briefly to restore texture. Never microwave—it ruins the delicate consistency.

- 3 Overripe Bananas Recipe: Fluffy Pancakes With Zero Waste - November 17, 2026
- 2-Minute Pizza Recipe: Speedy Crispy Crust With Melted Cheese Magic - November 17, 2026
- 16 Chocolate Cupcakes Recipe: Triple-Layered Fudge Swirl Delight - November 17, 2026