
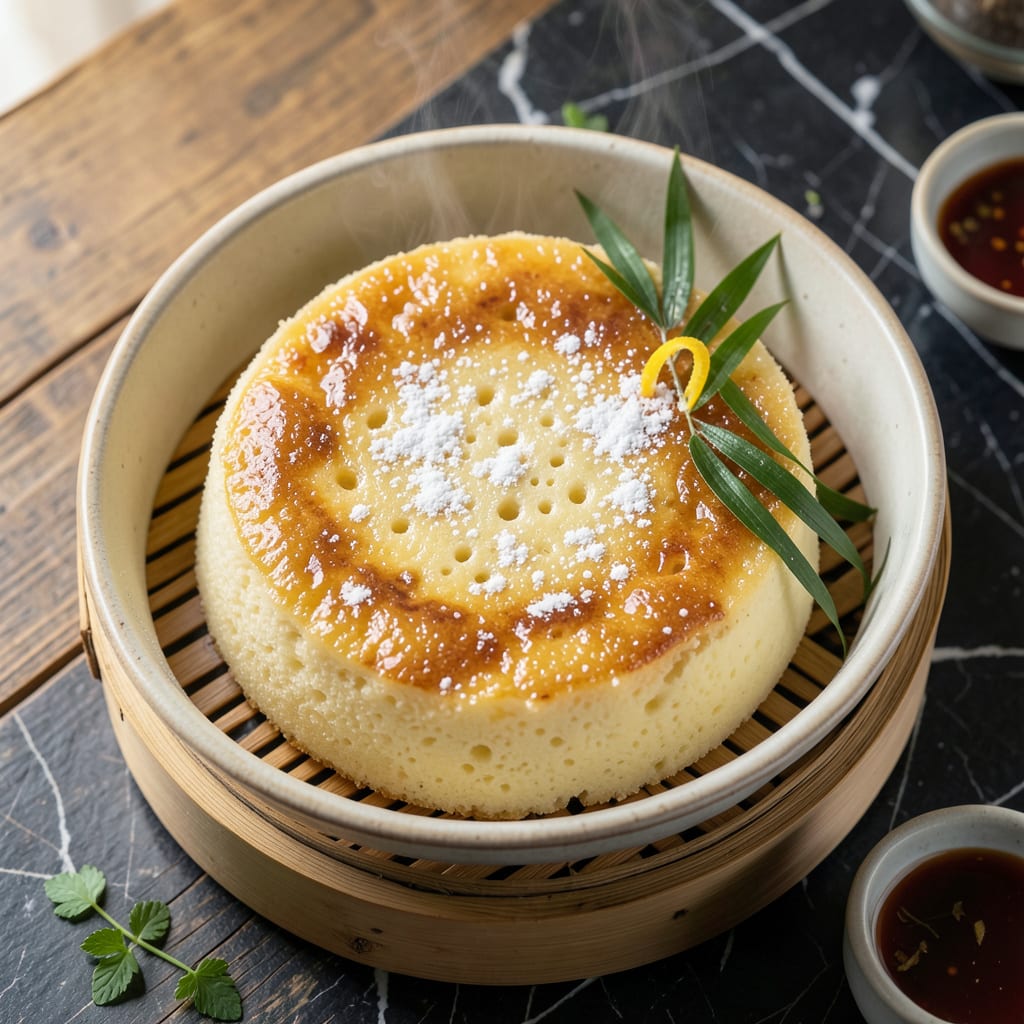
This Cantonese classic delivers a silky, cloud-like texture that melts in your mouth. The secret lies in precise steaming and a simple ratio of eggs to liquid.
What emerges is a lightly sweet, smooth cake with a delicate jiggle—perfect as a light dessert or afternoon treat. The method is straightforward but rewards attention to detail.
Ingredients for Chinese Steam Egg Cake
A handful of pantry staples transforms into this delicate, jiggly Cantonese delight with minimal effort.
| Ingredient | Amount | Notes |
|---|---|---|
| Large Eggs 🥚 | 6 whole | Room temperature, fresh |
| Granulated Sugar 🍚 | ½ cup | Adjust for sweetness preference |
| Whole Milk 🥛 | 1 ½ cups | Warmed slightly for better incorporation |
| Cake Flour 🌾 | ¾ cup | Sifted for smooth texture |
| Vanilla Extract 🌿 | 1 tsp | Pure for best flavor |
| Baking Powder 🧂 | 1 tsp | Ensures light rise |
| Salt 🧂 | ¼ tsp | Balances sweetness |
| Vegetable Oil 🫒 | 2 tbsp | Neutral flavor for cake |
| Water 💧 | 2 cups | For steaming bath |
| Sesame Seeds 🌰 | 1 tsp | Toasted, for garnish |
The eggs are critical here—fresh, large, and at room temperature ensure the smoothest texture. Organic or free-range often yields richer color and flavor. For the milk, whole milk provides the creamiest result, but 2% works in a pinch (avoid skim). Cake flour is non-negotiable for that cloud-like quality; all-purpose will yield a denser crumb.
No cake flour? All-purpose plus 2 tbsp cornstarch per cup gets you close. Out of vanilla? Almond extract at half the quantity adds a nice depth. For a lighter version, swap milk for coconut milk—it adds a subtle tropical note. The sugar can be reduced by 25% if you prefer less sweetness, but don’t omit it entirely—the cake needs structure.
This keeps beautifully for 2-3 days at room temperature, sealed. For longer storage, refrigerate for up to 5 days—just warm slices briefly in the microwave. The batter can be prepped a day ahead; cover and chill until ready to steam.
Why You’ll Love This Recipe
- One-Bowl Wonder: I just dump eggs, sugar, milk, and flour in one bowl—no mixer, no fuss, and it still turns out light and fluffy every time.
- Breakfast or Dessert: Honestly, I serve it warm for breakfast with tea or chilled as a dessert—it’s that versatile.
- Budget-Friendly Batch: Five simple ingredients, most of which I already have, and it makes enough to feed my family for days without breaking the bank.
Step-by-Step Instructions for Chinese Steam Egg Cake
This traditional Cantonese technique yields a delicate, jiggly cake with a velvety texture.
Step 1: Prepare the Steaming Bath
Fill a large pot with the 2 cups water and bring to a rolling boil over high heat. Choose a pot wide enough to accommodate your cake pan with at least 1 inch of clearance on all sides.
Place a steamer rack or heatproof plate upside-down in the pot to create a stable platform for your pan. The water level should be 1-2 inches below the rack—this prevents boiling water from touching the pan and overcooking the base.
Cover the pot with a tight-fitting lid to allow the steam to build while you prepare the batter. This advance prep ensures your steamer is ready the moment your batter is mixed.
Step 2: Whisk Wet Ingredients to Ribbon Stage
In a large mixing bowl, combine the 6 whole Large Eggs and 0.5 cup Granulated Sugar. Using a whisk or electric mixer, beat on high speed for 3-4 minutes until the mixture triples in volume and forms pale, thick ribbons.
With the mixer running on low speed, slowly pour in the 1.5 cups Whole Milk and 2 tbsp Vegetable Oil. Add the 1 tsp Vanilla Extract and continue mixing for 30 seconds until fully incorporated.
The mixture should be smooth, glossy, and slightly frothy. This extended whisking incorporates air, which creates the cake’s signature light and airy texture.
Step 3: Fold in Dry Ingredients Gently
Sift the 0.75 cup Cake Flour, 1 tsp Baking Powder, and 0.25 tsp Salt together into a separate bowl. This sifting step breaks up any lumps and ensures even distribution of leavening agents.
Gradually add the dry mixture to the wet ingredients in three additions, folding gently with a spatula after each. Mix just until no streaks of flour remain—overmixing will deflate the air you worked so hard to incorporate.
The batter should be thin and pourable, similar to heavy cream. Pour it through a fine-mesh strainer into your prepared pan to eliminate any remaining lumps for a perfectly smooth final texture.
Step 4: Steam to Silky Perfection
Place your cake pan on the prepared rack in the steamer. Cover with the lid and steam over medium-low heat for 25-30 minutes. The heat should be consistent but not aggressive—too high will cause the cake to rise too quickly and collapse.
Check for doneness by inserting a toothpick into the center—it should come out clean with no wet batter clinging. The surface will appear set with a slight jiggle when gently shaken, indicating the ideal custard-like consistency.
Avoid opening the lid during the first 20 minutes, as the sudden temperature change can cause the cake to deflate. The steam should be visible but not escaping forcefully from the pot.
Step 5: Cool and Garnish Before Serving
Carefully remove the pan from the steamer and let the cake cool in the pan for 10 minutes. This resting period allows the structure to set completely before unmolding.
Run a thin knife around the edges to loosen, then invert onto a serving plate. While still warm, sprinkle the 1 tsp Sesame Seeds evenly over the top, pressing lightly so they adhere.
Let the cake cool completely to room temperature before slicing. The texture will continue to set as it cools, achieving the characteristic silky-smooth consistency that makes this Cantonese dessert so beloved.
Pro Tips For Making Chinese Steam Egg Cake
- Preheat the Steamer: Always bring the water in your steamer to a full rolling boil before adding the cake batter—I learned this the hard way after my first few cakes came out dense and gummy.
- Sift the Flour: Cake flour clumps easily, so sift it before mixing to avoid lumps in your batter that can ruin the texture.
- Skip Cold Ingredients: Use room-temperature eggs and milk for a smoother batter that steams evenly—cold ingredients can make the cake crack.
- Cover with Cloth: Drape a clean kitchen towel over the steamer lid to catch condensation drips that can leave water spots on your cake.
Make-Ahead Tips for Leftovers
Batter Prep Ahead
You can mix the batter the night before and store it in the fridge for up to 12 hours. Just cover the bowl tightly with plastic wrap and whisk for 30 seconds before steaming to reincorporate air. This makes morning prep effortless. ⏰
Steam and Store
Once cooled completely, this cake keeps beautifully at room temperature for 2-3 days. Wrap it in cling film or place in an airtight container to maintain its silky texture. The flavors deepen slightly overnight.
Refrigeration Tips
For longer storage, refrigerate for up to 5 days. Bring slices to room temperature before serving, as cold dulls the delicate flavors. A 10-second microwave burst can restore warmth without drying it out.
Freezing Guidelines
Slice before freezing and wrap individual pieces in parchment paper, then freezer bags. Thaw overnight in the fridge. Re-steam for 3-5 minutes to revive the jiggly texture. This works for up to 1 month.
Reheating Methods
Steaming is the best way to refresh this cake. Use a bamboo steamer over simmering water for 5-7 minutes until warmed through. Avoid direct microwave heating, which can make the texture rubbery.
Serving Temperature
This dessert tastes best at room temperature or slightly warm. If serving chilled, let it sit out for 15-20 minutes first. The sesame seed garnish adds texture even when served cold. 💫
Nutrition Facts
Frequently Asked Questions
What pan size works best?
A 9-inch round cake pan or similar size fits most steamers perfectly. Avoid springform pans, as steam can seep through the seam. Line the bottom with parchment for easy removal.
Why did my cake collapse after steaming?
This usually happens if the lid was opened too soon or the heat was too high. Keep the lid closed for the full 25-30 minutes and maintain medium-low heat for even cooking.
Can I use a different flour?
Cake flour is ideal, but in a pinch, use all-purpose plus 2 tbsp cornstarch per cup. Avoid bread flour, as its high protein content will make the cake dense rather than silky.
How do I know when it’s done?
Insert a toothpick into the center—it should come out clean. The surface will look set with a slight jiggle when gently shaken, indicating the perfect custard-like texture.

- 6 Egg Cake Recipe with Oil: Light as Air With Buttery Moisture - October 4, 2026
- 4 Bean Casserole Recipe: One-Pan Heartiness With Smoky Paprika Depth - October 4, 2026
- 3-Ingredient Keto Mug Cake Recipe: Microwave Magic in 2 Minutes - October 4, 2026