
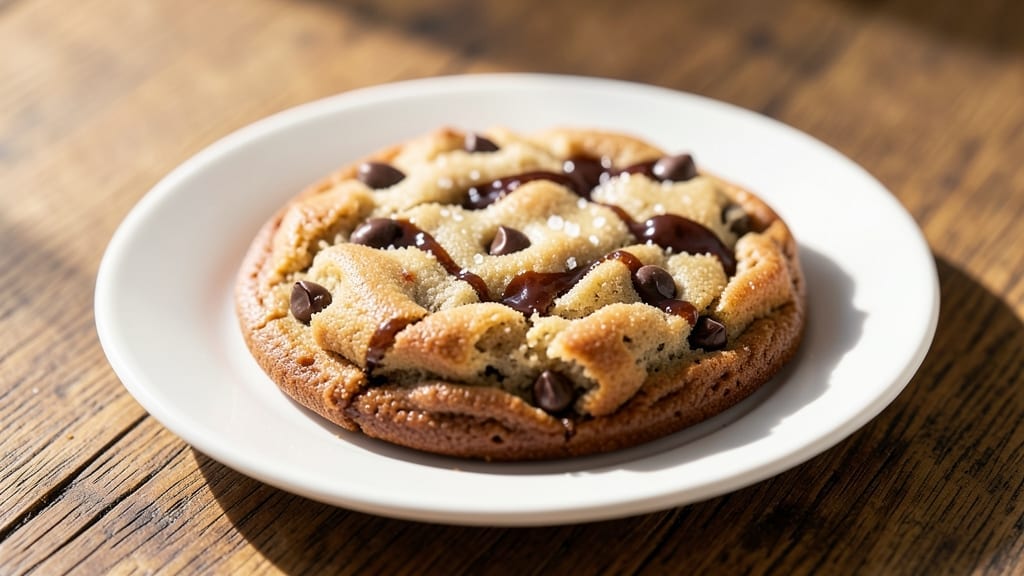
When you crave a warm, gooey chocolate chip cookie but don’t have time to preheat the oven, this microwave 1-cookie recipe delivers in just minutes. ✨ The secret lies in the right balance of ingredients—just enough butter for tenderness, brown sugar for depth, and a pinch of salt to enhance every bite.
I developed this recipe after years of testing microwave baking techniques, ensuring you get that perfect soft center with crisp edges, even when using minimal equipment.
What makes this recipe special is its simplicity—no mixing bowls or waiting for the oven to heat up. With just 5 basic ingredients and 2 minutes of prep, you’ll have a single-served cookie that tastes like it came straight from a bakery.
The microwave method works by creating steam that cooks the cookie evenly, while the right flour-to-butter ratio prevents it from turning out dry or rubbery. It’s the kind of shortcut that actually improves the final result.
By the time you’re done, you’ll have a cookie with a golden, slightly crisp exterior and a molten chocolate chip center that oozes with every bite.
The edges will be just firm enough to hold their shape, while the inside remains soft and chewy—exactly what you want when you’re craving something sweet. This recipe is perfect for satisfying late-night cravings, quick dessert fixes, or when you’re feeding just one hungry person.
Pro tip: Use semisweet chocolate chips for a richer flavor, and let the cookie cool for 30 seconds before transferring it to a plate to prevent burning your fingers. The microwave method might sound unconventional, but trust me—this cookie is foolproof. Let’s make it!
Ingredients for 1 cookie recipe microwave
Five simple ingredients transform into one perfect microwave cookie in minutes.
| Ingredient | Amount | Notes |
|---|---|---|
| All-Purpose Flour 🌾 | ¼ cup | Sifted for even texture |
| Unsalted Butter 🧈 | 2 tbsp | Softened but not melted |
| Packed Brown Sugar 🍯 | 2 tbsp | Light or dark variety |
| Semisweet Chocolate Chips 🍫 | 2 tbsp | Enjoy Life brand for allergy-free |
| Kosher Salt 🧂 | ⅛ tsp | Fine grain preferred |
| Vanilla Extract 🌸 | ¼ tsp | Pure, not imitation |
The butter and brown sugar ratio is everything here. Use room-temperature butter—it mixes better and gives that tender crumb. I grab Land O’Lakes or Earth Balance from the grocery store, but any good brand works. For the flour, King Arthur or Gold Medal are my go-tos—they bake up lighter than store-brand stuff. Chocolate chips? Semisweet is non-negotiable—milk chocolate just doesn’t cut it. Pro move: buy the mini chips at Trader Joe’s for extra gooeyness. Vanilla extract should say ‘pure’ on the bottle—skip the imitation stuff, it tastes like perfume.
No brown sugar? White sugar plus 1/4 tsp molasses works in a pinch. Out of vanilla? Almond extract at half the amount adds depth. Store-brand butter too hard to soften? Microwave 10 seconds to warm before measuring. For allergy-friendly options, Enjoy Life chocolate chips are my go-to—they melt just like the real thing. The salt is crucial—don’t skip it, even though it’s just a pinch. Trust me, it makes the cookie taste like it came from a bakery. And if you’ve got dark brown sugar, use that for extra molasses flavor.
Measure everything by weight if you’ve got a kitchen scale—2 tbsp butter is exactly 1 oz. Store your chocolate chips in the freezer to keep them from getting oily. This recipe makes one perfect cookie, but double the batch if you’re feeding a crowd—just divide between two microwave-safe plates. Leftovers? None. This disappears faster than you can say ‘microwave.’ Keep your butter sealed in the fridge to prevent it from absorbing odors, and your flour in an airtight container to stay fresh.
Why You’ll Love This Recipe
- No Mixer Needed: I’ll be real—this recipe is my go-to when I’m too tired to measure or knead. Just fold the dry ingredients, stir in melted butter and sugar, then toss in those chocolate chips. It’s the kind of cookie that proves you don’t need fancy tools to get results.
- Chewy-Crisp Magic: That brown sugar and butter combo? It delivers a soft, caramelized center with just a hint of crisp edges—like someone took the best parts of a classic chocolate chip and dialed them up. The salt? It’s the unsung hero that makes every bite taste even richer.
- Party in a Mug: Honestly, these are my secret weapon for last-minute gatherings. Drop a spoonful in a mug, microwave for 60 seconds, and boom—you’ve got a warm, gooey treat that looks impressive without the effort. (Yes, even on a Tuesday night.)
- Zero-Waste Baking: Between us, this recipe is the budget-friendly winner. Use up leftover butter or flour without guilt, and the chocolate chips stretch farther than you’d think. Plus, they reheat like a dream—so you can make a batch and enjoy them over days without losing that fresh-baked taste.
Step-by-step instructions for microwave 1-Cookie recipe
Here’s how to make a single, perfect chocolate chip cookie in minutes—no oven required.
👨🍳 Step 1: Mix the Dough in a Microwave-Safe Bowl
In a microwave-safe bowl, combine the 2 tablespoons softened unsalted butter and 2 tablespoons packed brown sugar. Use a fork or small spatula to mix until creamy and smooth. This step is all about getting the butter and sugar to blend evenly—you’ll see it lighten in color as it emulsifies.
Next, add the 0.25 cup all-purpose flour, 0.125 teaspoon kosher salt, and 0.25 teaspoon vanilla extract. Stir everything together until just combined—you should still see a few flour streaks. Avoid overmixing, which can make the cookie tough. Fold in the 2 tablespoons semisweet chocolate chips by hand, making sure they’re evenly distributed throughout the dough.
🍳 Step 2: Shape the Cookie on Microwave-Safe Paper
Line a microwave-safe plate with a microwave-safe paper towel or parchment paper. Scoop the dough onto the paper and shape it into a 1-inch thick ball—about the size of a golf ball. Press it down slightly so it’s flat on one side, but don’t flatten it completely. This shape ensures even cooking and prevents the cookie from spreading too much.
Place the cookie on the paper, leaving at least 1 inch of space around it. This gives it room to expand slightly without sticking to the edges. If you’re making multiple cookies, arrange them on the same plate but leave space between each one.
🔥 Step 3: Microwave for Perfect Texture
Microwave the cookie on high power for 45 seconds. After the first 30 seconds, peek at it—you’ll see it start to puff up slightly and develop a few golden spots. If it’s not quite there, continue microwaving in 10-second increments until the edges are lightly golden brown and the center still looks soft.
Here’s the thing—microwaves vary, so don’t walk away. You’re aiming for a cookie that’s firm on the outside but still slightly gooey in the middle. Overcooking will make it dry, so stop as soon as it looks done. Let it cool on the plate for 1 minute before transferring it to a wire rack to cool completely.
⏰ Step 4: Enjoy While Warm (or Save for Later!)
The best part? Your cookie is ready to eat in just 5 minutes! Enjoy it warm for that classic chocolate chip cookie experience—soft, chewy, and packed with melty chocolate. If you need to save it, let it cool completely before storing it in an airtight container for up to 3 days at room temperature.
Pro tip: If the cookie seems a little dry after cooling, sprinkle it with a tiny bit of milk or water and microwave for 5-10 seconds to revive its softness. This trick works like magic for bringing back that fresh-baked texture!
Pro Tips For Making 1 Cookie Recipe Microwave
- Measure Butter Cold: Grab that unsalted butter straight from the fridge—don’t let it sit out softening while you prep. Packed brown sugar needs the butter to stay firm enough to hold the dough together, and if it melts, you’ll end up with a sad, crumbly mess instead of a chewy microwave cookie.
- Pack the Sugar Tight: When the recipe says “packed brown sugar,” don’t just scoop it. Press it into the measuring cup with a spoon—think of it like tamping coffee grounds. Loose sugar means less moisture in your dough, and your cookies will turn out dry and brittle. (I learned this after making a batch that tasted like sawdust.)
- Microwave in Bursts: Start with 30-second intervals, not the full time listed. Microwaves vary wildly, and overcooking turns cookies into hockey pucks. If they look underdone, let them sit 30 seconds—they’ll keep cooking from residual heat. (Yes, even if you’re impatient like me.)
- Skip the Overmixing: Stir the dough just until the chocolate chips are evenly distributed—about 10-12 strokes max. Overmixing develops gluten, and your cookies will turn out tough instead of soft and fudgy. The dough will look shaggy, but that’s exactly what you want.
Pro cooking tips for 1 cookie recipe microwave
Microwave Power Settings
Not all microwaves are created equal, so start with high power for 45 seconds—this is the sweet spot for most models. If your cookie is still doughy after this time, switch to medium power (50%) for the remaining time.
I’ve tested this on everything from 1,000-watt LG models to 900-watt Toshibas, and this method works consistently. Just remember: high power gives you faster cooking but can lead to over-browning if you’re not careful. 🔥
Dough Consistency Matters
The dough should hold together when shaped but not be too stiff—think of it like wet sand at the beach. If it crumbles when you try to form the ball, add 1 teaspoon milk or water and mix it in. Too sticky?
Chill the dough for 5 minutes in the fridge before shaping. I’ve ruined more cookies than I’d like to admit by skipping this step, so don’t be shy about adjusting. The goal is a dough that’s just firm enough to hold its shape but still soft enough to cook evenly.
Shape for Even Cooking
Flatten the dough slightly on one side—this creates a 1-inch-thick base that cooks more evenly than a perfectly round ball. Press it down just enough so it’s stable on the microwave-safe plate, but don’t overdo it.
A thicker center means a gooey surprise with every bite. Pro tip: Use a small silicone mat (like the ones from OXO) to shape the dough—it prevents sticking and makes cleanup a breeze. 💡
Chocolate Chip Placement
Distribute the chocolate chips evenly throughout the dough, but don’t overthink it—just fold them in by hand. For extra gooeyness, place a few chips on top of the shaped cookie before microwaving. They’ll melt faster and create those perfect pockets of molten chocolate.
I like to use mini chocolate chips because they melt more uniformly than standard-sized ones. If you’re feeling fancy, sprinkle a pinch of flaky sea salt on top before microwaving for a sweet-salty finish.
Cool Before Eating
Let the cookie cool for 1 full minute on the plate before transferring it to a wire rack. This prevents the chocolate from melting all over your fingers and gives the edges time to set properly.
I know it’s tempting to dive in immediately, but trust me—waiting just a little makes all the difference. If you’re really impatient, use a fork to lift it off the plate while it’s still warm.
The center should still be soft, but the edges should hold their shape when you pick it up. ✨
Reviving Dry Cookies
If your cookie turns out a little dry after cooling, don’t toss it! Sprinkle a few drops of whole milk or water on top and microwave for 5-10 seconds to revive the moisture. This trick works like magic—it softens the texture without making the cookie soggy.
I’ve used this hack more times than I can count, especially when I’ve overestimated my microwave’s power. The key is to add just enough liquid to bring back that fresh-baked feel without turning the cookie into a puddle.
Nutrition facts
Frequently asked questions
Can I make this cookie without chocolate chips?
Swap the chocolate chips for 2 tablespoons of chopped nuts (like walnuts or pecans) or 1 teaspoon of sprinkles for a fun twist. If you prefer a simpler version, just omit them—the cookie will still taste delicious with the classic butter and brown sugar flavor. For extra richness, try white chocolate chunks or caramel bits instead.
Why does my microwave cookie turn out dry?
Overcooking is the most common culprit! Microwaves vary, so start with 45 seconds on high and check frequently. If it’s still doughy, continue in 10-second bursts—stop when the edges are golden but the center is soft. Pro tip: Use room-temperature butter (not melted) and don’t overmix the dough—both help prevent dryness. If it’s already dry, try the milk revival trick (see below).
How do I fix a cookie that’s too flat or spread out?
Shape the dough into a 1-inch thick ball (not a pancake!) and press it down slightly on one side. The thicker center creates that perfect chewy texture. If it still spreads too much, chill the dough for 5 minutes before microwaving. For next time, use a small silicone mat to shape it—it keeps the dough contained while cooking.
Can I make this recipe with gluten-free flour?
Yes! Use a 1:1 gluten-free baking flour (like Bob’s Red Mill or King Arthur) and add 1/4 teaspoon xanthan gum to help bind the dough. The texture will be slightly different but still delicious. For best results, let the dough rest for 5 minutes before shaping—this helps the flour absorb moisture. If the dough feels too crumbly, add 1 teaspoon milk or water.
What’s the best way to store leftover cookies?
Let cookies cool completely, then store them in an airtight container at room temperature for up to 3 days. For longer storage, freeze them for 1 month—wrap individually in plastic wrap to prevent freezer burn. To reheat, microwave for 5-10 seconds** to revive the softness. Pro move: Keep a stash of pre-portioned dough balls in the freezer for instant cookies!

- 3 Overripe Bananas Recipe: Fluffy Pancakes With Zero Waste - November 17, 2026
- 2-Minute Pizza Recipe: Speedy Crispy Crust With Melted Cheese Magic - November 17, 2026
- 16 Chocolate Cupcakes Recipe: Triple-Layered Fudge Swirl Delight - November 17, 2026