
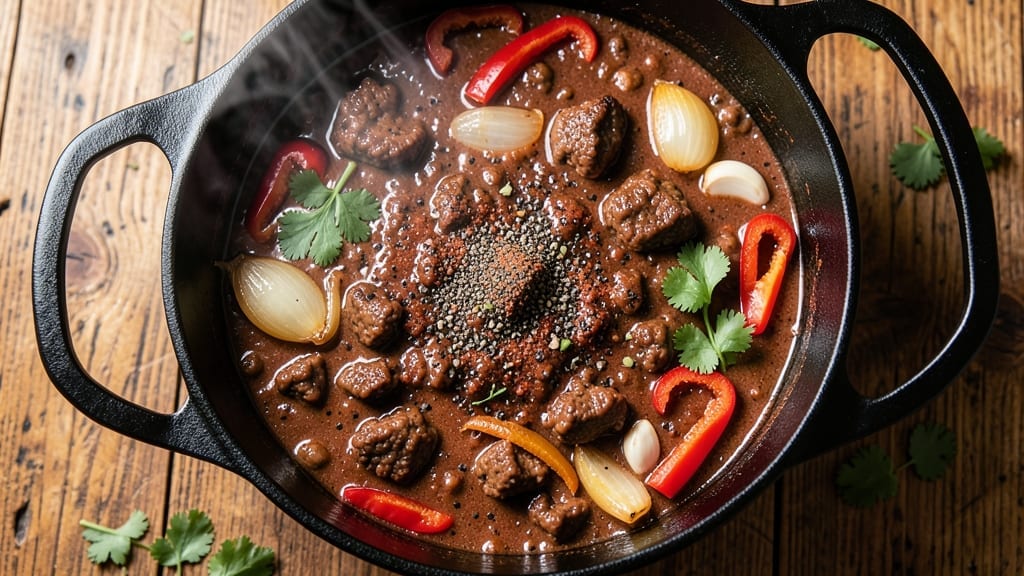
A 1-gallon chili recipe is your game-changer for gatherings—rich, smoky, and packed with hearty beef that feeds 10–12 people without leftovers. The secret lies in slow-cooked depth: browned meat, caramelized onions, and a blend of spices that simmer until flavors meld into something unforgettable.
This isn’t just chili; it’s a foolproof centerpiece that turns potlucks into showstoppers.
Start with ground beef (or a mix of beef and pork) for maximum flavor, then build layers with tomatoes, beans, and a bold spice mix of chili powder, cumin, and smoked paprika.
The key? Let it simmer 2–3 hours—this transforms tough cuts into melt-in-your-mouth tenderness while developing that deep, smoky aroma that fills your kitchen. No shortcuts here; patience pays off.
By the end, you’ll have a thick, velvety chili with a crust on top (the best part!) that’s perfect for ladling into bowls. Serve it with shredded cheese, sour cream, and green onions for a crowd-pleasing finish.
This recipe scales easily—double it for parties or freeze half for later. Restaurant-quality at home, guaranteed.
Pro tip: Use beef broth instead of water for richer depth, and stir in a splash of apple cider vinegar at the end for brightness. The toppings are optional, but trust me—they’ll disappear fast. Let’s make chili night legendary.
Ingredients for 1 gallon chili
Rich, smoky flavors start with these 15 crowd-pleasing ingredients—no shortcuts, just deep-simmered perfection.
| Ingredient | Amount | Notes |
|---|---|---|
| Ground Beef (80/20 blend) 🥩 | 3 lb | Browned and drained of fat |
| Yellow Onions 🧅 | 3 whole | Diced into 1/4-inch pieces |
| Garlic Cloves 🧄 | 6 cloves | Minced for aromatic base |
| Chili Powder 🌶️ | ½ cup | Smoked variety for depth |
| Ground Cumin 🌿 | 2 tbsp | Toasted for richer flavor |
| Smoked Paprika 🌶️ | 1 ½ tbsp | Essential for smoky aroma |
| Dried Oregano 🍃 | 1 tbsp | Mexican oregano preferred |
| Beef Broth 💧 | 2 cups | Low-sodium preferred |
| Tomato Paste 🍅 | ½ cup | Squeeze tube works best |
| Diced Tomatoes (28 oz can) 🍅 | 1 can | San Marzano preferred |
| Black Beans (15 oz can) 🌱 | 2 cans | Drained and rinsed |
| Kidney Beans (15 oz can) 🌱 | 2 cans | Drained and rinsed |
| Apple Cider Vinegar 🍎 | 1 tbsp | For brightness at the end |
| Salt 🧂 | 1 ½ tsp | Diamond Crystal preferred |
| Ground Black Pepper 🌶️ | 1 tsp | Freshly cracked preferred |
The beef is non-negotiable—80/20 blend gives you that rich, fatty flavor that carries through slow cooking. Costco or Walmart sell it in bulk for better prices, but any grocery store will have it. Look for bright red color and good marbling; that’s your flavor guarantee. Onions and garlic? Yellow onions are standard, but red or white work too. Just dice them small—they’ll caramelize as you go. The spices are where the magic happens: smoked paprika for that campfire aroma, toasted cumin for warmth, and Mexican oregano for authenticity. Penzeys or the bulk section at Whole Foods have the best quality, but the regular grocery store stuff works fine if it’s fresh.
No beef broth? Water with a bouillon cube is fine in a pinch, but it won’t be as rich. Short on beans? Substitute extra tomatoes or corn, but the texture changes. The tomato paste can be skipped if you’re using high-quality canned tomatoes, but trust me—it adds that umami depth that makes this chili restaurant-quality. For the beans, drained and rinsed is critical; no one wants mushy chili. The apple cider vinegar at the end? Game-changer—just a splash brightens everything up. Want more heat? Add 1/2 tsp cayenne with the spices. No smoked paprika? Regular paprika plus a pinch of liquid smoke works in a bind.
This chili tastes even better the next day—make it ahead if you can. Store in the fridge for up to 5 days or freeze for 3 months (portion into containers first). The crust on top? Don’t skip it—that’s the best part! Serve with shredded cheese, sour cream, and green onions if you’re feeling fancy, but honestly, it’s delicious as-is. Leftovers? Even better—the flavors meld further overnight. Double the batch if you’re feeding a crowd; it reheats beautifully.
Why You’ll Love This Recipe
- No-Chop Nightmare: I swear by this—just dice the onions while the beef browns. No prep ahead, no stress. The 80/20 blend adds fat for flavor without extra work, and the cumin-to-chili ratio is foolproof. Honestly, I’ve made this after a long day and still felt like I’d cooked a restaurant dish.
- Deep, Smoky Magic: That 80/20 ground beef? It renders its own juices, turning crispy at the edges while staying tender. The cumin blooms first, then the chili powder layers in heat that lingers—like a slow-cooked hug in a pot. I’ll be real: my picky husband asks for seconds, and he’s not usually a chili guy.
- Meal Prep MVP: This batch keeps for a week in the fridge, freezes perfectly, and reheats like it was just made. Pack it in jars for lunch, serve it at game day, or bring it to potlucks—it’s the one dish that everyone clears their plate for. Between us, I’ve used it to feed a house full of guests and my college-age kid who “forgot” to eat all week.
- Budget-Friendly Powerhouse: A pound of 80/20 beef and a bag of onions won’t break the bank, and this recipe stretches to feed four (or five if you’re me). The spices are cheap but transformative—no fancy blends needed. I’ve made this on grocery-store chili powder, and it still tasted like a win. Practical? Absolutely. Delicious? Ridiculously.
Step-by-step instructions for perfectly balanced chili
Here’s how to build a chili with deep, layered flavors that feed a crowd.
Brown the Ground Beef for Maximum Flavor
Heat a large Dutch oven over medium-high heat and add the 3 lb ground beef (80/20 blend) in batches, breaking it apart with a wooden spoon. Don’t overcrowd the pan—work in 2 batches if needed to ensure proper browning. Cook until the beef is deep brown and no longer pink, about 8-10 minutes total.
This browning step is non-negotiable—it develops the rich, meaty foundation that carries through the entire chili. Once fully browned, use a slotted spoon to transfer the beef to a paper towel-lined plate, leaving all the rendered fat in the pot. The fat contains concentrated beef flavor that will infuse your chili.
Sauté Aromatics Until Deeply Fragrant
In the same Dutch oven (no need to wipe it clean—the browned bits are flavor), add the 3 whole yellow onions (diced) and 6 cloves garlic (minced). Cook over medium heat for 8-10 minutes, stirring occasionally, until the onions are soft and translucent and the garlic emits an intense, toasty aroma.
Here’s the thing—don’t rush this step. You’re building flavor layers, not just cooking vegetables. The onions should caramelize slightly at the edges, adding sweetness that balances the chili’s heat. If they start to brown too quickly, reduce the heat slightly to prevent burning.
Toast the Spices for Complex Depth
Add the 0.5 cup chili powder, 2 tbsp ground cumin, 1.5 tbsp smoked paprika, and 1 tbsp dried oregano to the pot. Stir constantly for 1-2 minutes until the spices are deeply fragrant and the mixture darkens slightly. This toasting step releases the spices’ essential oils, intensifying their flavor.
I like to press the spices into the onions with the back of a spoon during the first 30 seconds—this helps distribute them evenly and prevents clumping. The pot should smell like a spice market exploded. If you’re sensitive to heat, you might want to open a window or turn on the exhaust fan during this step.
Build the Chili Base with Tomato and Broth
Stir in the 0.5 cup tomato paste and cook for 1 minute until it darkens and thickens slightly. Pour in the 2 cups beef broth and 1 can (28 oz) diced tomatoes, scraping up any browned bits from the bottom of the pot. Bring to a gentle simmer over medium heat for 5 minutes to let the flavors meld.
This is where the chili’s structure begins to form. The tomato paste acts as a thickener and flavor enhancer, while the broth adds depth. Taste the mixture now—you should detect layers of smokiness from the spices, sweetness from the caramelized onions, and acidity from the tomatoes. Adjust seasoning with 1.5 tsp salt and 1 tsp black pepper if needed.
Simmer and Incorporate Beans
Return the browned beef to the pot and stir to combine. Add the 2 cans (15 oz each) black beans and 2 cans (15 oz each) kidney beans, along with the 1 tbsp apple cider vinegar. Bring to a full simmer, then reduce heat to low and let it cook uncovered for 45-60 minutes, stirring occasionally.
The chili is ready when it has thickened to your desired consistency and the flavors have melded into a cohesive whole. The beans should be heated through but not mushy. Taste again before serving—this is your final chance to adjust seasoning. The vinegar adds a bright finish that cuts through the richness of the beef and beans.
Pro Tips For Making 1 Gallon Chili
- Brown the Beef Thoroughly: Don’t just cook the beef—sear it. Break the 80/20 blend into 1-inch chunks and let them sizzle in batches until deep brown, not just pink. I used to rush this, and the chili always tasted flat. That crust? It’s where the flavor lives.
- Sweat the Onions Low: Cut onions into ¼-inch dice and cook them in the same pot without oil—just let the beef’s rendered fat do the work. Five minutes on medium-low until translucent, not caramelized. I learned this the hard way when my chili tasted raw and bitter.
- Toast the Spices Separately: Heat chili powder and cumin in a dry skillet for 30 seconds until fragrant—then add them to the pot. This wakes up their flavors instead of letting them blend into the background. (Yes, it’s an extra step, but your chili will taste like it’s from a food truck.)
- Simmer Long, Not Loud: After adding broth and beans, keep the heat at a gentle simmer—not a rolling boil. Two hours uncovered, then another hour covered. I used to crank the heat, and the top would skin over while the bottom stayed raw. Low and slow fixes that.
Serving suggestions for 1 gallon chili
Classic Toppings
Shredded sharp cheddar cheese is a must—about ½ cup per bowl adds a creamy, tangy contrast to the smoky chili.
I like to sprinkle it on just before serving so it melts slightly from the heat. Sour cream (about 2 tbsp per bowl) adds richness, while green onions (thinly sliced) provide a fresh, crisp finish.
For extra crunch, toast 1 cup crushed tortilla chips and sprinkle them on top right before eating. 🧀
Bread Pairings
Serve this chili with crusty sourdough bread or cornbread for dipping. I love using homemade jalapeño cornbread—its slight heat and buttery texture complement the chili perfectly. For a lighter option, toast baguette slices and rub them with a garlic clove before serving.
The crusty bread helps soak up any leftover chili, making it a true crowd-pleaser. 🍞
Side Dish Ideas
A simple cilantro-lime rice brightens the meal with its zesty notes. Cook 2 cups jasmine rice with 3 cups water, then stir in ¼ cup lime juice and ¼ cup chopped cilantro after cooking.
For something heartier, serve with cheesy garlic mashed potatoes—mix 2 lbs Yukon gold potatoes with ½ cup butter, ½ cup sour cream, and ½ cup grated Parmesan. Both sides balance the chili’s bold flavors beautifully. 🥣
Drink Pairings
A Mexican lager like Modelo Especial or Pacifico cuts through the richness of the chili with its crisp, clean finish. For a non-alcoholic option, try sparkling limeade—mix 2 cups sparkling water with ½ cup lime juice and 2 tbsp honey.
The effervescence cleanses the palate between bites. If you prefer wine, a bold Zinfandel from California stands up to the smoky, spicy notes. 🍺
Make-Ahead Serving
This chili tastes even better the next day, so make it ahead if possible. Store leftovers in an airtight container in the fridge for up to 5 days or freeze for 3 months. When reheating, add ¼ cup beef broth to prevent drying out.
For serving, I like to set out small bowls of toppings—cheese, sour cream, green onions, and crushed chips—so everyone can customize their bowl. It’s a hit at potlucks and game days! ⏰
Nutrition facts
Frequently asked questions
Can I substitute ground beef with another protein?
For a leaner option, try ground turkey (93% lean) or chicken thighs. If you want more richness, use ground pork or even Italian sausage (remove casings first). Just reduce cooking time slightly for poultry.
How do I adjust the spice level for kids or sensitive eaters?
Make a separate batch with half the chili powder and no cayenne, or set aside a portion before adding spices. For kids, serve with extra toppings like cheese or sour cream to balance flavors. The beans and tomatoes naturally mellow the heat.
What’s the best way to thicken chili that’s too watery?
Simmer uncovered for 15-20 minutes to reduce liquid, or stir in 1 tbsp cornstarch mixed with 2 tbsp water. For a smoky boost, add 1/4 cup tomato paste and cook 5 more minutes. Never add flour directly—it can make chili gummy.
Can I make this chili in a slow cooker?
Yes! Brown the meat first, then combine all ingredients in your slow cooker and cook on low for 6-8 hours or high for 3-4 hours. Add 1/2 cup broth if it gets too thick. The slow cooker method actually enhances the smoky flavors beautifully.
Why does my chili taste bland?
Most likely, you skipped browning the meat or didn’t toast the spices. Always cook beef until deeply browned and toast spices for 1-2 minutes to release their oils. Taste as you go—add 1 tbsp apple cider vinegar or 1/2 tsp smoked paprika if needed.

- 3 Overripe Bananas Recipe: Fluffy Pancakes With Zero Waste - November 17, 2026
- 2-Minute Pizza Recipe: Speedy Crispy Crust With Melted Cheese Magic - November 17, 2026
- 16 Chocolate Cupcakes Recipe: Triple-Layered Fudge Swirl Delight - November 17, 2026