
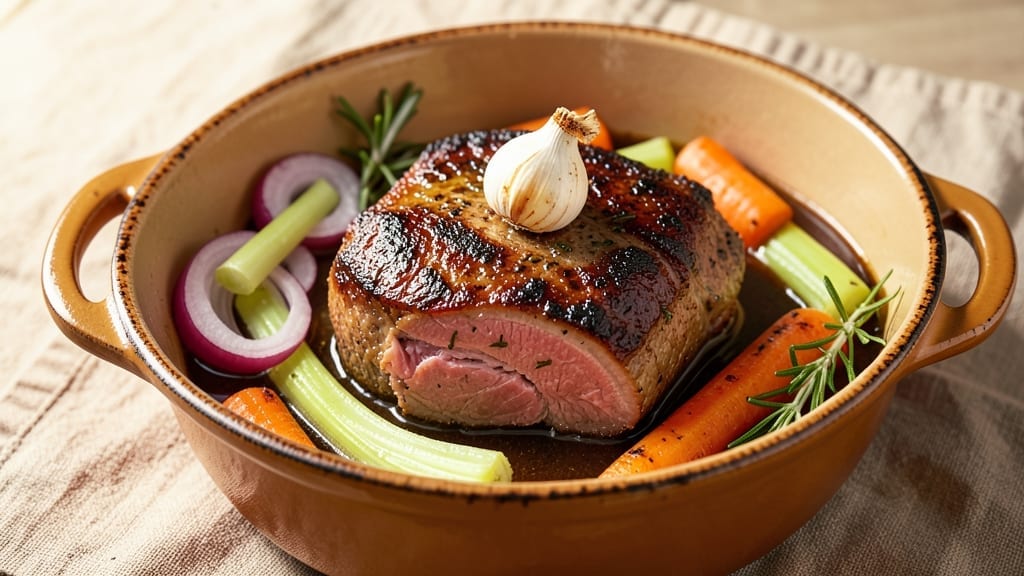
A 1 lb pot roast transforms tough cuts into melt-in-your-mouth perfection with the right technique—slow cooking develops deep flavor while keeping the meat tender through and through. The secret lies in proper seasoning and a moist environment that breaks down fibers without drying the surface.
I’ve perfected this method over years of testing, ensuring every bite delivers that satisfying contrast of crispy edges and succulent centers.
This recipe relies on a simple but effective approach: sear the roast first to lock in juices, then braise it low and slow with aromatics and liquid. The result is a dish that feels restaurant-quality yet requires minimal hands-on time.
Whether you’re feeding a family or treating yourself to a special meal, this method guarantees impressive results with minimal effort.
By the time it’s done, your pot roast will have a rich, caramelized crust that gives way to fork-tender meat. The cooking liquid reduces into a flavorful gravy that coats every bite, making this a complete meal in one pan.
Serve it with crusty bread, roasted vegetables, or mashed potatoes to soak up every last drop of that savory sauce.
The beauty of this recipe is its flexibility—use beef chuck roast for classic flavor or swap in pork shoulder for a different profile. The technique remains the same, delivering consistently tender results every time. Let’s get started on creating your perfect pot roast.
Ingredients for 1 lb pot roast
Tender beef meets aromatic vegetables and rich liquids for a restaurant-worthy pot roast.
| Ingredient | Amount | Notes |
|---|---|---|
| Beef Chuck Roast 🥩 | 1 lb | Tough cut, well-marbled preferred |
| Yellow Onion 🧅 | 1 whole | Sliced into wedges |
| Carrot 🥕 | 3 whole | Cut into 2-inch chunks |
| Celery Stalks 🌿 | 3 whole | Cut into 2-inch pieces |
| Garlic Cloves 🧄 | 4 cloves | Smashed, not minced |
| Beef Broth 💧 | 1 ½ cups | Low-sodium preferred |
| Red Wine 🍷 | ½ cup | Bold, dry variety |
| Tomato Paste 🍅 | 2 tbsp | Smooth, not chunky |
| Olive Oil 🫒 | 2 tbsp | High smoke point |
| Fresh Thyme 🌿 | 1 tbsp | Leaves only, stems removed |
| Fresh Rosemary 🌿 | 1 tbsp | Chopped sprigs |
| Salt 🧂 | 1 ½ tsp | Kosher or sea salt |
| Black Peppercorns 🌶️ | ½ tsp | Freshly cracked |
| All-Purpose Flour 🌾 | 1 tbsp | For gravy thickening |
The beef chuck roast is the star here—look for cuts with good marbling at your local butcher or Costco for the best quality. Well-marbled meat stays juicy while cooking. If your grocery store doesn’t carry chuck roast, pork shoulder works beautifully too. For the aromatics, fresh thyme and rosemary elevate the dish, but dried herbs at one-third the amount will work in a pinch. The red wine adds depth—any bold, dry variety like Cabernet Sauvignon or Merlot will do. If you prefer not to use alcohol, beef broth with a splash of balsamic vinegar works just as well.
No red wine? Dry white wine or extra beef broth keeps the dish flavorful. The tomato paste adds richness without overpowering—if you’re using a squeeze tube, two tablespoons will give you the same consistency. For the vegetables, baby carrots or pre-cut celery save time, but whole stalks work just fine. The garlic should be smashed, not minced, to prevent it from turning bitter. If you’re short on time, frozen vegetables can be used, though fresh will give you better texture. The flour for the gravy is optional but recommended for a thicker sauce—just make sure to whisk it into the reduced cooking liquid at the end.
This pot roast reheats beautifully—simply warm the meat and sauce together on the stove or in the oven. Store leftovers in an airtight container for up to 4 days in the fridge. For longer storage, freeze the roast and sauce together for up to 3 months. The flavors actually improve overnight as the meat continues to tenderize. I like to portion the sauce separately so I can drizzle it over rice or mashed potatoes as needed. The roast itself can be eaten straight or served with crusty bread to soak up every last drop of that savory sauce.
Why You’ll Love This Recipe
- One-Pot Magic: I swear by this—just toss the chuck roast, onions, carrots, and celery into a pot with broth, add the garlic, and walk away. No fancy prep, no extra dishes. Honestly, the hardest part is waiting for it to slow-cook.
- Umami Bomb: That beef chuck roast? It turns ridiculously tender with a deep, savory flavor—like a hug in a bowl. The onions and carrots caramelize just enough to add sweetness, while the garlic cloves? They melt into the meat, making every bite unforgettable.
- Leftover Hero: I make this on Sundays because it’s my secret weapon for the week. The roast keeps beautifully for days—perfect for sandwiches, salads, or reheating with a splash of gravy. (Yes, even on a Tuesday night.)
- Budget Win: A pound of chuck roast stretches further than you’d think, especially with veggies filling in. It’s cheaper than takeout but way more satisfying—plus, the leftovers feed me for half the week without breaking the bank.
Step-by-step instructions for 1 lb pot roast recipe
Master this classic technique for melt-in-your-mouth beef every time.
Sear the Roast for Maximum Flavor
Heat 2 tablespoons olive oil in a heavy Dutch oven over medium-high heat until shimmering. Pat the 1 lb beef chuck roast dry with paper towels—this is crucial for developing that deep savory crust. Season generously with 1.5 teaspoons salt and 0.5 teaspoon black peppercorns, pressing the seasoning into the meat.
Place the roast in the pot and sear for 4-5 minutes per side until deeply browned. The key here is patience—don’t move it around. You want that crust to form properly, which will hold all the flavors during the long cook. If the pan isn’t hot enough, the meat will steam instead of sear. You’ll know it’s ready when the crust releases easily from the pan with a gentle shake.
Build the Aromatic Base
Remove the roast and set it aside. In the same pot, add 1 whole yellow onion (sliced into wedges), 3 whole carrots (cut into 2-inch chunks), and 3 whole celery stalks (cut into 2-inch pieces). Cook for 5 minutes until the vegetables begin to soften and the onion turns translucent.
Add the 4 smashed garlic cloves, 2 tablespoons tomato paste, 1 tablespoon fresh thyme, and 1 tablespoon fresh rosemary. Stir for 1 minute until fragrant. This aromatic base forms the flavor foundation for your pot roast. The tomato paste adds depth while helping to thicken the cooking liquid later. Pour in the 0.5 cup red wine and scrape up any browned bits from the bottom of the pot—this is where all the flavor hides.
Braise Until Fork-Tender
Return the roast to the pot and pour in the 1.5 cups beef broth. Bring to a simmer, then reduce heat to low and cover. The liquid should come about halfway up the roast. Braise for 2.5-3 hours until the meat is fork-tender and easily pulls apart with minimal resistance.
I check doneness by inserting a knife into the thickest part of the roast—when it slides in easily and the meat separates cleanly, it’s ready. The vegetables should also be tender but still holding their shape. If you notice the liquid reducing too quickly, add a splash of water or broth to maintain moisture. The goal is to create a rich, flavorful sauce that coats every bite.
Thicken the Sauce and Rest
Remove the roast and vegetables from the pot and transfer them to a serving platter. Place the pot over medium heat and whisk in the 1 tablespoon all-purpose flour. Cook for 2-3 minutes until the sauce thickens slightly. If it’s too thick, add a splash of the cooking liquid to reach your desired consistency.
Return the roast to the pot and let it soak up the sauce for 2 minutes. Then transfer the roast to a cutting board and tent loosely with foil. Let it rest for 10 minutes before slicing. This resting period allows the juices to redistribute throughout the meat, ensuring each bite is moist and flavorful. The sauce will continue to thicken as it rests, creating that perfect consistency that clings to every slice.
Pro Tips For Making 1 Lb Pot Roast
- SEAR THE ROAST FIRST: Skip the slow start—hit that chuck roast with high heat until it’s deep brown on all sides. I used to rush this, but now I crank the stove to medium-high and let it sit until the crust forms, even if it takes 5-6 minutes. That crust locks in flavor and keeps the meat juicy later.
- CHOP VEGETABLES UNIFORM: Dice the onion, carrot, and celery into ½-inch chunks—no big pieces hiding in the pot. I learned this the hard way when my celery stalks stayed woody while the onions dissolved. Uniform size means everything cooks evenly.
- DON’T SKIP THE BROWNING: After searing the roast, don’t just dump in the veggies—let the meat rest for 2 minutes while you brown the onions, garlic, and celery in the same pot. That extra color and caramelization make the whole dish taste richer, even if it adds 5 minutes.
- USE A DUTCH OVEN OR LID: If your pot doesn’t have a tight lid, cover it with foil instead of leaving it open. I tried skipping this once, and the liquid evaporated too fast, leaving the roast dry. A snug fit keeps moisture trapped—no guesswork.
Pro cooking tips for this dish
Sear Like a Pro
That deep, golden crust isn’t just for looks—it locks in juices and builds flavor. Use a heavy Dutch oven (I love Lodge’s pre-seasoned cast iron) and heat your oil until it’s smoking hot before adding the roast.
Pat the meat bone-dry with paper towels first—this ensures maximum browning. For a 1 lb roast, sear 4-5 minutes per side without moving it. The crust should release easily when you gently shake the pot. 🔥
Low-and-Slow Secrets
After searing, reduce heat to low and maintain a gentle simmer—never a rolling boil. The liquid should barely bubble at the edges. I use a meat thermometer to track internal temp, aiming for 203°F for perfect tenderness.
If your pot isn’t deep enough, add ½ cup water to prevent drying. The key is patience: 2.5-3 hours at this stage transforms tough meat into melt-in-your-mouth perfection.
Vegetable Prep Matters
Don’t skip the 5-minute sauté of onions, carrots, and celery—they form the flavor base. Cut them into 2-inch chunks so they cook evenly without turning to mush. For garlic, smash (not mince) the cloves to prevent bitterness.
Add the tomato paste last in this step—it needs to caramelize slightly before the wine deglazes the pot. The wine should reduce by half before adding broth, concentrating those flavors.
Gravy Thickening Hacks
Whisk in the 1 tbsp flour only after removing the roast—this prevents lumps. For a silky texture, strain the sauce through a fine-mesh sieve if you prefer no vegetable bits. If your sauce is too thin, simmer uncovered for 2-3 minutes to reduce further.
Pro tip: Taste the sauce before serving and adjust with salt, pepper, or a splash of red wine—this is where homemade gravy shines over store-bought.
Resting Isn’t Optional
The 10-minute rest before slicing is non-negotiable. During this time, juices redistribute, preventing dry meat. Tent the roast loosely with foil to keep it warm without steaming. Slice against the grain for maximum tenderness—this shortens the muscle fibers.
Serve the roast with 2 tbsp sauce per person drizzled over each slice for that restaurant-quality presentation.
Equipment Must-Haves
You don’t need fancy tools, but these make a difference: a heavy Dutch oven (like Le Creuset), long-handled wooden spoon (for stirring), and instant-read thermometer (for perfect doneness). A carving fork helps slice cleanly.
For extra flavor, I add 1 bay leaf during braising—remove it before serving. The right tools ensure you replicate this every time without stress. ✨
Nutrition facts
Frequently asked questions
Can I use a different cut of meat for this recipe?
While beef chuck roast is ideal, you can substitute with pork shoulder or even lamb leg for a different flavor profile. The key is choosing a well-marbled, tough cut that benefits from slow cooking. For pork, reduce braising time to 2 hours since it cooks faster than beef. Always adjust seasoning to match the meat’s natural flavor.
What if I don’t have red wine?
No problem! Replace it with 1 cup beef broth plus 1 tablespoon balsamic vinegar for depth, or use ½ cup dry white wine if you prefer. The wine adds complexity, but the dish will still be delicious. For a non-alcoholic option, try apple cider vinegar or lemon juice with extra broth to balance the acidity.
How do I know when the pot roast is done?
Use the fork test: Insert a fork into the thickest part of the roast. If it slides in easily and the meat separates cleanly, it’s ready. For precision, use a meat thermometer—aim for 203°F for beef or 195°F for pork. The meat should feel tender but not fall apart completely. Overcooking can make it mushy, so watch closely during the last 30 minutes.
Can I make this in a slow cooker?
Yes! Sear the roast first, then transfer everything to a 6-quart slow cooker and cook on low for 6-8 hours or high for 4-5 hours. Add ½ cup water if needed to prevent drying. The slow cooker’s gentle heat works perfectly for tenderizing the meat. Just remember to thicken the sauce separately on the stovetop at the end.
What’s the best way to reheat leftovers?
Reheat in the same Dutch oven or a heavy skillet over medium-low heat with 2 tablespoons broth or water to prevent drying. Cover and warm for 10-15 minutes, stirring occasionally. For oven reheating, cover with foil and bake at 300°F for 20 minutes. Never microwave—it makes the meat tough. Add fresh sauce if needed to restore moisture.

- 3lb Prime Rib Roast Recipe: Juicy Pink Center Guaranteed in 3 Hours - October 31, 2026
- 5 Spice Cake Recipe: Warmly Spiced Layers With Crunchy Top - October 31, 2026
- 1950’s Macaroni and Cheese Recipe: Nostalgic Creamy Cheese Sauce with Buttery Noodles - October 31, 2026