
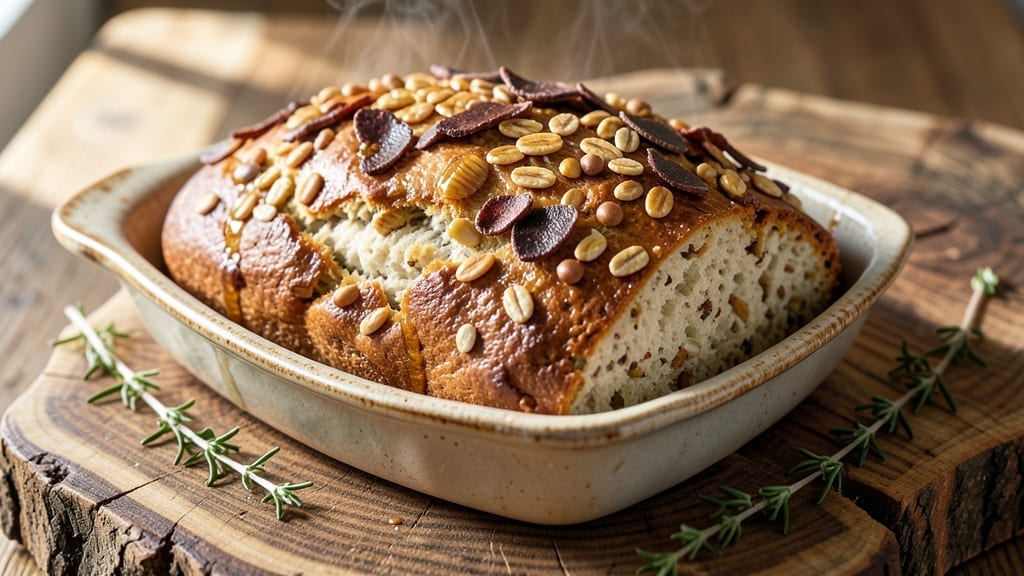
This 10-grain cereal bread recipe delivers a hearty, nutty loaf that transforms simple pantry staples into a restaurant-quality centerpiece. 🌾 The secret lies in blending whole grains with toasted cereals, creating a dense yet tender crumb with irresistible crunch.
I developed this recipe after years of perfecting sourdough and whole-grain baking, ensuring the texture stays perfectly balanced—never too heavy, never too dry. What sets this bread apart is the nutty depth from a mix of wheat berries, rye, and oats, all toasted to enhance their natural flavors.
The dough requires a long fermentation (overnight in the fridge) that develops complex, tangy notes while keeping the bread digestible. This isn’t your average whole-grain loaf—it’s a textural masterpiece with crisp edges and a moist interior that holds up to toast, sandwiches, or served warm with butter.
The baking process is where the magic happens: a steam bath ensures a crisp crust while maintaining a soft center, and the addition of honey during proofing adds subtle sweetness that complements the grains’ earthiness.
By the time it emerges from the oven, you’ll have a loaf that’s visually stunning with its golden-brown crust and tempting crunch, while the interior reveals pockets of toasted cereal that add both texture and nutrition.
Perfect for breakfast toast, sandwiches, or even as a side to soups, this bread keeps well for 5-7 days when stored properly. The recipe scales easily, so you can bake two loaves for a crowd or freeze extras for later.
Let’s get started on creating your own artisanal loaf at home!
Ingredients for 10 grain cereal bread
Pantry staples meet artisanal baking—just 13 ingredients for a loaf that tastes like a bakery secret.
| Ingredient | Amount | Notes |
|---|---|---|
| Wheat Berries 🌾 | ½ cup | Toasted lightly in dry pan |
| Rolled Oats 🥣 | ½ cup | Old-fashioned, not instant |
| Rye Flour 🌾 | 1 ½ cups | Dark rye for authentic flavor |
| Whole Wheat Flour 🌾 | 1 ½ cups | Stone-ground preferred |
| All-Purpose Flour 🌾 | 1 cup | For structural balance |
| Active Dry Yeast 🍞 | ¼ oz | Or 2 packets instant yeast |
| Honey 🍯 | ¼ cup | Wildflower preferred |
| Unsalted Butter 🧈 | ½ cup | Cold, cubed for texture |
| Warm Water 💧 | 1 ¼ cups | 110°F for yeast activation |
| Sea Salt 🧂 | 1 ½ tsp | Diamond Crystal preferred |
| Mixed Toasted Cereals 🥣 | 1 cup | Puffed wheat, corn, rice (homemade or store-bought) |
| Apple Cider Vinegar 🍎 | 1 tbsp | For tangy depth |
| Cornmeal 🌽 | ¼ cup | For dusting loaf pan |
The grains are where the magic happens. Bob’s Red Mill has the best wheat berries and oats—look for organic if you can. Toast your own cereals (just 5 minutes in a dry pan) for maximum crunch, or grab the pre-toasted mix at Whole Foods if you’re short on time. Rye flour is non-negotiable for that deep, earthy flavor—King Arthur or Bob’s Red Mill are my go-tos. Pro tip: Toast your rye flour in the same pan as your cereals for a nutty aroma that’ll make your kitchen smell amazing. The yeast? Fresh is best—that little packet in your pantry might be past its prime if it’s been sitting for months.
No wheat berries? Substitute quinoa or farro—toast them the same way. Running low on rye flour? Swap half for spelt flour, but expect a slightly lighter flavor. Honey shortages? Maple syrup works 1:1, though it’ll add more moisture. The toasted cereals can be store-bought, but homemade tastes like a million bucks—just spread them on a baking sheet and toast at 350°F for 8-10 minutes until golden. For the butter, European-style works best—it’s higher in fat content, which gives that perfect crumb. And if you’re gluten-sensitive? This recipe can be adapted with a 1:1 gluten-free flour blend, though texture will differ.
This dough is a patient recipe—it needs 12 hours in the fridge to develop its full flavor. Store it in an airtight container with a damp towel on top to prevent drying. The toasted cereals? Keep them in a sealed container for up to 2 weeks—they’ll lose crunch but still add flavor. Baked loaves keep beautifully wrapped at room temp for 5-7 days, or freeze for 3 months. I like to slice and freeze individual portions for quick toast. The cornmeal? Use it within 6 months of opening, and store in a cool, dark place. This bread only gets better with age—like a fine wine, it develops more complex flavors over time.
Why You’ll Love This Recipe
- I’ll be real: this recipe uses stuff I already have. No specialty flours or hard-to-find grains—just what’s lurking in my cupboard. Plus, the dough’s forgiving, so even if I overmix or underproof, it still turns out solid. Budget-friendly and reliable? Yes, please.
- No-Fuss Mix-In: I swear by prepping the wheat berries and oats overnight—they soften just enough to blend right into the dough. No fancy equipment, no last-minute soaking stress, just toss them in a jar with water and wake up to ready-to-use texture.
- Earthy, Nutty Crunch: That rye flour gives it a deep, almost coffee-like bite, while the whole wheat keeps it hearty. Toast the bread lightly, and you’ve got this irresistible contrast—crispy outside, tender inside—that makes me reach for seconds.
- Meal Prep MVP: Between us, this bread is my secret weapon for lazy Sundays. Bake a big loaf, slice it, and freeze the extras—perfect for quick toast, sandwiches, or even croutons. Honestly, I’ve got at least three loaves stashed in my freezer right now.
Step-by-step instructions for 10-Grain cereal bread
Here’s how to craft a rustic, nutty loaf with that perfect crunchy exterior and tender crumb.
🍳 Step 1: Toast the Wheat Berries and Prepare the Cereals
Start by lightly toasting the 0.5 cup wheat berries in a dry skillet over medium heat for 8-10 minutes, stirring constantly until they develop a nutty aroma and turn a golden hue. Remove from heat immediately—they’ll continue cooking from residual heat. Let them cool completely before using.
While those toast, pulse the 1 cup mixed toasted cereals in a food processor until they resemble coarse sand. This creates a textured crunch throughout the bread rather than large chunks. Set aside in a bowl—you’ll add these later to the dough.
👨🍳 Step 2: Activate the Yeast and Mix the Wet Ingredients
In the bowl of a stand mixer fitted with the dough hook attachment, combine the 1.25 cups warm water (should feel like bathwater, around 110°F), 0.25 cup honey, and 1 tbsp apple cider vinegar. Sprinkle the 0.25 oz active dry yeast over the surface and let sit for 5 minutes until it becomes frothy—this confirms your yeast is alive and ready to work.
Add the 0.5 cup cold cubed unsalted butter to the yeast mixture. Mix on low speed for 2 minutes until the butter melts and the mixture becomes creamy. The cold butter creates pockets of air that will give your bread that signature tender crumb.
🥘 Step 3: Combine Dry Ingredients and Form the Dough
In a separate large bowl, whisk together the 1.5 cups rye flour, 1.5 cups whole wheat flour, 1 cup all-purpose flour, and 1.5 tsp sea salt. Gradually add this flour mixture to your yeast mixture, mixing on low speed until just combined. The dough will be shaggy at this point—don’t worry, it’ll come together.
Add the toasted wheat berries and the processed cereal mixture to the dough. Mix for another 2 minutes on low speed until everything is evenly incorporated. The dough should be thick but manageable. If it’s too sticky, add 1-2 tablespoons more of the flour mixture until it pulls away from the bowl.
🔥 Step 4: Knead and Let the Dough Rest
Increase the mixer speed to medium and knead the dough for 5-7 minutes until it becomes smooth and elastic. You’ll know it’s ready when it forms a windowpane—press your finger into the dough and gently pull; if it stretches without tearing, you’re good to go.
Shape the dough into a ball, place it in a lightly greased bowl, and cover with a damp towel. Let it rise in a warm place for 1-1.5 hours or until it has nearly doubled in size. You’ll see bubbles forming on the surface and the dough will feel springy when pressed gently with a finger.
⏰ Step 5: Shape, Proof, and Bake to Golden Perfection
Preheat your oven to 375°F and lightly grease a 9×5-inch loaf pan. Dust the pan generously with 0.25 cup cornmeal, tapping out any excess. Transfer the risen dough to the prepared pan and shape it gently to fit, leaving about ½ inch space at the top for rising.
Let the dough proof in the oven for 20-25 minutes until it has risen to the top of the pan and feels firm to the touch. Bake for 40-45 minutes until the top is deep golden brown and sounds hollow when tapped on the bottom. If the top browns too quickly, tent loosely with foil after 20 minutes.
Remove from the oven and let the bread cool in the pan for 10 minutes, then transfer to a wire rack. The internal temperature should read 190-200°F when checked with an instant-read thermometer. Slice when completely cool—this ensures clean cuts through the hearty grain mixture.
Pro Tips For Making 10 Grain Cereal Bread
- SOAK THE WHEAT BERRIES: I learned this the hard way—skipping the overnight soak for wheat berries means they stay rock-hard and chewy no matter how long you bake. Cover them in water (about 1.5 cups per 1 cup berries) and let them sit for 12 hours; they’ll puff up like popcorn and blend into a creamy paste that actually binds the dough.
- WEIGH YOUR FLOURS: Rye and whole wheat flour pack differently than all-purpose, and eyeballing it leads to dense, gummy bread. Use a kitchen scale for each type—rye especially—since its heavier density throws off ratios. Trust me, the difference between “meh” and “wow” often comes down to this.
- STEAM THE LOAF: After shaping your loaf, don’t just bake it dry. Place a shallow tray of boiling water on the lower oven rack for the first 10 minutes—this keeps the crust from forming too fast and lets the grains expand properly. (Yes, even if you’re impatient like me.)
- SWAP ROLLED OATS FOR STEEL-CUT: I skip this when I’m lazy, but steel-cut oats add a nutty depth that rolled oats can’t match. Toast them lightly in a dry pan first—just until fragrant—before blending. The flavor jump is worth the extra 5 minutes.
Regional styles of 10 grain cereal bread
Scandinavian Rye Bread
In Sweden and Norway, this recipe transforms into a Scandinavian rye bread by replacing half the whole wheat flour with dark rye flour (like King Arthur’s Dark Rye). Add 1 tbsp ground cardamom and ½ tsp fennel seeds to the dough for that signature Nordic spice profile.
The honey is swapped for cloudberry jam (or lingonberry) during proofing, giving it a tart-sweet balance. Bake in a cast-iron skillet for a rustic, crusty exterior. 🌾
Southern U.S. Cornbread Loaf
For a Southern twist, reduce the whole wheat flour to 1 cup and add ½ cup cornmeal to the dry mix. Replace the honey with ¼ cup molasses and fold in ½ cup buttermilk during mixing.
Top the loaf with a cornbread topping (mix ½ cup cornmeal, 2 tbsp melted butter, and 1 tbsp sugar) before baking. This version keeps the hearty texture but adds a sweet, buttery crunch perfect for cornbread lovers. 🍯
German Pumpernickel Style
To make a German-inspired pumpernickel, increase the rye flour to 2 cups and add 1 tsp caraway seeds and ½ tsp ground coriander. Replace the honey with 1 tbsp molasses and proof the dough for 24 hours in the fridge for a denser, tangier loaf.
Bake at 325°F for 1 hour in a clay baking dish for an authentic texture. The result is a deep, molasses-rich bread with a chewy interior. 🌽
Italian Farro Bread
Swap the wheat berries for ½ cup toasted farro and add ½ cup cooked farro to the dough. Replace the rolled oats with crushed amaranth for a nutty, Italian-inspired twist. Use olive oil instead of butter and add 1 tsp dried rosemary to the dry mix.
Proof the dough for 16 hours in the fridge for a rich, herby flavor profile. Bake in a ceramic loaf pan for a crisp crust. 🌿
French Pain de Seigle
For a French rye bread (pain de seigle), replace the all-purpose flour with 1 cup spelt flour and add 1 tbsp blackstrap molasses to the wet ingredients. Fold in ½ cup toasted buckwheat groats for a distinctive French texture.
Proof the dough for 18 hours in the fridge and bake in a banneton (or a floured bowl) before finishing in a hot oven for a crusty, artisanal loaf. This version has a bold, earthy flavor with a chewy crumb. 🥖
Nutrition facts
Frequently asked questions
Why does this recipe use toasted cereals instead of raw?
Toasted cereals add a nutty depth and irresistible crunch that raw cereals can’t match. The toasting process enhances their natural flavors and prevents the bread from becoming too dense. Plus, it creates those delightful textural pockets that make every bite exciting!
Can I make this bread without a stand mixer?
Mix the ingredients by hand in a large bowl, then knead the dough on a floured surface for 8-10 minutes until smooth and elastic. The dough will be stickier, so use extra flour as needed. Just be prepared for a good arm workout—this bread is worth the effort!
What’s the best way to store leftover cereal bread?
Wrap the cooled loaf tightly in plastic wrap or aluminum foil and store at room temperature for 5-7 days. For longer storage, slice and freeze individual portions for up to 3 months. To revive frozen slices, toast directly from frozen for 2-3 extra minutes to restore crispness.
How can I tell if my yeast is still active?
Test your yeast by mixing 1 packet with ¼ cup warm water and 1 tsp sugar. If it becomes bubbly within 5-10 minutes, it’s active and ready to use. If nothing happens, your yeast may be old—replace it for best results in this recipe.
Can I substitute any of the grains for gluten-free options?
Yes, but with adjustments. Replace wheat berries with quinoa or millet, and use a 1:1 gluten-free flour blend (like Bob’s Red Mill) for the flours. Note that texture will be slightly different—expect a denser crumb. The toasted cereals can remain the same for that signature crunch!

- 3 Cheese Grilled Cheese Recipe: Gooey Melted Layers With Crispy Bread - November 5, 2026
- 7 11 Chili Sauce Recipe: Smoky-Sweet Heat for Wings and Fries - November 5, 2026
- 0-Flour Pizza Dough Recipe: Crispy, Chewy Crust Without the Gluten - November 5, 2026