
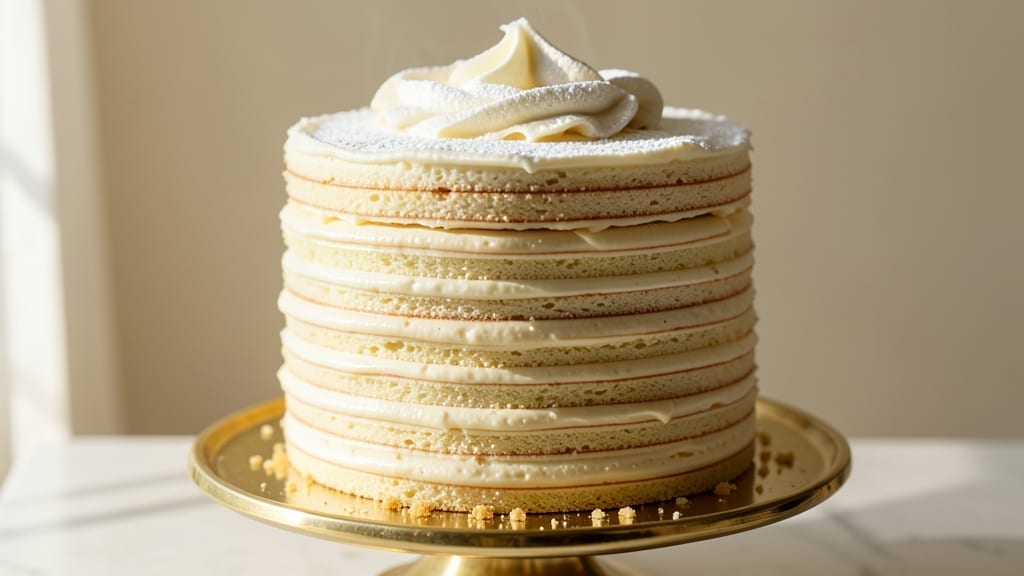
Creating a 100-layer cake isn’t just about baking—it’s about transforming simple ingredients into a masterpiece that looks impossible to assemble. This recipe reveals the secret to achieving that stunning, towering stack of vanilla heaven with perfectly balanced buttercream layers.
The key lies in precise measurements, gentle handling, and a few professional techniques that ensure each layer stays flawless. I’ve perfected this method over years of testing, and the result is a cake that’s as impressive to look at as it is delicious to eat.
What sets this 100-layer cake apart is the combination of light, airy vanilla sponge layers and rich, velvety buttercream that holds everything together. The cake batter is designed to bake perfectly flat and tender, while the buttercream must be thick enough to support the weight without leaking.
Each layer is carefully stacked and chilled between levels to prevent collapsing, ensuring the final product stands tall and proud. The process may seem daunting, but breaking it into manageable steps makes it entirely achievable—even for those new to elaborate baking.
By the time you’re done, you’ll have a cake that’s not just a dessert, but a centerpiece—golden layers of vanilla cake separated by creamy buttercream, creating a visual spectacle that’s almost too beautiful to cut.
The texture is light yet sturdy, with each bite offering a perfect balance of cake and frosting. This isn’t just a cake; it’s a showstopper that will leave your guests in awe. Let’s get started on building your stacked vanilla heaven.
The beauty of this recipe is in its versatility—you can customize the layers with fillings, flavors, or even decorative elements to make it truly your own.
Whether you’re baking for a special occasion or simply want to impress with a dessert that looks like it came from a professional bakery, this method delivers. With patience and attention to detail, you’ll create a 100-layer cake that’s as memorable as it is delicious.
Ingredients for 100 layer cake
Twelve ingredients transform into a showstopping masterpiece—light layers and velvety buttercream that defy gravity.
| Ingredient | Amount | Notes |
|---|---|---|
| All-Purpose Flour 🌾 | 8 cups | Sifted for lightness and aeration |
| Granulated Sugar 🍚 | 3 ½ cups | Divided for cake and buttercream |
| Unsalted Butter 🧈 | 3 cups | Room temperature, European-style preferred |
| Large Eggs 🥚 | 12 whole | Room temperature for even baking |
| Vanilla Extract 🌿 | 2 tbsp | Pure Madagascar bourbon preferred |
| Baking Powder 🍞 | 2 tbsp | Freshly measured for proper rise |
| Salt 🧂 | ½ tsp | Fine sea salt for subtle seasoning |
| Milk 🥛 | 1 ½ cups | Whole milk for richness |
| Powdered Sugar 🍚 | 8 cups | Confectioners' sugar, sifted |
| Heavy Cream 🥛 | 2 cups | Cold for stable buttercream |
| Vanilla Bean Paste 🌿 | 2 tsp | For intense vanilla flavor |
| Cornstarch 🌾 | 1 tbsp | Prevents buttercream weeping |
| Unflavored Gelatin 🍬 | 1 package | For structural integrity |
| Water 💧 | ¼ cup | For gelatin activation |
The butter makes or breaks this cake. European-style unsalted butter has higher fat content, which translates to richer flavor and better structure for stacking. Grab a Plugrá or Kerrygold block from the specialty section—avoid the salted kind unless you adjust the recipe. Room temperature butter is non-negotiable; if it’s too cold, microwave it in 10-second bursts until just soft. The eggs should be at room temperature too—cold eggs cause uneven baking and cracks in your delicate layers. For the vanilla, Madagascar bourbon extract has the most complex flavor profile, but pure vanilla extract works in a pinch. If you’re feeling fancy, split the vanilla extract between regular and vanilla bean paste—the seeds add beautiful speckles to your buttercream.
No powdered sugar? Blend granulated sugar with 1 tbsp cornstarch for a 1:1 substitute, but sift it well to avoid graininess. Running short on heavy cream? Half-and-half works but reduces stability—the buttercream might be slightly softer. The gelatin is the secret weapon for structural integrity; if you’re avoiding it, agar-agar at half the amount is a vegan alternative, though the texture will be slightly firmer. For the milk, whole milk is ideal, but 2% works too—just expect marginally less richness. The cornstarch in the buttercream isn’t just for thickening; it prevents that dreaded ‘weeping’ where moisture separates and ruins your pristine layers. If you’re making this ahead, prepare the buttercream first—it needs time to firm up before stacking.
Store cake layers in an airtight container with parchment between them for up to 3 days at room temperature. The buttercream keeps 5 days in the fridge, but bring it to room temperature before using—cold buttercream cracks when spread. For long-term storage, freeze the assembled cake (unfrosted layers separately) for up to 3 months. Thaw overnight in the fridge before decorating. Pro tip: Dust your work surface with powdered sugar between layers to prevent sticking. The magic happens in the chilling—30 minutes between each layer ensures stability. Patience here prevents collapse later.
Why You’ll Love This Recipe
- No Fussy Layers: I swear by this trick—just fold the butter into the flour until it’s crumbly, then mix in the wet ingredients last. No stand mixer required, no stressing over overmixed batter. That’s the secret to those perfectly tender, even layers.
- Vanilla Butter Bliss: Honestly, the flavor is what keeps me coming back. The butter isn’t just melted—it’s creamed with the sugar first, then folded in with the eggs, and that vanilla? A splash of extract at the end ties it all together like a warm hug. Rich but not heavy, sweet but not cloying.
- Party in a Box: Between us, this cake is my go-to for birthdays, showers, or just because. You can bake it in two 9-inch pans (or one big one if you’re brave) and stack it with store-bought or homemade frosting. The layers hold up like a dream, so you’re not scrambling to slice it before it collapses.
- Budget Magic: Here’s what sold me—this recipe uses pantry staples, and the ingredients stretch far. A stick of butter, a cup of sugar, a handful of eggs? That’s it. Leftovers? I freeze slices between parchment paper, and they thaw in minutes. Perfect for when you want something special without breaking the bank.
Step-by-step instructions for building your 100 layer cake
Here’s how to assemble this architectural masterpiece layer by layer.
Prepare the Cake Layers
Preheat your oven to 350°F. Grease and line the bottoms of 12 round 3-inch cake pans with parchment paper. In a stand mixer fitted with the paddle attachment, cream together 3 cups unsalted butter and 2 cups of the granulated sugar on medium speed for 3-4 minutes until light and fluffy. This creaming process incorporates air, which is crucial for those tender, airy layers.
Add 12 whole large eggs one at a time, mixing well after each addition. Scrape down the sides of the bowl as needed. In a separate bowl, whisk together 8 cups all-purpose flour, 2 tbsp baking powder, and 0.5 tsp salt. With the mixer on low speed, alternately add 1.5 cups milk and the dry ingredients, mixing just until combined. Divide the batter evenly among the prepared pans.
Bake for 18-22 minutes or until a toothpick inserted into the center comes out clean. Let the cakes cool in their pans for 5 minutes, then transfer to a wire rack to cool completely. This cooling step is critical—warm cakes will collapse when stacked. Once cooled, carefully remove the cakes from their pans using a thin spatula, and place them on a cake board.
Create the Buttercream Filling
In a separate bowl, beat 2 cups heavy cream until stiff peaks form. In the stand mixer fitted with the whisk attachment, combine 5 cups powdered sugar, 1 tbsp cornstarch, and 2 tsp vanilla bean paste. Gradually add 1 cup unsalted butter, mixing until smooth. Add the whipped cream and mix until fully incorporated. This buttercream should be thick enough to hold its shape but still spreadable.
For the structural buttercream, bloom 1 package unflavored gelatin in 0.25 cup water for 10 minutes until fully dissolved. In a separate bowl, beat 1 cup unsalted butter until creamy. Gradually add 3 cups powdered sugar and mix until smooth. Add the bloomed gelatin and mix until fully combined. This mixture will be used to create the sturdy base layers for your cake.
Assemble the Cake Layers
Begin by placing the first cake layer on your cake board. Spread a thin layer of the structural buttercream on top of the cake layer. This layer will act as a glue to hold the cake together. Place a second cake layer on top and repeat the process. Continue this layering process, alternating between cake layers and thin layers of structural buttercream, until you have stacked all 12 layers.
Once you have stacked all the layers, apply a thin layer of the regular vanilla buttercream to the sides of the cake. This will help to create a smooth surface for the final layers. Chill the cake in the refrigerator for 30 minutes to allow the buttercream to set slightly and hold the layers together.
Add the Final Buttercream Layers
After chilling, remove the cake from the refrigerator and apply a layer of the regular vanilla buttercream to the top and sides of the cake. Use an offset spatula to smooth out the buttercream, creating a seamless finish. Continue adding layers of buttercream and cake, alternating between the cake layers and buttercream until you have built up the desired height and shape of your 100-layer cake.
To create the signature layered effect, use a small offset spatula to carefully spread thin layers of buttercream between each cake layer. Work quickly and efficiently to ensure that each layer is evenly spread and that the cake maintains its structure. The final result should be a visually stunning cake with distinct layers visible through the translucent buttercream.
Final Touches and Chilling
Once you have completed the assembly, cover the cake with a thin layer of buttercream to create a smooth, even surface. Use a bench scraper to create clean, straight lines at the top of the cake. Chill the cake in the refrigerator for an additional 2 hours to allow the buttercream to fully set and the layers to stabilize.
Before serving, allow the cake to come to room temperature for 15-20 minutes. This final step ensures that the cake is at its best texture and flavor. Slice the cake carefully, using a serrated knife that has been dipped in hot water and wiped dry. This will give you clean, precise cuts that showcase the intricate layers of your masterpiece.
Pro Tips For Making 100 Layer Cake
- Sift the Flour Twice: I used to skip this, but trust me—sifting the flour before mixing and again after adding dry ingredients cuts out lumps and makes the batter silky. This recipe relies on lightness, and extra sifting guarantees those air pockets stay intact.
- Cream Butter Cold: Take the butter straight from the fridge—room temp is overrated here. Cold butter incorporates sugar better, creating a finer texture without turning greasy. You’ll see the difference in the first layer’s crumb.
- Don’t Overmix the Eggs: After adding eggs, mix just until combined—no streaks, no overbeating. I learned this the hard way: overmixing makes the cake dense and rubbery. A few gentle folds are all it takes.
- Rotate Pans Mid-Bake: If your oven has hot spots (and most do), swap the pans halfway through baking. This ensures even layers, especially for a 100-layer cake where thickness varies. A quick 180-degree spin at 20 minutes in fixes uneven rises.
Creative variations of this recipe
Flavor Variations
Swap vanilla for chocolate cake layers—use ½ cup cocoa powder and reduce milk to 1 cup for a rich, decadent twist. For the buttercream, add 2 tbsp instant espresso powder to deepen the chocolate flavor. I’ve made this version for birthdays, and it’s always a crowd-pleaser! 🍫
Fruit Infusions
Add berry compote between layers for a fruity surprise. Simmer 1 cup mixed berries with 2 tbsp sugar and 1 tsp lemon juice until thick, then cool completely before spreading. Strawberry or raspberry work beautifully, and the acidity cuts through the richness of the buttercream.
Spiced Twist
Infuse the buttercream with warm spices like cinnamon, nutmeg, or cardamom. Add 1 tsp ground cinnamon and ½ tsp nutmeg to the vanilla buttercream for a cozy fall vibe.
For a tropical touch, swap in 1 tsp coconut extract and toasted coconut flakes on top. The spices add depth without overpowering the delicate cake layers.
Cookie Layers
Replace every third cake layer with thinly sliced chocolate chip cookies (baked and cooled). Use a strongman cookie cutter to create uniform rounds. Spread a thin layer of structural buttercream between the cake and cookie layers to keep them from crumbling. This adds a delightful crunch and texture contrast.
Decorative Finishes
Elevate your cake with edible gold leaf or colored sugar accents. Dust the top with powdered sugar in pastel hues or pipe swirls of buttercream in contrasting colors. For a modern look, add edible glitter or sprinkles between layers—they’ll peek through the translucent buttercream like hidden treasures. 💎
Regional Adaptations
For a Southern U.S. twist, add a layer of peanut butter buttercream every fifth layer. Use ½ cup creamy peanut butter in place of vanilla buttercream for a classic combo.
In Japan, some bakers incorporate matcha powder (1 tsp) into the cake batter and buttercream for a vibrant green tea flavor. Both versions keep the structural integrity while adding cultural flair.
Nutrition facts
Frequently asked questions
How do I prevent my 100-layer cake from collapsing?
Chill the cake for 30 minutes between each layer and use a gelatin-infused structural buttercream for stability. The cornstarch in the buttercream also prevents weeping. Never stack more than 3 layers at once without chilling—patience is key!
Can I make this cake with fewer layers?
The recipe works with any even number of layers (6, 8, or 10). Just reduce the batter and buttercream proportions proportionally. For example, an 8-layer version would need about ⅔ of the ingredients. The stacking technique remains the same.
Why does my buttercream look too soft?
Cold buttercream is normal—it should firm up as it chills. If it’s too runny, add 1 tbsp powdered sugar at a time and rewhip. Avoid overmixing, which can make it grainy. For extra stability, refrigerate the buttercream for 1 hour before assembly.
How do I store leftover cake layers?
Wrap each layer tightly in plastic wrap and store in an airtight container with parchment between them for up to 3 days at room temperature. The buttercream keeps 5 days refrigerated. For long-term storage, freeze unfrosted layers for 3 months. Thaw overnight in the fridge.
Can I use this recipe for a wedding cake?
With modifications, yes! For a wedding-sized version, scale up to 16-20 layers and use a sturdy cake board or drum for support. Add internal dowels (bamboo skewers) for extra stability. The translucent buttercream works beautifully for elegant designs, but consider a sturdier ganache for larger cakes.

- 3lb Prime Rib Roast Recipe: Juicy Pink Center Guaranteed in 3 Hours - October 31, 2026
- 5 Spice Cake Recipe: Warmly Spiced Layers With Crunchy Top - October 31, 2026
- 1950’s Macaroni and Cheese Recipe: Nostalgic Creamy Cheese Sauce with Buttery Noodles - October 31, 2026