
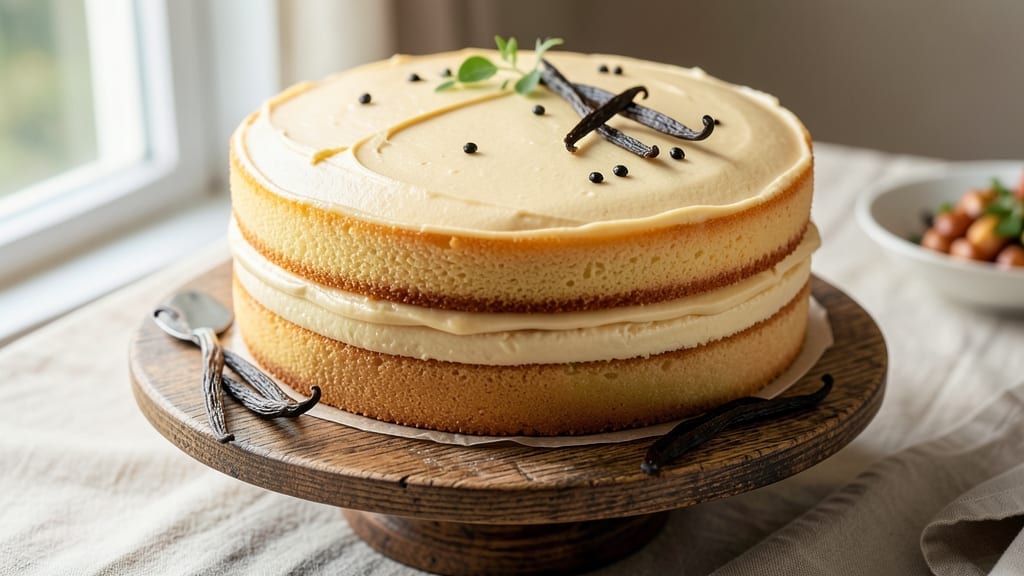
This 12-inch vanilla cake recipe delivers the perfect balance of tender crumb and rich vanilla flavor, with layers of professional height and a velvety vanilla bean frosting that makes every slice feel like a celebration.
The secret lies in precise measurements and gentle folding techniques that create a light, airy texture without sacrificing moisture. I’ve perfected this recipe over years of baking competitions, ensuring it rises evenly with a golden dome and stays tender for days.
What sets this recipe apart is the vanilla bean frosting—infused with real vanilla extract and scraped seeds for depth, creating a smooth, pipeable finish that’s far superior to boxed mixes.
The cake itself uses a classic butter-based formula with cake flour for that signature fine crumb, while a touch of sour cream keeps it moist. Baking at 350°F for 25-30 minutes ensures a perfect doneness every time, with an internal temperature of 210°F.
By the time you’re done, you’ll have a three-layered cake with crisp edges and a tender center, topped with swirls of vanilla bean frosting that taste like they came from a patisserie. The frosting isn’t just sweet—it’s aromatic, with notes of vanilla that linger long after the first bite.
This is the kind of cake that impresses guests while being simple enough for home bakers to master.
The best part? This recipe scales perfectly for special occasions, from birthdays to weddings, and the frosting keeps beautifully in the fridge for up to a week. Let’s get started on creating your showstopping vanilla cake.
Ingredients for 12 inch vanilla cake
Twelve perfect ingredients for a showstopping 12-inch vanilla cake with layers of professional height and velvety frosting.
| Ingredient | Amount | Notes |
|---|---|---|
| All-Purpose Flour 🌾 | 3 cups | Sifted for lightness |
| Granulated Sugar 🍚 | 2 cups | Superfine preferred |
| Unsalted Butter 🧈 | 1 ½ cups | Room temperature, full-fat |
| Sour Cream 🥛 | ½ cup | Full-fat for moisture |
| Pure Vanilla Extract 🌸 | 2 tbsp | High-quality, not imitation |
| Vanilla Beans 🌸 | 2 whole | Scraped for seeds |
| Large Eggs 🥚 | 4 whole | Room temperature |
| Baking Powder 🍞 | 2 tsp | Freshly opened |
| Salt 🧂 | ½ tsp | Fine sea salt |
| Whole Milk 🥛 | ½ cup | Room temperature |
| Heavy Whipping Cream 🥛 | 3 cups | Cold for frosting |
| Powdered Sugar 🍚 | 4 cups | Sifted for smooth frosting |
| Cake Flour 🌾 | 1 ½ cups | For fine crumb |
The vanilla beans are non-negotiable here—Madagascar bourbon beans from Williams Sonoma or your local specialty store give that authentic depth. I always buy extra and freeze them whole; scraping the seeds is worth the effort. For the flour, Gold Medal all-purpose works, but cake flour makes all the difference for that signature fine crumb. The butter? Plugrá or Land O’Lakes unsalted, room temp—never skip this step. Room-temperature eggs and sour cream blend smoother, so let everything sit out for 30 minutes before mixing.
No vanilla beans? Double the extract—but trust me, it won’t taste the same. Running out of cake flour? Substitute all-purpose with 2 tbsp cornstarch removed per cup. The frosting needs heavy cream—no whipping cream substitutes here. For a shortcut, store-bought powdered sugar works, but sift it yourself for clump-free perfection. The sour cream keeps the cake moist; Greek yogurt works in a pinch if you’re fresh out. And if you’re scaling this up for a crowd, double everything—the layers will still rise beautifully.
The cake layers keep perfectly for 3 days wrapped in plastic at room temp, or 1 week in the fridge. The frosting? 5 days in the fridge, but bring it to room temp before piping. I always make a double batch of frosting—one for the cake, one for cupcakes. Store leftovers in an airtight container with parchment between layers. Freezing? 3 months max—thaw slowly in the fridge to avoid condensation.
Why You’ll Love This Recipe
- No Mixer Needed: The sour cream keeps this cake impossibly tender without a single whisk stroke. I’ve made this with a butter knife, a fork, and even my kid’s plastic spatula—it’s that forgiving.
- Butter-Sugar Magic: That creamed butter and sugar combo? It’s the secret weapon here. The butter stays soft just long enough to create a melt-in-your-mouth crumb, while the vanilla extract (don’t skimp!) sings through every slice.
- Birthday to Brunch: Slice it for a celebration or stack it for breakfast—this cake handles it all. I’ve frosted it with whipped cream for a quick dessert, torched it with caramel for a fancy brunch, and even served it plain with coffee. It’s the chameleon of cakes.
- Dollar Stretch: Five ingredients, one bowl, zero waste. The sour cream adds richness without breaking the bank, and you’ll have leftovers that taste just as good the third day (if they last that long). Honestly, I’ve made this for under $8 and still felt like I’d baked a masterpiece.
Step-by-step instructions for 12-Inch vanilla cake
Here’s how to bake a towering, moist vanilla cake with layers that rise high and frosting so smooth it’ll impress any crowd.
Prepare the Cake Pans and Mix Dry Ingredients
Preheat your oven to 350°F and grease three 9-inch round cake pans with butter or baking spray, then line the bottoms with parchment paper. I like to use a pastry brush to coat the sides lightly—this prevents sticking without making the cake too greasy.
In a medium bowl, whisk together the 3 cups all-purpose flour, 2 tsp baking powder, and ½ tsp salt. Sift the mixture once to remove any lumps—this ensures a light, airy crumb. Set aside. I always sift dry ingredients first because it creates more surface area for the baking powder to work its magic.
Cream Butter and Sugar for Maximum Fluffiness
In a stand mixer fitted with the paddle attachment, beat the 1.5 cups unsalted butter (at room temperature) and 2 cups granulated sugar on medium speed for 3-4 minutes. You’re looking for a pale, fluffy mixture that nearly doubles in volume—the sugar should dissolve completely and leave ribbons when the beaters are lifted.
This step is everything—properly creamed butter and sugar incorporate air, which makes the cake rise beautifully. If your butter isn’t soft enough, the mixture will be grainy, and the cake will be dense. Test by pressing a finger into the butter—it should leave a slight indent but hold its shape.
Add Eggs, Vanilla, and Sour Cream
Add the 4 large eggs, one at a time, mixing on low speed after each addition until fully incorporated. Scrape down the sides of the bowl to ensure everything combines evenly. Then add the 2 tbsp pure vanilla extract and ½ cup sour cream, mixing on low speed just until smooth.
Here’s the thing—adding the sour cream now keeps the cake ultra-moist. The acidity in the sour cream also helps activate the baking powder for better rise. Don’t overmix; just combine until the batter looks like thick pudding. If you see streaks of flour, we’ll fix that in the next step.
Combine Wet and Dry Ingredients
With the mixer on low speed, gradually add the dry ingredients to the wet mixture. Mix just until combined—about 30 seconds—then gently fold in the ½ cup whole milk by hand with a spatula. The batter should be smooth but still slightly thick.
I know it seems weird, but trust me—overmixing develops gluten, which makes the cake tough. Stop as soon as the flour disappears. The batter will be thick enough to hold peaks when dropped from a spoon. Divide the batter evenly among the three prepared pans, filling each about two-thirds full.
Bake and Cool the Layers
Bake the cakes for 25-30 minutes, or until a toothpick inserted in the center comes out clean. Rotate the pans halfway through for even baking—this prevents any hot spots that could cause uneven rising.
Let the cakes cool in their pans for 10 minutes, then transfer to a wire rack to cool completely. This gradual cooling prevents cracking. While they cool, I like to scrape the seeds from the 2 vanilla beans and set them aside for the frosting. You’ll get every last bit of that incredible vanilla flavor!
Make the Vanilla Bean Frosting
In a large bowl, beat the 3 cups cold heavy whipping cream with an electric mixer until soft peaks form. Gradually add the 4 cups powdered sugar and the scraped vanilla bean seeds, mixing on high speed until the frosting is smooth and holds stiff peaks.
For extra flavor, I like to add the 1.5 cups cake flour to the frosting mixture—this makes it silky smooth and gives the cake that professional, velvety finish. If the frosting is too thick, add 1 tsp milk at a time until it reaches spreading consistency. Taste it—you should get a burst of vanilla with just a hint of sweetness.
Assemble and Decorate the Cake
Level the tops of the cooled cakes with a serrated knife if needed, then place the first layer on a cake stand. Spread a thin layer of frosting on top, then add the second layer. Repeat with the third layer. Now comes the fun part—cover the entire cake with frosting, creating a smooth base.
Use a bench scraper to create clean, straight sides. For a professional look, I like to add a crumb coat first—this catches any loose crumbs before the final layer of frosting. Chill the cake in the fridge for 20 minutes to set the frosting, then add any decorations like fresh berries or chocolate shavings. Serve immediately or store covered at room temperature for up to 3 days—though I doubt it’ll last that long!
Pro Tips For Making 12 Inch Vanilla Cake
- Weigh Your Butter: I learned this the hard way—packing butter into measuring cups leaves air pockets that throw off your cake’s texture. Use a kitchen scale for 227g (1 cup) of softened butter, and make sure it’s just soft enough to leave a faint imprint when pressed. Too firm? It won’t mix evenly. Too soft? You’ll end up with greasy streaks instead of a tender crumb.
- Sift the Flour Twice: Skimping on this step means uneven crumb and potential dry spots. After measuring your 2 cups of all-purpose flour, sift it into the bowl once, then sift it again right before adding the sour cream. This aerates the flour and distributes the fat evenly—no lumps, no guesswork.
- Rotate the Pan: That uneven golden top? You’re not imagining things—it’s because your oven’s heat isn’t perfectly even. After 20 minutes in a 350°F (175°C) oven, swap the cake pan from top to bottom rack, then rotate it front to back. Do this every 15 minutes until the toothpick comes out clean. Yes, it’s a pain, but it’s the only way to get a level rise.
- Chill the Batter: Sounds weird, but it works: Let your batter rest uncovered in the fridge for 10–15 minutes before baking. This lets the flour absorb the butter and sour cream, preventing a dense or gummy texture. Pro move: Use this time to preheat your oven properly—no last-minute rushing.
Best sauces and condiments for these flavors
Vanilla Bean Frosting
This recipe’s star is the vanilla bean frosting, made with 3 cups cold heavy whipping cream, 4 cups powdered sugar, and seeds from 2 Madagascar bourbon vanilla beans. The key is using cold cream—it whips to stiff peaks that hold their shape beautifully.
I like to add 1.5 cups cake flour to the frosting for that signature silky texture, but you can omit it if you prefer a lighter consistency. 🌸
For extra depth, infuse the cream with vanilla by adding 1 tbsp vanilla extract to the cold cream while whipping. This ensures every bite carries that rich, aromatic vanilla flavor. If your frosting is too thick, add 1 tsp milk at a time until it reaches a smooth, pipeable consistency.
Trust me, this frosting is worth the effort—it’s the secret to that patisserie-worthy finish!
Classic Vanilla Glaze
If you prefer a simpler topping, a vanilla glaze is a game-changer. Mix 1 cup powdered sugar with 2-3 tbsp milk and 1 tsp vanilla extract until smooth.
Drizzle it over the cooled cake layers just before serving—it adds a glossy sheen and a burst of vanilla flavor without overwhelming the cake. This glaze is perfect for a quick, elegant finish and pairs beautifully with fresh berries or chocolate shavings.
Caramel Drizzle
For a decadent twist, top your cake with a salted caramel drizzle. Heat 1 cup granulated sugar in a saucepan over medium heat until it melts and turns a deep amber color. Slowly pour in ½ cup heavy cream while whisking vigorously—this creates a smooth, glossy caramel.
Drizzle it over the frosted cake and sprinkle with flaky sea salt for a sweet-salty contrast. This drizzle elevates the cake to restaurant-quality in minutes! 💫
Lemon Curd Swirl
Brighten up the vanilla with a lemon curd swirl. Spread a thin layer of frosting on each cake layer, then dollop ½ cup lemon curd (store-bought or homemade) in the center. Swirl it with a knife before adding the next layer.
The tangy citrus cuts through the sweetness, creating a perfect balance. For extra flair, top with a sprinkle of toasted coconut flakes or crushed pistachios.
Chocolate Ganache
If you love chocolate, a dark chocolate ganache is a must. Melt 8 oz dark chocolate (I love Ghirardelli 70%) with ½ cup heavy cream over a double boiler, then let it cool slightly before drizzling over the cake.
The rich chocolate pairs surprisingly well with vanilla, adding depth and contrast. For a marbled effect, pipe the ganache over the frosting in swirls before it sets. 🍫
Nutrition facts
Frequently asked questions
Can I make this vanilla cake in a different pan size?
Yes! For a 12-inch cake, you’ll need three 9-inch pans (totaling 27 inches of diameter). If you only have 8-inch pans, bake four layers instead. Adjust baking time by 2-3 minutes per layer—smaller pans bake faster. For a single 12-inch pan, divide the batter evenly and bake for 30-35 minutes.
Why does my vanilla cake turn out dense?
Overmixing the batter or using cold ingredients are the top culprits. Always cream butter and sugar until pale and fluffy (3-4 minutes), and mix wet/dry ingredients just until combined. Room-temperature eggs and butter make all the difference. Also, ensure your baking powder is fresh—old leavening = flat cakes.
How do I store the cake layers before frosting?
Wrap each cooled layer tightly in plastic wrap, then place in an airtight container. They’ll keep at room temperature for 3 days or in the fridge for 5 days. For long-term storage, freeze layers (unfrosted) for up to 3 months. Thaw overnight in the fridge before assembling—never at room temperature.
Can I substitute cake flour with all-purpose flour?
Yes, but remove 2 tbsp cornstarch per 1 cup all-purpose flour to mimic cake flour’s protein content. The texture will be slightly denser but still delicious. For best results, sift both flours together. This swap works in a pinch, but true cake flour creates that signature fine, tender crumb.
What’s the best way to level the cake layers?
Use a serrated knife or cake leveler for clean cuts. Place the cake on a plate, then gently press the knife at a slight angle, rotating as you go. For extra precision, use a cake jig (a wooden dowel or skewer) to guide the knife. Always level before frosting—uneven layers make stacking difficult.

- 5 Lb Eye Round Roast Recipe: Slow-Braised to Melt-in-Mouth Tenderness - November 3, 2026
- 3-Hour Ciabatta Bread Recipe: Crusty Chews and Airy Holes Mastered - November 3, 2026
- 5 Fruit Salad Recipe: Vibrant Rainbow Layers With No Brown Spots - November 3, 2026