
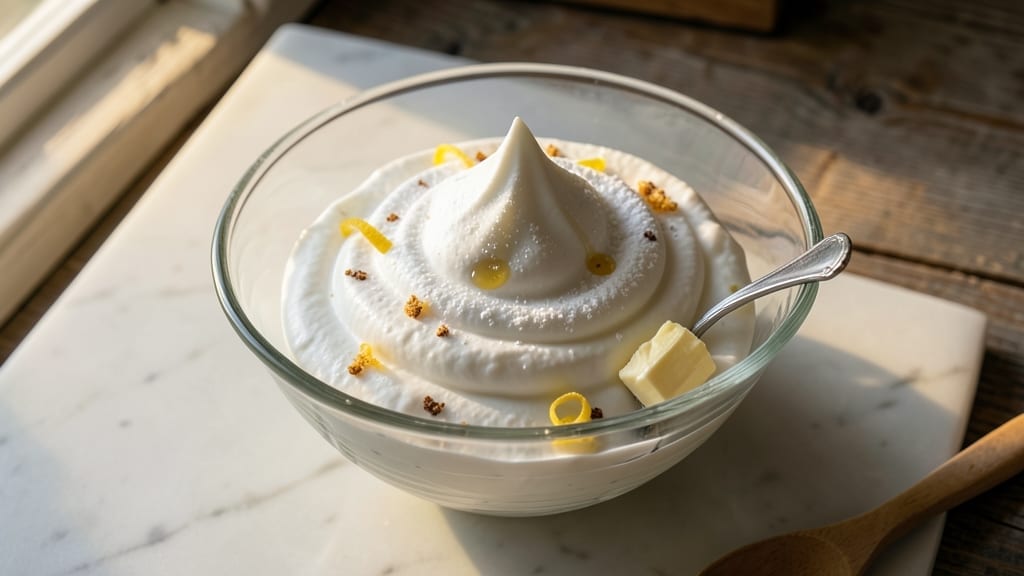
Creating 16 ounces of light, airy whipped cream in minutes is easier than you think—this recipe delivers professional-quality results every time. The secret lies in using cold heavy cream and a stabilizer (like powdered sugar or cornstarch) to prevent deflation, ensuring fluffy peaks that stay perfect for hours.
Whether you’re topping desserts, decorating cakes, or filling coffee cups, this method guarantees consistent texture without the guesswork.
This recipe uses simple, high-quality ingredients—just heavy cream, powdered sugar, and vanilla extract—to create 16 ounces of whipped cream in under 10 minutes. The powdered sugar acts as a stabilizer, preventing the cream from collapsing, while the vanilla adds a subtle, classic flavor.
For extra stability, you can also use cornstarch or gelatin, but powdered sugar is the easiest and most foolproof option for beginners.
What you’ll end up with is smooth, glossy whipped cream with stiff, holdable peaks—ideal for piping onto cakes, folding into fruit, or serving alongside hot beverages. The texture remains stable even after refrigeration, making it perfect for meal prep or last-minute dessert decorating.
The recipe scales easily, so you can double it for larger gatherings without sacrificing quality.
For flavor variations, simply swap the vanilla for chocolate, mint, or citrus zest—just add the extract or zest after whipping to avoid overmixing. Store any leftovers in an airtight container in the fridge for up to 3 days, though it’s best used fresh.
Ready to master this classic? Let’s get started.
Ingredients for 16 oz whipped cream
Six ingredients transform into 16 ounces of restaurant-quality whipped cream in minutes.
| Ingredient | Amount | Notes |
|---|---|---|
| Heavy Whipping Cream 🥛 | 16 oz | Cold, 36% fat minimum |
| Powdered Sugar 🍚 | 2 tbsp | Fine grain preferred |
| Pure Vanilla Extract 🌿 | 1 tsp | High-quality, no alcohol |
| Cornstarch 🌾 | ½ tsp | Alternative stabilizer |
| Unsalted Butter 🧈 | 1 tbsp | Optional for richness |
| Lemon Juice 🍋 | ½ tsp | Brightens flavor |
The heavy cream is non-negotiable—36% fat minimum guarantees those perfect peaks. Store-brand cream works fine, but Land O’Lakes or Organic Valley are my go-tos for consistent results. Chill the bowl and beaters in the freezer for 10 minutes before starting—this cold shock prevents deflation. Powdered sugar isn’t just sweetening; it’s the secret stabilizer that keeps your cream from collapsing. Grab the fine grain version from the baking aisle, not the confectioners’ sugar from the dessert section. Vanilla extract should be pure, no alcohol—Goya or McCormick are reliable brands that won’t overpower your cream.
No powdered sugar? Cornstarch at half the amount works in a pinch, though texture won’t be as stable. Swapping vanilla? Chocolate extract or mint extract add depth—just use the same ratio. Want extra richness? Add 1 tablespoon softened butter at the end for a decadent finish. The lemon juice brightens the flavor without altering texture—fresh is best, but bottled works if you’re in a rush. For flavor variations, add extracts or zest after whipping to avoid overmixing. And if you’re doubling the batch, use a stand mixer with the whisk attachment—hand whisks struggle with 32 ounces.
This whipped cream stays perfect for 3 days refrigerated if stored in an airtight container with parchment paper pressed against the surface to prevent a skin. For longer storage, freeze in 1-ounce portions—thaw overnight in the fridge before using. Pro tip: Chill your piping bag in the freezer for 10 minutes before piping—it keeps the cream stable while decorating. And if you accidentally overwhip? Add 1 teaspoon warm water and beat again—it often brings back that silky texture. The butter addition? Add it last while mixing on low speed to avoid deflating your peaks.
Why You’ll Love This Recipe
- Fridge-to-Table Magic: I swear by this recipe because it turns something I already have into something special—no shopping required. Just chill the cream, add the cornstarch (that’s the secret for stability), and boom. No waiting for store-bought to thaw or wondering if it’s actually real.
- Vanilla Buttercream Dream: The butter and vanilla extract make this taste like a bakery’s secret. I’ll be real: the powdered sugar gives it that sweet cloud texture, but the butter? That’s what makes it dangerously good—especially when I pipe it over warm cookies or dump it on pancakes.
- Party in a Can: This is my go-to for birthdays, holidays, or when I just want to impress. Make a double batch, split it into containers, and suddenly you’ve got whipped cream for pies, coffee, or straight from the spoon. (Yes, even on a Tuesday night.)
- No-Waste Winner: The cornstarch trick means it stays fluffy for days in the fridge—no soggy disasters. And since I use what I have (that half-stick of butter, the vanilla I already cracked open), it’s also my budget-friendly hack. Less food waste, more happy endings.
Step-by-step instructions for perfect whipped cream
Transforming cold cream into light, airy clouds takes just minutes—here’s how to nail it every time.
Chill All Equipment and Ingredients
Place your mixing bowl and beaters in the freezer for 10 minutes before starting. This cold shock is crucial—it prevents the cream from warming up too quickly during whipping, which can cause it to separate or turn grainy. Take the 16 oz heavy whipping cream out of the refrigerator just before you begin, as you want it cold but not frozen.
While everything chills, measure out the 2 tbsp powdered sugar, 1 tsp pure vanilla extract, 0.5 tsp cornstarch, and 0.5 tsp lemon juice. The cornstarch acts as a stabilizer, helping the whipped cream hold its shape longer, while the lemon juice brightens the flavor and balances the sweetness. Keep these ingredients at room temperature—they’ll blend more smoothly with the cream.
Whip the Cream to Soft Peaks
Remove the chilled bowl and beaters from the freezer and pour in the 16 oz heavy whipping cream. Using a stand mixer fitted with the whisk attachment, begin whipping on medium speed for 1-2 minutes until the cream starts to thicken slightly. You’ll notice small bubbles forming on the surface and the mixture becoming slightly lighter in color.
This initial stage is where the magic happens—the fat globules in the cream begin to break down and incorporate air. If you’re using the optional 1 tbsp unsalted butter, add it now and whip for an additional 30 seconds to fully incorporate. The butter adds richness and helps create an ultra-smooth texture, but it’s not essential for basic whipped cream.
Add Sweetener and Flavoring
With the mixer running on medium speed, gradually add the 2 tbsp powdered sugar, 1 tsp pure vanilla extract, 0.5 tsp cornstarch, and 0.5 tsp lemon juice one at a time. Let each ingredient blend in completely before adding the next—this prevents clumping and ensures even distribution. The mixture should look slightly thicker and more opaque as the sugar dissolves and the flavors integrate.
Here’s the thing—if you add the sugar too quickly, you risk creating a grainy texture. The cornstarch will help smooth this out, but it’s better to take your time. You’ll know you’re on the right track when the cream holds its shape when the beaters are lifted and forms soft peaks that collapse slightly when the whisk is removed.
Whip to Stiff Peaks
Increase the mixer speed to high and continue whipping for an additional 2-3 minutes until the cream forms stiff peaks. Stiff peaks are when the whipped cream holds its shape firmly when the beaters are lifted and the tip of the whisk leaves a distinct trail in the cream. It should look thick, glossy, and almost like a soft meringue.
Don’t over-whip—once the cream reaches stiff peaks, it can quickly turn into butter if you continue. Over-whipped cream loses its airiness and becomes dense and grainy. You want to stop just as the peaks form, not a second later. If you’re unsure, do the “trail test”: lift the whisk and see if the cream holds a clear, sharp peak that doesn’t collapse immediately.
Serve Immediately or Store Properly
Transfer the whipped cream to a serving bowl or piping bag fitted with a star tip. Use it immediately for toppings, desserts, or beverages, or store it in an airtight container in the refrigerator for up to 24 hours. If you need to store it for longer, spread it in a thin layer on parchment paper to prevent a skin from forming, then roll it up and place it back in the container.
For the best results, use the whipped cream within 4-6 hours of making it. The texture will start to break down as it sits, especially if the room temperature is warm. If you notice the cream becoming grainy or losing its stiffness, simply re-whip it briefly with a hand mixer to restore its lightness. Enjoy your perfect, cloud-like whipped cream!
Pro Tips For Making 16 Oz Whipped Cream
- Chill the Bowl First: Cold is your best friend here—pop your mixing bowl and beaters in the freezer for 10 minutes before starting. I learned this the hard way after struggling to get my cream to stiff peaks in a warm kitchen; the bowl absorbs heat like a sponge, and that’s the last thing you want when whipping.
- Whip in Stages: Don’t dump all the powdered sugar at once. Start with half, whip until soft peaks form, then add the rest—this keeps the cream light and airy instead of grainy. Cornstarch is your secret weapon here, but it needs time to dissolve properly, so mix it with a splash of cold cream first.
- Skip the Overmixed Butter: Once your whipped cream reaches stiff peaks, fold in the softened butter gently—just until combined. Overmixing turns it into buttercream, and that’s a texture shift you can’t undo. Use a spatula and work fast; the cream starts to break down the second you linger.
- Use Real Vanilla: That imitation vanilla extract? Skip it. Pure vanilla has compounds that actually enhance the cream’s flavor and stability. A splash (about ½ teaspoon) makes a real difference, especially if you’re serving this on berries or chocolate—it bridges the gap between sweet and rich. (Yes, even if you’re on a budget, a small bottle lasts forever.)
Best sauces and condiments for 16 oz whipped cream
Classic Vanilla Pairings
This classic whipped cream shines with hot coffee or lattes—the vanilla flavor complements the bitterness beautifully. I always keep a jar of Ghirardelli dark chocolate squares on hand to pair with my whipped cream for a decadent dessert combo.
The contrast of warm coffee and cool cream is pure comfort. 💛
Fruit Toppings
Fresh berries like strawberries or raspberries add vibrant color and acidity that balances the sweetness. I like to arrange them on a chilled dessert plate before adding a dollop of whipped cream.
For a tropical twist, try mango slices or pineapple chunks—the natural sweetness pairs perfectly with the vanilla. A squeeze of lime juice over the fruit enhances the flavors.
Chocolate Variations
Swap the vanilla extract for 1 teaspoon chocolate extract (like Goya) or fold in 2 tablespoons melted dark chocolate for a rich, decadent version. I recommend using 70% dark chocolate for depth.
For an extra touch, sprinkle crushed peppermint candies or sea salt flakes on top—it sounds fancy but takes seconds. This version is perfect for chocolate-dipped strawberries or brownies.
Citrus Brightness
Add ½ teaspoon lemon zest or orange extract for a zesty twist. The citrus cuts through the creaminess, making it ideal for citrus desserts or summer fruit salads. I love pairing this with baked peaches or grilled pineapple—the caramelized fruit flavors contrast wonderfully with the light cream.
A dash of orange liqueur (like Cointreau) adds sophistication for special occasions.
Spiced Cream
Infuse the cream with ½ teaspoon cinnamon or a pinch of nutmeg for a cozy, autumnal flavor. I often use this version with pumpkin pie or apple cider donuts.
For a boozy twist, add 1 teaspoon bourbon or rum—the warmth of the spices pairs beautifully with the alcohol’s depth. This spiced whipped cream is a crowd-pleaser during the holidays. ✨
Savory Surprises
Don’t limit whipped cream to desserts! Fold it into creamy dips for vegetable platters or seafood—the acidity of lemon juice balances rich flavors like smoked salmon. I’ve even used it as a filling for crepes with ham and cheese—it adds a luxurious touch.
For a sweet-savory combo, pair it with figs and prosciutto for an elegant appetizer.
Nutrition facts
Frequently asked questions
Can I use regular whipping cream instead of heavy whipping cream?
No, you must use heavy whipping cream (36% fat minimum)—it contains enough fat to create stable peaks. Regular whipping cream (often 30% fat) won’t whip as high or hold its shape. For best results, always check the label for the fat percentage.
What if my whipped cream turns grainy?
Graininess usually happens when the cream warms up too quickly or you overwhip it. To fix it, add 1 teaspoon warm water and re-whip briefly on low speed. For prevention, chill your bowl and beaters in the freezer for 10 minutes before starting. Also, avoid adding sugar too quickly—it should dissolve gradually while mixing.
How do I make whipped cream without a mixer?
Use a hand whisk or balloon whisk and work in a chilled metal bowl. Whisk vigorously in 30-second bursts with 30-second rests—this prevents overheating. It takes 5-7 minutes of consistent effort, but the cold shock from the bowl helps maintain stability. For best results, use a stand mixer—hand whisks can’t incorporate air as efficiently.
Can I make this recipe with coconut cream?
Yes, but the texture will be different—coconut whipped cream is lighter and sweeter. Use 1 can (13.5 oz) full-fat coconut milk (refrigerated overnight), scoop out the thick cream layer, and whip with 3 tbsp powdered sugar and 1 tsp vanilla. It won’t hold stiff peaks as long but works beautifully for tropical desserts. Store in the fridge for up to 2 days.
Why did my whipped cream deflate after sitting?
Deflation happens when the cream warms up or lacks stabilizers. To prevent it, store in an airtight container with parchment paper pressed against the surface. Keep it refrigerated and use within 4-6 hours. If it deflates, re-whip briefly with a hand mixer—it often restores the texture. For extra stability, add 0.5 tsp cornstarch to the recipe.

- 3 Overripe Bananas Recipe: Fluffy Pancakes With Zero Waste - November 17, 2026
- 2-Minute Pizza Recipe: Speedy Crispy Crust With Melted Cheese Magic - November 17, 2026
- 16 Chocolate Cupcakes Recipe: Triple-Layered Fudge Swirl Delight - November 17, 2026