
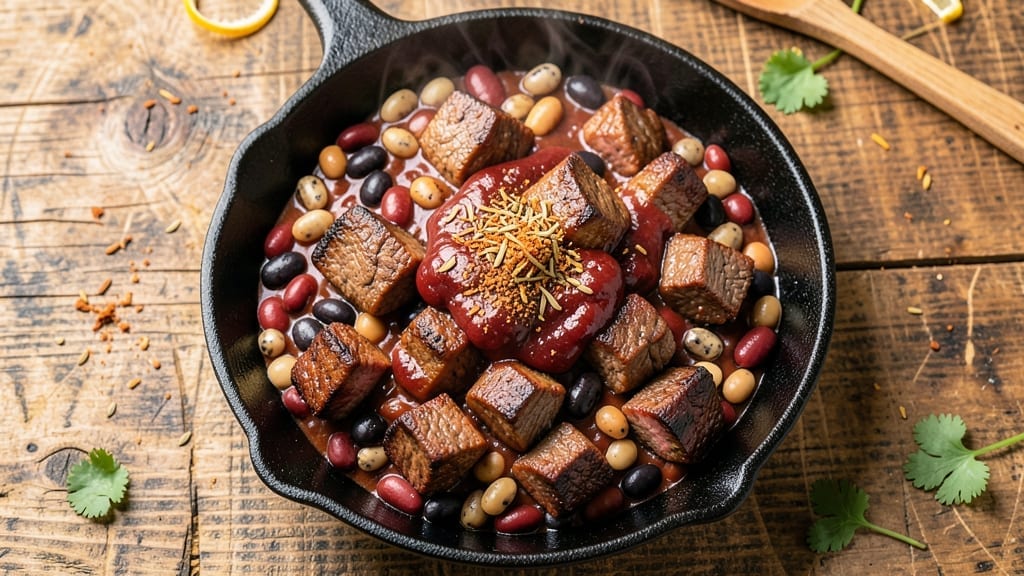
This 2-alarm chili recipe with beans delivers the kind of slow-building heat that turns a weeknight into a flavor adventure—deep, spiced, and packed with hearty black beans and kidney beans that soak up every layer of smoky, chili powder-infused richness.
The secret lies in layering spices gradually, letting their flavors meld over 3 hours of simmering until the broth thickens into a velvety, slightly sticky sauce that clings to every bite.
What starts as a mild, aromatic base evolves into something bold and complex, with just the right kick to linger on your palate.
Perfect for feeding a crowd or meal prepping, this chili transforms tough cuts of beef into tender, fork-shreddable chunks while the beans hold their shape and absorb the deep, earthy flavors.
The foolproof method ensures you won’t end up with a watery pot—just a rich, hearty stew that tastes even better the next day, when the spices have had time to fully develop.
It’s the kind of dish that gets better with time, rewarding patience with layers of flavor that balance smoky, sweet, and spicy notes.
By the time you’re ready to serve, you’ll have a steaming pot of chili with a deep, caramelized crust on the bottom and a thick, aromatic broth that’s perfect for ladling over rice or serving alongside warm cornbread.
The heat builds gradually, giving you control over the spice level—adjust with more chili powder if you crave extra fire or a pinch of sugar to balance the acidity. This isn’t just chili; it’s a restaurant-quality experience that feels like a hug on a cold night.
Pair it with a simple green salad to cut through the richness or serve it straight from the pot with a dollop of sour cream and chopped cilantro for freshness. The leftovers?
Even better. This chili is designed to improve overnight, as the flavors deepen and the spices meld into a cohesive, addictive harmony. Let’s get cooking—your taste buds will thank you.
Ingredients for 2 alarm chili recipe with beans
Pantry staples plus a few key ingredients for chili that builds heat all night.
| Ingredient | Amount | Notes |
|---|---|---|
| Chuck Roast 🥩 | 2 ½ lb | Cut into 1-inch cubes |
| Black Beans 🌿 | 1 can | Drained and rinsed (15 oz) |
| Kidney Beans 🌿 | 1 can | Drained and rinsed (15 oz) |
| Chili Powder 🌶️ | 4 tbsp | Smoked variety preferred |
| Ground Cumin 🌿 | 2 tbsp | Toasted for depth |
| Garlic Powder 🧄 | 1 tbsp | Freshly ground preferred |
| Onion Powder 🧅 | 1 tbsp | For aromatic base |
| Dried Oregano 🍃 | 1 tsp | Mexican oregano ideal |
| Cayenne Pepper 🔥 | 1 tsp | Adjust for heat |
| Salt 🧂 | 2 tsp | Kosher or sea salt |
| Black Pepper 🌶️ | 1 tsp | Freshly ground preferred |
| Yellow Onion 🧅 | 1 whole | Diced, medium size |
| Tomato Paste 🍅 | 2 tbsp | Squeeze tube preferred |
| Beef Broth 💧 | 4 cups | Low-sodium preferred |
| Water 💧 | 2 cups | For thinning broth |
The chuck roast is your secret weapon here—it breaks down beautifully into tender chunks. Costco or Walmart usually have it pre-cut, but if you grab a whole roast, cube it yourself for even cooking. Look for good marbling, which means more flavor. The beans? Canned is fine, but if you’re feeling fancy, soak dried beans overnight. For the spices, Penzeys or bulk bins at Whole Foods have the best quality, but regular grocery store brands work too. Just make sure your chili powder is fresh—it should smell aromatic, not dusty.
No smoked chili powder? Regular chili powder plus a pinch of liquid smoke gets you close. Short on cumin? Ground coriander at half the amount works in a pinch. The tomato paste can be jarred, but those squeeze tubes at Trader Joe’s are perfect—no waste, and they keep forever. For the onion, yellow or red both work, but yellow has a slightly sweeter flavor. If you’re watching sodium, use low-sodium beef broth and add salt to taste at the end. The cayenne is where you control the heat—start with less if you’re not a fan of spice.
This chili tastes even better the next day, so make a big batch. Keeps for 4-5 days in the fridge or 3 months in the freezer. I portion mine into containers so lunches are sorted for the week. For reheating, start on low heat and stir occasionally—you don’t want to break up the beans. Serve with sharp cheddar cheese and sour cream on top for that restaurant-quality finish. The crust on the bottom? That’s the good stuff—scrape it up and eat it too.
Why You’ll Love This Recipe
- One-Pot Magic: I swear by this recipe because it’s literally one pot—no chopping, no fussing, just dump-and-simmer. The chuck roast practically falls apart on its own, and those beans? They soak up all the smoky chili powder and cumin like sponges.
- Deep, Smoky Kick: Here’s what sold me—the way the cumin and chili powder toast in the pot first thing creates this insane aroma. The black and kidney beans add this perfect chewy contrast to the tender meat, and honestly? It’s the kind of flavor that makes you want to eat it straight from the pot.
- Game for Any Day: Between us, this chili is my lazy Sunday staple, my potluck hero, and the only thing keeping me sane on game-day nights. Serve it with cornbread or tortilla chips, or just eat it straight from the bowl—no judgment here.
- Budget Meets Bulk: A pound of chuck roast and a can of beans stretch this into days of leftovers, and it’s still cheaper than takeout. I’ll be real: I’ve had this for breakfast with eggs, lunch with avocado, and dinner with a side salad—it’s that versatile. Plus, the more it sits, the richer it gets.
Step-by-step instructions for deep-spiced bean chili
Here’s how to build layers of flavor that deepen as it simmers all night.
Brown the Chuck Roast for Rich Foundation
Heat a large Dutch oven over medium-high heat. Add the 2.5 lb chuck roast cut into 1-inch cubes in a single layer, working in batches if needed. Don’t crowd the pan—this prevents proper browning. Let the meat sear for 4-5 minutes per side until deeply browned with a crust forming. You’re developing the Maillard reaction here, which creates that deep, meaty flavor that carries through the entire chili.
As the meat browns, it’ll release its natural juices. Don’t wipe them away—those juices form the base of your sauce. Once all pieces are browned, remove them from the pot and set aside. You’ll notice the pot has some browned bits stuck to the bottom—this is flavor gold. We’ll scrape those up later when we deglaze.
Build the Spice Base with Onions and Aromatics
In the same Dutch oven, add the diced yellow onion and cook over medium heat for 5-6 minutes until softened and translucent. You’ll see the onions release moisture as they cook—this is normal. After the onions soften, stir in the 2 tbsp tomato paste and cook for another 2 minutes until it darkens slightly and loses its raw taste.
Now add the spices: 4 tbsp chili powder, 2 tbsp ground cumin, 1 tbsp garlic powder, 1 tbsp onion powder, 1 tsp dried oregano, 1 tsp cayenne pepper, 2 tsp salt, and 1 tsp black pepper. Stir vigorously for 30 seconds to toast the spices—you’ll smell that warm, earthy aroma. This step activates the spices’ flavors, making them more potent in the finished chili.
Simmer the Meat and Develop the Broth
Return the browned chuck roast to the pot and pour in the 4 cups beef broth and 2 cups water. Stir well to combine, scraping up those browned bits from the bottom. Bring everything to a gentle boil, then reduce heat to low and let it simmer uncovered for 1 hour. You want slow cooking here—this breaks down the meat fibers and infuses the broth with deep flavor.
After 1 hour, the meat should be fork-tender when pierced. If it’s not quite there yet, continue simmering for another 15-20 minutes. The liquid should reduce slightly, creating a thicker base. Here’s the thing—don’t rush this step. The longer the meat cooks in the liquid, the more flavor it releases, and the richer your chili will become.
Add Beans and Finish with Texture
Stir in the 1 can drained black beans and 1 can drained kidney beans. These beans add heartiness and texture contrast to the tender meat. Give everything a good stir and return to a simmer for another 30-45 minutes. The beans will absorb some of the liquid, and the chili will thicken naturally as it cooks down.
Taste the chili at this point—you’re looking for a balance of heat, salt, and meaty richness. If it needs more depth, add another ½ teaspoon of salt or a pinch of cayenne pepper. If it’s too thick, stir in ¼ cup water to reach your preferred consistency. The beans should be heated through but still hold their shape—overcooking will make them mushy.
Rest and Serve for Maximum Flavor
Once the chili reaches your desired consistency and the meat is completely tender, remove it from heat. Let it rest for 10-15 minutes before serving. This resting period allows the flavors to meld together and the liquid to fully absorb into the meat and beans. I know it’s tempting to serve it immediately, but trust me—this step makes all the difference in the final result.
Serve the chili hot in bowls, garnished with extra chili powder or fresh cilantro if you like. The flavors will continue to develop as it sits, getting even better after 30 minutes or so. This chili tastes best the next day when all the spices have fully integrated—it’s worth making ahead if you can.
Pro Tips For Making 2 Alarm Chili Recipe With Beans
- Sear the Chuck Roast: Chuck roast loves a good crust, and skipping this step means flavor hiding in the background. Hit it with a hot skillet—no oil needed—until every side turns deep brown. I used to rush this, and the chili always tasted like it needed more seasoning. Take the extra 30 seconds; your taste buds will notice.
- Toast the Spices: Chili powder and cumin aren’t just seasonings—they’re aromatics. Dry-toast them in the pot for 30 seconds before adding anything else. The nutty, toasty depth they develop is what separates good chili from great. (Yes, even if it smells weird at first.)
- Don’t Drown the Beans: Black and kidney beans release starch like crazy when overcrowded. Add them in batches, stirring between each, or you’ll end up with a gluey mess instead of tender, flavorful beans. I learned this after one particularly disastrous batch where the chili had the consistency of pudding.
- Simmer Low and Slow: After the initial sear and spice toast, drop the heat to a bare simmer—think tiny bubbles, not a rolling boil. Chuck roast needs time to break down, and rushing it turns it tough. Cover the pot and let it hum for at least 2 hours. (I know, I know—it’s tempting to speed it up, but trust the process.)
Essential equipment for this dish
Dutch Oven
This is my go-to pot for chili—it’s heavy enough to handle the long simmer without scorching, and its tight lid traps steam to infuse flavors. I use a Lodge 5.5-quart Dutch oven (about $80 at Williams Sonoma) because it distributes heat evenly and lasts forever.
For budget-friendly options, a Calphalon 5.5-quart ($50) works just as well. Avoid nonstick—it can’t handle the high heat needed for proper browning. 🔥
Meat Thermometer
A thermometer is non-negotiable for perfect chili. I rely on the Thermoworks Smoke ($30) because it’s durable and has a long probe for checking meat temp in the pot. Insert it into the thickest piece of chuck roast—when it hits 203°F, your meat is fork-tender.
No guessing! For a cheaper option, the Ozeri Pocket Pop ($15) is accurate and compact. Pro tip: Keep it in your chili pot while cooking to avoid cross-contamination.
Wooden Spoon
Metal utensils can scratch your Dutch oven, so I always use a wooden spoon (I love the OXO Good Grips $12) for stirring. It’s gentle on the pot and helps scrape up those flavorful browned bits from the bottom.
If you don’t have one, a heat-resistant silicone spatula works too—just avoid plastic, which can melt. Stirring occasionally prevents sticking and ensures even cooking.
Instant-Read Thermometer
For testing the chili’s doneness and adjusting heat, an instant-read thermometer is a game-changer. The Meater ($99) is my top pick for its precision, but the Thermapen One ($50) is a great mid-range option.
Use it to check the internal temp of the meat and the broth’s consistency—aim for 160°F for safe eating. It’s also handy for adjusting spice levels by testing the heat of your chili powder or cayenne before adding it to the pot. ✨
Slotted Spoon
A slotted spoon (like the OXO Stainless Steel $15) is essential for skimming excess fat from the surface while the chili simmers. I use it to remove foam and fat every 30 minutes to keep the chili rich but not greasy.
The slots let liquid drain back into the pot, so you don’t lose flavor. For a budget option, any stainless steel spoon with holes works—just avoid plastic, which can’t handle high heat.
Lid
Your Dutch oven’s lid is just as important as the pot itself. A tight-fitting lid (preferably with a handle) ensures steam circulates and flavors meld. If your lid doesn’t fit well, consider a separate heavy-duty lid (like the All-Clad Stainless Steel $30) for better heat retention.
Pro tip: Crack the lid slightly during the last 15 minutes of cooking to let excess moisture escape—this helps thicken the chili naturally. 💫
Nutrition facts
Frequently asked questions
Can I substitute ground beef for chuck roast in this recipe?
Yes, but expect a slightly different texture. Ground beef cooks faster and can make the chili more tender. Use 1.5 lbs of 80/20 ground chili blend instead, browning it first to develop deep flavor. For best results, add 1 tbsp tomato paste to help thicken the chili since ground beef releases more liquid. The heat level will be similar, but the meat won’t be as chunky.
How can I adjust the spice level if cayenne is too intense?
Start by reducing the cayenne to ½ teaspoon or omit it entirely. For balance, add 1 teaspoon sugar or ½ teaspoon baking soda (it neutralizes capsaicin) after cooking. If you love heat but want smoother spice, try smoked paprika instead—it adds depth without the sharp burn. Taste as you go and adjust gradually.
Can I make this chili in a slow cooker instead of a Dutch oven?
Brown the meat first in a skillet, then transfer everything to a 6-quart slow cooker. Cook on low for 6-7 hours or high for 3-4 hours, stirring occasionally. The slow cooker’s gentle heat enhances the spices naturally. For extra richness, add ½ cup beef broth if it gets too thick. The texture will be slightly softer but still delicious.
What’s the best way to reheat leftovers without making the beans mushy?
Reheat chili gently on the stove over low heat, stirring frequently. Add 1-2 tablespoons of water or broth to prevent drying. For microwave reheating, cover with a damp paper towel and heat in 30-second intervals, stirring between each. Avoid high heat—it breaks down the beans’ structure. Leftovers taste even better the next day as flavors meld!
Can I add other vegetables to this chili?
Yes! Try diced bell peppers (add with beans) or chopped zucchini (last 15 minutes). For heartiness, add 1 cup corn kernels or diced tomatoes. Just avoid starchy veggies like potatoes—they can make the chili gluey. Add veggies in the last 30 minutes of cooking to preserve texture and freshness.

- 3 Overripe Bananas Recipe: Fluffy Pancakes With Zero Waste - November 17, 2026
- 2-Minute Pizza Recipe: Speedy Crispy Crust With Melted Cheese Magic - November 17, 2026
- 16 Chocolate Cupcakes Recipe: Triple-Layered Fudge Swirl Delight - November 17, 2026