
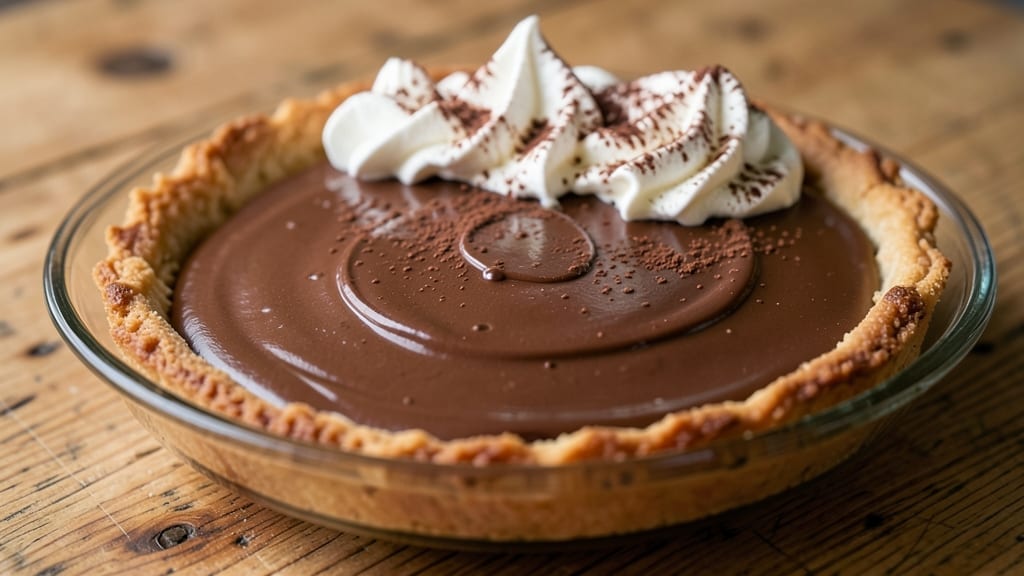
A no-bake chocolate pie with only two ingredients delivers rich, fudgy perfection without the fuss of traditional baking. This recipe transforms simple pantry staples into a velvety, melt-in-your-mouth filling that sets beautifully—no oven required.
The secret lies in precise timing and temperature control, ensuring a texture that rivals homemade pudding but with the elegance of a classic pie.
The beauty of this recipe is its simplicity: just sweetened condensed milk and cocoa powder create the filling, while a store-bought graham cracker crust handles the base. No measuring cups, no mixing bowls, and no waiting for an oven to preheat.
What you’ll end up with is a pie that’s foolproof, restaurant-worthy, and ready in under 30 minutes—ideal for last-minute dessert cravings or when you want to impress without stress.
This pie’s magic comes from the way the filling thickens as it chills, developing a fudgy center that contrasts beautifully with the crisp crust. The result is a dessert that’s equally satisfying warm (straight from the fridge) or at room temperature, making it perfect for potlucks or spontaneous gatherings.
No one will guess it took just two ingredients to create.
Serve with whipped cream or a dollop of vanilla ice cream to elevate it further, or enjoy it as-is for a guilt-free indulgence. The simplicity of the recipe doesn’t compromise on flavor—every bite is rich, chocolatey, and perfectly balanced. Let’s make this pie!
Ingredients for 2 ingredient chocolate pie
Two core ingredients plus optional toppings create this ultra-simple, no-bake chocolate masterpiece.
| Ingredient | Amount | Notes |
|---|---|---|
| Sweetened Condensed Milk 🥛 | 1 can | Unopened, 14 oz can |
| Unsweetened Cocoa Powder 🍫 | ½ cup | High-quality Dutch-processed |
| Graham Cracker Crust 🍪 | 1 package | Store-bought, 14.3 oz box |
| Heavy Whipping Cream 🥛 | 1 cup | Cold, for topping (optional) |
| Vanilla Extract 🍦 | ½ tsp | Pure, for enhanced flavor |
| Salt 🧂 | ¼ tsp | Fine sea salt |
| Dark Chocolate Chips 🍫 | ¼ cup | For garnish (optional) |
The sweetened condensed milk is non-negotiable—it’s the backbone of this pie’s velvety texture. Store-brand or name-brand cans both work, but avoid those with dents or bulging tops. For the cocoa powder, Hershey’s Special Dark or Ghirardelli deliver the richest flavor, though any high-quality Dutch-processed powder will suffice. The graham cracker crust? Nabisco or Honey Maid are the most reliable for a sturdy, buttery base. If you’re feeling fancy, toast the crust lightly before adding the filling—it adds a subtle crunch that elevates the whole pie. The vanilla extract and salt might seem minor, but they’re what transform this from ‘good’ to ‘restaurant-quality’—don’t skip them.
No sweetened condensed milk? Sweetened coconut condensed milk works in a pinch, though the flavor will be subtly different. Running low on cocoa powder? Melted dark chocolate (about 3 oz) can substitute, but you’ll need to strain out the solids. The whipping cream topping is entirely optional, but if you’re serving this warm, it’s a must—Crest or Whipped Cream from the grocery store tub works perfectly. For the chocolate chips, any semi-sweet or dark variety will do, but Ghirardelli or Nestlé Toll House are the most reliable for that perfect melt. Prefer a different garnish? Crushed pretzels or toasted nuts add an interesting crunch contrast.
This pie keeps beautifully in the fridge for up to 5 days, though it’s best enjoyed within the first 24 hours for peak texture. For longer storage, wrap tightly in plastic and freeze—it’ll last for up to 3 months. The filling thickens as it chills, so let it sit at room temperature for 10 minutes before serving for the perfect fudgy center. If you’re prepping ahead, assemble the pie and refrigerate the filling separately, then combine just before serving. The crust stays crisp when stored properly, so there’s no need to worry about sogginess.
Why You’ll Love This Recipe
- Pantry Magic: I swear, this pie comes together when I’m staring blankly at my fridge wondering what to eat. Just crack open a can of condensed milk, stir in cocoa powder—no measuring cups, no stress—and you’ve got the base. The graham crust handles the rest like a champ.
- Rich Without Effort: That velvety condensed milk and cocoa combo? It’s like someone poured liquid decadence into a pie dish. Top it with whipped cream, and honestly, I’ve had people ask if I hired a pastry chef. (Spoiler: I just mixed two things.)
- Birthday or Boredom: Between us, this pie works for everything—a last-minute dessert for company, a midnight craving, or when my kid “accidentally” burns dinner. The graham crust adds that buttery crunch, and the vanilla-kissed filling? Instant crowd-pleaser.
- Budget-Friendly Luxury: I’m not joking—this costs less than takeout but feels like a fancy treat. Condensed milk and cocoa powder stretch my grocery budget, and leftovers? They disappear faster than I can say “second slice.” (Yes, even on a Tuesday night.)
Step-by-step instructions for a fudgy no-bake chocolate pie
This two-ingredient filling delivers a rich, velvety center with minimal effort—just combine and chill.
Prepare the Graham Cracker Crust
Remove the graham cracker crust from its packaging and press it firmly into a 9-inch pie dish, ensuring it covers the bottom and sides completely. Use your fingers or a small rolling pin to smooth out any uneven areas—this creates a solid foundation that won’t crack during chilling. Place the crust-lined dish in the freezer for 10 minutes to firm up slightly before adding the filling. A chilled crust prevents melting when the warm filling is poured in.
While the crust chills, take a moment to check for any loose crumbs along the edges. Press them down gently with your fingertips, as these can create weak spots. The crust should sit flat and snug in the dish, with no gaps where filling might seep through. This step ensures your pie holds together perfectly without soggy bottoms.
Combine the Filling Ingredients
In a medium mixing bowl, pour the 1 can of Sweetened Condensed Milk and stir in the 0.5 cup of Unsweetened Cocoa Powder using a silicone spatula. Mix until the cocoa powder is fully dissolved and the mixture is smooth, with no visible streaks. The texture should be thick and glossy, resembling melted chocolate. If you encounter small lumps, press them against the side of the bowl with the spatula to break them up completely.
Next, add the 0.5 teaspoon of Vanilla Extract and 0.25 teaspoon of Salt, stirring gently to distribute evenly. The salt enhances the chocolate flavor, while the vanilla adds depth. At this stage, the mixture should be velvety and pourable—if it appears too thick, let it sit at room temperature for 2-3 minutes to warm slightly, making it easier to work with.
Pour and Chill the Filling
Remove the crust from the freezer and pour the chocolate mixture evenly over it, spreading it out to the edges with the back of the spatula. Use gentle, sweeping motions to create a smooth, level surface—this prevents air pockets and ensures an even set. Tap the pie dish lightly on the counter a few times to help any trapped air bubbles rise to the surface before they harden.
Cover the pie loosely with plastic wrap and refrigerate for at least 4 hours, or until the filling is completely set and firm to the touch. The longer it chills, the thicker and fudgier the texture becomes. A properly chilled pie will hold its shape when inverted, with a glossy, crackly top that indicates perfect firmness. Avoid cutting into it too soon—rushing this step can result in a runny filling.
Add Toppings and Serve (Optional)
Once fully set, remove the pie from the refrigerator and let it sit at room temperature for 5-10 minutes to soften slightly before serving. If desired, spread the 1 cup of Heavy Whipping Cream over the top in a thin, even layer, using the back of a spoon to create swirls. For extra indulgence, sprinkle the 0.25 cup of Dark Chocolate Chips over the cream before it sets, pressing them lightly into the surface.
Slice the pie with a warm knife for cleaner cuts, wiping the blade between slices to maintain sharp edges. Serve immediately for the creamiest texture, or store leftovers in the refrigerator for up to 3 days, covered tightly. The contrast of the cool, fudgy center with the whipped cream topping creates a luxurious dessert experience with just a handful of ingredients.
Pro Tips For Making 2 Ingredient Chocolate Pie
- Whisk the Cocoa First: Dump that cocoa powder into the condensed milk before adding anything else—this prevents clumps that turn your pie filling into a grainy mess. I learned this the hard way after scraping lumps out of what should’ve been silky smooth filling.
- Chill the Cream Hard: Pop the heavy whipping cream in the freezer for 10 minutes before whipping—it stiffens faster and holds its shape better. Skip this, and your topping will melt into the pie the second it hits the oven.
- Press the Crust Firm: Pack the graham cracker crust tightly into the pan—no gaps, no loose crumbs. I used to rush this, and the filling would leak everywhere. Press it like you’re sealing a pie crust, and it’ll stay put.
- Fold, Don’t Stir: When mixing the whipped cream into the chocolate base, fold it in with a spatula—gentle, sweeping motions. Stirring too hard deflates the cream and makes the texture dense. Think “clouds,” not “soup.”
Storing and reheating this recipe
Refrigerator Storage
Store your no-bake chocolate pie in an airtight container or tightly wrapped with plastic wrap in the refrigerator for up to 5 days. The filling thickens beautifully as it chills, creating that signature fudgy center.
I like to place a small plate over the top before sealing to prevent any absorption of fridge odors—this keeps the chocolate flavor pure and vibrant. 🥛
For the best texture, let the pie sit at room temperature for 10 minutes before serving after refrigeration. This brief warm-up softens the edges just enough to make slicing easier while maintaining that creamy interior.
If you’re prepping ahead, assemble the pie but refrigerate the filling separately, then combine just before serving to keep the crust crisp.
Freezer Storage
This pie freezes exceptionally well for up to 3 months without losing its rich flavor or texture. Wrap the entire pie dish tightly in heavy-duty aluminum foil followed by plastic wrap to create a double barrier against freezer burn.
Label the container with the date to track freshness—trust me, you won’t want to forget this dessert exists in your freezer! ❄️
When ready to serve, thaw the pie in the refrigerator overnight. Avoid microwave reheating, as it can make the filling grainy. Instead, let it sit at room temperature for 15-20 minutes before slicing. The texture will be slightly firmer than fresh, but still delightfully fudgy with that perfect crackly top.
Serving After Storage
If your pie has been stored for more than 24 hours, I recommend adding a thin layer of whipped cream or a dollop of vanilla ice cream to revive the experience. The cold contrast helps soften the edges and makes each bite feel fresh.
For extra indulgence, sprinkle crushed chocolate chips or toasted nuts over the whipped cream before serving—it adds a delightful crunch that cuts through the richness. 🍫
Slice with a hot knife (dip in warm water and wipe dry between cuts) for clean, professional-looking pieces. This technique prevents the filling from sticking to the blade and keeps your slices looking restaurant-worthy. Serve immediately after slicing to enjoy that perfect balance of cool, creamy filling and crisp crust.
Reheating Tips
While this pie is best enjoyed cold, you can gently warm individual slices if desired. Place a slice on a microwave-safe plate and heat for 10-15 seconds on low power—this just softens the edges without turning the filling rubbery.
For a more controlled approach, use a small saucepan with 2 tablespoons of water and warm the slice over low heat for 1-2 minutes, stirring occasionally. 🔥
Never reheat the entire pie at once, as the crust can become soggy. Instead, focus on warming just the slices you plan to serve immediately. If you’re serving a crowd, prepare fresh slices from a chilled pie—this guarantees the best texture and presentation every time.
Nutrition facts
Frequently asked questions
Can I make this pie without a graham cracker crust?
Yes! For a gluten-free option, use a store-bought almond flour crust or a crushed cookie crust made with digestive biscuits or gluten-free oatmeal cookies. Just press the alternative crust firmly into the pie dish and chill it for 10 minutes before adding the filling. The texture will be slightly different but still delicious.
Why did my pie filling turn grainy?
Graininess usually happens when the cocoa powder wasn’t fully dissolved or the mixture was chilled too quickly. Always stir the filling until completely smooth and let it sit at room temperature for 2-3 minutes before pouring into the crust. If it still looks grainy, gently warm the filling in a microwave for 10 seconds to help dissolve any lumps before chilling.
Can I use Dutch-processed or natural cocoa powder?
Both work, but Dutch-processed cocoa gives a smoother, richer flavor with less bitterness. Natural cocoa has a stronger chocolate taste but may require a touch more sweetness. For this recipe, Dutch-processed cocoa is ideal—it blends seamlessly with the sweetened condensed milk. If using natural cocoa, you might want to add 1 extra tablespoon of sugar to balance the flavor.
How do I fix a cracked or broken crust?
If the crust cracks before adding the filling, press it back into place and chill the pie for 1 extra hour to help it firm up. For cracks after chilling, cover them with extra whipped cream or melted chocolate chips to disguise them. If the crust is completely broken, use a small amount of melted butter to “glue” the pieces back together before chilling again.
Is this pie safe for kids with nut allergies?
Yes, this recipe is naturally nut-free! However, always check the labels on your graham cracker crust and cocoa powder for potential cross-contamination warnings. If you’re serving to someone with severe allergies, use a dedicated pie dish and utensils that haven’t come into contact with nuts. The filling ingredients are completely safe for nut-free diets.

- 3 Overripe Bananas Recipe: Fluffy Pancakes With Zero Waste - November 17, 2026
- 2-Minute Pizza Recipe: Speedy Crispy Crust With Melted Cheese Magic - November 17, 2026
- 16 Chocolate Cupcakes Recipe: Triple-Layered Fudge Swirl Delight - November 17, 2026