
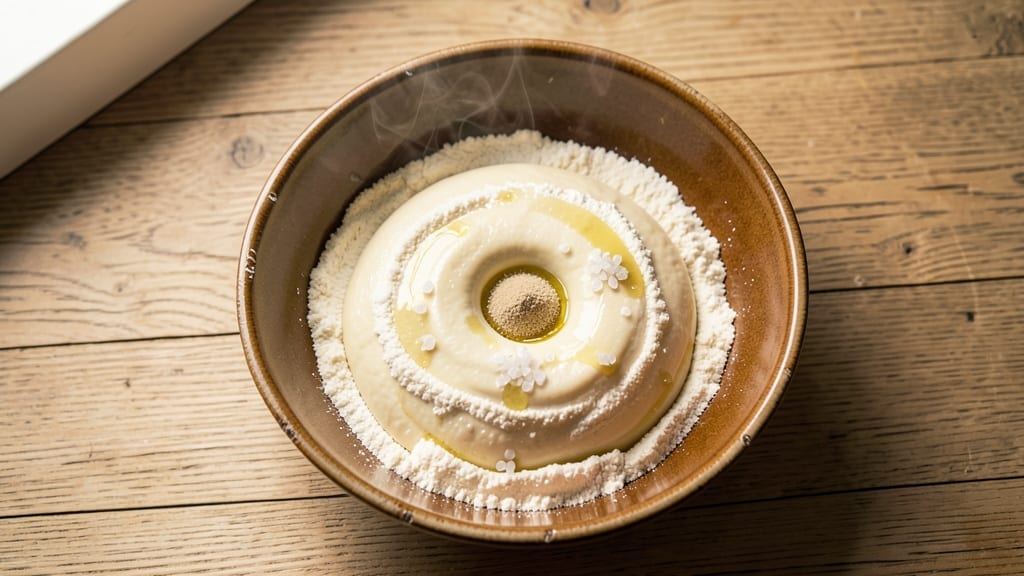
A no-knead crusty loaf made with just 3 cups of flour delivers restaurant-quality bread without the fuss or labor. This recipe transforms simple ingredients into a golden, crispy-crusted loaf with an airy interior—all in 3 hours from start to finish.
The secret lies in a long, slow fermentation that develops deep flavor and perfect texture, making it ideal for beginners or anyone craving artisanal bread without the complexity.
What sets this recipe apart is the minimal effort required—no kneading, no fancy equipment, just a bowl, a spoon, and your oven. The dough rests overnight (or at least 4 hours) at room temperature, allowing gluten to relax and flavors to meld naturally.
This method yields a crusty exterior with a tender, slightly chewy crumb, perfect for sandwiches, toast, or serving alongside soups.
With only 5 ingredients and 15 minutes of active prep, you’ll achieve bread that rivals store-bought or bakery loaves. The key steps—autolyse, bulk fermentation, shaping, and baking—are straightforward but critical for that professional-quality result.
Whether you’re baking for a family dinner or meal prepping, this recipe delivers consistent, foolproof results every time.
For even better results, consider adding a biga (pre-ferment) or experimenting with whole wheat flour for a nuttier flavor. The recipe scales easily, so double it for a larger loaf or halve it for a quick dinner roll. Let’s get started on your crusty, no-knead masterpiece—no experience required!
Ingredients for 3 cups flour bread
Five essential ingredients transform into restaurant-quality bread with minimal effort.
| Ingredient | Amount | Notes |
|---|---|---|
| All-Purpose Flour 🌾 | 3 cups | High-protein for better gluten development |
| Instant Yeast 🍞 | ¼ tsp | Active dry yeast works too |
| Fine Sea Salt 🧂 | 1 ½ tsp | Diamond Crystal preferred |
| Extra-Virgin Olive Oil 🫒 | ½ cup | High-quality for flavor |
| Warm Water 💧 | 1 ½ cups | 105-110°F for optimal activation |
The flour choice is critical here—high-protein (11-12% protein) yields better gluten structure for that signature crusty exterior. King Arthur or Bob’s Red Mill are reliable brands, but any all-purpose will work in a pinch. Bulk bins at Whole Foods often have fresher flour than pre-packaged bags. For an even more artisanal touch, substitute 1 cup whole wheat flour for the last cup of all-purpose—just be prepared for a slightly denser crumb. The yeast should be fresh: if it’s more than 3-4 months old, test it first by dissolving in warm water with a pinch of sugar to see if it foams within 10 minutes.
No instant yeast? Active dry yeast at half the amount works, but let it bloom in warm water with a pinch of sugar for 5 minutes before adding to the flour. The olive oil adds richness and tenderness—avocado oil is a neutral alternative if you prefer. Water temperature matters: too hot kills yeast, too cold slows fermentation. 105-110°F is ideal, but if you don’t have a thermometer, let tap water sit for 10 minutes after boiling to reach the perfect range. For a lower-carb option, replace 1 cup flour with almond flour, though texture will differ significantly.
This dough keeps beautifully for 2 days in the fridge before shaping—ideal for meal prep. After shaping, cover tightly with plastic wrap and refrigerate for up to 24 hours if your schedule allows. The longer cold fermentation enhances flavor. For baking, preheat your Dutch oven with a baking stone inside for 30 minutes—this creates that signature crust. Leftovers? Toast within 2 days for best texture, or freeze the whole loaf for up to 3 months—thaw overnight at room temperature.
Why You’ll Love This Recipe
- No-Fuss Dough: I swear by this—just mix, knead once, let it rise while I sip coffee. The yeast works fast, and the olive oil keeps it tender without fuss.
- Crusty Yet Soft: That golden crust? Achieved by a quick water spray before baking. Inside stays pillowy, thanks to the olive oil’s richness—no dry bites here.
- Budget Baking: Three cups of flour stretch far. Make two loaves, freeze extras, and still pay less than store-bought. My wallet and taste buds win.
- Weeknight Hero: Toss it together at lunch, let it rise overnight, bake fresh in the morning. Warm bread for breakfast? Yes, please—no excuses.
Step-by-step instructions for no-knead crusty loaf
Here’s the precise method for developing maximum gluten with minimal effort.
Mix the Dough with Precision
In a large bowl, combine the 3 cups all-purpose flour and 1.5 tsp fine sea salt. Create a well in the center and add the 0.25 tsp instant yeast. This high-protein flour will develop that signature open crumb structure when properly hydrated.
Slowly pour in the 0.5 cup extra-virgin olive oil and 1.5 cups warm water (105-110°F) while stirring with a wooden spoon. The dough will be shaggy at first—this is normal. Mix until just combined, about 2 minutes, stopping when flour streaks disappear. Overmixing develops too much gluten, which can make the bread dense.
Rest for Optimal Gluten Development
Cover the bowl tightly with plastic wrap and let the dough rest at room temperature for 1 hour. This initial rest allows the gluten to relax and the yeast to begin activating. You’ll notice the dough gradually pull away from the bowl’s edges—a visual cue that gluten is developing properly.
After 1 hour, perform a simple test: press your finger into the dough. If it springs back slowly (about 2-3 seconds), it’s ready for shaping. If it springs back immediately, let it rest another 15-20 minutes. This resting phase is what transforms simple ingredients into a professional-quality loaf.
Shape and Second Proof
Turn the dough onto a lightly floured surface and gently shape it into a round log, about 12 inches long. The dough should be smooth but not tight—press lightly with your knuckles to eliminate air bubbles. This shaping creates surface tension that will give your bread its signature oven spring.
Place the shaped dough seam-side up in a lightly oiled bowl, cover again, and let it proof at room temperature for 2-3 hours. You’re looking for the dough to nearly double in size and feel light when pressed gently. The edges should pull away cleanly from the bowl, indicating proper fermentation.
Bake for Maximum Crust Development
Preheat your oven to 450°F with a Dutch oven inside for 30 minutes. This high heat creates steam that’s essential for developing that coveted crust. Carefully transfer the dough (still in its bowl) to the hot Dutch oven using oven mitts.
Bake covered for 20 minutes, then remove the lid and bake for an additional 15-20 minutes until the crust is deep golden brown and sounds hollow when tapped on the bottom. The internal temperature should reach 190-200°F. This two-stage baking process ensures both a crisp exterior and tender interior.
Cool and Slice for Perfect Texture
Remove the bread from the Dutch oven and transfer it to a wire rack. Let it cool completely for at least 1 hour before slicing. This cooling period allows the gluten to fully relax, preventing a gummy crumb. The bread will continue to develop flavor as it cools.
Slice the loaf with a sharp serrated knife and serve within 24 hours for optimal freshness. The interior should reveal an open crumb structure with visible air pockets—proof of proper gluten development. Store any leftovers wrapped in a bread bag at room temperature for up to 3 days.
Pro Tips For Making 3 Cups Flour Bread
- MEASURE WATER BY TEMP: The recipe likely calls for “warm water,” but I learned this the hard way—lukewarm (105–110°F) is the sweet spot for instant yeast. Too hot and you kill it; too cold and it won’t activate. Stick a finger in the water—if it feels like bathwater, you’re good. (Yes, even if you’re impatient like me.)
- SALT THE WATER FIRST: Dissolve the sea salt in the warm water before adding yeast. This keeps the yeast from clumping and ensures even distribution—no more pockets of unsalted dough. I used to sprinkle it in later, and the flavor was noticeably weaker. (Your future self will thank you.)
- STOP KNEADING WHEN IT STICKS: This dough will feel sticky and fight you. The moment it starts to cleanly pull away from the bowl’s sides (about 5–7 minutes by hand), stop. Overworking it develops gluten too much, making the bread dense. I once kneaded for 12 minutes and got a brick. (Your hands will hate you less.)
- USE OLIVE OIL FOR RISE: Swap the olive oil for dough oil during bulk fermentation—it’s non-negotiable for flavor and texture. The EVOO keeps the crumb tender and adds a subtle richness. (I was skeptical until I tried it; now I never go back.) Brush the top with a little more before baking for that golden, crackly crust.
Common mistakes when making your 3 cups flour bread
Overmixing the Dough
I see this all the time—especially with beginners—and it’s the fastest way to ruin your bread’s texture. When you mix the dough beyond the 2-minute mark, you overdevelop the gluten, creating a dense, chewy loaf instead of that light, airy crumb we’re after.
The goal is to combine until no dry flour remains, but stop as soon as you see those streaks disappear. Think of it like whisking eggs: just until combined, not until it’s tough.
Pro tip: Use a wooden spoon instead of a dough whisk to avoid overworking. If your dough feels stiff or springs back immediately when pressed, it’s overmixed. No amount of kneading later will fix this—it’s a one-way ticket to dense bread. 💫
Skipping the Resting Phase
Rushing the 1-hour autolyse is a common mistake that leads to poor gluten development and weak structure. This resting period allows the flour to hydrate fully and the gluten strands to relax, setting the stage for that perfect open crumb.
If you skip it or cut it short, your dough will fight you during shaping and won’t rise properly in the oven.
Here’s how to tell if you’ve rested enough: Press your finger into the dough. If it springs back slowly (like a slow-motion bounce), it’s ready. If it pops right back (like a trampoline), give it another 15-20 minutes.
Patience here makes all the difference—trust me, your crust will thank you.
Incorrect Dough Temperature
Using water that’s too hot or too cold throws off yeast activation and fermentation timing. If your water is above 115°F, you’ll kill the yeast instantly, and if it’s below 80°F, fermentation will crawl along for days.
The sweet spot is 105-110°F, but most home cooks don’t have a thermometer.
No thermometer? Here’s a fail-safe: Let your tap water sit out for 10 minutes after boiling. This brings it down to the perfect range.
If your kitchen runs cold, warm the water slightly by microwaving it for 20-30 seconds and checking with your hand—it should feel warm but not hot to the touch. Yeast is finicky, but this method works every time.
Improper Proofing Conditions
Proofing in a drafty kitchen or near the oven’s heat source is a recipe for disaster. Yeast needs consistent, warm conditions (75-80°F) to ferment properly. If your dough proofing area is too cold, it’ll take forever to rise; if it’s too hot, the yeast will overproof and collapse.
I’ve seen doughs double in size in 30 minutes in a warm kitchen, only to deflate completely by baking time.
Create an ideal proofing environment by placing your dough in a turned-off oven with a bowl of hot water on the bottom rack. This traps heat and humidity, mimicking a professional proofing box.
If your kitchen is chilly, extend the proofing time by 30-60 minutes—just don’t let it exceed 2 hours at room temp, or you’ll risk overproofing.
Baking Without Steam
Skipping the Dutch oven’s steam phase is the #1 reason for pale, tough crusts. That 30-minute preheat with the pot inside isn’t just for show—it creates the steam that builds your bread’s signature crust.
Without it, you’ll end up with a dry, dense loaf that looks more like a brick than artisanal bread.
No Dutch oven? No problem. Place a metal tray on the oven rack below your baking stone and pour 1 cup boiling water into it when you load the dough.
The steam will rise and do the job. Just don’t forget to remove the tray after 10 minutes—you want that final crisping phase to happen with dry heat.
Cutting Too Soon
This is a cardinal sin in bread baking, and I’ve seen even experienced bakers fall for it. Slicing bread too soon—especially within the first 30 minutes—releases steam trapped in the crumb, turning your beautiful open structure into a gummy mess.
The bread needs that 1-hour cooling period to set properly.
Here’s my rule: If you can’t resist slicing, at least wait until the bread is completely cool to the touch. Pro tip: Place a wire rack over a baking sheet lined with a towel to catch any crumbs.
This not only prevents soggy bottoms but also makes cleanup a breeze. Your patience will be rewarded with clean slices and that perfect crumb.
Nutrition facts
Frequently asked questions
Can I substitute whole wheat flour for all-purpose in this recipe?
Yes, but replace only 1 cup of the all-purpose flour with whole wheat to maintain the right texture. Whole wheat has more protein and absorbs moisture differently, which can make the bread denser if used exclusively. For best results, use a 50/50 blend and expect a slightly nuttier flavor with a heartier crumb.
How do I know when the dough is fully proofed?
Look for two key signs: the dough should nearly double in size and feel light when pressed gently with one finger. It should leave a clean indent that springs back slowly (about 2-3 seconds). If it springs back immediately, it needs more time. For visual confirmation, check the edges—they should pull away cleanly from the bowl.
What if I don’t have a Dutch oven for baking?
No problem! Place a metal tray on the oven rack below your baking stone and pour 1 cup boiling water into it when loading the dough. This creates steam for 10 minutes, then remove the tray for the final 15-20 minutes of baking. The result will still have a crispy crust, though it may be slightly less pronounced than with a Dutch oven.
Can I make this bread ahead of time?
Shape the dough and refrigerate it overnight for enhanced flavor. The next morning, let it sit at room temperature for 1-2 hours before baking. This cold fermentation deepens the taste and improves texture. Store baked loaves wrapped in a bread bag at room temperature for up to 3 days or freeze for 3 months.
Why did my bread turn out dense instead of crusty?
This usually happens from overmixing (beyond 2 minutes), skipping the 1-hour rest, or insufficient proofing. The dough should be shaggy when mixed and spring back slowly when pressed. For next time, mix gently, let it rest properly, and ensure proofing conditions are 75-80°F—use your oven with a bowl of hot water if needed.

- 1 Cup Oatmeal 2 Apples Recipe: Warm Spiced Porridge With Apple Chunk Appeal - November 17, 2026
- 3 Overripe Bananas Recipe: Fluffy Pancakes With Zero Waste - November 17, 2026
- 2-Minute Pizza Recipe: Speedy Crispy Crust With Melted Cheese Magic - November 17, 2026