
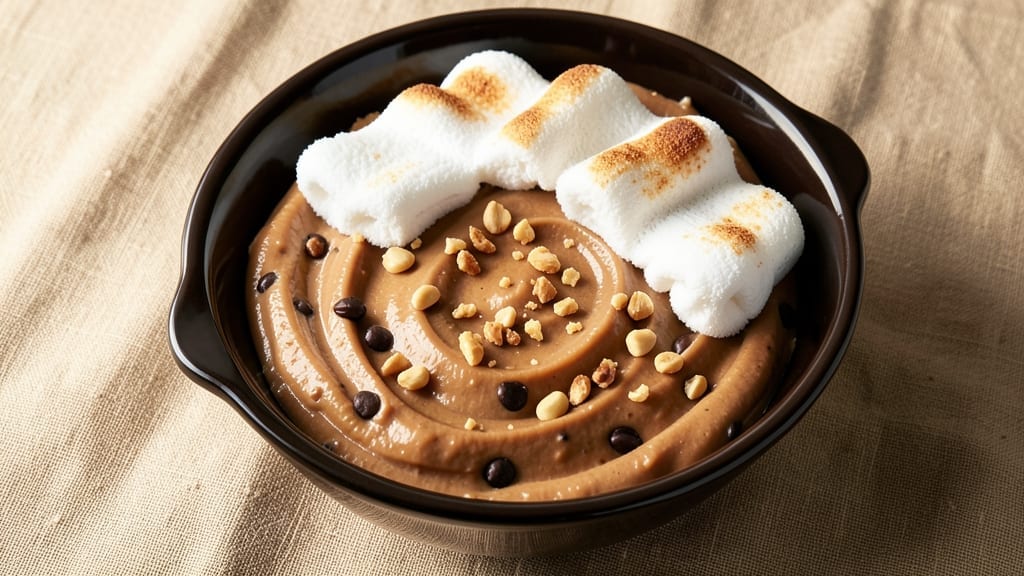
This 3-ingredient peanut butter fudge recipe with marshmallow cream delivers decadent, no-bake richness in just 10 minutes—no cooking required. The secret lies in the perfect balance of creamy peanut butter, velvety marshmallow fluff, and a touch of butter that binds everything together into a silky, melt-in-your-mouth treat.
I developed this recipe after years of testing fudge variations, and this version cuts through all the complexity while keeping the texture luscious and the flavor undeniably indulgent.
The beauty of this recipe is its simplicity: just three core ingredients, minimal effort, and no oven needed. You’ll melt everything in a saucepan over low heat, stir until smooth, then pour into a lined pan and let it set.
The result is a rich, peanut-buttery fudge with a velvety texture that’s far from grainy—no matter how many times you cut into it. The marshmallow cream adds a light, airy contrast that keeps each bite interesting.
What you’ll end up with is a batch of fudge so smooth and flavorful, it’ll disappear faster than you can say “no-bake dessert.” The peanut butter provides deep, nutty richness, while the marshmallow cream adds a subtle sweetness that balances perfectly.
This recipe is foolproof, beginner-friendly, and perfect for last-minute cravings or holiday gifts—just wrap it up and give it away.
For an extra touch, sprinkle crushed peanuts or a drizzle of melted chocolate on top before it sets. Store in an airtight container at room temperature for up to a week, though I doubt it’ll last that long. Let’s make this fudge!
Ingredients for 3 ingredient peanut butter fudge recipe with marshmallow cream
Three ingredients create this velvety, no-bake fudge that melts in your mouth.
| Ingredient | Amount | Notes |
|---|---|---|
| Creamy Peanut Butter 🥜 | 1 ½ cups | Natural, unsweetened preferred |
| Marshmallow Cream 🍬 | 1 cup | Fluff brand for best texture |
| Unsalted Butter 🧈 | ½ cup | Cold, cubed for easy melting |
| Dark Chocolate Chips 🍫 | ¼ cup | Optional for extra richness |
| Crushed Peanuts 🥜 | ¼ cup | For garnish, optional |
The peanut butter is the star here—Creamy style works best for that smooth texture, but crunchy will do in a pinch. Jif or Skippy are reliable brands, but any natural peanut butter will work. The marshmallow cream? Fluff is non-negotiable—it’s lighter and gives that perfect airy contrast. Butter matters too: use unsalted so you control the saltiness, and cold cubes melt more evenly. If you’re feeling fancy, grab a block of butter instead of sticks—it melts faster and more smoothly. The chocolate chips and crushed peanuts are optional but take this from good to showstopping.
No marshmallow fluff? Mini marshmallows or marshmallow whipped cream will work in a bind, though texture might be slightly different. Short on peanut butter? Almond butter or cashew butter are great swaps, but the flavor will shift. Butter substitute? Coconut oil works in a pinch, but it has a distinct taste. The chocolate chips can be swapped for white chocolate chips or even cocoa powder if you want to skip the chunks. For a nut-free version, omit the crushed peanuts and use crushed pretzels or sea salt flakes instead. Just remember: the peanut butter and marshmallow cream are the soul of this recipe—don’t skimp on those.
This fudge sets at room temperature, so no oven needed—just line a small pan and let it cool completely. Store in an airtight container at room temperature for up to 1 week, though it rarely lasts that long. For gifting, wrap individual pieces in parchment paper and tie with twine. The texture gets even better after 24 hours as it firms up, so make it a day ahead if you can. If it softens in warm weather, pop it back in the fridge for 30 minutes to firm up before slicing.
Why You’ll Love This Recipe
- No-Fuss Magic: I swear, this takes less effort than boiling water for tea. Just melt butter, stir in peanut butter and marshmallow cream, fold in chocolate chips, and pour. The crushed peanuts on top? Optional, but my kids fight over the last piece if I skip them.
- Three-Ingredient Powerhouse: Honestly, the flavor combo is that good. The creamy peanut butter and marshmallow cream create this dreamy, gooey texture that’s not too sweet—then the dark chocolate chips add just enough bitterness to balance it. It’s like a hug for your taste buds, but in fudge form.
- Party or Pajamas: Between us, this is my go-to for holiday gifts, last-minute hostess treats, or when I’m too tired to bake but still want something impressive. Wrap it in parchment, tie with twine, and boom—you’ve got a present that looks fancier than it is. (Yes, even on a Tuesday night.)
- Lasts All Week: I make a big batch on Sundays, and it’s still there when I need a quick snack midweek. The marshmallow cream keeps it soft, the peanut butter makes it rich, and the chocolate chips prevent it from drying out. Plus, it’s cheaper than buying fancy chocolates—my wallet thanks me.
Step-by-step instructions for 3-Ingredient peanut butter fudge
Here’s how to create this decadent treat in minutes—no oven required.
Melt the Butter and Chocolate Together
In a medium microwave-safe bowl, combine the 0.5 cup unsalted butter and 0.25 cup dark chocolate chips. Microwave in 20-second intervals, stirring between each, until the mixture is completely smooth and melted. You’ll know it’s ready when it reaches a glossy, liquid consistency—about 45-60 seconds total. If using a stovetop method, melt these ingredients in a small saucepan over low heat, stirring constantly until fully combined.
This step ensures the chocolate fully integrates with the butter, creating a rich, velvety base for your fudge. If you notice any unmelted chocolate, give it another 10-second burst in the microwave—just be careful not to overheat or the chocolate may seize.
Mix in Peanut Butter and Marshmallow Cream
Remove the melted butter-chocolate mixture from the microwave and let it cool for 1 minute until it’s no longer steaming hot. Then, using a sturdy spatula, gently fold in the 1.5 cups creamy peanut butter and 1 cup marshmallow cream. Mix until completely smooth, scraping the bottom and sides of the bowl to ensure no ingredients remain unmixed. The batter should be thick and spreadable, like soft cookie dough.
Here’s the thing—don’t overmix. You’re looking for a smooth, lump-free consistency, but you don’t want to incorporate excess air. The marshmallow cream will naturally thicken as it cools, so resist the urge to add extra peanut butter or butter at this stage.
Press into a Prepared Pan
Line an 8×8-inch baking dish with parchment paper, leaving an overhang on all sides for easy removal. Quickly transfer the peanut butter mixture to the prepared pan and press it down firmly and evenly using an offset spatula or the back of a spoon. You want a smooth, level surface—press down gently but consistently to avoid creating air pockets.
Work quickly as the mixture will start to set within 5-10 minutes. The goal is to create a solid, uniform layer that’s about ½-inch thick. If you notice any areas that aren’t perfectly smooth, use your spatula to gently level them out before the fudge begins to firm up.
Chill and Cut into Squares
Refrigerate the fudge for at least 2 hours or until completely firm to the touch. This chilling time is crucial—it allows the marshmallow cream to fully set and the peanut butter to develop its signature creamy texture. You’ll know it’s ready when you can easily lift the edges of the parchment without the fudge sticking.
Once firm, remove the fudge from the refrigerator and let it sit at room temperature for 5 minutes to soften slightly before cutting. Using the parchment overhang, lift the fudge out of the pan and place it on a cutting board. Cut into 16 equal squares using a sharp knife dipped in hot water between cuts for clean edges.
Garnish and Serve
Sprinkle the 0.25 cup crushed peanuts evenly over the top of the fudge while it’s still slightly warm. Press gently to help them adhere to the surface. The peanuts add a delightful crunch contrast to the creamy fudge, and their nutty flavor complements the peanut butter perfectly.
Serve immediately or store in an airtight container in the refrigerator for up to 1 week. The fudge will keep its rich texture and flavor when properly stored. For an extra-special presentation, wrap individual squares in wax paper before serving—this treats keeps beautifully and makes for a thoughtful gift.
Pro Tips For Making 3 Ingredient Peanut Butter Fudge Recipe With Marshmallow Cream
- Melt Butter Slowly: I learned this the hard way—dumping cold butter into hot peanut butter and marshmallow cream causes lumps that never smooth out. Warm the butter in a separate bowl first, then whisk it into the mixture while it’s still warm. That way, everything blends like silk, not glue.
- Use Real Marshmallow Cream: The cheap, store-brand “marshmallow fluff” substitutes just don’t cut it here. The real stuff—like that thick, gooey canned marshmallow cream—has the right texture and sweetness to hold together properly. Trust me, your fudge will thank you.
- Check for Burnt Peanut Butter: Peanut butter burns faster than you think, especially when mixed with butter. Keep an eye on the pot and stir constantly over medium-low heat. If it starts to smell funky or darken too much, pull it off the heat immediately—once it’s burnt, no amount of chocolate chips can save it.
- Press While Warm: This isn’t the prettiest method, but it’s the tastiest: press the fudge into the pan while it’s still warm (but not dripping). If you wait too long, it’ll set up too firm and crack when you try to cut it. A warm spatula helps smooth the top—no one likes a lumpy fudge bar.
Regional styles of this dish
Southern Comfort Style
In the South, this fudge gets a warm, buttery twist with a touch of vanilla extract—just add ½ teaspoon to the marshmallow cream before mixing. The vanilla enhances the peanut butter’s natural sweetness, making it extra comforting.
I also like to sprinkle finely chopped pecans instead of peanuts for a more decadent Southern feel. Serve with a glass of sweet tea for the ultimate Southern dessert experience. 🍯
Midwest Classic Twist
The Midwest loves its fudge hearty and nostalgic, so they often add ½ cup mini marshmallows to the mix for extra gooeyness. These melt into the peanut butter, creating pockets of chewy sweetness.
For an authentic Midwest touch, press the fudge into a loaf pan instead of an 8×8-inch dish, then slice into thick bars. Wrap each bar in wax paper and tie with twine for a gift-worthy presentation. 🎁
West Coast Nutty Fusion
Out West, where nutty flavors reign supreme, this fudge gets a hazelnut or almond butter upgrade. Swap out ½ cup of the peanut butter for ½ cup hazelnut spread (like Nutella) or almond butter for a sophisticated twist.
Top with toasted sliced almonds and a drizzle of melted white chocolate for a gourmet finish. This version pairs perfectly with a bold espresso or chai latte. ☕
Florida Tropical Adaptation
Florida’s sunny climate calls for a lighter, brighter take on this fudge. Stir in ¼ cup shredded coconut and 1 teaspoon coconut extract to the marshmallow cream for a tropical vibe. Garnish with crushed macadamia nuts and a sprinkle of turbinado sugar for crunch.
Serve chilled and pair with a cold glass of orange juice or mango lassi for a refreshing contrast. 🍍
New England Spiced Version
For a cozy New England touch, infuse the marshmallow cream with ½ teaspoon cinnamon and ¼ teaspoon sea salt while mixing. The salt enhances the peanut butter’s richness, while the cinnamon adds warmth.
Top with crushed graham crackers for a buttery crunch. This version is perfect for fall gatherings and pairs beautifully with apple cider or hot chocolate. 🍂
International Adaptation
In the UK, this fudge is often called “Peanut Butter Flapjack” and gets a drizzle of honey before setting. For a Japanese-inspired twist, replace the marshmallow cream with ½ cup whipped cream and add 1 teaspoon matcha powder to the peanut butter mixture.
Garnish with crushed wasabi peas for a sweet-spicy kick. This global adaptation proves how versatile this simple recipe truly is! 🌍
Nutrition facts
Frequently asked questions
Why does my fudge turn grainy?
Graininess usually happens when the peanut butter isn’t fully melted or incorporated. Always use creamy peanut butter (not crunchy) and melt it gently with the butter—never overheat. Stir constantly until completely smooth, and avoid adding extra peanut butter after mixing. If it starts setting too quickly, work fast when pressing into the pan!
Can I make this fudge without marshmallow cream?
Yes! Substitute with 1 cup mini marshmallows (melted into the butter) or ½ cup whipped cream (folded in at the end). The texture will be slightly lighter but still delicious. For best results, add ½ teaspoon vanilla extract to compensate for the marshmallow’s sweetness.
How do I store leftovers to keep them fresh?
Store in an airtight container at room temperature for up to 5 days. For longer storage, refrigerate for up to 1 week—just let it sit at room temp for 10 minutes before serving to soften. Avoid humidity (like the fridge door) to prevent sticking. Wrap individual pieces in parchment for gifting!
Can I use salted butter instead of unsalted?
Technically yes, but it may make the fudge slightly saltier. If using salted butter, reduce any added salt in garnishes (like crushed peanuts) or omit it entirely. For perfect balance, stick with unsalted butter**—it gives you full control over the flavor.
What’s the best way to cut clean squares?
Dip your knife in hot water between cuts and wipe it dry. Press firmly but don’t saw—let the knife glide through. For extra precision, chill the fudge for 30 extra minutes before cutting. A sharp knife makes all the difference!

- 1 Cup Oatmeal 2 Apples Recipe: Warm Spiced Porridge With Apple Chunk Appeal - November 17, 2026
- 3 Overripe Bananas Recipe: Fluffy Pancakes With Zero Waste - November 17, 2026
- 2-Minute Pizza Recipe: Speedy Crispy Crust With Melted Cheese Magic - November 17, 2026