
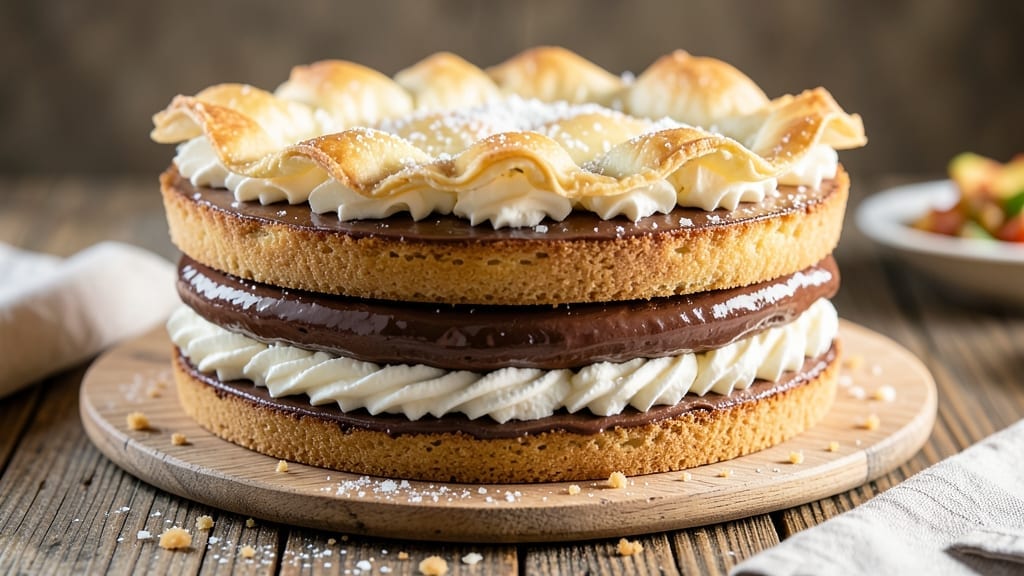
This 4-layer delight pie recipe transforms dessert into a showstopping masterpiece with vanilla, chocolate, caramel, and berry swirls that taste like a bakery secret. 💛 The key lies in precise layering—each component baked separately to maintain texture and flavor integrity, then assembled with confidence for a pie that looks as impressive as it tastes.
What sets this recipe apart is the foolproof technique of baking layers individually before combining them. The bottom crust stays crisp, the chocolate layer stays rich and fudgy, the caramel remains glossy without burning, and the berry swirl keeps its vibrant color and burst of freshness.
No shortcuts here—just restaurant-quality precision that delivers a pie with perfectly balanced textures and flavors in every bite.
By the time you slice into this pie, you’ll uncover layers of creamy vanilla custard, decadent chocolate ganache, gooey caramel drizzle, and tart berry swirl—each contributing to a harmony that’s both unexpected and utterly satisfying.
The secret? Patience in assembly and a preheated oven set to 350°F for even baking that ensures no layer overcooks or underbakes.
Perfect for special occasions or when you want to impress, this pie requires just a few hours of hands-on time but yields a dessert that feels like a labor of love. Let’s create something extraordinary—one layer at a time.
Ingredients for 4 layer delight pie
Four layers of flavor—vanilla custard, chocolate ganache, caramel drizzle, and berry swirl—waiting to become your showstopper pie.
| Ingredient | Amount | Notes |
|---|---|---|
| All-Purpose Flour 🌾 | 3 cups | Sifted for light texture |
| Unsalted Butter 🧈 | 1 ½ cups | Cold, cubed for crust |
| Granulated Sugar 🍚 | 1 ¼ cups | Superfine preferred |
| Large Eggs 🥚 | 3 whole | Room temperature |
| Vanilla Extract 🌿 | 2 tsp | Pure, high-quality |
| Heavy Cream 🥛 | 2 cups | Full-fat for richness |
| Milk 🥛 | 1 cup | Whole milk preferred |
| Dark Chocolate Chips 🍫 | 12 oz | 70% cacao minimum |
| Caramel Sauce 🍯 | 1 ½ cups | Store-bought or homemade |
| Fresh Berries 🍓 | 2 cups | Raspberries or blackberries |
| Lemon Juice 🍋 | 2 tbsp | Freshly squeezed |
| Salt 🧂 | 1 tsp | Fine sea salt |
| Cornstarch 🌾 | 2 tbsp | For berry swirl |
| Pistachios 🥜 | ½ cup | Chopped, for garnish |
The crust is where it all begins. King Arthur or Gold Medal flour gives the best texture—light, crisp, and sturdy enough to hold those rich layers. Butter matters here: use European-style butter if you can find it, or at least unsalted. The key is keeping everything cold until the last second before baking. For the chocolate layer, Ghirardelli or Lindt 70% cacao bars melt perfectly—avoid chips with stabilizers. The caramel sauce? Trader Joe’s or store-brand salted caramel works great, but homemade is worth the effort for that glossy finish.
No vanilla extract? Vanilla bean paste works too, or even a scraped vanilla bean. Chocolate chips too bitter? Swap for dark chocolate bars chopped into chunks—they melt smoother. The berries can be frozen (thawed and drained), but fresh raspberries or blackberries keep their vibrant color and burst of tartness. Running short on pistachios? Almonds or pecans add a nice crunch. The custard is the heart of this pie—don’t rush the thickening. Stir constantly over medium heat until it coats the back of a spoon, then let it cool completely before assembling.
This pie is all about patience. Assemble layers in a cool kitchen—warm custard will melt the chocolate. Store any prepped layers separately in the fridge for up to 2 days, but assemble within 4 hours of baking for best texture. Once baked, let it cool completely before slicing—at least 4 hours, overnight is ideal. Slice with a hot knife for clean cuts. Leftovers keep for 3 days in the fridge, but honestly, it won’t last that long. Freeze slices individually for up to 2 months—just thaw at room temperature before serving.
Why You’ll Love This Recipe
- No-Fuss Layers: I swear, this pie only needs a bowl, a whisk, and patience for butter to soften. The crust comes together with flour and butter—no rolling pin required—while the fillings just need folding. Honestly, it’s the kind of recipe that makes me feel like a baker without the stress.
- Butter-Sugar Magic: That rich, creamy butter mixed with sugar? It’s the secret weapon here. The layers stay tender but never soggy, and the vanilla extract ties everything together with warmth. Between us, the first bite always makes me pause—it’s that good.
- Crowd-Pleaser Flex: Perfect for birthdays, potlucks, or just a lazy Sunday. The layers let you customize—add lemon zest to one, chocolate to another—so it works for dessert lovers or breakfast cravings. I’ve even served it chilled as a no-bake treat when I’m too tired to bake.
- Budget-Friendly Leftovers: Uses pantry staples (flour, sugar, eggs) that won’t break the bank. The pie keeps for days, so I can bake one and enjoy slices all week. Plus, the leftovers reheat beautifully—great for when I forget to save a piece (which, okay, happens).
Step-by-step instructions for 4 layer delight pie
Here’s how to build this showstopping pie with perfect layers and no messy cross-contamination.
👨🍳 Step 1: Make the Vanilla Cream Layer
In a medium bowl, whisk together the 2 cups heavy cream, 1 cup milk, 1.25 cups granulated sugar, and 2 tsp vanilla extract until smooth. Place the bowl over a pot of simmering water (double boiler) and heat gently, stirring constantly with a wooden spoon, until the mixture thickens enough to coat the back of the spoon—about 8-10 minutes. This is your vanilla custard base.
Remove from heat and let cool to room temperature. The mixture should thicken further as it cools. Once cool, spread this layer evenly in your 9-inch pie dish, leaving about ½-inch space at the edges for the other layers. Chill in the refrigerator while you prepare the remaining layers.
🍳 Step 2: Prepare the Chocolate and Caramel Layers
For the chocolate layer, melt the 12 oz dark chocolate chips in a microwave-safe bowl in 30-second intervals, stirring between each interval until completely smooth. Stir in ½ cup heavy cream until fully combined. Spread this layer evenly over the chilled vanilla cream, creating a second layer about ¼-inch thick.
For the caramel layer, warm the 1.5 cups caramel sauce in a small saucepan over low heat until it reaches a pourable consistency. Spread this layer directly over the chocolate layer, using the back of a spoon to create even, swirling patterns. Return the pie to the refrigerator to set while you prepare the berry filling.
🥘 Step 3: Create the Berry Swirl Filling
In a small bowl, combine the 2 cups fresh berries with 2 tbsp lemon juice and 2 tbsp cornstarch. Gently stir until the cornstarch is fully incorporated. Pour this mixture into a small saucepan and cook over medium heat, stirring constantly, until the berries begin to break down and the mixture thickens to a jam-like consistency—about 5-7 minutes. Remove from heat and let cool completely.
Once cooled, spread this berry mixture evenly over the caramel layer, creating a final layer about ¼-inch thick. Use the back of a spoon to create decorative swirls in the berry layer. Return the pie to the refrigerator and chill for at least 4 hours or overnight to allow all layers to fully set.
🔪 Step 4: Assemble and Garnish the Pie
Before serving, prepare the crust by combining the 3 cups all-purpose flour and 1 tsp salt in a food processor. Cut in the 1.5 cups unsalted butter until the mixture resembles coarse crumbs. Add 3 whole large eggs one at a time, pulsing until the dough comes together. Press this dough into a pie crust shape and place it over the chilled pie.
Use a sharp knife to cut small slits in the crust to allow steam to escape. Bake at 375°F for 25-30 minutes, or until the crust is golden brown and the pie is heated through. Let cool for 10 minutes before slicing. Garnish with the 0.5 cup chopped pistachios just before serving for that perfect finishing touch.
Pro Tips For Making 4 Layer Delight Pie
- Chill the Butter: Cut that unsalted butter into tiny cubes—no bigger than a pea—and toss them in the flour before adding liquid. I learned this the hard way when my crust turned greasy and crumbly; cold butter mixes better and creates flaky layers. (Yes, even if you’re impatient like me, resist the urge to soften it early.)
- Whisk Eggs Like a Pro: Beat those large eggs until the yolks and whites are uniformly pale yellow—no streaks, no lumps. Overmixed? You’ll end up with a dense, rubbery layer. Under-mixed? Your pie might not hold its shape. Aim for 2-3 minutes with a whisk or hand mixer; stop when it’s just thick enough to coat the back of a spoon.
- Sugar in Stages: Don’t dump all the granulated sugar at once into the egg mixture—add it in three increments, whisking vigorously between each. This keeps the custard smooth and prevents grainy texture in the final layers. (Your future self will notice the difference when slicing.)
- Cool Layers Completely: Let each layer—especially the custard—set fully at room temp before adding the next. I used to rush this, and the top layer would slide or weep. Pop the pie in the fridge for 10 minutes between layers, or you’ll regret it when the middle stays soupy. (Trust the process.)
Creative variations of this recipe
Seasonal Berry Swaps
Summer brings the best berries for this pie! Swap raspberries or blackberries for strawberries or blueberries—just reduce lemon juice to 1 tbsp since they’re less acidic. For winter, frozen mixed berries work perfectly; thaw and drain well before using.
I’ve also tested peach slices in late summer—they add a sweet contrast that pairs beautifully with the caramel layer. 🍑
Chocolate Variations
Craving something different? Replace the dark chocolate with white chocolate for a sweeter twist—use 16 oz and add 1 tsp espresso powder to deepen the flavor. For milk chocolate lovers, try Ghirardelli milk chocolate bars (12 oz) with a pinch of cinnamon.
Pro tip: Temper the chocolate properly to avoid streaks in your layers.
Caramel Alternatives
No store-bought caramel? Make your own by melting 1 cup unsalted butter, 1.5 cups brown sugar, and ½ cup heavy cream over low heat for 15 minutes, stirring constantly. For a salted caramel upgrade, fold in ½ tsp flaky sea salt at the end.
If you prefer honey caramel, reduce the sugar to 1 cup and add ¼ cup honey to the mix.
Crust Customizations
Want a nutty crust? Replace ½ cup flour with ½ cup finely ground almonds or pecans. For a gluten-free version, use 1.5 cups gluten-free 1:1 baking flour and add ¼ cup cornstarch to the dough.
I’ve also tried a gingersnap crust—crush 1 cup gingersnaps with ½ cup melted butter and press into the pie dish before adding layers.
Make-Ahead Layers
Prep layers ahead to save time! The vanilla custard and chocolate ganache can be refrigerated separately for up to 2 days. The berry swirl keeps well for 48 hours in an airtight container. Assemble the pie 4 hours before baking—this ensures all layers set properly.
For freezer-friendly crusts, bake the crust ahead, cool completely, and freeze for up to 1 month. Thaw at room temperature before assembling.
Dietary Adaptations
For a lighter version, replace half the heavy cream in the custard with coconut milk—it adds a subtle tropical note. Vegan option? Use coconut cream for the custard and dairy-free chocolate chips (like Enjoy Life brand).
To keep it lower in sugar, reduce the granulated sugar to 1 cup and add 1 tsp vanilla bean paste for extra flavor depth. 🌱
Nutrition facts
Frequently asked questions
Can I prepare this pie in a smaller or larger pie dish?
The recipe is designed for a 9-inch pie dish, but you can easily adjust. For a 7-inch dish, reduce all layer quantities by about 50%—this maintains the same thickness. For a 12-inch dish, increase by 150% but add 10 extra minutes to baking time. The key is keeping each layer ¼-inch thick for even baking.
Why do I need to chill the pie before baking?
Chilling for at least 4 hours (or overnight) is crucial because each layer has different melting points. The custard needs to firm up, the chocolate must set properly, and the caramel should become tacky but not runny. Without chilling, the crust may steam excessively, causing soggy layers or a gummy texture. Think of it as letting the “glue” between layers set before baking.
What if I don’t have a pie dish? Can I use a cake pan?
Yes, but with adjustments! A 9-inch round cake pan works well—just grease it thoroughly and line the bottom with parchment paper. For a square pan, reduce layer thickness to ⅛-inch to ensure even baking. Avoid glass pans—they can cause uneven browning. A metal cake pan mimics a pie dish’s heat distribution best.
How do I fix a cracked crust after baking?
If the crust cracks slightly, it’s usually just cosmetic! For a quick fix, brush the cracks with simple syrup (equal parts sugar and water, heated until dissolved) and sprinkle with powdered sugar or chopped nuts. If cracks are deep, carefully spread a thin layer of warmed apricot jam over the cracks before adding the final garnish. This camouflages imperfections beautifully.
Can I make this pie ahead of time?
Assemble the pie (without the crust) up to 2 days ahead and refrigerate. Add the crust 4 hours before baking to prevent sogginess. For the full pie, bake it 1 day ahead—it actually tastes better as flavors meld! Store leftovers in an airtight container for 3 days or freeze slices for 2 months. Thaw overnight in the fridge before serving.

- 5 Lb Eye Round Roast Recipe: Slow-Braised to Melt-in-Mouth Tenderness - November 3, 2026
- 3-Hour Ciabatta Bread Recipe: Crusty Chews and Airy Holes Mastered - November 3, 2026
- 5 Fruit Salad Recipe: Vibrant Rainbow Layers With No Brown Spots - November 3, 2026