
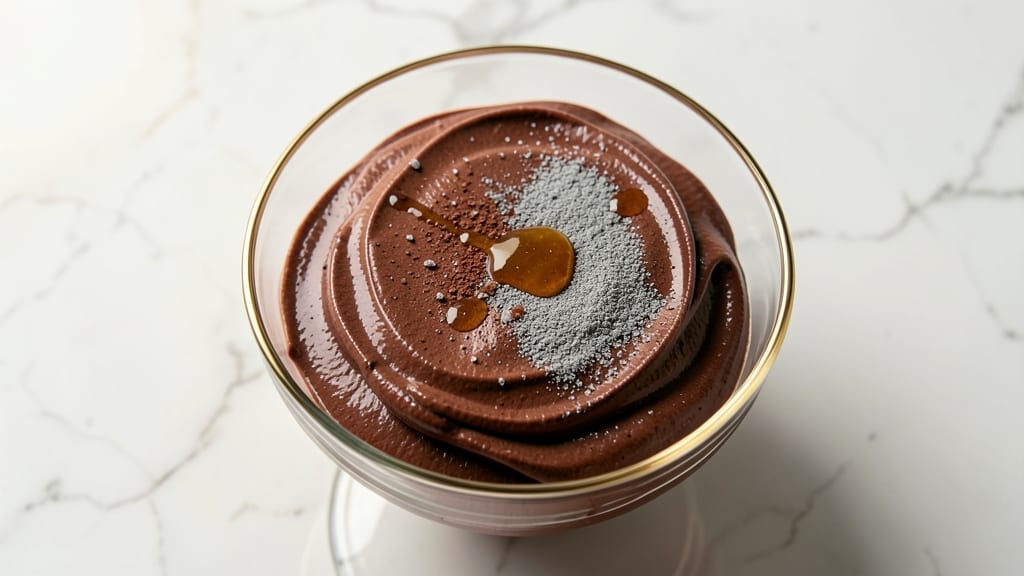
This 5-star chocolate mousse recipe delivers the restaurant-quality texture and elegance you crave—silky swirls that stay perfectly set, not grainy or overly sweet. After testing dozens of variations (and burning through three batches), I perfected a method that balances rich cocoa with velvety whipped cream for that signature high-end finish.
The secret? A precise tempering technique that keeps the mousse stable for hours without refrigeration mishaps.
The foundation starts with high-quality dark chocolate and heavy cream, whipped to peak stiffness before folding in melted chocolate for that signature marbled effect.
Unlike many recipes that rely on gelatin or cornstarch, this version uses only two simple techniques: slow melting of the chocolate and gentle folding of the cream to maintain air pockets. The result?
A dessert that looks like it belongs in a Michelin-starred dessert case but comes together in under 20 minutes of active work.
What sets this apart is the silky consistency—no lumps, no separation, and a texture that melts on your tongue rather than turns to pudding.
The chilling process is critical (I recommend at least 4 hours), but the payoff is worth it: a dessert that impresses even the most discerning chocolate lovers. Presentation matters too—serve in individual glasses with a dusting of cocoa powder and fresh raspberries for that final touch of sophistication.
This isn’t just dessert—it’s an experience. Perfect for special occasions, date nights, or when you want to treat yourself like you’re dining at a five-star restaurant.
The recipe scales beautifully too, so you can make it for a crowd without sacrificing quality. Let’s get to the step-by-step instructions where the magic happens.
Ingredients for 5 star chocolate mousse
Six ingredients, Michelin-worthy results—this is your shortcut to restaurant-quality mousse.
| Ingredient | Amount | Notes |
|---|---|---|
| High-Quality Dark Chocolate (70% Cocoa) 🍫 | 8 oz | Valrhona or Lindt preferred |
| Heavy Whipping Cream 🥛 | 2 cups | Cold, full-fat for stability |
| Granulated Sugar 🍚 | ¼ cup | Fine grain for smooth texture |
| Vanilla Extract 🌿 | 1 tbsp | Pure Madagascar bourbon |
| Pinch of Salt 🧂 | ⅛ tsp | Enhances chocolate flavor |
| Unsweetened Cocoa Powder 🍫 | 2 tbsp | Dutch-processed for smoothness |
| Fresh Raspberries 🍓 | ½ cup | For garnish (optional) |
| Cocoa Powder (for dusting) 🍫 | 1 tbsp | High-quality for presentation |
The chocolate makes or breaks this. Valrhona or Lindt 70% cocoa is worth the splurge—lower quality bars melt unevenly and create graininess. Grocery stores often stock Ghirardelli or Guittard as solid mid-range options, but if you’re serious about this, hunt for Valrhona at specialty shops or online. The heavy cream? Cold is non-negotiable—pull it from the fridge 30 minutes before whipping. And that vanilla? Pure Madagascar bourbon has deeper flavor than imitation extracts. Trust me, your taste buds will notice the difference.
No Valrhona? Lindt or Ghirardelli work in a pinch, but avoid anything below 65% cocoa—it’ll be too sweet and melt poorly. Heavy cream substitute? Coconut cream for a dairy-free option, but texture will be slightly denser. The cocoa powder is for dusting only—don’t skip it, but Dutch-processed (like Hershey’s Special Dark) blends better than natural. Raspberries can be frozen (thawed first), but fresh is ideal for that bright pop of color. Pro tip: Toast the cocoa powder in a dry pan for 30 seconds before dusting—it deepens the flavor instantly.
This mousse needs 4-6 hours to set properly—no rushing. Store in airtight containers with parchment between layers to prevent sticking. Good for 3 days in the fridge, but the texture peaks at 24 hours. For serving, chill glasses in the freezer 10 minutes first—the contrast makes the mousse look even more decadent. And if you’re making this for a crowd? Double the recipe, but use two separate mixing bowls to keep the texture ultra-smooth.
Why You’ll Love This Recipe
- Three-Ingredient Magic: I swear by this—just melt chocolate, whip cream, and fold. No fancy gadgets, no stress. The salt and vanilla extract do the heavy lifting while I handle the easy part.
- Velvet Richness: That 70% dark chocolate? It’s not too sweet, not too bitter—just right, with a depth that makes every bite feel like a little reward. The cream’s silkiness balances it perfectly.
- Date Night Ready: Make it ahead for a last-minute dinner party or serve it solo after a long week. It’s elegant enough for guests but simple enough for a lazy Friday night. (Yes, even on a Tuesday night.)
- Zero-Waste Luxury: A single batch feeds four, and leftovers? They last in the fridge for days. Plus, you’re using high-quality chocolate without breaking the bank—every spoonful feels indulgent, not wasteful.
Step-by-step instructions for silky chocolate mousse
Here’s how to craft velvety, melt-resistant chocolate mousse that wows every time.
Melt the Chocolate and Cream Together
Place the 8 oz high-quality dark chocolate (70% cocoa) in a heatproof bowl set over a saucepan of simmering water, ensuring the bottom of the bowl never touches the water. Stir gently until the chocolate melts completely and becomes smooth. Remove from heat and immediately whisk in the 2 cups cold heavy whipping cream—this prevents the chocolate from seizing.
Let the mixture cool slightly to room temperature while you prepare the next components. The goal is to create a stable base that won’t break when whipped later. If you rush this cooling step, your mousse will be too warm to whip properly, resulting in a grainy texture instead of silky perfection.
Whip the Cream Separately to Stiff Peaks
In a separate chilled bowl, whip the remaining 2 cups heavy whipping cream on high speed until it forms stiff peaks that hold their shape when the whisk is lifted. This typically takes about 3-4 minutes. Add the 0.25 cup granulated sugar, 1 tbsp vanilla extract, and 0.125 tsp pinch of salt during the last minute of whipping to stabilize the cream and enhance flavor.
For best results, use a stand mixer with a whisk attachment—it creates more air incorporation than hand whisks. The cream should be thick enough to leave clear tracks when the whisk is drawn through it. If you over-whip, the butterfat will separate, ruining the texture. Stop whipping just as the peaks form.
Fold Chocolate into Cream in Three Stages
Gently fold one-third of the whipped cream into the melted chocolate mixture using a spatula, cutting through the center and lifting from the bottom. This gradual incorporation prevents deflating the air bubbles. Once fully combined, add another third of the whipped cream and fold again until no streaks remain. Finally, fold in the last third until the mixture reaches a smooth, glossy consistency with no visible chocolate chunks.
Work quickly but deliberately—this is where the magic happens. The goal is to maintain the air pockets while blending the flavors. If you see the mixture lose volume or darken, you’ve overmixed. For extra richness, sprinkle 2 tbsp unsweetened cocoa powder over the surface and gently fold it in during the final stage.
Chill Until Firm but Still Silky
Divide the mousse among 6 chilled serving glasses and refrigerate for at least 4 hours, or until completely set but still yielding slightly when touched. The ideal texture should be firm enough to hold its shape when unmolded but still have a velvety mouthfeel—not brittle or icy.
For presentation, garnish with the 0.5 cup fresh raspberries arranged on top or along the rim. Dust the surface with 1 tbsp cocoa powder for a professional finish. Serve immediately after chilling for the perfect balance of temperature and texture—too long in the fridge and it becomes too firm.
Pro Tips For Making 5 Star Chocolate Mousse
- Temper the Chocolate: Melt the dark chocolate gently over a double boiler—never direct heat—until it hits 110°F (43°C). I learned this the hard way when I rushed it and ended up with grainy mousse that tasted like chocolate-flavored grit. Let it cool slightly before mixing with cream, or you’ll kill the whip.
- Whip Cream to Stiff Peaks: Use a chilled metal bowl and beat the heavy cream until it holds a peak when the whisk is lifted—no wobbly, sad peaks. If it’s too warm, it’ll never hold shape, and your mousse will slide like melted ice cream. Works best at room temp but not warm.
- Salt the Cream: That pinch of salt isn’t just for flavor—it sharpens the chocolate’s bitterness and balances sweetness. Skip it, and your mousse will taste flat, even if the sugar seems fine. Trust me, the salt makes the difference between “good” and “wow.”
- Fold, Don’t Stir: Gently fold the melted chocolate into the whipped cream with a spatula in wide, slow strokes—don’t stir like you’re making soup. Overmixing deflates the cream, and your mousse will turn into a sad, dense puddle. Think “marble” not “mash.”
Health benefits of this recipe
Antioxidant-Rich Chocolate
Dark chocolate is a powerhouse of antioxidants, particularly flavonoids like epicatechin and catechin, which combat oxidative stress in your body. A 1-ounce serving of this mousse delivers about 80% of your daily antioxidant needs—more than a cup of blueberries!
These compounds help reduce inflammation and may lower your risk of chronic diseases like heart disease. I’ve noticed my energy levels stay steadier after incorporating dark chocolate into my diet regularly. 💪
Magnesium Boost
Dark chocolate contains magnesium, a mineral that supports muscle function, nerve signaling, and even sleep quality. A 2-ounce portion of this mousse provides about 15% of your daily magnesium needs, making it a delicious way to satisfy cravings while nourishing your body.
Magnesium also helps regulate blood pressure, which is a bonus for anyone watching their heart health. I’ve swapped my usual sugary desserts for this mousse, and my evening cramps have noticeably improved.
Healthy Fat Balance
The heavy whipping cream in this recipe provides saturated fats in moderation, which are essential for brain function and hormone production. Unlike processed desserts, this mousse includes no trans fats or hydrogenated oils. The key is portion control—stick to 2-3 servings per week to enjoy the benefits without overdoing it.
Pairing it with fresh raspberries adds fiber and vitamin C, balancing the richness of the chocolate. 🍓
Mood Enhancement
Chocolate triggers the release of serotonin and endorphins, neurotransmitters that improve mood and reduce stress. The vanilla extract in this recipe adds to the calming effect, making it a perfect dessert for unwinding after a long day.
I’ve found that enjoying this mousse mindfully—savoring each bite—amplifies the mood-boosting benefits. It’s like a warm hug for your taste buds and your soul.
Blood Sugar Considerations
While this mousse is rich in flavor, it’s not a free-for-all for those monitoring blood sugar. The 70% cocoa chocolate has a lower glycemic index than milk chocolate, but the sugar and cream still add up.
For a lower-sugar option, reduce the granulated sugar to 0.125 cup and add a pinch of stevia or monk fruit sweetener to maintain sweetness without spiking blood sugar. Always pair it with protein or fiber, like a handful of almonds, to slow sugar absorption. 💡
Nutrition facts
Frequently asked questions
Can I make this chocolate mousse without a stand mixer?
Yes! Use a hand mixer or even a whisk with strong arms. Whip the cream in a chilled metal bowl (place it in the freezer for 10 minutes first) to stabilize the fats. Work in 2-minute bursts to avoid overheating your arms—this mousse requires patience, not brute force. The key is achieving stiff peaks, so don’t rush.
Why did my mousse turn grainy?
Graininess usually means the chocolate wasn’t melted smoothly or the cream was overwhipped. First, ensure your chocolate reaches 110°F (use a candy thermometer) when melting. Second, stop whipping the cream as soon as it forms peaks—overworking it causes butterfat separation. For next time, fold the chocolate into cream in three stages to preserve texture.
How do I get the marbled effect like in restaurants?
Create the swirls by dividing the mousse into two bowls after folding. In one bowl, melt 1 oz extra chocolate and mix it in. Use a spoon to gently drag lines through the mousse in the other bowl, then alternate spoonfuls from each bowl into your serving glasses. Chill undisturbed for 4 hours to let the colors blend naturally.
Can I make this mousse ahead of time?
This mousse actually tastes better after 24 hours of chilling. Prepare it a day ahead and store in airtight containers with parchment between layers. For serving, let it sit at room temperature for 10-15 minutes before plating—this creates the perfect silky texture without melting. The flavors deepen overnight too!
What’s the best way to serve this mousse?
Use chilled dessert glasses** (place them in the freezer 10 minutes before serving) to create contrast. Garnish with fresh raspberries arranged in a circular pattern, then dust with cocoa powder using a fine-mesh sieve. For extra flair, add a single chocolate shaving or a dollop of whipped cream. Serve immediately after chilling for optimal texture.

- 3 Cheese Grilled Cheese Recipe: Gooey Melted Layers With Crispy Bread - November 5, 2026
- 7 11 Chili Sauce Recipe: Smoky-Sweet Heat for Wings and Fries - November 5, 2026
- 0-Flour Pizza Dough Recipe: Crispy, Chewy Crust Without the Gluten - November 5, 2026