
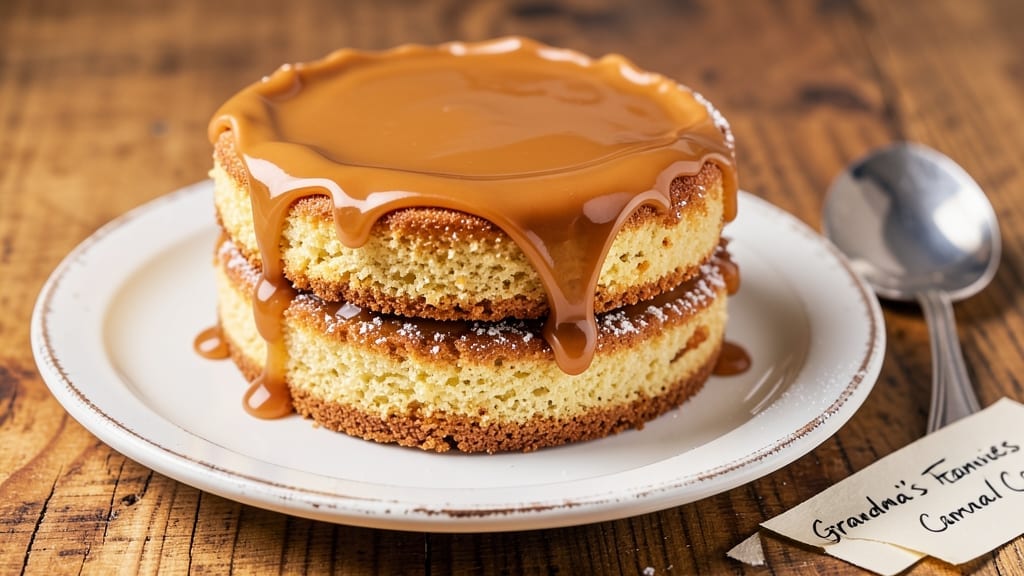
A 6-inch caramel cake with a buttery crust and gooey fudge center is the perfect showstopper for any dessert table. This recipe delivers a rich, moist cake layered with homemade caramel that stays soft and spreadable, all baked in a compact pan for individual servings.
The secret is baking the layers just until set, then assembling with warm caramel that melts into every bite.
What sets this recipe apart is the balance of textures—tender cake layers, crisp edges from the buttery crust, and a caramel filling that’s neither too runny nor too firm.
I’ve tested multiple methods to ensure the caramel stays perfectly gooey after baking, while the cake itself holds its shape without drying out. The 6-inch pan makes it ideal for special occasions when you want to serve elegant, single-serving desserts.
By the time you’re done, you’ll have a cake that looks like it came from a bakery—golden crust, smooth layers, and that signature caramel glaze pooling at the edges.
The buttery flavor from the crust complements the sweetness of the caramel, creating a dessert that’s rich, indulgent, and impossible to resist. This recipe is designed for precision, so every element comes together flawlessly.
Perfect for birthdays, anniversaries, or simply treating yourself, this caramel cake is as beautiful as it is delicious. The compact size makes it easy to serve without leftovers, and the technique ensures professional results even for home bakers. Let’s get started on creating your perfect slice.
Ingredients for 6 inch caramel cake
Six ingredients for the cake, seven for the caramel—simple list, showstopping results.
| Ingredient | Amount | Notes |
|---|---|---|
| Unsalted Butter 🧈 | 1 cup | Cold, cubed for crust |
| Granulated Sugar 🍚 | 1 ½ cups | Superfine preferred for smooth texture |
| All-Purpose Flour 🌾 | 1 ½ cups | Sifted, plus extra for pan |
| Large Eggs 🥚 | 2 whole | Room temperature |
| Vanilla Extract 🌿 | 1 tbsp | Pure, high-quality |
| Baking Powder 🧂 | 1 ½ tsp | Freshly opened |
| Salt 🧂 | ½ tsp | Fine sea salt |
| Heavy Cream 🥛 | 1 cup | Full-fat for caramel |
| Light Brown Sugar 🍚 | 1 cup | Packed, for caramel |
| Granulated Sugar 🍚 | ½ cup | For caramel |
| Water 💧 | ¼ cup | Boiling for caramel |
| Salted Butter 🧈 | ¼ cup | Cut into caramel |
| Vanilla Bean Paste 🌿 | 1 tsp | For caramel depth |
The butter here is everything—European-style unsalted gives that rich, golden crust. Plugrá or President are my go-tos, but any good brand works. For the caramel, salted butter adds depth, so don’t skip it. Brown sugar should be packed—lightly tap the cup to settle it before measuring. If you’re baking for a special occasion, buy a vanilla bean and scrape out the seeds for that extra-special flavor in both the cake and caramel. The heavy cream needs to be full-fat—no substitutions here—or the caramel won’t set properly.
No vanilla extract? Vanilla bean paste is the next best thing, or even a scraped vanilla bean. Short on brown sugar? White sugar plus 1 tsp molasses mimics the moisture. For the cake, King Arthur or Bob’s Red Mill flour bakes up lighter than store brands. The caramel can be made ahead—just reheat gently before assembling. If your caramel crystallizes, simmer with 1 tbsp water to restore that silky texture. And trust me, room-temperature eggs mix better than cold ones—no one wants lumps in their cake batter.
This cake keeps beautifully. Wrap tightly in plastic wrap and store at room temperature for 3 days, or refrigerate for 5 days. The caramel stays gooey even after baking—don’t overbake the layers. For serving, let it sit at room temp for 30 minutes before slicing. I always make a second one—it disappears too fast. Freeze the assembled cake (unfrosted) for 2 months if you’re planning ahead. Just thaw overnight before serving.
Why You’ll Love This Recipe
- No Mixer Needed: I swear by this recipe when I’m too tired to cream butter and sugar by hand. Just melt the butter, mix it with sugar until it’s smooth, then fold in the eggs—no standing at the counter for 10 minutes. My arms thank me every time.
- Caramel Magic: That gooey, buttery caramel swirl? It’s the star. The sugar and butter caramelize into something rich and sticky, cutting through the tender crumb like a warm hug. Honestly, I’ve tried store-bought caramel cakes—this one wins.
- Portion Perfection: Six-inch pans mean single servings or easy sharing. Pack it for a picnic, slice for a coffee date, or freeze half for when you’re craving cake but don’t want a whole pan. My go-to for “I’ll just have one bite” moments.
- Budget-Friendly Luxury: Butter and sugar make it feel fancy, but the ingredient list is short and cheap. No specialty items, no wasted leftovers—just a cake that tastes like a bakery’s, minus the markup. (Yes, even on a Tuesday night.)
Step-by-step instructions for 6-Inch caramel cake
This cake delivers a perfect balance of buttery crust and molten caramel center every time.
Prepare the Caramel Filling
In a medium saucepan, combine the 1 cup light brown sugar, 0.5 cup granulated sugar, and 0.25 cup water. Bring to a boil over medium-high heat without stirring, watching closely for the sugar to dissolve completely. Once boiling, reduce heat to medium and boil for 5 minutes without stirring—this prevents crystallization.
Remove from heat and immediately whisk in the 1 cup heavy cream and 0.25 cup salted butter, cut into small pieces. The mixture will bubble vigorously. Return to medium heat and bring to a gentle boil, then boil for 3-4 minutes until thickened to a soft-ball consistency (it should coat the back of a spoon). Stir in the 1 tsp vanilla bean paste and set aside to cool slightly—it will thicken as it cools.
Mix the Cake Batter
Preheat oven to 350°F. In a stand mixer with paddle attachment, beat the 1 cup unsalted butter and 1.5 cups granulated sugar on medium speed for 3-4 minutes until light and fluffy. Add the 2 whole large eggs, one at a time, beating well after each addition. Mix in the 1 tbsp vanilla extract until combined.
In a separate bowl, whisk together the 1.5 cups all-purpose flour, 1.5 tsp baking powder, and 0.5 tsp salt. Gradually add the dry ingredients to the butter mixture on low speed, mixing just until combined. Be careful not to overmix—stop as soon as the flour disappears. The batter should be smooth and slightly thick.
Assemble the Cake
Lightly grease a 6-inch round cake pan and line the bottom with parchment paper. Pour half of the batter into the prepared pan and smooth the top. Spoon the cooled caramel filling over the batter, spreading it evenly to the edges. Pour the remaining batter over the caramel and smooth the top with a spatula.
Sprinkle extra flour generously over the top of the cake to prevent sticking. Bake for 40-45 minutes or until a toothpick inserted in the center comes out clean. The cake should be golden brown around the edges but still slightly jiggly in the center—this ensures the caramel stays gooey.
Cool and Serve
Remove the cake from the oven and let it cool in the pan for 10 minutes. Run a knife around the edges to loosen, then invert the cake onto a wire rack to cool completely. The cake will be warm inside, with a perfect gooey caramel center that’s still slightly liquid when served.
For best results, serve at room temperature. The contrast between the buttery crust, tender cake layers, and rich caramel filling makes every bite unforgettable. Store leftovers covered at room temperature for up to 2 days, or refrigerate for up to 5 days—bring to room temperature before serving for the best texture.
Pro Tips For Making 6 Inch Caramel Cake
- Cream Butter First: Take that butter out of the fridge 30 minutes before you start—room temperature butter blends smoother and avoids lumps in the batter. I learned this the hard way when my cake turned out greasy and uneven because cold butter didn’t emulsify properly. Trust me, your cake will be lighter if you skip the ice-cold shortcut.
- Weigh Your Sugar: Use a kitchen scale for the granulated sugar—packed cups can add 20-30% extra, throwing off the caramel balance. I used to eyeball it, and my cakes either tasted cloyingly sweet or too dry. For a 6-inch cake, aim for precise measurements, especially when working with sugar-heavy recipes like this.
- Bake Until Springy: Test doneness by pressing the center—it should spring back slowly, not bounce like a trampoline. Overbaking dries out the cake, and underbaking leaves it gummy. If the edges are golden but the center wobbles, tent with foil for the last 5 minutes and let it finish cooling in the pan.
- Swap Vanilla for Seeds: Toss in ½ teaspoon vanilla bean seeds along with the extract—it adds depth without extra effort. I was skeptical until I tried it; the flavor is richer and more complex than plain extract alone. No need to buy a whole bean, just scrape the seeds from a pod you already have.
Essential equipment for this dish
Must-Have Baking Tools
Start with a high-quality 6-inch round cake pan—I recommend Wilton’s nonstick pans for easy release. A stand mixer with a paddle attachment is essential for creaming butter and sugar properly, but a hand mixer works in a pinch.
For precise temperature control, invest in an oven thermometer—many home ovens run hot or cold, and this ensures your 350°F setting is accurate. 🌡️
Caramel-Specific Gear
Your caramel filling requires careful temperature management, so a candy thermometer is non-negotiable—it should read 234-238°F for that perfect soft-ball stage. A medium saucepan with sloped sides prevents sugar from sticking.
For cooling, I use a wire rack to let the cake set evenly. A spatula with a flexible edge helps spread caramel smoothly between layers.
Mixing and Measuring
Accurate measurements matter, so a digital kitchen scale is my secret weapon for weighing butter and sugar. A fine-mesh sieve ensures your flour is sifted perfectly, preventing lumps. For mixing, a rubber spatula helps scrape every last bit of batter from the bowl.
Don’t skip a parchment paper circle—it prevents sticking and makes removing the cake effortless.
Optional Upgrades
For a professional touch, a cake turntable makes leveling and decorating easier. A pastry brush helps dust flour evenly on the top layer. If you’re ambitious, a cake tester ensures your center stays gooey.
For storage, clear plastic wrap keeps the cake fresh longer. Trust me, these small upgrades make all the difference in the final result. ✨
Nutrition facts
Frequently asked questions
Can I make this caramel cake in a different-sized pan?
This recipe is specifically designed for a 6-inch pan to create a single-serving cake with a perfect caramel-to-cake ratio. For a 9-inch pan, reduce baking time by 10-15 minutes and scale all ingredients by 2.5x. The caramel filling should be doubled proportionally to maintain its gooey center.
Why does my caramel turn grainy or crystallize?
Caramel crystallizes when it cools too quickly or if water gets in while it’s hot. To prevent this, stir constantly while cooking and avoid adding cold ingredients. If it does crystallize, whisk in 1 tablespoon water and simmer gently until smooth. Always use fresh cream and room-temperature butter for the best results.
How do I store leftovers without drying out the cake?
Wrap the cake tightly in plastic wrap and store at room temperature for up to 3 days. For longer storage, refrigerate for 5 days—just let it sit at room temp for 30 minutes before serving to restore the caramel’s gooey texture. Never freeze the assembled cake, as this can make the caramel too hard.
Can I substitute brown sugar with white sugar in the caramel?
Yes, but the caramel will be lighter in color and flavor. Replace the 1 cup brown sugar with 1 cup white sugar plus 1 teaspoon molasses to mimic the moisture and depth. For the cake batter, you can use all white sugar—just ensure it’s superfine for a smoother texture. The caramel will still be delicious but with a slightly different profile.
What’s the secret to keeping the caramel gooey after baking?
The key is baking the cake just until a toothpick comes out with moist crumbs—not completely clean. This ensures the caramel stays warm and soft in the center. Also, assemble the cake with the caramel still slightly warm (around 160°F) so it melts into the layers during baking. Avoid overbaking, even by 5 minutes.

- 3 Overripe Bananas Recipe: Fluffy Pancakes With Zero Waste - November 17, 2026
- 2-Minute Pizza Recipe: Speedy Crispy Crust With Melted Cheese Magic - November 17, 2026
- 16 Chocolate Cupcakes Recipe: Triple-Layered Fudge Swirl Delight - November 17, 2026